Amazon Web Services 文档中描述的 Amazon Web Services 服务或功能可能因区域而异。要查看适用于中国区域的差异,请参阅
中国的 Amazon Web Services 服务入门
(PDF)。
高级示例
本节包含一个高级示例,可帮助您了解 VPC 屏蔽公共访问权限功能在不同方案中如何工作。每个方案都以之前的方案为基础构建,因此按顺序完成这些步骤很重要。
请勿在生产账户中完成此示例。强烈建议您在生产账户中启用 VPC BPA 之前,仔细检查需要访问互联网的工作负载。
要充分了解 VPC BPA 功能,您的账户中需要某些资源。在本节中,我们提供一个 CloudFormation 模板,您可以使用该模板来预置所需的资源,以充分了解此功能如何工作。使用 CloudFormation 模板预置的资源以及使用网络访问分析器和 Reachability Analyzer 执行分析会产生相关的费用。如果您使用本节中的模板,则请确保在完成此示例后完成清理步骤。
部署 CloudFormation 模板(可选)
要演示此功能如何工作,您需要一个 VPC、子网、实例和其他资源。为了更轻松地完成本演示,我们在下面提供了一个 Amazon CloudFormation 模板,您可以使用该模板来快速启动本演示中方案所需的资源。这一步骤是可选的,您可能只是想查看本节场景中的图表。
该模板在您的账户中创建以下资源:
-
仅出口互联网网关
-
互联网网关
-
NAT 网关
-
两个公有子网
-
一个私有子网
-
具有公有和私有 IPv4 地址的两个实例
-
具有 IPv6 地址和私有 IPv4 地址的一个 EC2 实例
-
仅具有私有 IPv4 地址的一个 EC2 实例
-
允许 SSH 和 ICMP 入站流量且允许所有出站流量的安全组
-
VPC 流日志
-
子网 B 中的一个 EC2 Instance Connect 端点
复制下面的模板并将其保存到 .yaml 文件。
AWSTemplateFormatVersion: '2010-09-09'
Description: Creates a VPC with public and private subnets, NAT gateway, and EC2 instances for VPC BPA.

Parameters:
  InstanceAMI:
    Description: ID of the Amazone Machine Image (AMI) to use with the instances launched by this template
    Type: AWS::EC2::Image::Id
  InstanceType:
    Description: EC2 Instance type to use with the instances launched by this template
    Type: String
    Default: t2.micro

Resources:

  # VPC
  VPCBPA:
    Type: AWS::EC2::VPC
    Properties:
      CidrBlock: 10.0.0.0/16
      EnableDnsHostnames: true
      EnableDnsSupport: true
      InstanceTenancy: default
      Tags:
        - Key: Name
          Value: VPC BPA

  # VPC IPv6 CIDR
  VPCBPAIpv6CidrBlock:
    Type: AWS::EC2::VPCCidrBlock
    Properties:
      VpcId: !Ref VPCBPA
      AmazonProvidedIpv6CidrBlock: true

  # EC2 Key Pair
  VPCBPAKeyPair:
    Type: AWS::EC2::KeyPair
    Properties:
      KeyName: vpc-bpa-key

  # Internet Gateway
  VPCBPAInternetGateway:
    Type: AWS::EC2::InternetGateway
    Properties:
      Tags:
        - Key: Name
          Value: VPC BPA Internet Gateway

  VPCBPAInternetGatewayAttachment:
    Type: AWS::EC2::VPCGatewayAttachment
    Properties:
      VpcId: !Ref VPCBPA
      InternetGatewayId: !Ref VPCBPAInternetGateway

  # Egress-Only Internet Gateway
  VPCBPAEgressOnlyInternetGateway:
    Type: AWS::EC2::EgressOnlyInternetGateway
    Properties:
      VpcId: !Ref VPCBPA

  # Subnets
  VPCBPAPublicSubnetA:
    Type: AWS::EC2::Subnet
    Properties:
      VpcId: !Ref VPCBPA
      CidrBlock: 10.0.1.0/24
      MapPublicIpOnLaunch: true
      Tags:
        - Key: Name
          Value: VPC BPA Public Subnet A

  VPCBPAPublicSubnetB:
    Type: AWS::EC2::Subnet
    Properties:
      VpcId: !Ref VPCBPA
      CidrBlock: 10.0.2.0/24
      MapPublicIpOnLaunch: true
      Tags:
        - Key: Name
          Value: VPC BPA Public Subnet B

  VPCBPAPrivateSubnetC:
    Type: AWS::EC2::Subnet
    Properties:
      VpcId: !Ref VPCBPA
      CidrBlock: 10.0.3.0/24
      MapPublicIpOnLaunch: false
      Ipv6CidrBlock: !Select [0, !GetAtt VPCBPA.Ipv6CidrBlocks]
      AssignIpv6AddressOnCreation: true
      Tags:
        - Key: Name
          Value: VPC BPA Private Subnet C

  # NAT Gateway
  VPCBPANATGateway:
    Type: AWS::EC2::NatGateway
    Properties:
      AllocationId: !GetAtt VPCBPANATGatewayEIP.AllocationId
      SubnetId: !Ref VPCBPAPublicSubnetB
      Tags:
        - Key: Name
          Value: VPC BPA NAT Gateway

  VPCBPANATGatewayEIP:
    Type: AWS::EC2::EIP
    Properties:
      Domain: vpc
      Tags:
        - Key: Name
          Value: VPC BPA NAT Gateway EIP

  # Route Tables
  VPCBPAPublicRouteTable:
    Type: AWS::EC2::RouteTable
    Properties:
      VpcId: !Ref VPCBPA
      Tags:
        - Key: Name
          Value: VPC BPA Public Route Table

  VPCBPAPublicRoute:
    Type: AWS::EC2::Route
    DependsOn: VPCBPAInternetGatewayAttachment
    Properties:
      RouteTableId: !Ref VPCBPAPublicRouteTable
      DestinationCidrBlock: 0.0.0.0/0
      GatewayId: !Ref VPCBPAInternetGateway

  VPCBPAPublicSubnetARouteTableAssoc:
    Type: AWS::EC2::SubnetRouteTableAssociation
    Properties:
      SubnetId: !Ref VPCBPAPublicSubnetA
      RouteTableId: !Ref VPCBPAPublicRouteTable

  VPCBPAPublicSubnetBRouteTableAssoc:
    Type: AWS::EC2::SubnetRouteTableAssociation
    Properties:
      SubnetId: !Ref VPCBPAPublicSubnetB
      RouteTableId: !Ref VPCBPAPublicRouteTable

  VPCBPAPrivateRouteTable:
    Type: AWS::EC2::RouteTable
    Properties:
      VpcId: !Ref VPCBPA
      Tags:
        - Key: Name
          Value: VPC BPA Private Route Table

  VPCBPAPrivateRoute:
    Type: AWS::EC2::Route
    Properties:
      RouteTableId: !Ref VPCBPAPrivateRouteTable
      DestinationCidrBlock: 0.0.0.0/0
      NatGatewayId: !Ref VPCBPANATGateway

  VPCBPAPrivateSubnetCRoute:
    Type: AWS::EC2::Route
    Properties:
      RouteTableId: !Ref VPCBPAPrivateRouteTable
      DestinationIpv6CidrBlock: ::/0
      EgressOnlyInternetGatewayId: !Ref VPCBPAEgressOnlyInternetGateway

  VPCBPAPrivateSubnetCRouteTableAssociation:
    Type: AWS::EC2::SubnetRouteTableAssociation
    Properties:
      SubnetId: !Ref VPCBPAPrivateSubnetC
      RouteTableId: !Ref VPCBPAPrivateRouteTable

  # EC2 Instances Security Group
  VPCBPAInstancesSecurityGroup:
    Type: AWS::EC2::SecurityGroup
    Properties:
      GroupName: VPC BPA Instances Security Group
      GroupDescription: Allow SSH and ICMP access
      SecurityGroupIngress:
        - IpProtocol: tcp
          FromPort: 22
          ToPort: 22
          CidrIp: 0.0.0.0/0
        - IpProtocol: icmp
          FromPort: -1
          ToPort: -1
          CidrIp: 0.0.0.0/0
      VpcId: !Ref VPCBPA
      Tags:
        - Key: Name
          Value: VPC BPA Instances Security Group

  # EC2 Instances
  VPCBPAInstanceA:
    Type: AWS::EC2::Instance
    Properties:
      ImageId: !Ref InstanceAMI
      InstanceType: t2.micro
      KeyName: !Ref VPCBPAKeyPair
      SubnetId: !Ref VPCBPAPublicSubnetA
      SecurityGroupIds:
        - !Ref VPCBPAInstancesSecurityGroup
      Tags:
        - Key: Name
          Value: VPC BPA Instance A

  VPCBPAInstanceB:
    Type: AWS::EC2::Instance
    Properties:
      ImageId: !Ref InstanceAMI
      InstanceType: !Ref InstanceType
      KeyName: !Ref VPCBPAKeyPair
      SubnetId: !Ref VPCBPAPublicSubnetB
      SecurityGroupIds:
        - !Ref VPCBPAInstancesSecurityGroup
      Tags:
        - Key: Name
          Value: VPC BPA Instance B

  VPCBPAInstanceC:
    Type: AWS::EC2::Instance
    Properties:
      ImageId: !Ref InstanceAMI
      InstanceType: !Ref InstanceType
      KeyName: !Ref VPCBPAKeyPair
      SubnetId: !Ref VPCBPAPrivateSubnetC
      SecurityGroupIds:
        - !Ref VPCBPAInstancesSecurityGroup
      Tags:
        - Key: Name
          Value: VPC BPA Instance C

  VPCBPAInstanceD:
    Type: AWS::EC2::Instance
    Properties:
      ImageId: !Ref InstanceAMI
      InstanceType: !Ref InstanceType
      KeyName: !Ref VPCBPAKeyPair
      NetworkInterfaces:
        - DeviceIndex: '0'
          GroupSet:
            - !Ref VPCBPAInstancesSecurityGroup
          SubnetId: !Ref VPCBPAPrivateSubnetC
          Ipv6AddressCount: 1
      Tags:
        - Key: Name
          Value: VPC BPA Instance D

  # Flow Logs IAM Role
  VPCBPAFlowLogRole:
    Type: AWS::IAM::Role
    Properties:
      AssumeRolePolicyDocument:
        Version: '2012-10-17'
        Statement:
          - Effect: Allow
            Principal:
              Service: vpc-flow-logs.amazonaws.com
            Action: 'sts:AssumeRole'
      Tags:
        - Key: Name
          Value: VPC BPA Flow Logs Role

  VPCBPAFlowLogPolicy:
    Type: AWS::IAM::Policy
    Properties:
      PolicyName: VPC-BPA-FlowLogsPolicy
      PolicyDocument:
        Version: '2012-10-17'
        Statement:
          - Effect: Allow
            Action:
              - 'logs:CreateLogGroup'
              - 'logs:CreateLogStream'
              - 'logs:PutLogEvents'
              - 'logs:DescribeLogGroups'
              - 'logs:DescribeLogStreams'
            Resource: '*'
      Roles:
        - !Ref VPCBPAFlowLogRole

  # Flow Logs
  VPCBPAFlowLog:
    Type: AWS::EC2::FlowLog
    Properties:
      ResourceId: !Ref VPCBPA
      ResourceType: VPC
      TrafficType: ALL
      LogDestinationType: cloud-watch-logs
      LogGroupName: /aws/vpc-flow-logs/VPC-BPA
      DeliverLogsPermissionArn: !GetAtt VPCBPAFlowLogRole.Arn
      LogFormat: '${version} ${account-id} ${interface-id} ${srcaddr} ${dstaddr} ${srcport} ${dstport} ${protocol} ${packets} ${bytes} ${start} ${end} ${action} ${log-status} ${vpc-id} ${subnet-id} ${instance-id} ${tcp-flags} ${type} ${pkt-srcaddr} ${pkt-dstaddr} ${region} ${az-id} ${sublocation-type} ${sublocation-id} ${pkt-src-aws-service} ${pkt-dst-aws-service} ${flow-direction} ${traffic-path} ${reject-reason}'
      Tags:
        - Key: Name
          Value: VPC BPA Flow Logs

  # EC2 Instance Connect Endpoint
  VPCBPAEC2InstanceConnectEndpoint:
    Type: AWS::EC2::InstanceConnectEndpoint
    Properties:
      SecurityGroupIds:
        - !Ref VPCBPAInstancesSecurityGroup
      SubnetId: !Ref VPCBPAPublicSubnetB

Outputs:
  VPCBPAVPCId:
    Description: A reference to the created VPC
    Value: !Ref VPCBPA
    Export:
      Name: vpc-id

  VPCBPAPublicSubnetAId:
    Description: The ID of the public subnet A
    Value: !Ref VPCBPAPublicSubnetA

  VPCBPAPublicSubnetAName:
    Description: The name of the public subnet A
    Value: VPC BPA Public Subnet A

  VPCBPAPublicSubnetBId:
    Description: The ID of the public subnet B
    Value: !Ref VPCBPAPublicSubnetB

  VPCBPAPublicSubnetBName:
    Description: The name of the public subnet B
    Value: VPC BPA Public Subnet B

  VPCBPAPrivateSubnetCId:
    Description: The ID of the private subnet C
    Value: !Ref VPCBPAPrivateSubnetC

  VPCBPAPrivateSubnetCName:
    Description: The name of the private subnet C
    Value: VPC BPA Private Subnet C

  VPCBPAInstanceAId:
    Description: The ID of instance A
    Value: !Ref VPCBPAInstanceA

  VPCBPAInstanceBId:
    Description: The ID of instance B
    Value: !Ref VPCBPAInstanceB

  VPCBPAInstanceCId:
    Description: The ID of instance C
    Value: !Ref VPCBPAInstanceC

  VPCBPAInstanceDId:
    Description: The ID of instance D
    Value: !Ref VPCBPAInstanceD
- Amazon Web Services 管理控制台
-
- Amazon CLI
-
-
运行以下命令创建 CloudFormation 堆栈:
aws cloudformation create-stack --stack-name VPC-BPA-stack --template-body file://sampletemplate.yaml --capabilities CAPABILITY_IAM --region us-east-2
输出:
{
    "StackId": "arn:aws:cloudformation:us-east-2:470889052923:stack/VPC-BPA-stack/8a7a2cc0-8001-11ef-b196-06386a84b72f"
}
-
查看进度并确保堆栈已完成,然后再继续:
aws cloudformation describe-stack-events --stack-name VPC-BPA-stack --region us-east-2
使用网络访问分析器查看 VPC BPA 的影响
在本节中,您将使用网络访问分析器查看账户中使用互联网网关的资源。使用此分析可了解在您的账户中启用 VPC BPA 和阻止流量所产生的影响。
有关网络访问分析器区域可用性的信息,请参阅《Network Access Analyzer Guide》中的 Limitations。
- Amazon Web Services 管理控制台
-
-
打开位于 https://console.amazonaws.cn/networkinsights/ 的 Amazon 网络见解控制台。
-
选择网络访问分析器。
-
选择创建网络访问范围。
-
选择评估 VPC 阻止公开访问的影响,然后选择下一步。
-
该模板已配置为分析您账户中进出互联网网关的流量。您可以在来源和目标下查看此项。
-
选择下一步。
-
选择创建网络访问范围。
-
选择您刚创建的范围,然后选择分析。
-
等待分析完成。
-
查看分析的调查发现。调查发现下的每一行都显示数据包在网络中进出您账户中的互联网网关可以采用的网络路径。在这种情况下,如果您启用 VPC BPA,并且这些调查发现中显示的 VPC 和/或子网均未配置为 VPC BPA 排除项,则流向这些 VPC 和子网的流量将受到限制。
-
分析每项调查发现,了解 VPC BPA 对 VPC 中资源的影响。
影响分析已完成。
- Amazon CLI
-
-
创建网络访问范围:
aws ec2 create-network-insights-access-scope --match-paths "Source={ResourceStatement={ResourceTypes=["AWS::EC2::InternetGateway"]}}" "Destination={ResourceStatement={ResourceTypes=["AWS::EC2::InternetGateway"]}}" --region us-east-2
输出:
{
  "NetworkInsightsAccessScope": {
    "NetworkInsightsAccessScopeId": "nis-04cad3c4b3a1d5e3e",
    "NetworkInsightsAccessScopeArn": "arn:aws:ec2:us-east-2:470889052923:network-insights-access-scope/nis-04cad3c4b3a1d5e3e",
    "CreatedDate": "2024-09-30T15:55:53.171000+00:00",
    "UpdatedDate": "2024-09-30T15:55:53.171000+00:00"
  },
  "NetworkInsightsAccessScopeContent": {
    "NetworkInsightsAccessScopeId": "nis-04cad3c4b3a1d5e3e",
    "MatchPaths": [
      {
        "Source": {
          "ResourceStatement": {
            "ResourceTypes": [
              "AWS::EC2::InternetGateway"
            ]
          }
        }
      },
      {
        "Destination": {
          "ResourceStatement": {
            "ResourceTypes": [
              "AWS::EC2::InternetGateway"
            ]
          }
        }
      }
    ]
  }
}
-
开始范围分析:
aws ec2 start-network-insights-access-scope-analysis --network-insights-access-scope-id nis-04cad3c4b3a1d5e3e --region us-east-2
输出:
{
  "NetworkInsightsAccessScopeAnalysis": {
    "NetworkInsightsAccessScopeAnalysisId": "nisa-0aa383a1938f94cd1",
    "NetworkInsightsAccessScopeAnalysisArn": "arn:aws:ec2:us-east-2:470889052923:network-insights-access-scope-analysis/nisa-0aa383a1938f94cd",
    "NetworkInsightsAccessScopeId": "nis-04cad3c4b3a1d5e3e",
    "Status": "running",
    "StartDate": "2024-09-30T15:56:59.109000+00:00",
    "AnalyzedEniCount": 0
  }
}
-
获取分析的结果:
aws ec2 get-network-insights-access-scope-analysis-findings --network-insights-access-scope-analysis-id nisa-0aa383a1938f94cd1 --region us-east-2 --max-items 1
输出:
{
  "AnalysisFindings": [
    {
      "NetworkInsightsAccessScopeAnalysisId": "nisa-0aa383a1938f94cd1",
      "NetworkInsightsAccessScopeId": "nis-04cad3c4b3a1d5e3e",
      "FindingId": "AnalysisFinding-1",
      "FindingComponents": [
        {
          "SequenceNumber": 1,
          "Component": {
            "Id": "igw-04a5344b4e30486f1",
            "Arn": "arn:aws:ec2:us-east-2:470889052923:internet-gateway/igw-04a5344b4e30486f1",
            "Name": "VPC BPA Internet Gateway"
          },
          "OutboundHeader": {
            "DestinationAddresses": [
              "10.0.1.85/32"
            ]
          },
          "InboundHeader": {
            "DestinationAddresses": [
              "10.0.1.85/32"
            ],
            "DestinationPortRanges": [
              {
                "From": 22,
                "To": 22
              }
            ],
            "Protocol": "6",
            "SourceAddresses": [
              "0.0.0.0/5",
              "100.0.0.0/10",
              "96.0.0.0/6"
            ],
            "SourcePortRanges": [
              {
                "From": 0,
                "To": 65535
              }
            ]
          },
          "Vpc": {
            "Id": "vpc-0762547ec48b6888d",
            "Arn": "arn:aws:ec2:us-east-2:470889052923:vpc/vpc-0762547ec48b6888d",
            "Name": "VPC BPA"
          }
        },
        {
          "SequenceNumber": 2,
          "AclRule": {
            "Cidr": "0.0.0.0/0",
            "Egress": false,
            "Protocol": "all",
            "RuleAction": "allow",
            "RuleNumber": 100
          },
          "Component": {
            "Id": "acl-06194fc3a4a03040b",
            "Arn": "arn:aws:ec2:us-east-2:470889052923:network-acl/acl-06194fc3a4a03040b"
          }
        },
        {
          "SequenceNumber": 3,
          "Component": {
            "Id": "sg-093dde06415d03924",
            "Arn": "arn:aws:ec2:us-east-2:470889052923:security-group/sg-093dde06415d03924",
            "Name": "VPC BPA Instances Security Group"
          },
          "SecurityGroupRule": {
            "Cidr": "0.0.0.0/0",
            "Direction": "ingress",
            "PortRange": {
              "From": 22,
              "To": 22
            },
            "Protocol": "tcp"
          }
        },
        {
          "SequenceNumber": 4,
          "AttachedTo": {
            "Id": "i-058db34f9a0997895",
            "Arn": "arn:aws:ec2:us-east-2:470889052923:instance/i-058db34f9a0997895",
            "Name": "VPC BPA Instance A"
          },
          "Component": {
            "Id": "eni-0fa23f2766f03b286",
            "Arn": "arn:aws:ec2:us-east-2:470889052923:network-interface/eni-0fa23f2766f03b286"
          },
          "InboundHeader": {
            "DestinationAddresses": [
              "10.0.1.85/32"
            ],
            "DestinationPortRanges": [
              {
                "From": 22,
                "To": 22
              }
            ],
            "Protocol": "6",
            "SourceAddresses": [
              "0.0.0.0/5",
              "100.0.0.0/10",
              "96.0.0.0/6"
            ],
            "SourcePortRanges": [
              {
                "From": 0,
                "To": 65535
              }
            ]
          },
          "Subnet": {
            "Id": "subnet-035d235a762eeed04",
            "Arn": "arn:aws:ec2:us-east-2:470889052923:subnet/subnet-035d235a762eeed04",
            "Name": "VPC BPA Public Subnet A"
          },
          "Vpc": {
            "Id": "vpc-0762547ec48b6888d",
            "Arn": "arn:aws:ec2:us-east-2:470889052923:vpc/vpc-0762547ec48b6888d",
            "Name": "VPC BPA"
          }
        }
      ]
    }
  ],
  "AnalysisStatus": "succeeded",
  "NetworkInsightsAccessScopeAnalysisId": "nisa-0aa383a1938f94cd1",
  "NextToken": "eyJOZXh0VG9rZW4iOiBudWxsLCAiYm90b190cnVuY2F0ZV9hbW91bnQiOiAxfQ=="
}
结果显示进出您账户所有 VPC 中互联网网关的流量。结果被归类为“调查发现”。"FindingId": "AnalysisFinding-1" 表示这是分析中的第一个调查发现。请注意,有多个调查发现,每个调查发现都表明启用 VPC BPA 将影响流量。第一个调查发现表明流量从互联网网关("SequenceNumber": 1)开始,依次传递到 NACL("SequenceNumber": 2)、安全组("SequenceNumber": 3),然后在实例("SequenceNumber": 4)处结束。
-
分析调查发现以了解 VPC BPA 对 VPC 中资源的影响。
影响分析已完成。
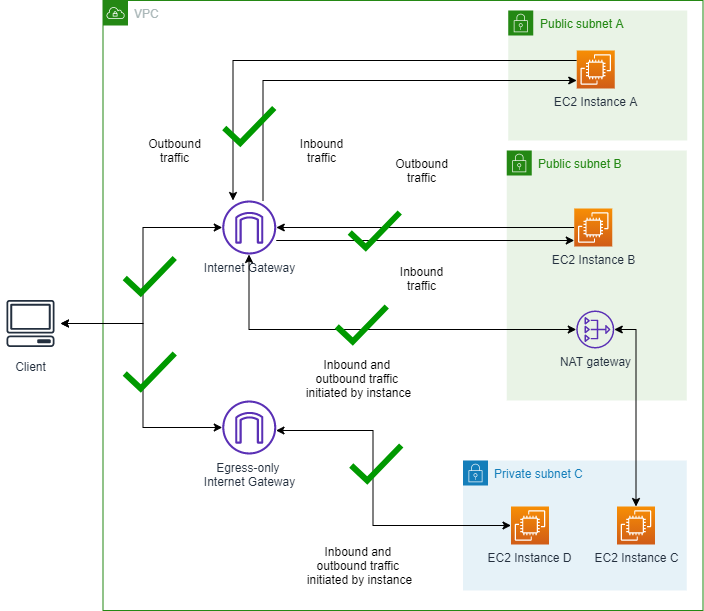
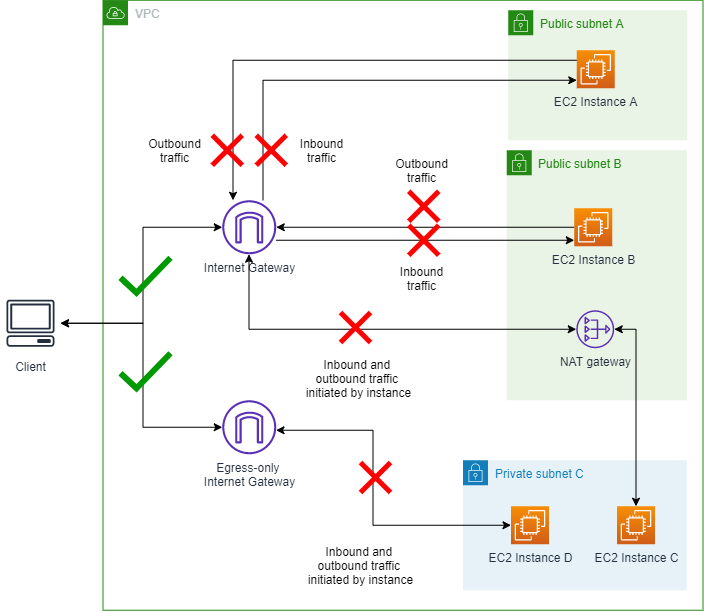
场景 1 - 连接到未启用 VPC BPA 的实例
在本节中,可以通过允许入站和出站流量的互联网网关,从互联网访问公有子网 A 和 B 中的 EC2 实例。私有子网中的实例 C 和 D 可以通过 NAT 网关或仅出口互联网网关发出出站流量,但无法直接从互联网访问。此设置为某些资源提供 Internet 访问,同时保护其他资源。本设置旨在设置基准并确保在启用 VPC BPA 之前可以访问所有实例,您需要连接到所有实例并对公有 IP 地址运行 ping 命令。
未启用 VPC BPA 的 VPC 示意图:
1.1 连接到实例
完成本节以在关闭 VPC BPA 的情况下连接到您的实例,以确保可以毫无问题地进行连接。在本示例中使用 CloudFormation 创建的所有实例都有“VPC BPA 实例 A”之类的名称。
- Amazon Web Services 管理控制台
-
-
通过以下网址打开 Amazon EC2 控制台:https://console.aws.amazon.com/ec2/。
-
打开实例 A 的详细信息。
-
通过 EC2 Instance Connect > 使用 EC2 Instance Connect 端点连接选项连接到实例 A。
-
选择连接。成功连接到该实例后,运行 ping www.amazon.com 命令确认您可以向互联网发送出站请求。
-
使用与连接实例 A 相同的方法连接到实例 B、C 和 D。从每个实例 ping www.amazon.com 以验证您是否可以将出站请求发送到 Internet。
- Amazon CLI
-
-
使用公有 IPv4 地址对实例 A 运行 Ping 命令以检查入站流量:
ping 18.225.8.244
输出:
Pinging 18.225.8.244 with 32 bytes of data:

Reply from 18.225.8.244: bytes=32 time=51ms TTL=110
Reply from 18.225.8.244: bytes=32 time=61ms TTL=110
请注意,运行 ping 命令成功并且流量未被阻止。
-
使用私有 IPv4 地址连接并检查出站流量:
aws ec2-instance-connect ssh --instance-id i-058db34f9a0997895 --region us-east-2 --connection-type eice
输出:
A newer release of "Amazon Linux" is available. Version 2023.5.20240916:
Run "/usr/bin/dnf check-release-update" for full release and version update info
,     #_   ~_  ####_        Amazon Linux 2023
~~  _#####\  ~~     ###|
~~       #/ ___   https://aws.amazon.com/linux/amazon-linux-2023
~~       V~' '->
~~~         /
~~._.   _/
/ /
/m/'
Last login: Fri Sep 27 18:27:57 2024 from 3.16.146.5
[ec2-user@ip-10-0-1-85 ~]$ ping www.amazon.com
PING www-amazon-com.customer.fastly.net (18.65.233.187) 56(84) bytes of data.
64 bytes from 18.65.233.187 (18.65.233.187): icmp_seq=15 ttl=58 time=2.06 ms
64 bytes from 18.65.233.187 (18.65.233.187): icmp_seq=16 ttl=58 time=2.26 ms
请注意,运行 ping 命令成功并且流量未被阻止。
-
使用公有 IPv4 地址对实例 B 运行 Ping 命令以检查入站流量:
ping 3.18.106.198
输出:
Pinging 3.18.106.198 with 32 bytes of data:
Reply from 3.18.106.198: bytes=32 time=83ms TTL=110
Reply from 3.18.106.198: bytes=32 time=54ms TTL=110
请注意,运行 ping 命令成功并且流量未被阻止。
-
使用私有 IPv4 地址连接并检查出站流量:
aws ec2-instance-connect ssh --instance-id i-08552a0774b5c8f72 --region us-east-2 --connection-type eice
输出:
A newer release of "Amazon Linux" is available.
Version 2023.5.20240916:
Run "/usr/bin/dnf check-release-update" for full release and version update info
,     #   ~_  ####        Amazon Linux 2023
~~  _#####\  ~~     ###|
~~       #/ ___   https://aws.amazon.com/linux/amazon-linux-2023
~~       V~' '->
~~~         /
~~..   _/
/ /
/m/'
Last login: Fri Sep 27 18:12:27 2024 from 3.16.146.5
[ec2-user@ip-10-0-2-98 ~]$ ping www.amazon.com
PING d3ag4hukkh62yn.cloudfront.net (18.65.233.187) 56(84) bytes of data.
64 bytes from server-3-160-24-126.cmh68.r.cloudfront.net (18.65.233.187): icmp_seq=1 ttl=249 time=1.55 ms
64 bytes from server-3-160-24-126.cmh68.r.cloudfront.net (18.65.233.187): icmp_seq=2 ttl=249 time=1.67 ms
请注意,运行 ping 命令成功并且流量未被阻止。
-
连接到实例 C。由于没有可以运行 ping 命令的公有 IP 地址,因此请使用 EC2 Instance Connect 进行连接,然后从该实例对公有 IP 运行 ping 命令以检查出站流量:
aws ec2-instance-connect ssh --instance-id i-04eca55f2a482b2c4 --region us-east-2 --connection-type eice
输出:
A newer release of "Amazon Linux" is available.
Version 2023.5.20240916:
Run "/usr/bin/dnf check-release-update" for full release and version update info
,     #   ~_  ####        Amazon Linux 2023
~~  _#####\  ~~     ###|
~~       #/ ___   https://aws.amazon.com/linux/amazon-linux-2023
~~       V~' '->
~~~         /
~~..   _/
/ /
/m/'
Last login: Thu Sep 19 20:31:26 2024 from 10.0.2.86
[ec2-user@ip-10-0-3-180 ~]$ ping www.amazon.com
PING d3ag4hukkh62yn.cloudfront.net (18.65.233.187) 56(84) bytes of data.
64 bytes from server-3-160-24-126.cmh68.r.cloudfront.net (18.65.233.187): icmp_seq=1 ttl=248 time=1.75 ms
64 bytes from server-3-160-24-126.cmh68.r.cloudfront.net (18.65.233.187): icmp_seq=2 ttl=248 time=1.97 ms
64 bytes from server-3-160-24-26.cmh68.r.cloudfront.net (18.65.233.187): icmp_seq=3 ttl=248 time=1.08 ms
请注意,运行 ping 命令成功并且流量未被阻止。
-
连接到实例 D。由于没有可以运行 ping 命令的公有 IP 地址,因此请使用 EC2 Instance Connect 进行连接,然后从该实例对公有 IP 运行 ping 命令以检查出站流量:
aws ec2-instance-connect ssh --instance-id i-05f9e6a9cfac1dba0 --region us-east-2 --connection-type eice
输出:
The authenticity of host '10.0.3.59 can't be established.
ECDSA key fingerprint is SHA256:c4naBCqbC61/cExDyccEproNU+1HHSpMSzl2J6cOtIZA8g.
Are you sure you want to continue connecting (yes/no/[fingerprint])? yes
Warning: Permanently added '10.0.3.59' (ECDSA) to the list of known hosts.
A newer release of "Amazon Linux" is available.  Version 2023.5.20240916:
Run "/usr/bin/dnf check-release-update" for full release and version update info
,     #   ~_  ####        Amazon Linux 2023
~~  _#####\  ~~     ###|
~~       #/ ___   https://aws.amazon.com/linux/amazon-linux-2023
~~       V~' '->
~~~         /
~~..   _/
_/ _/
_/m/'
[ec2-user@ip-10-0-3-59 ~]$ ping www.amazon.com
PING www.amazon.com(2600:9000:25f3:ee00:7:49a5:5fd4:b121 (2600:9000:25f3:ee00:7:49a5:5fd4:b121)) 56 data bytes
64 bytes from 2600:9000:25f3:ee00:7:49a5:5fd4:b121 (2600:9000:25f3:ee00:7:49a5:5fd4:b121): icmp_seq=1 ttl=58 time=1.19 ms
64 bytes from 2600:9000:25f3:ee00:7:49a5:5fd4:b121 (2600:9000:25f3:ee00:7:49a5:5fd4:b121): icmp_seq=2 ttl=58 time=1.38 ms
请注意,运行 ping 命令成功并且流量未被阻止。
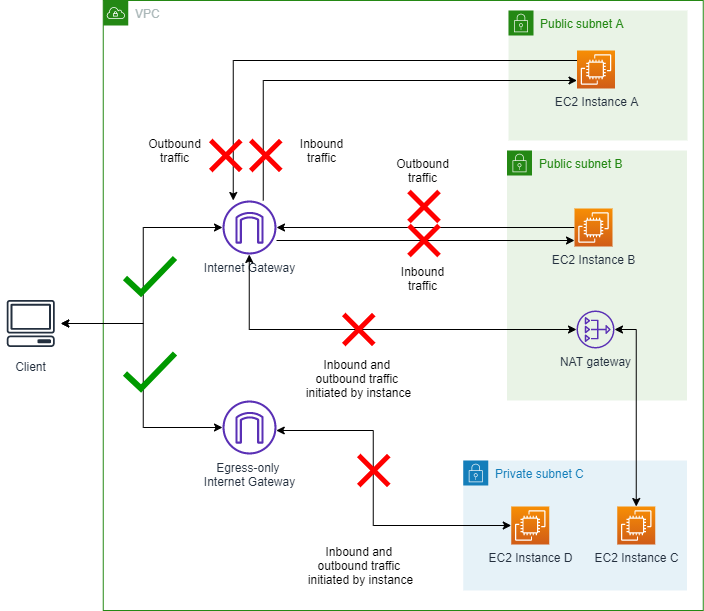
场景 2 - 启用 VPC BPA 双向模式
在本节中,您将启用 VPC BPA,并在阻止进出您账户中互联网网关的流量。
显示 VPC BPA 双向模式启用的示意图:
2.1 启用 VPC BPA 双向模式
完成本节以启用 VPC BPA。VPC BPA 双向模式阻止进出此区域互联网网关和仅出口互联网网关的所有流量(已排除 VPC 和子网除外)。
- Amazon Web Services 管理控制台
-
VPC BPA 现已启用。
- Amazon CLI
-
-
使用 modify-vpc-block-public-access-options 命令启用 VPC BPA:
aws ec2 --region us-east-2 modify-vpc-block-public-access-options --internet-gateway-block-mode block-bidirectional
VPC BPA 设置生效和状态更新可能需要几分钟时间。
-
查看 VPC BPA 的状态:
aws ec2 --region us-east-2 describe-vpc-block-public-access-options
2.2 连接到实例
完成本节以连接到您的实例。
- Amazon Web Services 管理控制台
-
-
如同在方案 1 中所做的那样,对实例 A 和实例 B 的公有 IPv4 地址运行 Ping 命令。请注意,流量已被阻止。
-
按照场景 1 中的方式,通过 EC2 Instance Connect > 使用 EC2 Instance Connect 端点连接选项连接到实例 A。确保您使用端点选项。
-
选择连接。成功连接到实例后,ping www.amazon.com。请注意,所有出站流量均已阻止。
-
使用与连接实例 A 相同的方法连接到实例 B、C 和 D,测试对互联网的出站请求。请注意,所有出站流量均已阻止。
- Amazon CLI
-
-
使用公有 IPv4 地址对实例 A 运行 Ping 命令以检查入站流量:
ping 18.225.8.244
输出:
Pinging 18.225.8.244 with 32 bytes of data:

Request timed out.
请注意,运行 ping 命令失败并且流量将被阻止。
-
使用私有 IPv4 地址连接并检查出站流量:
aws ec2-instance-connect ssh --instance-id i-058db34f9a0997895 --region us-east-2 --connection-type eice
输出:
The authenticity of host '10.0.1.85' can't be established.
ECDSA key fingerprint is SHA256:3zo/gSss+HAZ+7eTyWlOB/Ke04IM+hadjsoLJeRTWBk.
Are you sure you want to continue connecting (yes/no/[fingerprint])? yes
Warning: Permanently added '10.0.1.85' (ECDSA) to the list of known hosts.
A newer release of "Amazon Linux" is available.  Version 2023.5.20240916:
Run "/usr/bin/dnf check-release-update" for full release and version update info
,     #_   ~_  ####_        Amazon Linux 2023
~~  _#####\  ~~     ###|
~~       #/ ___   https://aws.amazon.com/linux/amazon-linux-2023
~~       V~' '->
~~~         /
~~._.   _/
/ /
/m/'
Last login: Fri Sep 27 14:16:53 2024 from 3.16.146.5
[ec2-user@ip-10-0-1-85 ~]$ ping www.amazon.com
PING d3ag4hukkh62yn.cloudfront.net (18.65.233.187) 56(84) bytes of data.
请注意,运行 ping 命令失败并且流量将被阻止。
-
使用公有 IPv4 地址对实例 B 运行 Ping 命令以检查入站流量:
ping 3.18.106.198
输出:
Pinging 3.18.106.198 with 32 bytes of data:
Request timed out.
请注意,运行 ping 命令失败并且流量将被阻止。
-
使用私有 IPv4 地址连接并检查出站流量:
aws ec2-instance-connect ssh --instance-id i-08552a0774b5c8f72 --region us-east-2 --connection-type eice
输出:
The authenticity of host '10.0.2.98' can't be established.
ECDSA key fingerprint is SHA256:0IjXKKyVlDthcCfI0IPIJMUiItAOLYKRNLGTYURnFXo.
Are you sure you want to continue connecting (yes/no/[fingerprint])? yes
Warning: Permanently added '10.0.2.98' (ECDSA) to the list of known hosts.
A newer release of "Amazon Linux" is available.  Version 2023.5.20240916:
Run "/usr/bin/dnf check-release-update" for full release and version update info
,     #   ~_  ####        Amazon Linux 2023
~~  _#####\  ~~     ###|
~~       #/ ___   https://aws.amazon.com/linux/amazon-linux-2023
~~       V~' '->
~~~         /
~~..   _/
/ /
/m/'
Last login: Fri Sep 27 14:18:16 2024 from 3.16.146.5
[ec2-user@ip-10-0-2-98 ~]$ ping www.amazon.com
PING d3ag4hukkh62yn.cloudfront.net (18.65.233.187) 56(84) bytes of data.
请注意,运行 ping 命令失败并且流量将被阻止。
-
连接到实例 C。由于没有可以运行 ping 命令的公有 IP 地址,因此请使用 EC2 Instance Connect 进行连接,然后从该实例对公有 IP 运行 ping 命令以检查出站流量:
aws ec2-instance-connect ssh --instance-id i-04eca55f2a482b2c4 --region us-east-2 --connection-type eice
输出:
A newer release of "Amazon Linux" is available.  Version 2023.5.20240916:
Run "/usr/bin/dnf check-release-update" for full release and version update info
,     #   ~_  ####        Amazon Linux 2023
~~  _#####\  ~~     ###|
~~       #/ ___   https://aws.amazon.com/linux/amazon-linux-2023
~~       V~' '->
~~~         /
~~..   _/
/ /
/m/'
Last login: Tue Sep 24 15:17:56 2024 from 10.0.2.86
[ec2-user@ip-10-0-3-180 ~]$ ping www.amazon.com
PING d3ag4hukkh62yn.cloudfront.net (18.65.233.187) 56(84) bytes of data.
请注意,运行 ping 命令失败并且流量将被阻止。
-
连接到实例 D。由于没有可以运行 ping 命令的公有 IP 地址,因此请使用 EC2 Instance Connect 进行连接,然后从该实例对公有 IP 运行 ping 命令以检查出站流量:
aws ec2-instance-connect ssh --instance-id i-05f9e6a9cfac1dba0 --region us-east-2 --connection-type eice
输出:
A newer release of "Amazon Linux" is available.  Version 2023.5.20240916:
Run "/usr/bin/dnf check-release-update" for full release and version update info
,     #   ~_  ####        Amazon Linux 2023
~~  _#####\  ~~     ###|
~~       #/ ___   https://aws.amazon.com/linux/amazon-linux-2023
~~       V~' '->
~~~         /
~~..   _/
_/ _/
_/m/'
Last login: Fri Sep 27 16:42:01 2024 from 3.16.146.5
[ec2-user@ip-10-0-3-59 ~]$ ping www.amazon.com
PING www.amazon.com(2600:9000:25f3:8200:7:49a5:5fd4:b121 (2600:9000:25f3:8200:7:49a5:5fd4:b121)) 56 data bytes
请注意,运行 ping 命令失败并且流量将被阻止。
2.3 可选:使用 Reachability Analyzer 验证连接是否被阻止
VPC Reachability Analyzer 可用于了解根据您的网络配置(包括 VPC BPA 设置)是否可以访问某些网络路径。在本示例中,您将分析之前尝试的相同网络路径,以确认 VPC BPA 是连接失败的原因。
- Amazon Web Services 管理控制台
-
- Amazon CLI
-
-
使用标记为 VPC BPA 互联网网关的互联网网关的 ID 和标记为 VPC BPA 实例 A 的实例 ID 创建网络路径:
aws ec2 --region us-east-2 create-network-insights-path --source igw-id --destination instance-id --protocol TCP
-
开始对网络路径进行分析:
aws ec2 --region us-east-2 start-network-insights-analysis --network-insights-path-id nip-id
-
检索分析的结果:
aws ec2 --region us-east-2 describe-network-insights-analyses --network-insights-analysis-ids nia-id
-
请确认 VPC_BLOCK_PUBLIC_ACCESS_ENABLED 是无法访问的 ExplanationCode。
请注意,您也可以使用流日志监控 VPC BPA 影响。
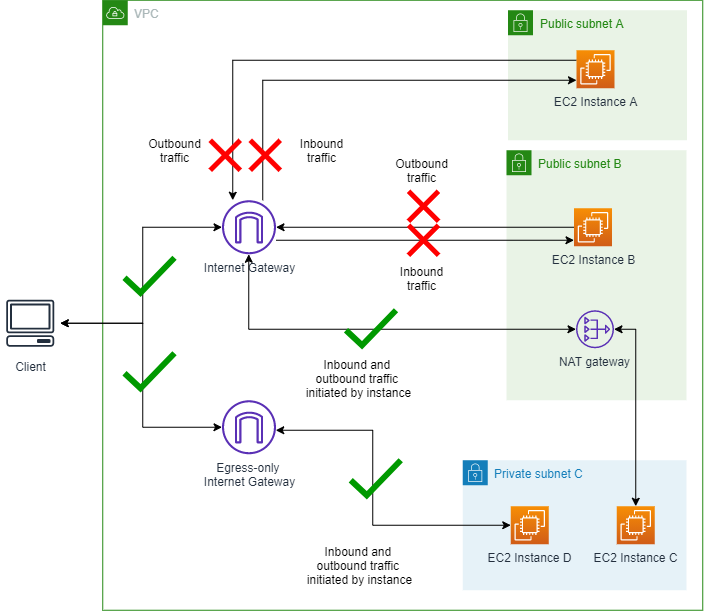
场景 3 - 将 VPC BPA 更改为仅入口模式
在本节中,您将更改 VPC BPA 流量方向,只允许使用 NAT 网关或仅出口互联网网关的流量。公有子网中的 EC2 实例 A 和 B 无法通过互联网访问,因为 BPA 会阻止通过互联网网关的入站流量。私有子网中的实例 C 和 D 仍能够通过 NAT 网关和仅出口互联网网关发出出站流量,因此仍然可以访问互联网。
VPC BPA 仅入口模式已启用的示意图:
3.1 将模式更改为仅入口
完成本节以更改模式。
- Amazon Web Services 管理控制台
-
- Amazon CLI
-
-
修改 VPC BPA 模式:
aws ec2 --region us-east-2 modify-vpc-block-public-access-options --internet-gateway-block-mode block-ingress
VPC BPA 设置生效和状态更新可能需要几分钟时间。
-
查看 VPC BPA 的状态:
aws ec2 --region us-east-2 describe-vpc-block-public-access-options
3.2 连接到实例
完成本节以连接到实例。
- Amazon Web Services 管理控制台
-
-
如同在方案 1 中所做的那样,对实例 A 和实例 B 的公有 IPv4 地址运行 Ping 命令。请注意,流量已被阻止。
-
如同在方案 1 中所做的那样,使用 EC2 Instance Connect 连接到实例 A 和实例 B,然后从这些实例运行 ping www.amazon.com 命令。请注意,您无法从实例 A 或实例 B 对互联网上的公共站点运行 ping 命令并且流量已被阻止。
-
如同在方案 1 中所做的那样,使用 EC2 Instance Connect 连接到实例 C 和实例 D,然后从这些实例运行 ping www.amazon.com 命令。请注意,您可以从实例 C 或实例 D 对互联网上的公共站点运行 ping 命令并且允许流量。
- Amazon CLI
-
-
使用公有 IPv4 地址对实例 A 运行 Ping 命令以检查入站流量:
ping 18.225.8.244
输出:
Pinging 18.225.8.244 with 32 bytes of data:

Request timed out.
请注意,运行 ping 命令失败并且流量将被阻止。
-
使用私有 IPv4 地址连接并检查出站流量:
aws ec2-instance-connect ssh --instance-id i-058db34f9a0997895 --region us-east-2 --connection-type eice
输出:
The authenticity of host '10.0.1.85' can't be established.
ECDSA key fingerprint is SHA256:3zo/gSss+HAZ+7eTyWlOB/Ke04IM+hadjsoLJeRTWBk.
Are you sure you want to continue connecting (yes/no/[fingerprint])? yes
Warning: Permanently added '10.0.1.85' (ECDSA) to the list of known hosts.
A newer release of "Amazon Linux" is available.  Version 2023.5.20240916:
Run "/usr/bin/dnf check-release-update" for full release and version update info
,     #_   ~_  ####_        Amazon Linux 2023
~~  _#####\  ~~     ###|
~~       #/ ___   https://aws.amazon.com/linux/amazon-linux-2023
~~       V~' '->
~~~         /
~~._.   _/
/ /
/m/'
Last login: Fri Sep 27 14:16:53 2024 from 3.16.146.5
[ec2-user@ip-10-0-1-85 ~]$ ping www.amazon.com
PING d3ag4hukkh62yn.cloudfront.net (18.65.233.187) 56(84) bytes of data.
请注意,运行 ping 命令失败并且流量将被阻止。
-
使用公有 IPv4 地址对实例 B 运行 Ping 命令以检查入站流量:
ping 3.18.106.198
输出:
Pinging 3.18.106.198 with 32 bytes of data:
Request timed out.
请注意,运行 ping 命令失败并且流量将被阻止。
-
使用私有 IPv4 地址连接并检查出站流量:
aws ec2-instance-connect ssh --instance-id i-08552a0774b5c8f72 --region us-east-2 --connection-type eice
输出:
The authenticity of host '10.0.2.98 ' can't be established.
ECDSA key fingerprint is SHA256:0IjXKKyVlDthcCfI0IPIJMUiItAOLYKRNLGTYURnFXo.
Are you sure you want to continue connecting (yes/no/[fingerprint])? yes
Warning: Permanently added '10.0.2.98' (ECDSA) to the list of known hosts.
A newer release of "Amazon Linux" is available.  Version 2023.5.20240916:
Run "/usr/bin/dnf check-release-update" for full release and version update info
,     #   ~_  ####        Amazon Linux 2023
~~  _#####\  ~~     ###|
~~       #/ ___   https://aws.amazon.com/linux/amazon-linux-2023
~~       V~' '->
~~~         /
~~..   _/
_/ /
/m/'
Last login: Fri Sep 27 14:18:16 2024 from 3.16.146.5
[ec2-user@ip-10-0-2-98 ~]$ ping www.amazon.com
PING d3ag4hukkh62yn.cloudfront.net (18.65.233.187) 56(84) bytes of data.
请注意,运行 ping 命令失败并且流量将被阻止。
-
连接到实例 C。由于没有可以运行 ping 命令的公有 IP 地址,因此请使用 EC2 Instance Connect 进行连接,然后从该实例对公有 IP 运行 ping 命令以检查出站流量:
aws ec2-instance-connect ssh --instance-id i-04eca55f2a482b2c4 --region us-east-2 --connection-type eice
输出:
A newer release of "Amazon Linux" is available.  Version 2023.5.20240916:
Run "/usr/bin/dnf check-release-update" for full release and version update info
   ,     #_   ~\_  ####_        Amazon Linux 2023
  ~~  \_#####\  ~~     \###|
  ~~       \#/ ___   https://aws.amazon.com/linux/amazon-linux-2023
   ~~       V~' '->
    ~~~         /
      ~~._.   _/
         _/ _/
       _/m/'
Last login: Tue Sep 24 15:28:09 2024 from 10.0.2.86
[ec2-user@ip-10-0-3-180 ~]$ ping www.amazon.com
PING d3ag4hukkh62yn.cloudfront.net (18.65.233.187) 56(84) bytes of data.
64 bytes from server-3-160-24-126.cmh68.r.cloudfront.net (18.65.233.187): icmp_seq=1 ttl=248 time=1.84 ms
64 bytes from server-3-160-24-126.cmh68.r.cloudfront.net (18.65.233.187): icmp_seq=2 ttl=248 time=1.40 ms
请注意,运行 ping 命令成功并且流量未被阻止。
-
连接到实例 D。由于没有可以运行 ping 命令的公有 IP 地址,因此请使用 EC2 Instance Connect 进行连接,然后从该实例对公有 IP 运行 ping 命令以检查出站流量:
aws ec2-instance-connect ssh --instance-id i-05f9e6a9cfac1dba0 --region us-east-2 --connection-type eice
输出:
A newer release of "Amazon Linux" is available.  Version 2023.5.20240916:
Run "/usr/bin/dnf check-release-update" for full release and version update info
   ,     #_   ~\_  ####_        Amazon Linux 2023
  ~~  \_#####\  ~~     \###|
  ~~       \#/ ___   https://aws.amazon.com/linux/amazon-linux-2023
   ~~       V~' '->
    ~~~         /
      ~~._.   _/
         _/ _/
       _/m/'
Last login: Fri Sep 27 16:48:38 2024 from 3.16.146.5
[ec2-user@ip-10-0-3-59 ~]$ ping www.amazon.com
PING www.amazon.com(2600:9000:25f3:5800:7:49a5:5fd4:b121 (2600:9000:25f3:5800:7:49a5:5fd4:b121)) 56 data bytes
64 bytes from 2600:9000:25f3:5800:7:49a5:5fd4:b121 (2600:9000:25f3:5800:7:49a5:5fd4:b121): icmp_seq=14 ttl=58 time=1.47 ms
64 bytes from 2600:9000:25f3:5800:7:49a5:5fd4:b121 (2600:9000:25f3:5800:7:49a5:5fd4:b121): icmp_seq=16 ttl=58 time=1.59 ms
请注意,运行 ping 命令成功并且流量未被阻止。
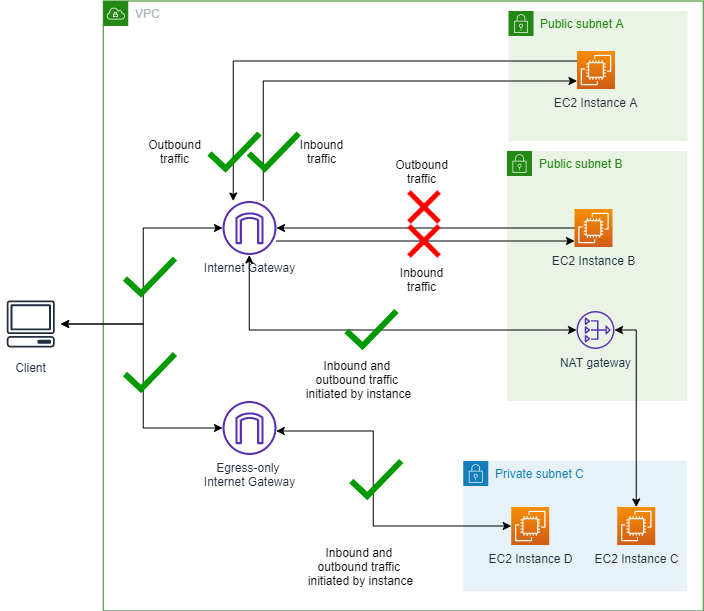
场景 4 - 创建排除项
在本部分中,您将创建一个排除项。然后,VPC BPA 将只阻止没有排除项的子网上的流量。VPC BPA 排除是一种可以应用于单个 VPC 或子网的模式,可将其排除在账户的 VPC BPA 模式之外,并允许双向或仅出口访问。即使账户未启用 VPC BPA,您也可以为 VPC 和子网创建 VPC BPA 排除项,以确保启用 VPC BPA 时排除项不会中断流量。
在本示例中,我们将为子网 A 创建排除项,以显示 VPC BPA 如何影响排除项的流量。
VPC BPA 仅入口模式已启用且子网 A 排除项已启用双向模式的示意图:
4.1 为子网 A 创建排除项
完成本节以创建排除项。VPC BPA 排除是一种可以应用于单个 VPC 或子网的模式,可将其排除在账户的 VPC BPA 模式之外,并允许双向或仅出口访问。即使账户未启用 VPC BPA,您也可以为 VPC 和子网创建 VPC BPA 排除项,以确保启用 VPC BPA 时排除项不会中断流量。
- Amazon Web Services 管理控制台
-
排除项已创建。
- Amazon CLI
-
-
修改排除允许方向:
aws ec2 --region us-east-2 create-vpc-block-public-access-exclusion --subnet-id subnet-id --internet-gateway-exclusion-mode allow-bidirectional
-
更新排除项状态可能需要一段时间。要查看排除项的状态:
aws ec2 --region us-east-2 describe-vpc-block-public-access-exclusions --exclusion-ids exclusion-id
4.2 连接到实例
完成本节以连接到实例。
- Amazon Web Services 管理控制台
-
-
对实例 A 的公有 IPv4 地址运行 Ping 命令。请注意,允许流量。
-
对实例 B 的公有 IPv4 地址运行 Ping 命令。请注意,流量已被阻止。
-
如同在方案 1 中所做的那样,使用 EC2 Instance Connect 连接到实例 A,然后运行 ping www.amazon.com 命令。请注意,您可以从实例 A 对互联网上的公共站点运行 ping 命令。允许流量。
-
如同在方案 1 中所做的那样,使用 EC2 Instance Connect 连接到实例 B,然后从该实例运行 ping www.amazon.com 命令。请注意,您无法从实例 B 对互联网上的公共站点运行 ping 命令。流量已被阻止。
-
如同在方案 1 中所做的那样,使用 EC2 Instance Connect 连接到实例 C 和实例 D,然后从这些实例运行 ping www.amazon.com 命令。请注意,您可以从实例 C 或实例 D 对互联网上的公共站点运行 ping 命令。允许流量。
- Amazon CLI
-
-
使用公有 IPv4 地址对实例 A 运行 Ping 命令以检查入站流量:
ping 18.225.8.244
输出:
Pinging 18.225.8.244 with 32 bytes of data:

Reply from 18.225.8.244: bytes=32 time=51ms TTL=110
Reply from 18.225.8.244: bytes=32 time=61ms TTL=110
请注意,运行 ping 命令成功并且流量未被阻止。
-
使用私有 IPv4 地址连接并检查出站流量:
aws ec2-instance-connect ssh --instance-id i-058db34f9a0997895 --region us-east-2 --connection-type eice
输出:
A newer release of "Amazon Linux" is available.  Version 2023.5.20240916:
Run "/usr/bin/dnf check-release-update" for full release and version update info
,     #_   ~_  ####_        Amazon Linux 2023
~~  _#####\  ~~     ###|
~~       #/ ___   https://aws.amazon.com/linux/amazon-linux-2023
~~       V~' '->
~~~         /
~~._.   _/
/ /
/m/'
Last login: Fri Sep 27 17:58:12 2024 from 3.16.146.5
[ec2-user@ip-10-0-1-85 ~]$ ping www.amazon.com
PING d3ag4hukkh62yn.cloudfront.net (18.65.233.187) 56(84) bytes of data.
64 bytes from server-3-160-24-126.cmh68.r.cloudfront.net (18.65.233.187): icmp_seq=1 ttl=249 time=1.03 ms
64 bytes from server-3-160-24-126.cmh68.r.cloudfront.net (18.65.233.187): icmp_seq=2 ttl=249 time=1.72 ms
请注意,运行 ping 命令成功并且流量未被阻止。
-
使用公有 IPv4 地址对实例 B 运行 Ping 命令以检查入站流量:
ping 3.18.106.198
输出:
Pinging 3.18.106.198 with 32 bytes of data:
Request timed out.
请注意,运行 ping 命令失败并且流量将被阻止。
-
使用私有 IPv4 地址连接并检查出站流量:
aws ec2-instance-connect ssh --instance-id i-08552a0774b5c8f72 --region us-east-2 --connection-type eice
输出:
A newer release of "Amazon Linux" is available.  Version 2023.5.20240916:
Run "/usr/bin/dnf check-release-update" for full release and version update info
,     #   ~_  ####        Amazon Linux 2023
~~  _#####\  ~~     ###|
~~       #/ ___   https://aws.amazon.com/linux/amazon-linux-2023
~~       V~' '->
~~~         /
~~..   _/
_/ /
/m/'
Last login: Fri Sep 27 18:12:03 2024 from 3.16.146.5
[ec2-user@ip-10-0-2-98 ~]$ ping www.amazon.com
PING d3ag4hukkh62yn.cloudfront.net (18.65.233.187) 56(84) bytes of data.
请注意,运行 ping 命令失败并且流量将被阻止。
-
连接到实例 C。由于没有可以运行 ping 命令的公有 IP 地址,因此请使用 EC2 Instance Connect 进行连接,然后从该实例对公有 IP 运行 ping 命令以检查出站流量:
aws ec2-instance-connect ssh --instance-id i-04eca55f2a482b2c4 --region us-east-2 --connection-type eice
Output
A newer release of "Amazon Linux" is available.  Version 2023.5.20240916:
Run "/usr/bin/dnf check-release-update" for full release and version update info
,     #   ~_  ####        Amazon Linux 2023
~~  _#####\  ~~     ###|
~~       #/ ___   https://aws.amazon.com/linux/amazon-linux-2023
~~       V~' '->
~~~         /
~~..   _/
_/ /
/m/'
Last login: Tue Sep 24 15:28:09 2024 from 10.0.2.86
[ec2-user@ip-10-0-3-180 ~]$ ping www.amazon.com
PING d3ag4hukkh62yn.cloudfront.net (18.65.233.187) 56(84) bytes of data.
64 bytes from server-3-160-24-126.cmh68.r.cloudfront.net (18.65.233.187): icmp_seq=1 ttl=248 time=1.84 ms
64 bytes from server-3-160-24-126.cmh68.r.cloudfront.net (18.65.233.187): icmp_seq=2 ttl=248 time=1.40 ms
请注意,运行 ping 命令成功并且流量未被阻止。
-
连接到实例 D。由于没有可以运行 ping 命令的公有 IP 地址,因此请使用 EC2 Instance Connect 进行连接,然后从该实例对公有 IP 运行 ping 命令以检查出站流量:
aws ec2-instance-connect ssh --instance-id i-05f9e6a9cfac1dba0 --region us-east-2 --connection-type eice
Output
A newer release of "Amazon Linux" is available.  Version 2023.5.20240916:
Run "/usr/bin/dnf check-release-update" for full release and version update info
   ,     #_   ~\_  ####_        Amazon Linux 2023
  ~~  \_#####\  ~~     \###|
  ~~       \#/ ___   https://aws.amazon.com/linux/amazon-linux-2023
   ~~       V~' '->
    ~~~         /
      ~~._.   _/
         _/ _/
       _/m/'
Last login: Fri Sep 27 18:00:52 2024 from 3.16.146.5
[ec2-user@ip-10-0-3-59 ~]$ ping www.amazon.com
PING www.amazon.com(g2600-141f-4000-059a-0000-0000-0000-3bd4.deploy.static.akamaitechnologies.com (2600:141f:4000:59a::3bd4)) 56 data bytes
64 bytes from g2600-141f-4000-059a-0000-0000-0000-3bd4.deploy.static.akamaitechnologies.com (2600:141f:4000:59a::3bd4): icmp_seq=1 ttl=48 time=15.9 ms
64 bytes from g2600-141f-4000-059a-0000-0000-0000-3bd4.deploy.static.akamaitechnologies.com (2600:141f:4000:59a::3bd4): icmp_seq=2 ttl=48 time=15.8 ms
请注意,运行 ping 命令成功并且流量未被阻止。
4.3 可选:使用 Reachability Analyzer 验证连接
使用与方案 2 在 Reachability Analyzer 中创建的相同网络路径,由于已经为公有子网 A 创建了排除项,您现在可以运行新分析并确认路径目前是否可访问。
有关 Reachability Analyzer 区域可用性的信息,请参阅《Reachability Analyzer Guide》中的 Considerations。
- Amazon Web Services 管理控制台
-
-
从您之前在网络见解控制台中创建的网络路径,单击重新运行分析。
-
等待分析完成。该过程可能需要几分钟。
-
确认该路径现在可访问。
- Amazon CLI
-
-
使用之前创建的网络路径 ID 开始新分析:
aws ec2 --region us-east-2 start-network-insights-analysis --network-insights-path-id nip-id
-
检索分析的结果:
aws ec2 --region us-east-2 describe-network-insights-analyses --network-insights-analysis-ids nia-id
-
确认 VPC_BLOCK_PUBLIC_ACCESS_ENABLED 说明代码不再存在。
场景 5 - 修改排除模式
在本节中,您将更改排除项的允许流量方向,以了解其如何影响 VPC BPA。
在这一场景下,您需要将排除模式更改为仅出口。请注意在这样操作时,子网 A 上的“仅出口”排除项不允许出站流量,这是有违直觉的,因为您原本希望它允许出站流量。但是,由于账户级 BPA 为仅入口模式,因此仅出口排除项将被忽略,并且子网 A 到互联网网关的路由受到 VPC BPA 的限制,从而阻止了出站流量。要在子网 A 上启用出站流量,就必须将 VPC BPA 切换到双向模式。
VPC BPA 仅入口模式已启用且子网 A 排除项已启用仅出口模式的示意图:
5.1 将排除项允许方向更改为仅出口
完成本节以更改排除项允许方向。
- Amazon Web Services 管理控制台
-
-
编辑您在方案 4 中创建的排除项,并将允许方向更改为仅出口。
-
选择保存更改。
-
等待排除项状态变为活动。VPC BPA 设置生效和状态更新可能需要几分钟时间。您可能需要刷新排除项表才能查看更改。
- Amazon CLI
-
-
修改排除允许方向:
aws ec2 --region us-east-2 modify-vpc-block-public-access-exclusion --exclusion-id exclusion-id --internet-gateway-exclusion-mode allow-egress
VPC BPA 设置生效和状态更新可能需要几分钟时间。
-
更新排除项状态可能需要一段时间。要查看排除项的状态:
aws ec2 --region us-east-2 describe-vpc-block-public-access-exclusion
5.2 连接到实例
完成本节以连接到实例。
- Amazon Web Services 管理控制台
-
-
对实例 A 和实例 B 的公有 IPv4 地址运行 Ping 命令。请注意,流量已被阻止。
-
如同在方案 1 中所做的那样,使用 EC2 Instance Connect 连接到实例 A 和实例 B,然后运行 ping www.amazon.com 命令。请注意,您无法从实例 A 或实例 B 对互联网上的公共站点运行 ping 命令。流量已被阻止。
-
如同在方案 1 中所做的那样,使用 EC2 Instance Connect 连接到实例 C 和实例 D,然后从这些实例运行 ping www.amazon.com 命令。请注意,您可以从实例 C 或实例 D 对互联网上的公共站点运行 ping 命令。允许流量。
- Amazon CLI
-
-
使用公有 IPv4 地址对实例 A 运行 Ping 命令以检查入站流量:
ping 18.225.8.244
输出:
Pinging 18.225.8.244 with 32 bytes of data:
Request timed out.
请注意,运行 ping 命令失败并且流量将被阻止。
-
使用私有 IPv4 地址连接并检查出站流量:
aws ec2-instance-connect ssh --instance-id i-058db34f9a0997895 --region us-east-2 --connection-type eice
输出:
A newer release of "Amazon Linux" is available.  Version 2023.5.20240916:
Run "/usr/bin/dnf check-release-update" for full release and version update info
   ,     #_   ~\_  ####_        Amazon Linux 2023
  ~~  \_#####\  ~~     \###|
  ~~       \#/ ___   https://aws.amazon.com/linux/amazon-linux-2023
   ~~       V~' '->
    ~~~         /
      ~~._.   _/
         _/ _/
       _/m/'
Last login: Fri Sep 27 18:09:55 2024 from 3.16.146.5
[ec2-user@ip-10-0-1-85 ~]$ ping www.amazon.com
PING d3ag4hukkh62yn.cloudfront.net (18.65.233.187) 56(84) bytes of data.
请注意,运行 ping 命令失败并且流量将被阻止。
-
使用公有 IPv4 地址对实例 B 运行 Ping 命令以检查入站流量:
ping 3.18.106.198
输出:
Pinging 3.18.106.198 with 32 bytes of data:
Request timed out.
请注意,运行 ping 命令失败并且流量将被阻止。
-
使用私有 IPv4 地址连接并检查出站流量:
aws ec2-instance-connect ssh --instance-id i-058db34f9a0997895 --region us-east-2 --connection-type eice
输出:
A newer release of "Amazon Linux" is available.  Version 2023.5.20240916:
Run "/usr/bin/dnf check-release-update" for full release and version update info
   ,     #_   ~\_  ####_        Amazon Linux 2023
  ~~  \_#####\  ~~     \###|
  ~~       \#/ ___   https://aws.amazon.com/linux/amazon-linux-2023
   ~~       V~' '->
    ~~~         /
      ~~._.   _/
         _/ _/
       _/m/'
Last login: Fri Sep 27 18:09:55 2024 from 3.16.146.5
[ec2-user@ip-10-0-1-85 ~]$ ping www.amazon.com
PING d3ag4hukkh62yn.cloudfront.net (18.65.233.187) 56(84) bytes of data.
请注意,运行 ping 命令失败并且流量将被阻止。
-
连接到实例 C。由于没有可以运行 ping 命令的公有 IP 地址,因此请使用 EC2 Instance Connect 进行连接,然后从该实例对公有 IP 运行 ping 命令以检查出站流量:
aws ec2-instance-connect ssh --instance-id i-04eca55f2a482b2c4 --region us-east-2 --connection-type eice
输出:
A newer release of "Amazon Linux" is available.  Version 2023.5.20240916:
Run "/usr/bin/dnf check-release-update" for full release and version update info
   ,     #_   ~\_  ####_        Amazon Linux 2023
  ~~  \_#####\  ~~     \###|
  ~~       \#/ ___   https://aws.amazon.com/linux/amazon-linux-2023
   ~~       V~' '->
    ~~~         /
      ~~._.   _/
         _/ _/
       _/m/'
Last login: Fri Sep 27 18:00:31 2024 from 3.16.146.5
[ec2-user@ip-10-0-3-180 ~]$ ping www.amazon.com
PING www.amazon.com(2600:9000:25f3:a600:7:49a5:5fd4:b121 (2600:9000:25f3:a600:7:49a5:5fd4:b121)) 56 data bytes
64 bytes from 2600:9000:25f3:a600:7:49a5:5fd4:b121 (2600:9000:25f3:a600:7:49a5:5fd4:b121): icmp_seq=1 ttl=58 time=1.51 ms
64 bytes from 2600:9000:25f3:a600:7:49a5:5fd4:b121 (2600:9000:25f3:a600:7:49a5:5fd4:b121): icmp_seq=2 ttl=58 time=1.49 ms
请注意,运行 ping 命令成功并且流量未被阻止。
-
连接到实例 D。由于没有可以运行 ping 命令的公有 IP 地址,因此请使用 EC2 Instance Connect 进行连接,然后从该实例对公有 IP 运行 ping 命令以检查出站流量:
aws ec2-instance-connect ssh --instance-id i-05f9e6a9cfac1dba0 --region us-east-2 --connection-type eice
输出:
A newer release of "Amazon Linux" is available.  Version 2023.5.20240916:
Run "/usr/bin/dnf check-release-update" for full release and version update info
   ,     #_   ~\_  ####_        Amazon Linux 2023
  ~~  \_#####\  ~~     \###|
  ~~       \#/ ___   https://aws.amazon.com/linux/amazon-linux-2023
   ~~       V~' '->
    ~~~         /
      ~~._.   _/
         _/ _/
       _/m/'
Last login: Fri Sep 27 18:13:55 2024 from 3.16.146.5
[ec2-user@ip-10-0-3-59 ~]$ ping www.amazon.com
PING www.amazon.com(2606:2cc0::374 (2606:2cc0::374)) 56 data bytes
64 bytes from 2606:2cc0::374 (2606:2cc0::374): icmp_seq=1 ttl=58 time=1.21 ms
64 bytes from 2606:2cc0::374 (2606:2cc0::374): icmp_seq=2 ttl=58 time=1.51 ms
请注意,运行 ping 命令成功并且流量未被阻止。
场景 6 - 修改 VPC BPA 模式
在本节中,您将更改 VPC BPA 阻止方向,以了解其如何影响流量。在本方案中,双向模式下启用的 VPC BPA 会阻止所有流量,就像在方案 1 中一样。除非排除项可以访问 NAT 网关或仅出口互联网网关,否则流量将被阻止。
VPC BPA 双向模式已启用且子网 A 排除项已启用仅入口模式的示意图:
6.1 将 VPC BPA 更改为双向模式
完成本节以更改 VPC BPA 模式。
- Amazon Web Services 管理控制台
-
- Amazon CLI
-
-
修改 VPC BPA 阻止方向:
aws ec2 --region us-east-2 modify-vpc-block-public-access-options --internet-gateway-block-mode block-bidirectional
VPC BPA 设置生效和状态更新可能需要几分钟时间。
-
查看 VPC BPA 的状态:
aws ec2 --region us-east-2 describe-vpc-block-public-access-options
6.2 连接到实例
完成本节以连接到实例。
- Amazon Web Services 管理控制台
-
-
对实例 A 和实例 B 的公有 IPv4 地址运行 Ping 命令。请注意,流量已被阻止。
-
如同在方案 1 中所做的那样,使用 EC2 Instance Connect 连接到实例 A 和实例 B,然后运行 ping www.amazon.com 命令。请注意,您无法从实例 A 或实例 B 对互联网上的公共站点运行 ping 命令。流量已被阻止。
-
如同在方案 1 中所做的那样,使用 EC2 Instance Connect 连接到实例 C 和实例 D,然后从这些实例运行 ping www.amazon.com 命令。请注意,您无法从实例 C 或实例 D 对互联网上的公共站点运行 ping 命令。流量已被阻止。
- Amazon CLI
-
-
使用公有 IPv4 地址对实例 A 运行 Ping 命令以检查入站流量:
ping 18.225.8.244
输出:
Pinging 18.225.8.244 with 32 bytes of data:
Request timed out.
请注意,运行 ping 命令失败并且流量将被阻止。
-
使用私有 IPv4 地址连接并检查出站流量:
aws ec2-instance-connect ssh --instance-id i-058db34f9a0997895 --region us-east-2 --connection-type eice
输出:
A newer release of "Amazon Linux" is available.  Version 2023.5.20240916:
Run "/usr/bin/dnf check-release-update" for full release and version update info
   ,     #_   ~\_  ####_        Amazon Linux 2023
  ~~  \_#####\  ~~     \###|
  ~~       \#/ ___   https://aws.amazon.com/linux/amazon-linux-2023
   ~~       V~' '->
    ~~~         /
      ~~._.   _/
         _/ _/
       _/m/'
Last login: Fri Sep 27 18:17:44 2024 from 3.16.146.5
[ec2-user@ip-10-0-1-85 ~]$ ping www.amazon.com
PING d3ag4hukkh62yn.cloudfront.net (18.65.233.187) 56(84) bytes of data.
请注意,运行 ping 命令失败并且流量将被阻止。
-
使用公有 IPv4 地址对实例 A 运行 Ping 命令以检查入站流量:
ping 3.18.106.198
输出:
Pinging 3.18.106.198 with 32 bytes of data:
Request timed out.
请注意,运行 ping 命令失败并且流量将被阻止。
-
使用私有 IPv4 地址连接并检查出站流量:
aws ec2-instance-connect ssh --instance-id i-058db34f9a0997895 --region us-east-2 --connection-type eice
输出:
A newer release of "Amazon Linux" is available.  Version 2023.5.20240916:
Run "/usr/bin/dnf check-release-update" for full release and version update info
   ,     #_   ~\_  ####_        Amazon Linux 2023
  ~~  \_#####\  ~~     \###|
  ~~       \#/ ___   https://aws.amazon.com/linux/amazon-linux-2023
   ~~       V~' '->
    ~~~         /
      ~~._.   _/
         _/ _/
       _/m/'
Last login: Fri Sep 27 18:09:55 2024 from 3.16.146.5
[ec2-user@ip-10-0-1-85 ~]$ ping www.amazon.com
PING d3ag4hukkh62yn.cloudfront.net (18.65.233.187) 56(84) bytes of data.
请注意,运行 ping 命令失败并且流量将被阻止。
-
连接到实例 C。由于没有可以运行 ping 命令的公有 IP 地址,因此请使用 EC2 Instance Connect 进行连接,然后从该实例对公有 IP 运行 ping 命令以检查出站流量:
aws ec2-instance-connect ssh --instance-id i-04eca55f2a482b2c4 --region us-east-2 --connection-type eice
输出:
A newer release of "Amazon Linux" is available.  Version 2023.5.20240916:
Run "/usr/bin/dnf check-release-update" for full release and version update info
   ,     #_   ~\_  ####_        Amazon Linux 2023
  ~~  \_#####\  ~~     \###|
  ~~       \#/ ___   https://aws.amazon.com/linux/amazon-linux-2023
   ~~       V~' '->
    ~~~         /
      ~~._.   _/
         _/ _/
       _/m/'
Last login: Fri Sep 27 18:19:45 2024 from 3.16.146.5
[ec2-user@ip-10-0-3-180 ~]$ ping www.amazon.com
PING www.amazon.com(2600:9000:25f3:6200:7:49a5:5fd4:b121 (2600:9000:25f3:6200:7:49a5:5fd4:b121)) 56 data bytes
请注意,运行 ping 命令失败并且流量将被阻止。
-
连接到实例 D。由于没有可以运行 ping 命令的公有 IP 地址,因此请使用 EC2 Instance Connect 进行连接,然后从该实例对公有 IP 运行 ping 命令以检查出站流量:
aws ec2-instance-connect ssh --instance-id i-05f9e6a9cfac1dba0 --region us-east-2 --connection-type eice
输出:
A newer release of "Amazon Linux" is available.  Version 2023.5.20240916:
Run "/usr/bin/dnf check-release-update" for full release and version update info
   ,     #_   ~\_  ####_        Amazon Linux 2023
  ~~  \_#####\  ~~     \###|
  ~~       \#/ ___   https://aws.amazon.com/linux/amazon-linux-2023
   ~~       V~' '->
    ~~~         /
      ~~._.   _/
         _/ _/
       _/m/'
Last login: Fri Sep 27 18:20:58 2024 from 3.16.146.5
[ec2-user@ip-10-0-3-59 ~]$ ping www.amazon.com
PING www.amazon.com(2600:9000:25f3:b400:7:49a5:5fd4:b121 (2600:9000:25f3:b400:7:49a5:5fd4:b121)) 56 data bytes
请注意,运行 ping 命令失败并且流量将被阻止。
清理
在本节中,您将删除为此高级示例创建的所有资源。清理资源很重要,这样可以避免在您账户中创建的资源产生过多的额外费用。
删除 CloudFormation 资源
完成本节以删除您使用 Amazon CloudFormation 模板创建的资源。
- Amazon Web Services 管理控制台
-
- Amazon CLI
-
-
删除 CloudFormation 堆栈。您可能必须强制删除堆栈才能将其完全删除。
aws cloudformation delete-stack --stack-name VPC-BPA-stack --region us-east-2
-
查看进度并确保堆栈已删除。
aws cloudformation describe-stack-events --stack-name VPC-BPA-stack --region us-east-2
使用 CloudTrail 跟踪排除项删除
完成本节以使用 Amazon CloudTrail 跟踪排除项删除。当您删除排除项时,会显示 CloudTrail 条目。
- Amazon Web Services 管理控制台
-
通过在位于 https://console.amazonaws.cn/cloudtrailv2/ 的 Amazon CloudTrail 控制台中查找资源类型 > AWS::EC2::VPCBlockPublicAccessExclusion,您可以在 CloudTrail 事件历史记录中查看任何已删除的排除项。
- Amazon CLI
-
您可以使用 lookup-events 命令查看与删除排除项有关的事件:
aws cloudtrail lookup-events --lookup-attributes AttributeKey=ResourceType,AttributeValue=AWS::EC2::VPCBlockPublicAccessExclusion
高级示例已完成。