# 嵌套现有的堆栈
可以使用 `resource import` 功能将现有堆栈嵌套在另一个现有堆栈中。嵌套堆栈是您从其他模板中声明和引用的通用组件。这样,您就可以避免将相同的配置复制并粘贴到您的模板中,并简化堆栈更新。如果您具有通用组件的模板,您可以使用 `AWS::CloudFormation::Stack` 资源从另一个模板中引用该模板。有关嵌套堆栈的更多信息,请参阅[使用嵌套堆栈将模板拆分为可重复使用的部分](using-cfn-nested-stacks.md)。
在使用 `resource import` 时,Amazon CloudFormation 仅支持一层嵌套。这意味着,您无法将堆栈导入到子堆栈中,也无法导入具有子堆栈的堆栈。
如果您不熟悉导入,建议您先查看 [手动将 Amazon 资源导入 CloudFormation 堆栈](import-resources-manually.md) 主题中的介绍信息。
## 嵌套堆栈导入验证
在嵌套堆栈导入操作期间,Amazon CloudFormation 执行以下验证。
+ 父堆栈模板中的嵌套 `AWS::CloudFormation::Stack` 定义与实际嵌套堆栈的模板匹配。
+ 父堆栈模板中的嵌套 `AWS::CloudFormation::Stack` 定义的标签与实际嵌套堆栈资源的标签匹配。
## 使用 Amazon Web Services 管理控制台嵌套现有的堆栈
1. 使用 `Retain` [DeletionPolicy](https://docs.amazonaws.cn/AWSCloudFormation/latest/TemplateReference/aws-attribute-deletionpolicy.html) 将 `AWS::CloudFormation::Stack` 资源添加到父堆栈模板中。在以下示例父堆栈模板中,`MyNestedStack` 是导入目标。
**JSON**
```
{
"AWSTemplateFormatVersion" : "2010-09-09",
"Resources" : {
"ServiceTable":{
"Type":"AWS::DynamoDB::Table",
"Properties":{
"TableName":"Service",
"AttributeDefinitions":[
{
"AttributeName":"key",
"AttributeType":"S"
}
],
"KeySchema":[
{
"AttributeName":"key",
"KeyType":"HASH"
}
],
"ProvisionedThroughput":{
"ReadCapacityUnits":5,
"WriteCapacityUnits":1
}
}
},
"MyNestedStack" : {
"Type" : "AWS::CloudFormation::Stack",
"DeletionPolicy": "Retain",
"Properties" : {
"TemplateURL" : "{{https://s3.amazonaws.com/cloudformation-templates-us-east-2/EC2ChooseAMI.template}}",
{{"Parameters" : {
"InstanceType" : "t1.micro",
"KeyName" : "mykey"}}
}
}
}
}
}
```
**YAML**
```
AWSTemplateFormatVersion: 2010-09-09
Resources:
ServiceTable:
Type: AWS::DynamoDB::Table
Properties:
TableName: Service
AttributeDefinitions:
- AttributeName: key
AttributeType: S
KeySchema:
- AttributeName: key
KeyType: HASH
ProvisionedThroughput:
ReadCapacityUnits: 5
WriteCapacityUnits: 1
MyNestedStack:
Type: AWS::CloudFormation::Stack
DeletionPolicy: Retain
Properties:
TemplateURL: >-
{{https://s3.amazonaws.com/cloudformation-templates-us-east-2/EC2ChooseAMI.template}}
{{Parameters:
InstanceType: t1.micro
KeyName: mykey}}
```
1. 打开 Amazon CloudFormation 控制台。
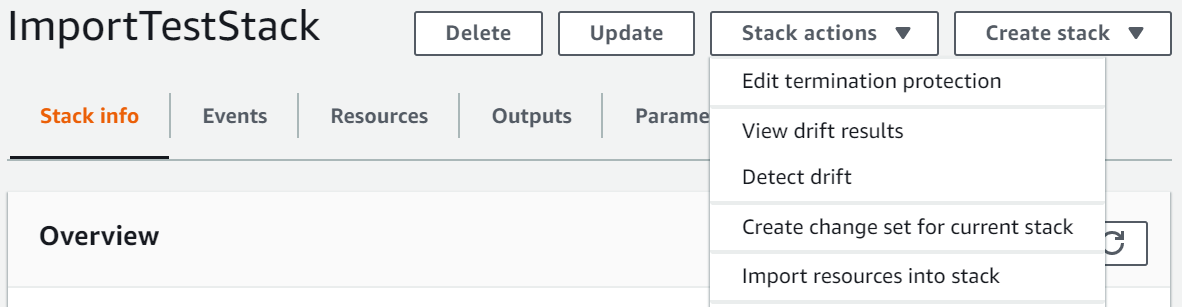
1. 在 **Stacks (堆栈)** 页面上,在选择了父堆栈的情况下,选择 **Stack actions (堆栈操作)**,然后选择 **Import resources into stack (将资源导入到堆栈)**。
1. 访问 **Import overview (导入概述)** 页面,以查看在该操作期间需要提供的内容列表。然后选择**下一步**。
1. 在 **Specify template (指定模板)** 页面上,使用以下方法之一提供更新的父模板,然后选择 **Next (下一步)**。
+ 选择 **Amazon S3 URL**,然后在文本框中指定您的模板的 URL。
+ 选择 **Upload a template file (上传模板文件)**,然后浏览您的模板。
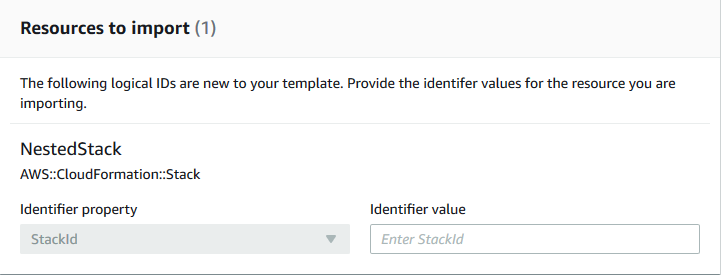
1. 在 **Identify resources (标识资源)** 页面上,标识 `AWS::CloudFormation::Stack` 资源。
1. 在 **Identifier property (标识符属性)** 下面,选择资源标识符的类型。例如,可以使用 `StackId` 属性标识 `AWS::CloudFormation::Stack` 资源。
1. 在**标识符值**下,键入要导入的堆栈的 ARN。例如 `{{arn:aws:cloudformation:us-west-2:12345678910:stack/mystack/5b918d10-cd98-11ea-90d5-0a9cd3354c10}}`。
1. 选择**下一步**。
1. 在 **Specify stack details (指定堆栈详细信息)** 页面上,修改任何参数,然后选择 **Next (下一步)**。这会自动创建一个更改集。
**重要**
如果您修改的现有参数启动创建、更新或删除操作,导入操作将失败。
1. 在**查看 {{MyParentStack}}** 页面上,确认正在导入正确的资源,然后选择**导入资源**。这会自动执行在上一步中创建的更改集。此时,任何堆栈级标签将应用于导入的资源。
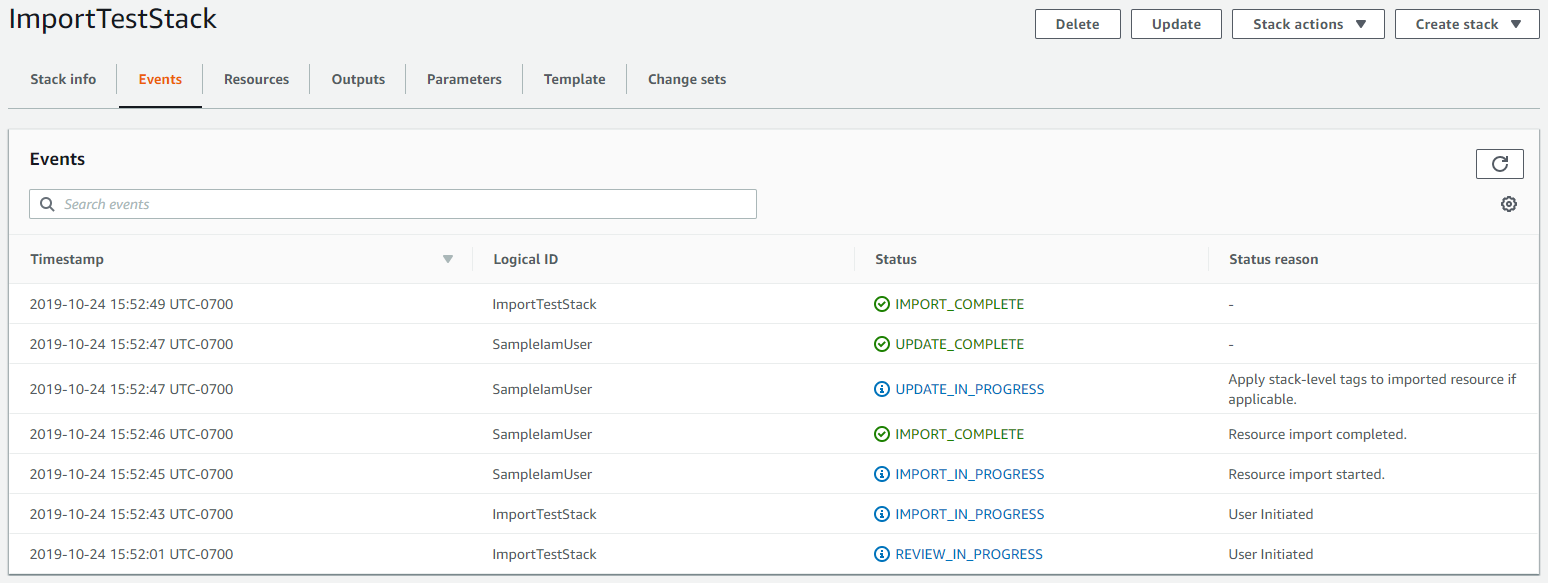
1. 将显示父堆栈的 **Stack details**(堆栈详细信息)页面的 **Events(事件)**窗格。
**注意**
在该导入操作完成后,无需对父堆栈运行偏差检测,因为 `AWS::CloudFormation::Stack` 资源已由 Amazon CloudFormation 进行管理。
## 使用 Amazon CLI嵌套现有的堆栈
1. 使用 `Retain` [DeletionPolicy](https://docs.amazonaws.cn/AWSCloudFormation/latest/TemplateReference/aws-attribute-deletionpolicy.html) 将 `AWS::CloudFormation::Stack` 资源添加到父堆栈模板中。在以下示例父模板中,`MyNestedStack` 是导入目标。
**JSON**
```
{
"AWSTemplateFormatVersion" : "2010-09-09",
"Resources" : {
"ServiceTable":{
"Type":"AWS::DynamoDB::Table",
"Properties":{
"TableName":"Service",
"AttributeDefinitions":[
{
"AttributeName":"key",
"AttributeType":"S"
}
],
"KeySchema":[
{
"AttributeName":"key",
"KeyType":"HASH"
}
],
"ProvisionedThroughput":{
"ReadCapacityUnits":5,
"WriteCapacityUnits":1
}
}
},
"{{MyNestedStack}}" : {
"Type" : "AWS::CloudFormation::Stack",
"DeletionPolicy": "Retain",
"Properties" : {
"TemplateURL" : "{{https://s3.amazonaws.com/cloudformation-templates-us-east-2/EC2ChooseAMI.template}}",
{{"Parameters" : {
"InstanceType" : "t1.micro",
"KeyName" : "mykey"}}
}
}
}
}
}
```
**YAML**
```
AWSTemplateFormatVersion: 2010-09-09
Resources:
ServiceTable:
Type: AWS::DynamoDB::Table
Properties:
TableName: Service
AttributeDefinitions:
- AttributeName: key
AttributeType: S
KeySchema:
- AttributeName: key
KeyType: HASH
ProvisionedThroughput:
ReadCapacityUnits: 5
WriteCapacityUnits: 1
{{MyNestedStack}}:
Type: AWS::CloudFormation::Stack
DeletionPolicy: Retain
Properties:
TemplateURL: >-
{{https://s3.amazonaws.com/cloudformation-templates-us-east-2/EC2ChooseAMI.template}}
{{Parameters:
InstanceType: t1.micro
KeyName: mykey}}
```
1. 编写 JSON 字符串,如以下示例所示,并进行以下修改:
+ 将 {{MyNestedStack}} 替换为模板中指定的目标资源的逻辑 ID。
+ 将 {{arn:aws:cloudformation:us-west-2:12345678910:stack/mystack/5b918d10-cd98-11ea-90d5-0a9cd3354c10}} 替换为要导入的堆栈的 ARN。
```
[{"ResourceType":"AWS::CloudFormation::Stack","LogicalResourceId":"{{MyNestedStack}}","ResourceIdentifier":{"StackId":"{{arn:aws:cloudformation:us-east-2:123456789012:stack/mystack/5b918d10-cd98-11ea-90d5-0a9cd3354c10}}"}}]
```
或者,您也可以在配置文件中指定参数。
例如,要导入 `MyNestedStack`,可以创建一个包含以下配置的 {{ResourcesToImport.txt}} 文件。
**JSON**
```
[
{
"ResourceType":"AWS::CloudFormation::Stack",
"LogicalResourceId":"{{MyNestedStack}}",
"ResourceIdentifier": {
"StackId":"{{arn:aws:cloudformation:us-west-2:12345678910:stack/mystack/5b918d10-cd98-11ea-90d5-0a9cd3354c10}}"
}
}
]
```
**YAML**
```
ResourceType: AWS::CloudFormation::Stack
LogicalResourceId: {{MyNestedStack}}
ResourceIdentifier:
StackId: >-
{{arn:aws:cloudformation:us-west-2:12345678910:stack/mystack/5b918d10-cd98-11ea-90d5-0a9cd3354c10}}
```
1. 要创建更改集,请使用以下 **create-change-set** 命令并替换占位符文本。对于 `--change-set-type` 选项,请指定 **IMPORT** 的值。对于 `--resources-to-import` 选项,将示例 JSON 字符串替换为您刚刚创建的实际 JSON 字符串。
```
aws cloudformation create-change-set \
--stack-name {{MyParentStack}} --change-set-name {{ImportChangeSet}} \
--change-set-type IMPORT \
--template-body {{file://TemplateToImport.json}} \
--resources-to-import {{'[{"ResourceType":"AWS::CloudFormation::Stack","LogicalResourceId":"MyNestedStack","ResourceIdentifier":{"StackId":"arn:aws:cloudformation:us-west-2:12345678910:stack/mystack/5b918d10-cd98-11ea-90d5-0a9cd3354c10"}}]'}}
```
**注意**
`--resources-to-import` 不支持内联 YAML。JSON 字符串中对转义引号的要求因终端而异。有关更多信息,请参阅《Amazon Command Line Interface User Guide**》中的 [Using quotation marks inside strings](https://docs.amazonaws.cn/cli/latest/userguide/cli-usage-parameters-quoting-strings.html#cli-usage-parameters-quoting-strings-containing)。
或者,您可以使用文件 URL 作为 `--resources-to-import` 选项的输入内容,如以下示例所示。
```
--resources-to-import {{file://ResourcesToImport.txt}}
```
如果成功,此命令将返回以下示例输出:
```
{
"Id": "arn:aws:cloudformation:us-west-2:12345678910:changeSet/ImportChangeSet/8ad75b3f-665f-46f6-a200-0b4727a9442e",
"StackId": "arn:aws:cloudformation:us-west-2:12345678910:stack/MyParentStack/4e345b70-1281-11ef-b027-027366d8e82b"
}
```
1. 查看更改集,以确保导入正确的堆栈。
```
aws cloudformation describe-change-set --change-set-name {{ImportChangeSet}}
```
1. 要启动更改集并将堆栈导入父源堆栈,请使用以下 **execute-change-set** 命令并替换占位符文本。此时,任何[堆栈级标签](cfn-console-create-stack.md#configure-stack-options)将应用于导入的资源。在成功完成导入操作后 `(IMPORT_COMPLETE)`,将成功嵌套堆栈。
```
aws cloudformation execute-change-set --change-set-name {{ImportChangeSet}}
```
**注意**
在该导入操作完成后,无需对父堆栈运行偏差检测,因为 `AWS::CloudFormation::Stack` 资源已由 Amazon CloudFormation 进行管理。