本文属于机器翻译版本。若本译文内容与英语原文存在差异,则一律以英文原文为准。
高级迁移场景
本节介绍复杂 IIS 部署的高级迁移场景。
使用应用程序请求路由(ARR)进行多站点迁移
eb migrate 命令会在迁移期间自动检测并保留 ARR 配置。当它识别出您的 IIS 中的 ARR 设置时applicationHost.config,它会生成必要的 PowerShell 脚本,以便在目标 EC2 实例上重新安装和配置 ARR。
ARR 配置检测
迁移过程会检查 IIS 中的三个关键配置部分:
-
system.webServer/proxy:Core ARR 代理设置 -
system.webServer/rewrite:URL 重写规则 -
system.webServer/caching:缓存配置
例如,考虑常见的 ARR 配置,其中在端口 80 代理上运行的 RouterSite 向分别在端口 8081 和 8082 上运行的 APIService 和 AdminPortal 发出请求:
<!-- Original IIS ARR Configuration -->
<rewrite>
<rules>
<rule name="Route to API" stopProcessing="true">
<match url="^api/(.*)$" />
<action type="Rewrite" url="http://backend:8081/api/{R:1}" />
</rule>
<rule name="Route to Admin" stopProcessing="true">
<match url="^admin/(.*)$" />
<action type="Rewrite" url="http://backend:8082/admin/{R:1}" />
</rule>
</rules>
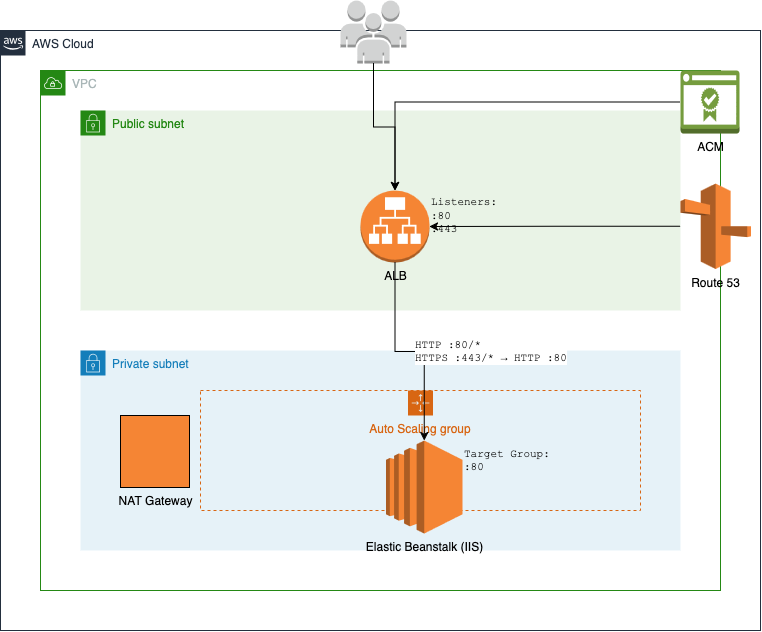
</rewrite>下图描述了这些规则如何隐藏在 IIS 服务器的端口 80 后面,而不是通过 EC2 安全组公开。应用程序负载均衡器只能访问端口 80,来自该端口的所有流量都通过端口 80 路由到目标组。
下面的命令可迁移此配置:
PS C:\migrations_workspace>eb migrate --sites "RouterSite,APIService,AdminPortal" ` --copy-firewall-config
ARR 迁移过程
迁移过程通过几个步骤保留 ARR 配置。
- 配置导出
-
该工具将您现有的 ARR 设置从三个关键配置部分导出到存储在
ebmigrateScripts目录中的单独 XML 文件中:ebmigrateScripts\ ├── arr_config_proxy.xml ├── arr_config_rewrite.xml └── arr_config_caching.xml - 安装脚本
-
生成了两个 PowerShell 脚本来处理 ARR 设置:
-
arr_msi_installer.ps1:下载并安装 ARR 模块 -
arr_configuration_importer_script.ps1:导入已导出的 ARR 配置
-
- 部署清单集成
-
脚本会通过
aws-windows-deployment-manifest.json中的条目集成到部署过程中:{ "manifestVersion": 1, "deployments": { "custom": [ { "name": "WindowsProxyFeatureEnabler", "scripts": { "install": { "file": "ebmigrateScripts\\windows_proxy_feature_enabler.ps1" } } }, { "name": "ArrConfigurationImporterScript", "scripts": { "install": { "file": "ebmigrateScripts\\arr_configuration_importer_script.ps1" } } } ] } }
负载均衡器集成
迁移过程会尽可能将您的 ARR 规则转换为应用程序负载均衡器(ALB)侦听器规则。例如,上述 ARR 配置生成 ALB 规则,这些规则基于 URL 路径模式路由流量,同时在 EC2 实例上维护内部路由。
由此产生的环境可维护 ARR 路由逻辑,同时充分利用 Amazon弹性基础架构。您的应用程序可以继续像以前一样运行,由 ARR 处理内部路由,由应用程序负载均衡器管理外部流量分配。
使用基于主机的路由在无 ARR 的情况下完成多站点迁移
虽然应用程序请求路由(ARR)是在 IIS 中管理多个站点的常用方法,但您也可以利用应用程序负载均衡器的基于主机的路由功能,将多站点部署直接迁移到无 ARR 的 Elastic Beanstalk。这种方法可以省去额外的路由层,从而降低复杂性并提高性能。
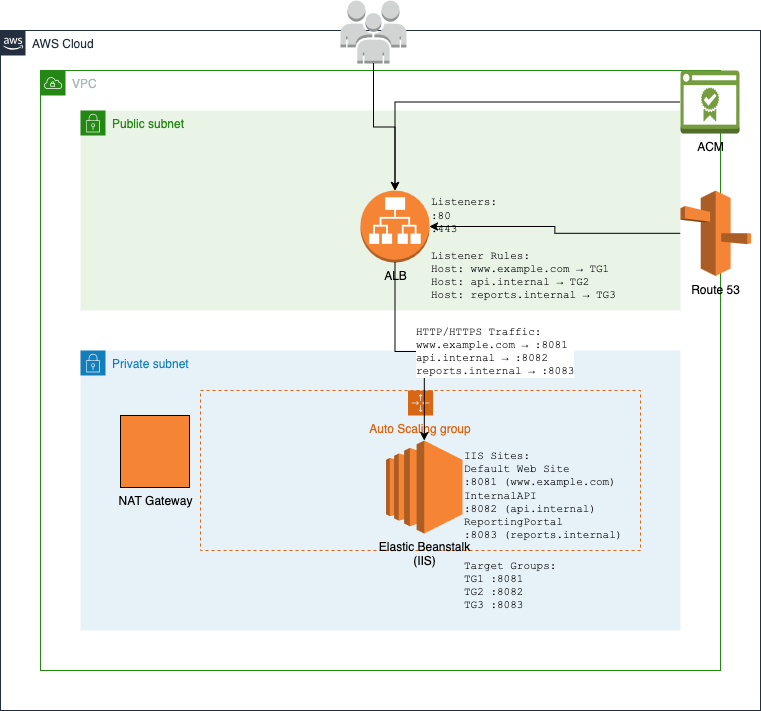
基于主机的路由概述
在这种方法中,每个 IIS 站点都暴露在 EC2 实例之外,Application Load Balancer 会根据主机标头将流量直接路由到相应的端口。这样一来便不再需要 ARR,同时保持应用程序之间互相分离。
考虑使用包含三个站点的多站点 IIS 配置,每个站点都有自己的主机名绑定:
<sites>
    <site name="Default Web Site" id="1">
        <bindings>
            <binding protocol="http" bindingInformation="*:8081:www.example.com" />
        </bindings>
    </site>
    <site name="InternalAPI" id="2">
        <bindings>
            <binding protocol="http" bindingInformation="*:8082:api.internal" />
        </bindings>
    </site>
    <site name="ReportingPortal" id="3">
        <bindings>
            <binding protocol="http" bindingInformation="*:8083:reports.internal" />
        </bindings>
    </site>
</sites>
这些站点通过安全组在端口 8081、8082 和 8083 上 EC2 公开。应用程序负载均衡器根据负载均衡器侦听器规则配置路由到这些站点。
迁移过程
要在不使用 ARR 的情况下将此配置迁移到 Elastic Beanstalk,请使用以下示例中的 eb migrate 命令:
PS C:\migrations_workspace>eb migrate --sites "Default Web Site,InternalAPI,ReportingPortal"
迁移过程会自动使用基于主机的路由规则配置应用程序负载均衡器,这些规则会根据主机标头将流量引导到相应的目标组。每个目标组将流量转发到您的 EC2 实例上的相应端口:
主机标头 www.example.com → 端口 8081 上的目标组
主机标头 api.internal → 端口 8082 上的目标组
主机标头 reports.internal → 端口 8083 上的目标组
SSL/TLS 配置
要使用保护您的应用程序, SSL/TLS 请执行以下步骤:
-
通过 Amazon Certificate Manager(ACM) 为您的域名申请证书。
-
使用这些证书在应用程序负载均衡器上配置 HTTPS 侦听器。
-
更新您的环境配置,使其包含具有以下配置选项设置的 HTTPS 侦听器。
option_settings:
  aws:elb:listener:443:
    ListenerProtocol: HTTPS
    SSLCertificateId: arn:aws:acm:region:account-id:certificate/certificate-id
    InstancePort: 80
    InstanceProtocol: HTTP
使用此配置,负载均衡器上会发生 SSL 终止,流量将通过 HTTP 转发到您的实例。这简化了证书管理,同时确保与客户端的安全连接。
最佳实践
- 安全组
-
将安全组配置为仅允许来自应用程序负载均衡器安全组的 IIS 站点使用的端口(本示例中为 8081、8082、8083)上的入站流量。
- 运行状况检查
-
为每个目标组配置运行状况检查,以确保流量仅路由到运行状况良好的实例。如果尚不存在运行状况检查端点,则为每个应用程序创建运行状况检查端点。
- 监控
-
设置 CloudWatch 警报以分别监控每个目标组的运行状况和性能。这样就能识别出单个应用程序特有的问题。
- 扩展
-
在配置自动扩缩策略时,应考虑所有应用程序的资源需求。如果一个应用程序的资源需求明显不同,可以考虑将其迁移到独立的环境。
虚拟目录管理
在将 IIS 应用程序迁移到 Elastic Beanstalk 时,eb migrate 命令可以保留虚拟目录结构。
默认权限配置
迁移虚拟目录时,通过授予对以下内容的 ReadAndExecute 访问权限来eb migrate建立一组基准权限:
-
IIS_IUSRS
-
IUSR
-
经过身份验证的用户
例如,假设一个典型的虚拟目录结构:
<site name="CorporatePortal">
    <application path="/" applicationPool="CorporatePortalPool">
        <virtualDirectory path="/" physicalPath="C:\sites\portal" />
        <virtualDirectory path="/shared" physicalPath="C:\shared\content" />
        <virtualDirectory path="/reports" physicalPath="D:\reports" />
    </application>
</site>
受密码保护的虚拟目录
当 eb migrate 遇到受密码保护的虚拟目录时,系统会发出警告并需要手动干预。
以下配置示例将导致示例之后出现的警告响应。
<virtualDirectory path="/secure"
                 physicalPath="C:\secure\content"
                 userName="DOMAIN\User"
                 password="[encrypted]" />
[WARNING] CorporatePortal/secure is hosted at C:\secure\content which is password-protected and won't be copied.要维持密码保护,请创建如下所示的自定义部署脚本:
# PS C:\migrations_workspace> cat secure_vdir_config.ps1

$vdirPath = "C:\secure\content"
$siteName = "CorporatePortal"
$vdirName = "secure"
$username = "DOMAIN\User"
$password = "SecurePassword"

# Ensure directory exists
if (-not (Test-Path $vdirPath)) {
    Write-Host "Creating directory: $vdirPath"
    New-Item -Path $vdirPath -ItemType Directory -Force
}

# Configure virtual directory with credentials
Write-Host "Configuring protected virtual directory: $vdirName"
New-WebVirtualDirectory -Site $siteName -Name $vdirName `
    -PhysicalPath $vdirPath -UserName $username -Password $password

# Set additional permissions as needed
$acl = Get-Acl $vdirPath
$rule = New-Object System.Security.AccessControl.FileSystemAccessRule(
    $username, "ReadAndExecute", "ContainerInherit,ObjectInherit", "None", "Allow"
)
$acl.AddAccessRule($rule)
Set-Acl $vdirPath $acl
通过将此脚本包含在清单中,将其添加到部署中:
{
    "manifestVersion": 1,
    "deployments": {
        "custom": [
            {
                "name": "SecureVirtualDirectory",
                "scripts": {
                    "install": {
                        "file": "secure_vdir_config.ps1"
                    }
                }
            }
        ]
    }
}
自定义权限管理
eb migrate 命令会为自定义权限脚本提供框架,以便适应需要默认权限以外的权限的应用程序。
$paths = @(
    "C:\sites\portal\uploads",
    "C:\shared\content"
)

foreach ($path in $paths) {
    if (-not (Test-Path $path)) {
        Write-Host "Creating directory: $path"
        New-Item -Path $path -ItemType Directory -Force
    }

    $acl = Get-Acl $path

    # Add custom permissions
    $customRules = @(
        # Application Pool Identity - Full Control
        [System.Security.AccessControl.FileSystemAccessRule]::new(
            "IIS AppPool\CorporatePortalPool",
            "FullControl",
            "ContainerInherit,ObjectInherit",
            "None",
            "Allow"
        ),
        # Custom Service Account
        [System.Security.AccessControl.FileSystemAccessRule]::new(
            "NT SERVICE\CustomService",
            "Modify",
            "ContainerInherit,ObjectInherit",
            "None",
            "Allow"
        )
    )

    foreach ($rule in $customRules) {
        $acl.AddAccessRule($rule)
    }

    Set-Acl $path $acl
    Write-Host "Custom permissions applied to: $path"
}
最佳实践
遵循这些最佳实践来规划、执行、监控和验证您的迁移。
- 迁移前规划
-
迁移之前,记录现有权限和身份验证要求。部署到生产环境之前,先在开发环境中测试自定义权限脚本。
- 共享内容管理
-
对于共享内容目录,请确保已通过自定义脚本正确配置所有必需的文件系统权限。考虑使用 FSx 适用于 Windows 的 Amazon 文件服务器
来满足共享存储需求。 - 监控和验证
-
迁移后监控应用程序日志,以验证对虚拟目录的访问是否正确。请特别注意以下方面:
-
应用程序池身份访问权限
-
自定义服务账户权限
-
网络共享连接
-
身份验证失败次数
-
自定义应用程序池设置
默认情况下,eb migrate 命令不会复制自定义应用程序池设置。要保留自定义应用程序池配置,请按照以下过程创建并应用自定义清单部分。
-
创建迁移构件的存档。
PS C:\migrations_workspace>eb migrate --archive -
创建用于配置应用程序池的自定义 PowerShell 脚本。
# PS C:\migrations_workspace> cat .\migrations\latest\upload_target\customize_application_pool_config.ps1 $configPath = "$env:windir\System32\inetsrv\config\applicationHost.config" [xml]$config = Get-Content -Path $configPath $newPoolXml = @" <!-- Original IIS Configuration --> <applicationPools> <add name="CustomPool" managedRuntimeVersion="v4.0" managedPipelineMode="Integrated"> <processModel identityType="SpecificUser" userName="AppPoolUser" password="[encrypted]" /> <recycling> <periodicRestart time="00:00:00"> <schedule> <add value="02:00:00" /> <add value="14:00:00" /> </schedule> </periodicRestart> </recycling> </add> </applicationPools> "@ $newPoolXmlNode = [xml]$newPoolXml # Find the applicationPools section $applicationPools = $config.SelectSingleNode("//configuration/system.applicationHost/applicationPools") # Import the new node into the document $importedNode = $config.ImportNode($newPoolXmlNode.DocumentElement, $true) $applicationPools.AppendChild($importedNode) # Save the changes $config.Save($configPath) Write-Host "ApplicationHost.config has been updated successfully." -
更新
aws-windows-deployment-manifest.json文件以包含自定义脚本。{ "manifestVersion": 1, "deployments": { ... "custom": [ ..., { "name": "ModifyApplicationPoolConfig", "description": "Modify application pool configuration from source machine to remove", "scripts": { "install": { "file": "customize_application_pool_config.ps1" }, "restart": { "file": "ebmigrateScripts\\noop.ps1" }, "uninstall": { "file": "ebmigrateScripts\\noop.ps1" } } } ] } } -
使用更新的存档目录创建环境。
PS C:\migrations_workspace>eb migrate ` --archive-dir '.\migrations\latest\upload_target\'
--archive-dir 参数会让 eb migrate 使用之前创建的源代码,从而避免创建新的存档。
部署先前版本
eb migrate 会在 Elastic Beanstalk 中通过带有时间戳的目录和应用程序版本来维护迁移历史记录。每次迁移都会创建一个唯一的 zip 文件,此文件可根据需要进行部署。
PS C:\migrations_workspace>ls .\migrations\Mode LastWriteTime Length Name ---- ------------- ------ ---- d----l 3/18/2025 10:34 PM latest d----- 3/16/2025 5:47 AM migration_1742104049.479849 d----- 3/17/2025 9:18 PM migration_1742246303.18056 d----- 3/17/2025 9:22 PM migration_1742246546.565739 ... d----- 3/18/2025 10:34 PM migration_1742337258.30742
latest 符号链接始终指向最近创建的迁移构件目录。除了相关的应用程序和错误日志外,每个迁移构件目录还包含可以部署到 Elastic Beanstalk 的 upload_target.zip 文件。
PS C:\migrations_workspace>ls .\migrations\latest\Mode LastWriteTime Length Name ---- ------------- ------ ---- d----- 3/18/2025 10:34 PM upload_target -a---- 3/18/2025 10:34 PM 13137 application.log -a---- 3/18/2025 10:34 PM 0 error.log -a---- 3/18/2025 10:34 PM 1650642 upload_target.zip
可以使用 eb migrate 部署 upload_target.zip 文件:
PS C:\migrations_workspace>eb migrate --zip .\migrations\latest\upload_target.zip