Virtual private clouds
Amazon Virtual Private Cloud (Amazon VPC) enables you to define a virtual network in your own logically isolated area within the Amazon cloud, known as a virtual private cloud or VPC. You can create Amazon resources, such as Amazon EC2 instances, into the subnets of your VPC. Your VPC closely resembles a traditional network that you might operate in your own data center, with the benefits of using scalable infrastructure from Amazon. You can configure your VPC; you can select its IP address range, create subnets, and configure route tables, network gateways, and security settings. You can connect instances in your VPC to the internet or to your own data center.
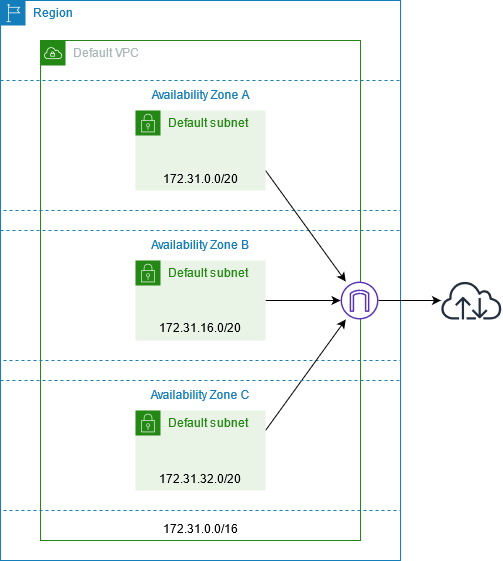
Your default VPCs
When you create your Amazon account, we create a default VPC in each Region. A default VPC is a VPC that is already configured and ready for you to use. For example, there is a default subnet for each Availability Zone in each default VPC, an internet gateway attached to the VPC, and there's a route in the main route table that sends all traffic (0.0.0.0/0) to the internet gateway. Alternatively, you can create your own VPC and configure it to meet your needs.
Create additional VPCs
Use the following procedure to create a VPC with the subnets, gateways, and routing configuration that you need.
To create a VPC
Open the Amazon VPC console at https://console.amazonaws.cn/vpc/
. -
Choose Create VPC.
-
Under Resources to create, choose VPC and more.
-
For Name tag auto-generation, enter a name for the VPC.
-
For IPv4 CIDR block, either keep the default suggestion, enter the CIDR block required by your application or network.
-
For Number of Availability Zones, choose 2, so that you can launch instances in multiple Availability Zones to ensure high availability.
-
If your instances must be accessible from the internet, do one of the following:
-
If your instances can be in a public subnet, select a nonzero value for Number of public subnets. Keep both options under DNS options selected. You can optionally add private subnets now or later on.
-
If your instances must be in a private subnet, select 0 for Number of public subnets. For Number of private subnets, select a number depending on your needs (the possible values correspond to 1 or 2 private subnets per Availability Zone). For NAT gateways, if your instances in both Availability Zones send or receive a significant volume of traffic across Availability Zones, select 1 per AZ. Otherwise, select In 1 AZ and launch instances that send or receive cross-zone traffic in the same Availability Zone as the NAT gateway.
-
-
Expand Customize subnet CIDR blocks. Either keep the default suggestions, or enter a CIDR block for each subnet. For more information, see Subnet CIDR blocks in the Amazon VPC User Guide.
-
Review the Preview pane, which shows the VPC resources that will be created based on your selections.
-
Choose Create VPC.
Access the internet from your instances
Instances launched into a default subnet in a default VPC have access to the internet, as default VPCs are configured to assign public IP addresses and DNS hostnames, and the main route table is configured with a route to an internet gateway attached to the VPC.
For instances that you launch in nondefault subnets and VPCs, you can use one of the following options to ensure that the instances that you launch in these subnets have access to the internet:
-
Configure an internet gateway. For more information, see Connect to the internet using an internet gateway in the Amazon VPC User Guide.
-
Configure a public NAT gateway. For more information, see Access the internet from a private subnet in the Amazon VPC User Guide.
Shared subnets
When launching EC2 instances into shared VPC subnets, note the following:
-
Participants can run instances in a shared subnet by specifying the ID of the shared subnet. Participants must own any security groups or network interfaces that they specify.
-
Participants can start, stop, terminate, and describe instances that they've created in a shared subnet. Participants can't start, stop, terminate, or describe instances that the VPC owner created in the shared subnet.
-
VPC owners can't start, stop, terminate, or describe instances created by participants in a shared subnet.
-
Participants can connect to an instance in a shared subnet using EC2 Instance Connect Endpoint. The participant must create the EC2 Instance Connect Endpoint in the shared subnet. Participants can't use an EC2 Instance Connect Endpoint that the VPC owner created in the shared subnet.
For more information see, Share your VPC with other accounts in the Amazon VPC User Guide.
IPv6-only subnets
An EC2 instance launched in an IPv6-only subnet receives an IPv6 address but not an IPv4 address. Any instances that you launch into an IPv6-only subnet must be instances built on the Amazon Nitro System.
RDP access to your instances
To connect to an instance, you must authorize RDP traffic to the instance from your network.
You must also specify a key pair when you launch the instance and specify the
.pem file when you connect to the instance. For more
information, see Prerequisites.