Physical migration from MySQL by using Percona XtraBackup and Amazon S3
You can copy the full and incremental backup files from your source MySQL version 5.7 or 8.0 database to an Amazon S3 bucket. Then you can restore to an Amazon Aurora MySQL DB cluster with the same major DB engine version from those files.
This option can be considerably faster than migrating data using mysqldump, because using
mysqldump replays all of the commands to recreate the schema and data from your source database in your new
Aurora MySQL DB cluster. By copying your source MySQL data files, Aurora MySQL can immediately use those files as the data for
an Aurora MySQL DB cluster.
You can also minimize downtime by using binary log replication during the migration process. If you use binary log replication, the external MySQL database remains open to transactions while the data is being migrated to the Aurora MySQL DB cluster. After the Aurora MySQL DB cluster has been created, you use binary log replication to synchronize the Aurora MySQL DB cluster with the transactions that happened after the backup. When the Aurora MySQL DB cluster is caught up with the MySQL database, you finish the migration by completely switching to the Aurora MySQL DB cluster for new transactions. For more information, see Synchronizing the Amazon Aurora MySQL DB cluster with the MySQL database using replication.
Contents
- Limitations and considerations
- Before you begin
- Backing up files to be restored as an Amazon Aurora MySQL DB cluster
- Restoring an Amazon Aurora MySQL DB cluster from an Amazon S3 bucket
- Synchronizing the Amazon Aurora MySQL DB cluster with the MySQL database using replication
- Reducing the time for physical migration to Amazon Aurora MySQL
Limitations and considerations
The following limitations and considerations apply to restoring to an Amazon Aurora MySQL DB cluster from an Amazon S3 bucket:
-
You can migrate your data only to a new DB cluster, not an existing DB cluster.
-
You must use Percona XtraBackup to back up your data to S3. For more information, see Installing Percona XtraBackup.
-
The Amazon S3 bucket and the Aurora MySQL DB cluster must be in the same Amazon Region.
-
You can't restore from the following:
-
A DB cluster snapshot export to Amazon S3. You also can't migrate data from a DB cluster snapshot export to your S3 bucket.
-
An encrypted source database, but you can encrypt the data being migrated. You can also leave the data unencrypted during the migration process.
-
A MySQL 5.5 or 5.6 database
-
-
Percona Server for MySQL isn't supported as a source database, because it can contain
compression_dictionary*tables in themysqlschema. -
You can't restore to an Aurora Serverless DB cluster.
-
Backward migration isn't supported for either major versions or minor versions. For example, you can't migrate from MySQL version 8.0 to Aurora MySQL version 2 (compatible with MySQL 5.7), and you can't migrate from MySQL version 8.0.32 to Aurora MySQL version 3.03, which is compatible with MySQL community version 8.0.26.
-
You can't migrate to Aurora MySQL version 3.05 and higher from some older MySQL 8.0 versions, including 8.0.11, 8.0.13, and 8.0.15. We recommend that you upgrade to MySQL version 8.0.28 before migrating.
-
Importing from Amazon S3 isn't supported on the db.t2.micro DB instance class. However, you can restore to a different DB instance class, and change the DB instance class later. For more information about DB instance classes, see Aurora DB instance classes.
-
Amazon S3 limits the size of a file uploaded to an S3 bucket to 5 TB. If a backup file exceeds 5 TB, then you must split the backup file into smaller files.
-
Amazon RDS limits the number of files uploaded to an S3 bucket to 1 million. If the backup data for your database, including all full and incremental backups, exceeds 1 million files, use a Gzip (.gz), tar (.tar.gz), or Percona xbstream (.xbstream) file to store full and incremental backup files in the S3 bucket. Percona XtraBackup 8.0 only supports Percona xbstream for compression.
-
To provide management services for each DB cluster, the
rdsadminuser is created when the DB cluster is created. As this is a reserved user in RDS, the following limitations apply:-
Functions, procedures, views, events, and triggers with the
'rdsadmin'@'localhost'definer aren't imported. For more information, see Stored objects with 'rdsadmin'@'localhost' as the definer and Master user privileges with Amazon Aurora MySQL. -
When the Aurora MySQL DB cluster is created, a master user is created with the maximum privileges supported. While restoring from backup, any unsupported privileges assigned to users being imported are removed automatically during import.
To identify users that might be affected by this, see User accounts with unsupported privileges. For more information on supported privileges in Aurora MySQL, see Role-based privilege model.
-
-
For Aurora MySQL version 3, dynamic privileges aren't imported. Aurora-supported dynamic privileges can be imported after migration. For more information, see Dynamic privileges in Aurora MySQL version 3.
-
User-created tables in the
mysqlschema aren't migrated. -
The
innodb_data_file_pathparameter must be configured with only one data file that uses the default data file nameibdata1:12M:autoextend. Databases with two data files, or with a data file with a different name, can't be migrated using this method.The following are examples of file names that aren't allowed:
innodb_data_file_path=ibdata1:50M,ibdata2:50M:autoextend, andinnodb_data_file_path=ibdata01:50M:autoextend. -
You can't migrate from a source database that has tables defined outside of the default MySQL data directory.
-
The maximum supported size for uncompressed backups using this method is currently limited to 64 TiB. For compressed backups, this limit goes lower to account for the uncompression space requirements. In such cases, the maximum supported backup size would be (
64 TiB – compressed backup size). -
Aurora MySQL doesn't support the importing of MySQL and other external components and plugins.
-
Aurora MySQL doesn't restore everything from your database. We recommend that you save the database schema and values for the following items from your source MySQL database, then add them to your restored Aurora MySQL DB cluster after it has been created:
-
User accounts
-
Functions
-
Stored procedures
-
Time zone information. Time zone information is loaded from the local operating system of your Aurora MySQL DB cluster. For more information, see Local time zone for Amazon Aurora DB clusters.
-
Before you begin
Before you can copy your data to an Amazon S3 bucket and restore to a DB cluster from those files, you must do the following:
-
Install Percona XtraBackup on your local server.
-
Permit Aurora MySQL to access your Amazon S3 bucket on your behalf.
Installing Percona XtraBackup
Amazon Aurora can restore a DB cluster from files that were created using Percona XtraBackup. You can install Percona
XtraBackup from Software Downloads - Percona
For MySQL 5.7 migration, use Percona XtraBackup 2.4.
For MySQL 8.0 migration, use Percona XtraBackup 8.0. Make sure that the Percona XtraBackup version is compatible with the engine version of your source database.
Required permissions
To migrate your MySQL data to an Amazon Aurora MySQL DB cluster, several permissions are required:
-
The user that is requesting that Aurora create a new cluster from an Amazon S3 bucket must have permission to list the buckets for your Amazon account. You grant the user this permission using an Amazon Identity and Access Management (IAM) policy.
-
Aurora requires permission to act on your behalf to access the Amazon S3 bucket where you store the files used to create your Amazon Aurora MySQL DB cluster. You grant Aurora the required permissions using an IAM service role.
-
The user making the request must also have permission to list the IAM roles for your Amazon account.
-
If the user making the request is to create the IAM service role or request that Aurora create the IAM service role (by using the console), then the user must have permission to create an IAM role for your Amazon account.
-
If you plan to encrypt the data during the migration process, update the IAM policy of the user who will perform the migration to grant RDS access to the Amazon KMS keys used for encrypting the backups. For instructions, see Creating an IAM policy to access Amazon KMS resources.
For example, the following IAM policy grants a user the minimum required permissions to use the console to list IAM roles, create an IAM role, list the Amazon S3 buckets for your account, and list the KMS keys.
{
    "Version": "2012-10-17",
    "Statement": [
        {
            "Effect": "Allow",
            "Action": [
                "iam:ListRoles",
                "iam:CreateRole",
                "iam:CreatePolicy",
                "iam:AttachRolePolicy",
                "s3:ListBucket",
                "kms:ListKeys"
            ],
            "Resource": "*"
        }
    ]
}
Additionally, for a user to associate an IAM role with an Amazon S3 bucket, the IAM user must have the
iam:PassRole permission for that IAM role. This permission allows an administrator to restrict
which IAM roles a user can associate with Amazon S3 buckets.
For example, the following IAM policy allows a user to associate the role named S3Access with an
Amazon S3 bucket.
{
    "Version":"2012-10-17",
    "Statement":[
        {
            "Sid":"AllowS3AccessRole",
            "Effect":"Allow",
            "Action":"iam:PassRole",
            "Resource":"arn:aws-cn:iam::123456789012:role/S3Access"
        }
    ]
}
For more information on IAM user permissions, see Managing access using policies.
Creating the IAM service role
You can have the Amazon Web Services Management Console create a role for you by choosing the Create a New Role option (shown later in this topic). If you select this option and specify a name for the new role, then Aurora creates the IAM service role required for Aurora to access your Amazon S3 bucket with the name that you supply.
As an alternative, you can manually create the role using the following procedure.
To create an IAM role for Aurora to access Amazon S3
-
Complete the steps in Creating an IAM policy to access Amazon S3 resources.
-
Complete the steps in Creating an IAM role to allow Amazon Aurora to access Amazon services.
-
Complete the steps in Associating an IAM role with an Amazon Aurora MySQL DB cluster.
Backing up files to be restored as an Amazon Aurora MySQL DB cluster
You can create a full backup of your MySQL database files using Percona XtraBackup and upload the backup files to an Amazon S3 bucket. Alternatively, if you already use Percona XtraBackup to back up your MySQL database files, you can upload your existing full and incremental backup directories and files to an Amazon S3 bucket.
Topics
Creating a full backup with Percona XtraBackup
To create a full backup of your MySQL database files that can be restored from Amazon S3 to create an Aurora MySQL DB
cluster, use the Percona XtraBackup utility (xtrabackup) to back up your database.
For example, the following command creates a backup of a MySQL database and stores the files in the
/on-premises/s3-restore/backup folder.
xtrabackup --backup --user=<myuser>--password=<password>--target-dir=</on-premises/s3-restore/backup>
If you want to compress your backup into a single file (which can be split, if needed), you can use the
--stream option to save your backup in one of the following formats:
-
Gzip (.gz)
-
tar (.tar)
-
Percona xbstream (.xbstream)
The following command creates a backup of your MySQL database split into multiple Gzip files.
xtrabackup --backup --user=<myuser>--password=<password>--stream=tar \ --target-dir=</on-premises/s3-restore/backup>| gzip - | split -d --bytes=500MB \ -</on-premises/s3-restore/backup/backup>.tar.gz
The following command creates a backup of your MySQL database split into multiple tar files.
xtrabackup --backup --user=<myuser>--password=<password>--stream=tar \ --target-dir=</on-premises/s3-restore/backup>| split -d --bytes=500MB \ -</on-premises/s3-restore/backup/backup>.tar
The following command creates a backup of your MySQL database split into multiple xbstream files.
xtrabackup --backup --user=<myuser>--password=<password>--stream=xbstream \ --target-dir=</on-premises/s3-restore/backup>| split -d --bytes=500MB \ -</on-premises/s3-restore/backup/backup>.xbstream
Note
If you see the following error, it might be caused by mixing file formats in your command:
ERROR:/bin/tar: This does not look like a tar archive
Once you have backed up your MySQL database using the Percona XtraBackup utility, you can copy your backup directories and files to an Amazon S3 bucket.
For information on creating and uploading a file to an Amazon S3 bucket, see Getting started with Amazon Simple Storage Service in the Amazon S3 Getting Started Guide.
Using incremental backups with Percona XtraBackup
Amazon Aurora MySQL supports both full and incremental backups created using Percona XtraBackup. If you already use
Percona XtraBackup to perform full and incremental backups of your MySQL database files, you don't need to create a
full backup and upload the backup files to Amazon S3. Instead, you can save a significant amount of time by copying your
existing backup directories and files for your full and incremental backups to an Amazon S3 bucket. For more information,
see Create an
incremental backup
When copying your existing full and incremental backup files to an Amazon S3 bucket, you must recursively copy the
contents of the base directory. Those contents include the full backup and also all incremental backup directories
and files. This copy must preserve the directory structure in the Amazon S3 bucket. Aurora iterates through all files and
directories. Aurora uses the xtrabackup-checkpoints file included with each incremental backup
to identify the base directory and to order incremental backups by log sequence number (LSN) range.
For information on creating and uploading a file to an Amazon S3 bucket, see Getting started with Amazon Simple Storage Service in the Amazon S3 Getting Started Guide.
Backup considerations
Aurora doesn't support partial backups created using Percona XtraBackup. You can't use the following options
to create a partial backup when you back up the source files for your database: --tables,
--tables-exclude, --tables-file, --databases,
--databases-exclude, or --databases-file.
For more information about backing up your database with Percona XtraBackup, see Percona XtraBackup -
Documentation
Aurora supports incremental backups created using Percona XtraBackup. For more information, see Create an incremental
backup
Aurora consumes your backup files based on the file name. Be sure to name your backup files with the appropriate
file extension based on the file format—for example, .xbstream for files stored using the
Percona xbstream format.
Aurora consumes your backup files in alphabetical order and also in natural number order. Always use the
split option when you issue the xtrabackup command to ensure that your backup files
are written and named in the proper order.
Amazon S3 limits the size of a file uploaded to an Amazon S3 bucket to 5 TB. If the backup data for your database exceeds 5
TB, use the split command to split the backup files into multiple files that are each less than 5
TB.
Aurora limits the number of source files uploaded to an Amazon S3 bucket to 1 million files. In some cases, backup data for your database, including all full and incremental backups, can come to a large number of files. In these cases, use a tarball (.tar.gz) file to store full and incremental backup files in the Amazon S3 bucket.
When you upload a file to an Amazon S3 bucket, you can use server-side encryption to encrypt the data. You can then restore an Amazon Aurora MySQL DB cluster from those encrypted files. Amazon Aurora MySQL can restore a DB cluster with files encrypted using the following types of server-side encryption:
-
Server-side encryption with Amazon S3–managed keys (SSE-S3) – Each object is encrypted with a unique key employing strong multifactor encryption.
-
Server-side encryption with Amazon KMS–managed keys (SSE-KMS) – Similar to SSE-S3, but you have the option to create and manage encryption keys yourself, and also other differences.
For information about using server-side encryption when uploading files to an Amazon S3 bucket, see Protecting data using server-side encryption in the Amazon S3 Developer Guide.
Restoring an Amazon Aurora MySQL DB cluster from an Amazon S3 bucket
You can restore your backup files from your Amazon S3 bucket to create a new Amazon Aurora MySQL DB cluster by using the Amazon RDS console.
To restore an Amazon Aurora MySQL DB cluster from files on an Amazon S3 bucket
Sign in to the Amazon Web Services Management Console and open the Amazon RDS console at https://console.amazonaws.cn/rds/
. -
In the top right corner of the Amazon RDS console, choose the Amazon Region in which to create your DB cluster. Choose the same Amazon Region as the Amazon S3 bucket that contains your database backup.
-
In the navigation pane, choose Databases, and then choose Restore from S3.
-
Choose Restore from S3.
The Create database by restoring from S3 page appears.

-
Under S3 destination:
-
Choose the S3 bucket that contains the backup files.
-
(Optional) For S3 folder path prefix, enter a file path prefix for the files stored in your Amazon S3 bucket.
If you don't specify a prefix, then RDS creates your DB instance using all of the files and folders in the root folder of the S3 bucket. If you do specify a prefix, then RDS creates your DB instance using the files and folders in the S3 bucket where the path for the file begins with the specified prefix.
For example, suppose that you store your backup files on S3 in a subfolder named backups, and you have multiple sets of backup files, each in its own directory (gzip_backup1, gzip_backup2, and so on). In this case, you specify a prefix of backups/gzip_backup1 to restore from the files in the gzip_backup1 folder.
-
-
Under Engine options:
-
For Engine type, choose Amazon Aurora.
-
For Version, choose the Aurora MySQL engine version for your restored DB instance.
-
-
For IAM role, you can choose an existing IAM role.
-
(Optional) You can also have a new IAM role created for you by choosing Create a new role. If so:
-
Enter the IAM role name.
-
Choose whether to Allow access to KMS key:
-
If you didn't encrypt the backup files, choose No.
-
If you encrypted the backup files with AES-256 (SSE-S3) when you uploaded them to Amazon S3, choose No. In this case, the data is decrypted automatically.
-
If you encrypted the backup files with Amazon KMS (SSE-KMS) server-side encryption when you uploaded them to Amazon S3, choose Yes. Next, choose the correct KMS key for Amazon KMS key.
The Amazon Web Services Management Console creates an IAM policy that enables Aurora to decrypt the data.
For more information, see Protecting data using server-side encryption in the Amazon S3 Developer Guide.
-
-
-
Choose settings for your DB cluster, such as the DB cluster storage configuration, DB instance class, DB cluster identifier, and login credentials. For information about each setting, see Settings for Aurora DB clusters.
-
Customize additional settings for your Aurora MySQL DB cluster as needed.
-
Choose Create database to launch your Aurora DB instance.
On the Amazon RDS console, the new DB instance appears in the list of DB instances. The DB instance has a status of creating until the DB instance is created and ready for use. When the state changes to available, you can connect to the primary instance for your DB cluster. Depending on the DB instance class and store allocated, it can take several minutes for the new instance to be available.
To view the newly created cluster, choose the Databases view in the Amazon RDS console and choose the DB cluster. For more information, see Viewing an Amazon Aurora DB cluster.
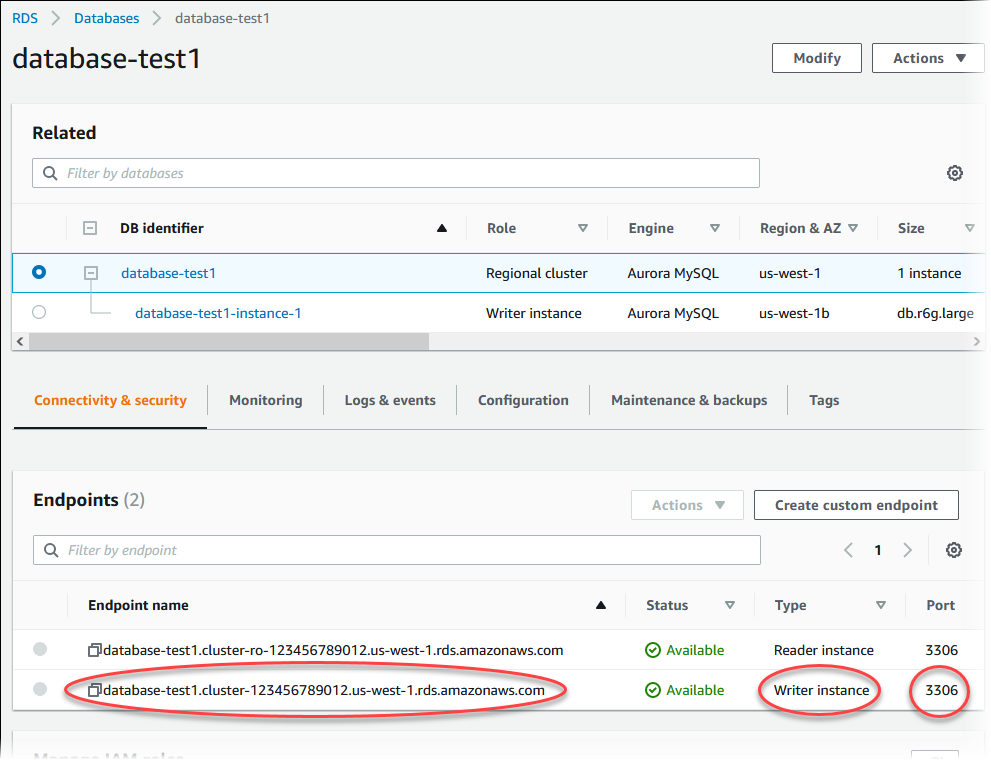
Note the port and the writer endpoint of the DB cluster. Use the writer endpoint and port of the DB cluster in your JDBC and ODBC connection strings for any application that performs write or read operations.
Synchronizing the Amazon Aurora MySQL DB cluster with the MySQL database using replication
To achieve little or no downtime during the migration, you can replicate transactions that were committed on your MySQL database to your Aurora MySQL DB cluster. Replication enables the DB cluster to catch up with the transactions on the MySQL database that happened during the migration. When the DB cluster is completely caught up, you can stop the replication and finish the migration to Aurora MySQL.
Topics
Configuring your external MySQL database and your Aurora MySQL DB cluster for encrypted replication
To replicate data securely, you can use encrypted replication.
Note
If you don't need to use encrypted replication, you can skip these steps and move on to the instructions in Synchronizing the Amazon Aurora MySQL DB cluster with the external MySQL database.
The following are prerequisites for using encrypted replication:
-
Secure Sockets Layer (SSL) must be enabled on the external MySQL primary database.
-
A client key and client certificate must be prepared for the Aurora MySQL DB cluster.
During encrypted replication, the Aurora MySQL DB cluster acts a client to the MySQL database server. The certificates and keys for the Aurora MySQL client are in files in .pem format.
To configure your external MySQL database and your Aurora MySQL DB cluster for encrypted replication
-
Ensure that you are prepared for encrypted replication:
-
If you don't have SSL enabled on the external MySQL primary database and don't have a client key and client certificate prepared, enable SSL on the MySQL database server and generate the required client key and client certificate.
-
If SSL is enabled on the external primary, supply a client key and certificate for the Aurora MySQL DB cluster. If you don't have these, generate a new key and certificate for the Aurora MySQL DB cluster. To sign the client certificate, you must have the certificate authority key that you used to configure SSL on the external MySQL primary database.
For more information, see Creating SSL certificates and keys using openssl
in the MySQL documentation. You need the certificate authority certificate, the client key, and the client certificate.
-
-
Connect to the Aurora MySQL DB cluster as the primary user using SSL.
For information about connecting to an Aurora MySQL DB cluster with SSL, see Using TLS with Aurora MySQL DB clusters.
-
Run the mysql.rds_import_binlog_ssl_material stored procedure to import the SSL information into the Aurora MySQL DB cluster.
For the
ssl_material_valueparameter, insert the information from the .pem format files for the Aurora MySQL DB cluster in the correct JSON payload.The following example imports SSL information into an Aurora MySQL DB cluster. In .pem format files, the body code typically is longer than the body code shown in the example.
call mysql.rds_import_binlog_ssl_material(
'{"ssl_ca":"-----BEGIN CERTIFICATE-----
AAAAB3NzaC1yc2EAAAADAQABAAABAQClKsfkNkuSevGj3eYhCe53pcjqP3maAhDFcvBS7O6V
hz2ItxCih+PnDSUaw+WNQn/mZphTk/a/gU8jEzoOWbkM4yxyb/wB96xbiFveSFJuOp/d6RJhJOI0iBXr
lsLnBItntckiJ7FbtxJMXLvvwJryDUilBMTjYtwB+QhYXUMOzce5Pjz5/i8SeJtjnV3iAoG/cQk+0FzZ
qaeJAAHco+CY/5WrUBkrHmFJr6HcXkvJdWPkYQS3xqC0+FmUZofz221CBt5IMucxXPkX4rWi+z7wB3Rb
BQoQzd8v7yeb7OzlPnWOyN0qFU0XA246RA8QFYiCNYwI3f05p6KLxEXAMPLE
-----END CERTIFICATE-----\n","ssl_cert":"-----BEGIN CERTIFICATE-----
AAAAB3NzaC1yc2EAAAADAQABAAABAQClKsfkNkuSevGj3eYhCe53pcjqP3maAhDFcvBS7O6V
hz2ItxCih+PnDSUaw+WNQn/mZphTk/a/gU8jEzoOWbkM4yxyb/wB96xbiFveSFJuOp/d6RJhJOI0iBXr
lsLnBItntckiJ7FbtxJMXLvvwJryDUilBMTjYtwB+QhYXUMOzce5Pjz5/i8SeJtjnV3iAoG/cQk+0FzZ
qaeJAAHco+CY/5WrUBkrHmFJr6HcXkvJdWPkYQS3xqC0+FmUZofz221CBt5IMucxXPkX4rWi+z7wB3Rb
BQoQzd8v7yeb7OzlPnWOyN0qFU0XA246RA8QFYiCNYwI3f05p6KLxEXAMPLE
-----END CERTIFICATE-----\n","ssl_key":"-----BEGIN RSA PRIVATE KEY-----
AAAAB3NzaC1yc2EAAAADAQABAAABAQClKsfkNkuSevGj3eYhCe53pcjqP3maAhDFcvBS7O6V
hz2ItxCih+PnDSUaw+WNQn/mZphTk/a/gU8jEzoOWbkM4yxyb/wB96xbiFveSFJuOp/d6RJhJOI0iBXr
lsLnBItntckiJ7FbtxJMXLvvwJryDUilBMTjYtwB+QhYXUMOzce5Pjz5/i8SeJtjnV3iAoG/cQk+0FzZ
qaeJAAHco+CY/5WrUBkrHmFJr6HcXkvJdWPkYQS3xqC0+FmUZofz221CBt5IMucxXPkX4rWi+z7wB3Rb
BQoQzd8v7yeb7OzlPnWOyN0qFU0XA246RA8QFYiCNYwI3f05p6KLxEXAMPLE
-----END RSA PRIVATE KEY-----\n"}');
For more information, see mysql.rds_import_binlog_ssl_material and Using TLS with Aurora MySQL DB clusters.
Note
After running the procedure, the secrets are stored in files. To erase the files later, you can run the mysql.rds_remove_binlog_ssl_material stored procedure.
Synchronizing the Amazon Aurora MySQL DB cluster with the external MySQL database
You can synchronize your Amazon Aurora MySQL DB cluster with the MySQL database using replication.
To synchronize your Aurora MySQL DB cluster with the MySQL database using replication
-
Ensure that the /etc/my.cnf file for the external MySQL database has the relevant entries.
If encrypted replication is not required, ensure that the external MySQL database is started with binary logs (binlogs) enabled and SSL disabled. The following are the relevant entries in the /etc/my.cnf file for unencrypted data.
log-bin=mysql-bin
server-id=2133421
innodb_flush_log_at_trx_commit=1
sync_binlog=1
If encrypted replication is required, ensure that the external MySQL database is started with SSL and binlogs enabled. The entries in the /etc/my.cnf file include the .pem file locations for the MySQL database server.
log-bin=mysql-bin
server-id=2133421
innodb_flush_log_at_trx_commit=1
sync_binlog=1

# Setup SSL.
ssl-ca=/home/sslcerts/ca.pem
ssl-cert=/home/sslcerts/server-cert.pem
ssl-key=/home/sslcerts/server-key.pem
You can verify that SSL is enabled with the following command.
mysql>show variables like 'have_ssl';Your output should be similar the following.
+~-~-~-~-~-~-~-~-~-~-~-~-~-~--+~-~-~-~-~-~--+ | Variable_name | Value | +~-~-~-~-~-~-~-~-~-~-~-~-~-~--+~-~-~-~-~-~--+ | have_ssl | YES | +~-~-~-~-~-~-~-~-~-~-~-~-~-~--+~-~-~-~-~-~--+ 1 row in set (0.00 sec) -
Determine the starting binary log position for replication. You specify the position to start replication in a later step.
Using the Amazon Web Services Management Console
Sign in to the Amazon Web Services Management Console and open the Amazon RDS console at https://console.amazonaws.cn/rds/
. -
In the navigation pane, choose Events.
-
In the Events list, note the position in the Recovered from Binary log filename event.

Using the Amazon CLI
You can also get the binlog file name and position by using the describe-events Amazon CLI command. The following shows an example
describe-eventscommand.PROMPT> aws rds describe-eventsIn the output, identify the event that shows the binlog position.
-
While connected to the external MySQL database, create a user to be used for replication. This account is used solely for replication and must be restricted to your domain to improve security. The following is an example.
mysql>CREATE USER '<user_name>'@'<domain_name>' IDENTIFIED BY '<password>';The user requires the
REPLICATION CLIENTandREPLICATION SLAVEprivileges. Grant these privileges to the user.GRANT REPLICATION CLIENT, REPLICATION SLAVE ON *.* TO '<user_name>'@'<domain_name>';If you need to use encrypted replication, require SSL connections for the replication user. For example, you can use the following statement to require SSL connections on the user account
<user_name>GRANT USAGE ON *.* TO '<user_name>'@'<domain_name>' REQUIRE SSL;Note
If
REQUIRE SSLis not included, the replication connection might silently fall back to an unencrypted connection. -
In the Amazon RDS console, add the IP address of the server that hosts the external MySQL database to the VPC security group for the Aurora MySQL DB cluster. For more information on modifying a VPC security group, see Security groups for your VPC in the Amazon Virtual Private Cloud User Guide.
You might also need to configure your local network to permit connections from the IP address of your Aurora MySQL DB cluster, so that it can communicate with your external MySQL database. To find the IP address of the Aurora MySQL DB cluster, use the
hostcommand.host<db_cluster_endpoint>The host name is the DNS name from the Aurora MySQL DB cluster endpoint.
-
Enable binary log replication by running the mysql.rds_reset_external_master (Aurora MySQL version 2) or mysql.rds_reset_external_source (Aurora MySQL version 3) stored procedure. This stored procedure has the following syntax.
CALL mysql.rds_set_external_master (
  host_name
  , host_port
  , replication_user_name
  , replication_user_password
  , mysql_binary_log_file_name
  , mysql_binary_log_file_location
  , ssl_encryption
);

CALL mysql.rds_set_external_source (
  host_name
  , host_port
  , replication_user_name
  , replication_user_password
  , mysql_binary_log_file_name
  , mysql_binary_log_file_location
  , ssl_encryption
);
For information about the parameters, see mysql.rds_reset_external_master (Aurora MySQL version 2) and mysql.rds_reset_external_source (Aurora MySQL version 3).
For
mysql_binary_log_file_nameandmysql_binary_log_file_location, use the position in the Recovered from Binary log filename event you noted earlier.If the data in the Aurora MySQL DB cluster is not encrypted, the
ssl_encryptionparameter must be set to0. If the data is encrypted, thessl_encryptionparameter must be set to1.The following example runs the procedure for an Aurora MySQL DB cluster that has encrypted data.
CALL mysql.rds_set_external_master(
  'Externaldb.some.com',
  3306,
  'repl_user'@'mydomain.com',
  'password',
  'mysql-bin.000010',
  120,
  1);

CALL mysql.rds_set_external_source(
  'Externaldb.some.com',
  3306,
  'repl_user'@'mydomain.com',
  'password',
  'mysql-bin.000010',
  120,
  1);
This stored procedure sets the parameters that the Aurora MySQL DB cluster uses for connecting to the external MySQL database and reading its binary log. If the data is encrypted, it also downloads the SSL certificate authority certificate, client certificate, and client key to the local disk.
-
Start binary log replication by running the mysql.rds_start_replication stored procedure.
CALL mysql.rds_start_replication; -
Monitor how far the Aurora MySQL DB cluster is behind the MySQL replication primary database. To do so, connect to the Aurora MySQL DB cluster and run the following command.
Aurora MySQL version 2:
SHOW SLAVE STATUS;

Aurora MySQL version 3:
SHOW REPLICA STATUS;
In the command output, the
Seconds Behind Masterfield shows how far the Aurora MySQL DB cluster is behind the MySQL primary. When this value is0(zero), the Aurora MySQL DB cluster has caught up to the primary, and you can move on to the next step to stop replication. -
Connect to the MySQL replication primary database and stop replication. To do so, run the mysql.rds_stop_replication stored procedure.
CALL mysql.rds_stop_replication;