Amazon Redshift will no longer support the creation of new Python UDFs starting Patch 198.
Existing Python UDFs will continue to function until June 30, 2026. For more information, see the
blog post
Conduct a proof of concept (POC) for Amazon Redshift
Amazon Redshift is a popular cloud data warehouse, which offers a fully managed cloud-based service that integrates with an organization’s Amazon Simple Storage Service data lake, real-time streams, machine learning (ML) workflows, transactional workflows, and much more. The following sections guide you through the process of doing a proof of concept (POC) on Amazon Redshift. The information here helps you set goals for your POC, and takes advantage of tools that can automate the provisioning and configuration of services for your POC.
Note
For a copy of this information as a PDF, choose the link Run your own Redshift POC on the
Amazon Redshift resources
When doing a POC of Amazon Redshift, you test, prove out, and adopt features ranging from best-in-class security capabilities, elastic scaling, easy integration and ingestion, and flexible decentralized data architecture options.

Follow the these steps to conduct a successful POC.
Step 1: Scope your POC

When conducting a POC, you can either choose to use your own data, or you can choose to use benchmarking datasets. When you choose your own data you run your own queries against the data. With benchmarking data, sample queries are provided with the benchmark. See Use sample datasets for more details if you are not ready to conduct a POC with your own data just yet.
In general, we recommend using two weeks of data for an Amazon Redshift POC.
Start by doing the following:
Identify your business and functional requirements, then work backwards. Common examples are: faster performance, lower costs, test a new workload or feature, or comparison between Amazon Redshift and another data warehouse.
Set specific targets which become the success criteria for the POC. For example, from faster performance, come up with a list of the top five processes you wish to accelerate, and include the current run times along with your required run time. These can be reports, queries, ETL processes, data ingestion, or whatever your current pain points are.
Identify the specific scope and artifacts needed to run the tests. What datasets do you need to migrate or continuously ingest into Amazon Redshift, and what queries and processes are needed to run the tests to measure against the success criteria? There are two ways to do this:
Bring your own data
To test your own data, come up with the minimum viable list of data artifacts which is required to test for your success criteria. For example, if your current data warehouse has 200 tables, but the reports you want to test only need 20, your POC can be run faster by using only the smaller subset of tables.
Use sample datasets
If you don’t have your own datasets ready, you can still get started doing a POC on Amazon Redshift by using the industry-standard benchmark datasets such as TPC-DS
or TPC-H and run sample benchmarking queries to harness the power of Amazon Redshift. These datasets can be accessed from within your Amazon Redshift data warehouse after it is created. For detailed instructions on how to access these datasets and sample queries, see Step 2: Launch Amazon Redshift.
Step 2: Launch Amazon Redshift

Amazon Redshift accelerates your time to insights with fast, easy, and secure cloud data warehousing at scale.
You can start quickly by launching your warehouse on the Redshift Serverless console
Set up Amazon Redshift Serverless
The first time you use Redshift Serverless, the console leads you through the steps required to launch your warehouse.
You might also be eligible for a credit towards your Redshift Serverless usage in your account.
For more information about choosing a free trial, see Amazon Redshift free trial
If you have previously launched Redshift Serverless in your account, follow the steps in Creating a workgroup with a namespace in the Amazon Redshift Management Guide. After your warehouse is available, you can opt to load the sample data available in Amazon Redshift. For information about using Amazon Redshift query editor v2 to load data, see Loading sample data in the Amazon Redshift Management Guide.
If you are bringing your own data instead of loading the sample data set, see Step 3: Load your data.
Step 3: Load your data

After launching Redshift Serverless, the next step is to load your data for the POC. Whether you are uploading a simple CSV file, ingesting semi-structured data from S3, or streaming data directly, Amazon Redshift provides the flexibility to quickly and easily move the data into Amazon Redshift tables from the source.
Choose one of the following methods to load your data.
Upload a local file
For quick ingestion and analysis, you can use
Amazon Redshift query editor v2
to easily load data files from your local desktop.
It has the capability to process files in various formats such as CSV, JSON, AVRO, PARQUET, ORC, and more.
To enable your users, as an administrator, to load data from a local desktop using query editor v2 you have to specify a common Amazon S3 bucket,
and the user account must be
configured with the proper permissions.
You can follow Data load made easy and secure in Amazon Redshift using Query Editor V2
Load an Amazon S3 file
To load data from an Amazon S3 bucket into Amazon Redshift, begin by using the COPY command, specifying the source Amazon S3 location and target Amazon Redshift table. Ensure that the IAM roles and permissions are properly configured to allow Amazon Redshift access to the designated Amazon S3 bucket. Follow Tutorial: Loading data from Amazon S3 for step-by-step guidance. You can also choose the Load data option in query editor v2 to directly load data from your S3 bucket.
Continuous data ingestion
Autocopy (in preview) is an extension of the COPY command and automates continuous data loading from Amazon S3 buckets. When you create a copy job, Amazon Redshift detects when new Amazon S3 files are created in a specified path, and then loads them automatically without your intervention. Amazon Redshift keeps track of the loaded files to verify that they are loaded only one time. For instructions on how to create copy jobs, see COPY JOB
Note
Autocopy is currently in preview and supported only in provisioned clusters in specific Amazon Web Services Regions. To create a preview cluster for autocopy, see Create an S3 event integration to automatically copy files from Amazon S3 buckets.
Load your streaming data
Streaming ingestion provides low-latency, high-speed ingestion of stream data from
Amazon Kinesis Data Streams
Step 4: Analyze your data

After creating your Redshift Serverless workgroup and namespace, and loading your data, you can immediately run queries by opening the Query editor v2 from the
navigation panel of the Redshift Serverless console
Query using Amazon Redshift query editor v2
You can access query editor v2 from the Amazon Redshift console.
See Simplify your data analysis with Amazon Redshift query editor v2
Alternatively, if you want to run a load test as part of your POC, you can do this by the following steps to install and run Apache JMeter.
Run a load test using Apache JMeter
To perform a load test to simulate “N” users submitting queries concurrently to Amazon Redshift, you can use
Apache JMeter
To install and configure Apache JMeter to run against your Redshift Serverless workgroup, follow the instructions in
Automate Amazon Redshift load testing with the Amazon Analytics Automation Toolkit
After you complete customizing your SQL statements and finalizing your test plan,
save and run your test plan against your Redshift Serverless workgroup.
To monitor the progress of your test, open the Redshift Serverless console
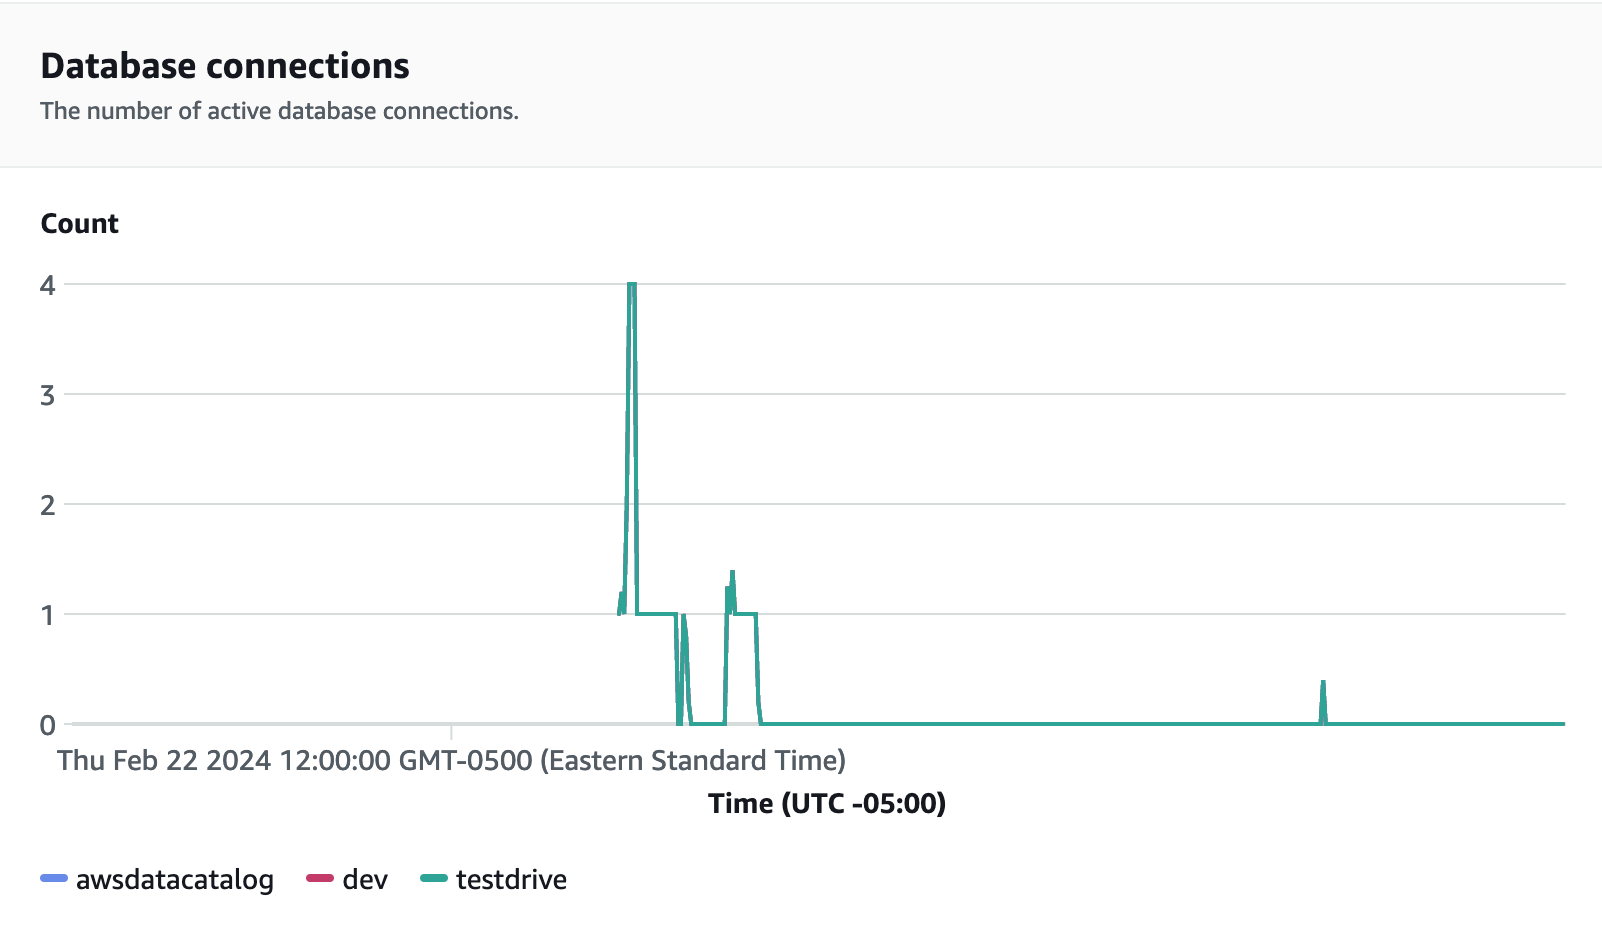
For performance metrics, choose the Database performance tab on the Redshift Serverless console, to monitor metrics such as Database Connections and CPU utilization. Here you can view a graph to monitor the RPU capacity used and observe how Redshift Serverless automatically scales to meet concurrent workload demands while the load test is running on your workgroup.

Database connections is another useful metric to monitor while running the load test to see how your workgroup is handling numerous concurrent connections at a given time to meet the increasing workload demands.
Step 5: Optimize

Amazon Redshift empowers tens of thousands of users to process exabytes of data every day and power their analytics workloads by offering a variety of configurations and features to support individual use cases. When choosing between these options, customers are looking for tools that help them determine the most optimal data warehouse configuration to support their Amazon Redshift workload.
Test drive
You can use Test Drive