Moving resources between stacks
Using the resource import feature, you can move resources between, or
refactor, stacks. You need to first add a Retain
deletion policy to the resource you want to move to ensure that the resource is preserved
when you remove it from the source stack and import it to the target stack.
If you're new to importing, we recommend that you first review the introductory information in the Import Amazon resources into a CloudFormation stack topic.
Important
Not all resources support import operations. See Resources that support import operations before you remove a resource from your stack. If you remove a resource that doesn't support import operations from your stack, you can't import the resource into another stack or bring it back into the source stack.
Refactor a stack using the Amazon Web Services Management Console
-
In the source template, specify a
RetainDeletionPolicy for the resource you want to move.In the following example source template,
Gamesis the target of this refactor.Example JSON
{ "AWSTemplateFormatVersion": "2010-09-09", "Description": "Import test", "Resources": { "ServiceTable":{ "Type":"AWS::DynamoDB::Table", "Properties":{ "TableName":"Service", "AttributeDefinitions":[ { "AttributeName":"key", "AttributeType":"S" } ], "KeySchema":[ { "AttributeName":"key", "KeyType":"HASH" } ], "ProvisionedThroughput":{ "ReadCapacityUnits":5, "WriteCapacityUnits":1 } } }, "GamesTable": { "Type": "AWS::DynamoDB::Table", "DeletionPolicy": "Retain", "Properties": { "TableName": "Games", "AttributeDefinitions": [ { "AttributeName": "key", "AttributeType": "S" } ], "KeySchema": [ { "AttributeName": "key", "KeyType": "HASH" } ], "ProvisionedThroughput": { "ReadCapacityUnits": 5, "WriteCapacityUnits": 1 } } } } } -
Open the CloudFormation console to perform a stack update to apply the deletion policy.
-
On the Stacks page, with the stack selected, choose Update.
-
Under Prepare template, choose Replace current template.
-
Under Specify template, provide the updated source template with the
DeletionPolicyattribute onGamesTable, and then choose Next.-
Choose Amazon S3 URL, and then specify the URL to the updated source template in the text box.
-
Choose Upload a template file, and then browse for the updated source template file.
-
-
On the Specify stack details page, no changes are required. Choose Next.
-
On the Configure stack options page, no changes are required. Choose Next.
-
On the Review
SourceStackNamepage, review your changes. If your template contains IAM resources, select I acknowledge that this template may create IAM resources to specify that you want to use IAM resources in the template. For more information about using IAM resources in templates, see Control CloudFormation access with Amazon Identity and Access Management. Then, either update your source stack by creating a change set or update your source stack directly.
-
-
Remove the resource, related parameters, and outputs from the source template, and then add them to the target template.
The source template now looks like the following.
Example JSON
{
    "AWSTemplateFormatVersion": "2010-09-09",
    "Description": "Import test",
    "Resources": {
        "ServiceTable":{
           "Type":"AWS::DynamoDB::Table",
           "Properties":{
              "TableName":"Service",
              "AttributeDefinitions":[
                 {
                    "AttributeName":"key",
                    "AttributeType":"S"
                 }
              ],
              "KeySchema":[
                 {
                    "AttributeName":"key",
                    "KeyType":"HASH"
                 }
              ],
              "ProvisionedThroughput":{
                 "ReadCapacityUnits":5,
                 "WriteCapacityUnits":1
              }
           }
        }
    }
}
The following example target template currently has the
PlayersTableresource, and now also containsGamesTable.Example JSON
{ "AWSTemplateFormatVersion": "2010-09-09", "Description": "Import test", "Resources": { "PlayersTable": { "Type": "AWS::DynamoDB::Table", "Properties": { "TableName": "Players", "AttributeDefinitions": [ { "AttributeName": "key", "AttributeType": "S" } ], "KeySchema": [ { "AttributeName": "key", "KeyType": "HASH" } ], "ProvisionedThroughput": { "ReadCapacityUnits": 5, "WriteCapacityUnits": 1 } } }, "GamesTable": { "Type": "AWS::DynamoDB::Table", "DeletionPolicy": "Retain", "Properties": { "TableName": "Games", "AttributeDefinitions": [ { "AttributeName": "key", "AttributeType": "S" } ], "KeySchema": [ { "AttributeName": "key", "KeyType": "HASH" } ], "ProvisionedThroughput": { "ReadCapacityUnits": 5, "WriteCapacityUnits": 1 } } } } } -
Repeat steps 2 – 3 to update the source stack again, this time to delete the target resource from the stack.
-
Perform an import operation to add
GamesTableto the target stack.-
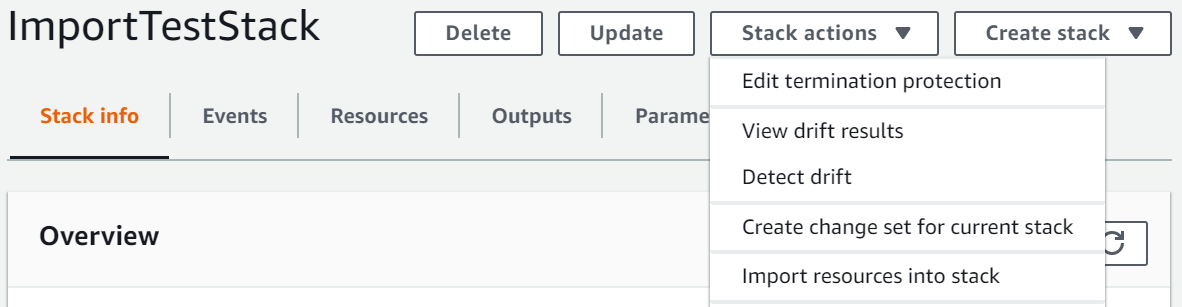
On the Stacks page, with the parent stack selected, choose Stack actions, and then choose Import resources into stack.
-
Read the Import overview page for a list of things you're required to provide during this operation. Then, choose Next.
-
On the Specify template page, complete one of the following, and then choose Next.
-
Choose Amazon S3 URL, and then specify a URL in the text box.
-
Choose Upload a template file, and then browse for a file to upload.
-
-
On the Identify resources page, identify the resource you're moving (in this example,
GamesTable). For more information, see Resource identifiers.-
Under Identifier property, choose the type of resource identifier. For example, an
AWS::DynamoDB::Tableresource can be identified using theTableNameproperty. -
Under Identifier value, type the actual property value. For example,
GamesTables -
Choose Next.
-
-
On the Specify stack details page, modify any parameters, and then choose Next. This automatically creates a change set.
Important
The import operation fails if you modify existing parameters that initiate a create, update, or delete operation.
-
On the Review
TargetStackNamepage, confirm that the correct resource is being imported, and then choose Import resources. This automatically initiates the change set created in the last step. Any stack-level tags are applied to imported resources at this time. -
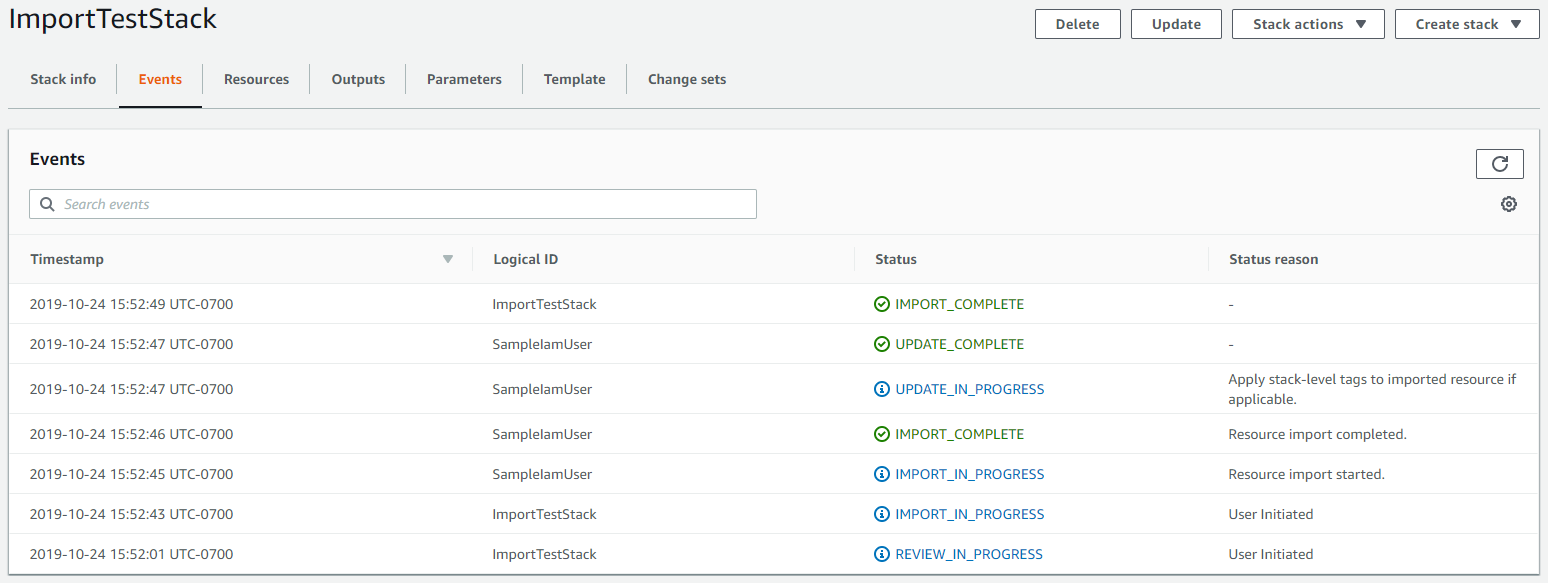
The Events pane of the Stack details page for your parent stack displays.
Note
It's not necessary to run drift detection on the parent stack after this import operation because the
AWS::CloudFormation::Stackresource is already managed by CloudFormation.
-
Refactor a stack using the Amazon CLI
-
In the source template, specify a
RetainDeletionPolicy for the resource you want to move.In the following example source template,
GamesTableis the target of this refactor.Example JSON
{ "AWSTemplateFormatVersion": "2010-09-09", "Description": "Import test", "Resources": { "ServiceTable":{ "Type":"AWS::DynamoDB::Table", "Properties":{ "TableName":"Service", "AttributeDefinitions":[ { "AttributeName":"key", "AttributeType":"S" } ], "KeySchema":[ { "AttributeName":"key", "KeyType":"HASH" } ], "ProvisionedThroughput":{ "ReadCapacityUnits":5, "WriteCapacityUnits":1 } } }, "GamesTable": { "Type": "AWS::DynamoDB::Table", "DeletionPolicy": "Retain", "Properties": { "TableName": "Games", "AttributeDefinitions": [ { "AttributeName": "key", "AttributeType": "S" } ], "KeySchema": [ { "AttributeName": "key", "KeyType": "HASH" } ], "ProvisionedThroughput": { "ReadCapacityUnits": 5, "WriteCapacityUnits": 1 } } } } } -
Update the source stack to apply the deletion policy to the resource.
aws cloudformation update-stack --stack-nameSourceStackName -
Remove the resource, related parameters, and outputs from the source template, and then add them to the target template.
The source template now looks like the following.
Example JSON
{
    "AWSTemplateFormatVersion": "2010-09-09",
    "Description": "Import test",
    "Resources": {
        "ServiceTable":{
           "Type":"AWS::DynamoDB::Table",
           "Properties":{
              "TableName":"Service",
              "AttributeDefinitions":[
                 {
                    "AttributeName":"key",
                    "AttributeType":"S"
                 }
              ],
              "KeySchema":[
                 {
                    "AttributeName":"key",
                    "KeyType":"HASH"
                 }
              ],
              "ProvisionedThroughput":{
                 "ReadCapacityUnits":5,
                 "WriteCapacityUnits":1
              }
           }
        }
    }
}
The following example target template currently has the
PlayersTableresource, and now also containsGamesTable.Example JSON
{ "AWSTemplateFormatVersion": "2010-09-09", "Description": "Import test", "Resources": { "PlayersTable": { "Type": "AWS::DynamoDB::Table", "Properties": { "TableName": "Players", "AttributeDefinitions": [ { "AttributeName": "key", "AttributeType": "S" } ], "KeySchema": [ { "AttributeName": "key", "KeyType": "HASH" } ], "ProvisionedThroughput": { "ReadCapacityUnits": 5, "WriteCapacityUnits": 1 } } }, "GamesTable": { "Type": "AWS::DynamoDB::Table", "DeletionPolicy": "Retain", "Properties": { "TableName": "Games", "AttributeDefinitions": [ { "AttributeName": "key", "AttributeType": "S" } ], "KeySchema": [ { "AttributeName": "key", "KeyType": "HASH" } ], "ProvisionedThroughput": { "ReadCapacityUnits": 5, "WriteCapacityUnits": 1 } } } } } -
Update the source stack to delete the
GamesTableresource and its related parameters and outputs from the stack.aws cloudformation update-stack --stack-nameSourceStackName -
Compose a list of actual resources to import and their unique identifiers in the following JSON string format. For more information, see Resource identifiers.
[{"ResourceType":"AWS::DynamoDB::Table","LogicalResourceId":"GamesTable","ResourceIdentifier":{"TableName":"Games"}}]Alternatively, you can specify the JSON-formatted parameters in a configuration file.
For example, to import
GamesTable, you might create aResourcesToImport.txtfile that contains the following configuration.[ { "ResourceType":"AWS::DynamoDB::Table", "LogicalResourceId":"GamesTable", "ResourceIdentifier": { "TableName":"Games" } } ] -
To create a change set, use the following create-change-set command and replace the placeholder text. For the
--change-set-typeoption, specify a value ofIMPORT. For the--resources-to-importoption, replace the sample JSON string with the actual JSON string you just created.aws cloudformation create-change-set \ --stack-nameTargetStackName--change-set-nameImportChangeSet\ --change-set-typeIMPORT\ --template-bodyfile://TemplateToImport.json\ --resources-to-import "'[{"ResourceType":"AWS::DynamoDB::Table","LogicalResourceId":"GamesTable","ResourceIdentifier":{"TableName":"Games"}}]'"Note
--resources-to-importdoesn't support inline YAML. The requirements for escaping quotes in the JSON string vary depending on your terminal. For more information, see Using quotation marks inside strings in the Amazon Command Line Interface User Guide.Alternatively, you can use a file URL as input for the
--resources-to-importoption, as shown in the following example.--resources-to-importfile://ResourcesToImport.txt -
Review the change set to make sure the correct resource is being imported into the target stack.
aws cloudformation describe-change-set \ --change-set-nameImportChangeSet -
To initiate the change set and import the resource, use the following execute-change-set command and replace the placeholder text. Any stack-level tags are applied to imported resources at this time. On successful completion of the operation
(IMPORT_COMPLETE), the resource is successfully imported.aws cloudformation execute-change-set \ --change-set-nameImportChangeSet--stack-nameTargetStackNameNote
It's not necessary to run drift detection on the target stack after this import operation because the resource is already managed by CloudFormation.