Configure secondary private IPv4 addresses for Windows instances
You can specify multiple private IPv4 addresses for your instances. After you assign a secondary private IPv4 address to an instance, you must configure the operating system on the instance to recognize the secondary private IPv4 address.
Note
These instructions are based on Windows Server 2022. The implementation of these steps might vary based on the operating system of the Windows instance.
Tasks
Prerequisites
-
Assign the secondary private IPv4 address to the network interface for the instance. You can assign the secondary private IPv4 address when you launch the instance, or after the instance is running. For more information, see Assign secondary IP addresses to an instance.
Step 1: Configure static IP addressing in your instance
To enable your Windows instance to use multiple IP addresses, you must configure your instance to use static IP addressing rather than a DHCP server.
Important
When you configure static IP addressing in your instance, the IP address must match exactly what is shown in the console, CLI, or API. If you enter these IP addresses incorrectly, the instance could become unreachable.
To configure static IP addressing on a Windows instance
-
Connect to your instance.
-
Find the IP address, subnet mask, and default gateway addresses for the instance by performing the following steps:
-
Run the following command in PowerShell:
ipconfig /allReview the output and note the IPv4 Address, Subnet Mask, Default Gateway, and DNS Servers values for the network interface. Your output should resemble the following example:
... Ethernet adapter Ethernet 4: Connection-specific DNS Suffix . : us-west-2.compute.internal Description . . . . . . . . . . . : Amazon Elastic Network Adapter #2 Physical Address. . . . . . . . . : 02-9C-3B-FC-8E-67 DHCP Enabled. . . . . . . . . . . : Yes Autoconfiguration Enabled . . . . : Yes Link-local IPv6 Address . . . . . : fe80::f4d1:a773:5afa:cd1%7(Preferred) IPv4 Address. . . . . . . . . . . :10.200.0.128(Preferred) Subnet Mask . . . . . . . . . . . :255.255.255.0Lease Obtained. . . . . . . . . . : Monday, April 8, 2024 12:19:29 PM Lease Expires . . . . . . . . . . : Monday, April 8, 2024 4:49:30 PM Default Gateway . . . . . . . . . :10.200.0.1DHCP Server . . . . . . . . . . . : 10.200.0.1 DHCPv6 IAID . . . . . . . . . . . : 151166011 DHCPv6 Client DUID. . . . . . . . : 00-01-00-01-2D-67-AC-FC-12-34-9A-BE-A5-E7 DNS Servers . . . . . . . . . . . :10.200.0.2NetBIOS over Tcpip. . . . . . . . : Enabled
-
-
Open the Network and Sharing Center by running the following command in PowerShell:
& $env:SystemRoot\system32\control.exe ncpa.cpl -
Open the context (right-click) menu for the network interface (Local Area Connection or Ethernet) and choose Properties.
-
Choose Internet Protocol Version 4 (TCP/IPv4), Properties.
-
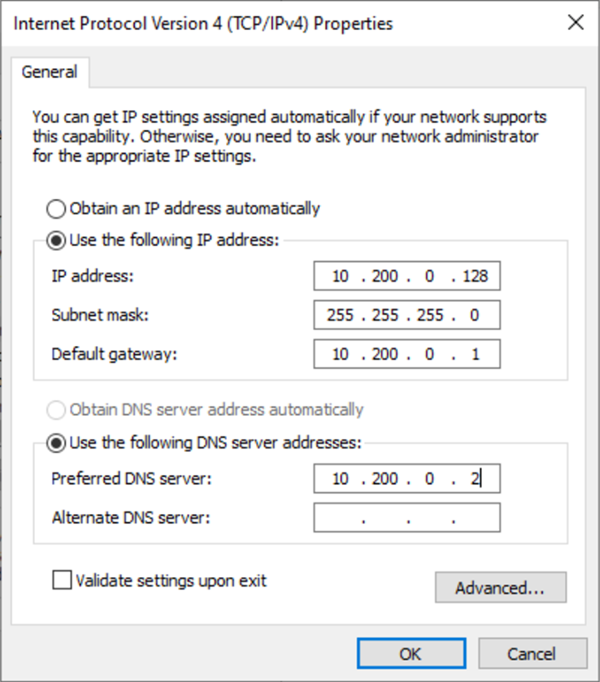
In the Internet Protocol Version 4 (TCP/IPv4) Properties dialog box, choose Use the following IP address, enter the following values, and then choose OK.
Field Value IP address The IPv4 address obtained in step 2 above. Subnet mask The subnet mask obtained in step 2 above. Default gateway The default gateway address obtained in step 2 above. Preferred DNS server The DNS server obtained in step 2 above. Alternate DNS server The alternate DNS server obtained in step 2 above. If an alternate DNS server was not listed, leave this field blank. Important
If you set the IP address to any value other than the current IP address, you will lose connectivity to the instance.
You will lose RDP connectivity to the Windows instance for a few seconds while the instance converts from using DHCP to static addressing. The instance retains the same IP address information as before, but now this information is static and not managed by DHCP.
Step 2: Configure a secondary private IP address for your instance
After you have set up static IP addressing on your Windows instance, you are ready to prepare a second private IP address.
To configure a secondary IP address
Open the Amazon EC2 console at https://console.amazonaws.cn/ec2/
. -
In the navigation pane, choose Instances and select your instance.
-
On the Networking, note the secondary IP address.
-
Connect to your instance.
-
On your Windows instance, choose Start, Control Panel.
-
Choose Network and Internet, Network and Sharing Center.
-
Select the network interface (Local Area Connection or Ethernet) and choose Properties.
-
On the Local Area Connection Properties page, choose Internet Protocol Version 4 (TCP/IPv4), Properties, Advanced.
-
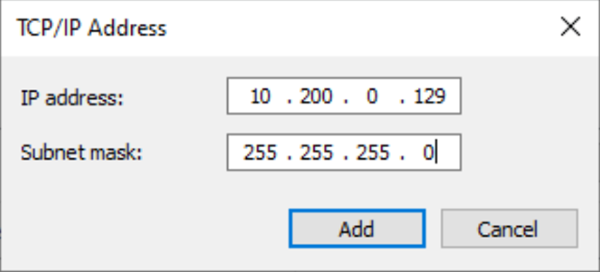
Choose Add.
-
In the TCP/IP Address dialog box, type the secondary private IP address for IP address. For Subnet mask, type the same subnet mask that you entered for the primary private IP address in Step 1: Configure static IP addressing in your instance, and then choose Add.
-
Verify the IP address settings and choose OK.
-
Choose OK, Close.
-
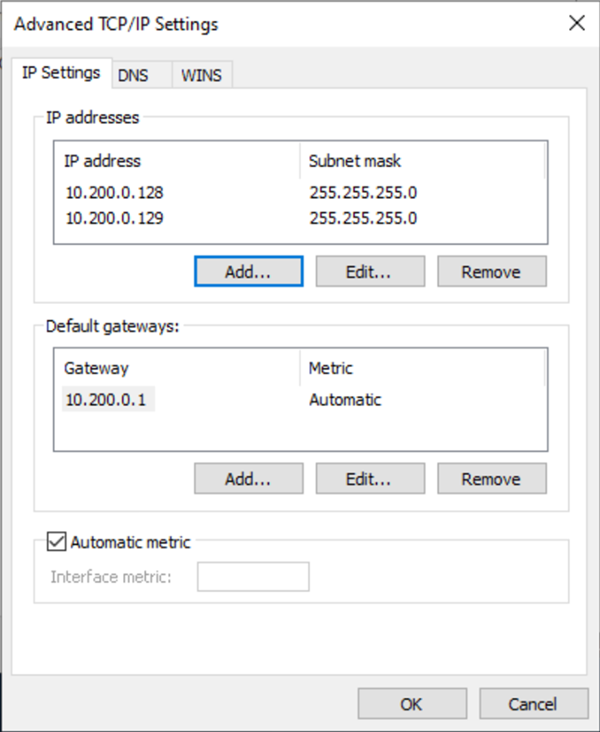
To confirm that the secondary IP address has been added to the operating system, run the
ipconfig /allcommand in PowerShell. Your output should resemble the following:Ethernet adapter Ethernet 4: Connection-specific DNS Suffix . : Description . . . . . . . . . . . : Amazon Elastic Network Adapter #2 Physical Address. . . . . . . . . : 02-9C-3B-FC-8E-67 DHCP Enabled. . . . . . . . . . . : No Autoconfiguration Enabled . . . . : Yes Link-local IPv6 Address . . . . . : fe80::f4d1:a773:5afa:cd1%7(Preferred) IPv4 Address. . . . . . . . . . . :10.200.0.128(Preferred) Subnet Mask . . . . . . . . . . . : 255.255.255.0 IPv4 Address. . . . . . . . . . . :10.200.0.129(Preferred) Subnet Mask . . . . . . . . . . . : 255.255.255.0 Default Gateway . . . . . . . . . : 10.200.0.1 DHCPv6 IAID . . . . . . . . . . . : 151166011 DHCPv6 Client DUID. . . . . . . . : 00-01-00-01-2D-67-AC-FC-12-34-9A-BE-A5-E7 DNS Servers . . . . . . . . . . . : 10.200.0.2 NetBIOS over Tcpip. . . . . . . . : Enabled
Step 3: Configure applications to Use the secondary private IP address
You can configure any applications to use the secondary private IP address. For example, if your instance is running a website on IIS, you can configure IIS to use the secondary private IP address.
To configure IIS to use the secondary private IP address
-
Connect to your instance.
-
Open Internet Information Services (IIS) Manager.
-
In the Connections pane, expand Sites.
-
Open the context (right-click) menu for your website and choose Edit Bindings.
-
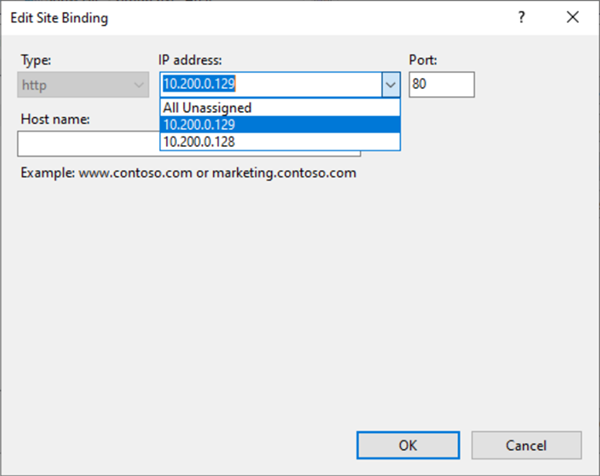
In the Site Bindings dialog box, for Type, choose http, Edit.
-
In the Edit Site Binding dialog box, for IP address, select the secondary private IP address. (By default, each website accepts HTTP requests from all IP addresses.)
-
Choose OK, Close.