Troubleshoot your Amazon EC2 instance using the EC2 Serial Console
By using EC2 Serial Console, you can troubleshoot boot, network configuration, and other issues by connecting to your instance's serial port.
Use the instructions for your instance's operating system and for the tool you've configured on your instance.
Prerequisites
Before you begin, make sure you have completed the prerequisites, including configuring your chosen troubleshooting tool.
(Linux instances) Use GRUB to troubleshoot your instance
GNU GRUB (short for GNU GRand Unified Bootloader, commonly referred to as GRUB) is the default boot loader for most Linux operating systems. From the GRUB menu, you can select which kernel to boot into, or modify menu entries to change how the kernel will boot. This can be useful when troubleshooting a failing instance.
The GRUB menu is displayed during the boot process. The menu is not accessible via normal SSH, but you can access it using the EC2 Serial Console.
You can boot into single user mode or emergency mode. Single user mode will boot the kernel at a lower runlevel. For example, it might mount the filesystem but not activate the network, giving you the opportunity to perform the maintenance necessary to fix the instance. Emergency mode is similar to single user mode except that the kernel runs at the lowest runlevel possible.
To boot into single user mode
-
Connect to the instance's serial console.
-
Reboot the instance using the following command.
[ec2-user ~]$sudo reboot -
During reboot, when the GRUB menu appears, press any key to stop the boot process.
-
In the GRUB menu, use the arrow keys to select the kernel to boot into, and press
eon your keyboard. -
Use the arrow keys to locate your cursor on the line containing the kernel. The line begins with either
linuxorlinux16depending on the AMI that was used to launch the instance. For Ubuntu, two lines begin withlinux, which must both be modified in the next step. -
At the end of the line, add the word
single.The following is an example for Amazon Linux 2.
linux /boot/vmlinuz-4.14.193-149.317.amzn2.aarch64 root=UUID=d33f9c9a-\ dadd-4499-938d-ebbf42c3e499 ro console=tty0 console=ttyS0,115200n8 net.ifname\ s=0 biosdevname=0 nvme_core.io_timeout=4294967295 rd.emergency=poweroff rd.she\ ll=0 single -
Press Ctrl+X to boot into single user mode.
-
At the
loginprompt, enter the username of the password-based user that you set up previously, and then press Enter. -
At the
Passwordprompt, enter the password, and then press Enter.
To boot into emergency mode
Follow the same steps as single user mode, but at step 6, add the word
emergency instead of single.
(Linux instances) Use SysRq to troubleshoot your instance
The System Request (SysRq) key, which is sometimes referred to as "magic SysRq", can be
used to directly send the kernel a command, outside of a shell, and the kernel will respond,
regardless of what the kernel is doing. For example, if the instance has stopped responding,
you can use the SysRq key to tell the kernel to crash or reboot. For more information, see
Magic SysRq key
You can use SysRq commands in the EC2 Serial Console browser-based client or in an SSH client. The command to send a break request is different for each client.
To use SysRq, choose one of the following procedures based on the client that you are using.
(Windows instances) Use SAC to troubleshoot your instance
The Special Admin Console (SAC) capability of Windows provides a way to troubleshoot a Windows instance. By connecting to the instance's serial console and using SAC, you can interrupt the boot process and boot Windows in safe mode.
Note
If you enable SAC on an instance, the EC2 services that rely on password retrieval will not work from the Amazon EC2 console. Windows on Amazon EC2 launch agents (EC2Config, EC2Launch v1, and EC2Launch v2) rely on the serial console to execute various tasks. These tasks do not perform successfully when you enable SAC on an instance. For more information about Windows on Amazon EC2 launch agents, see Configure your Amazon EC2 Windows instance. If you enable SAC, you can disable it later. For more information, see Disable SAC and the boot menu.
Use SAC
To use SAC
-
Connect to the serial console.
If SAC is enabled on the instance, the serial console displays the
SAC>prompt.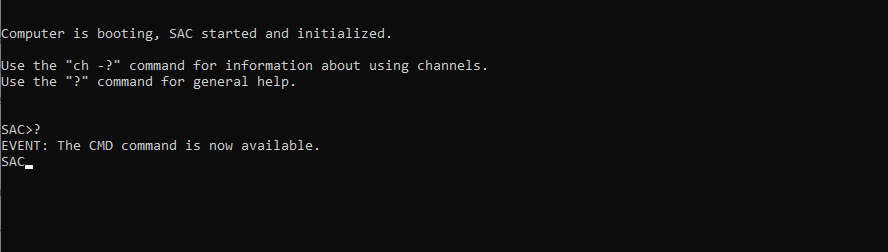
-
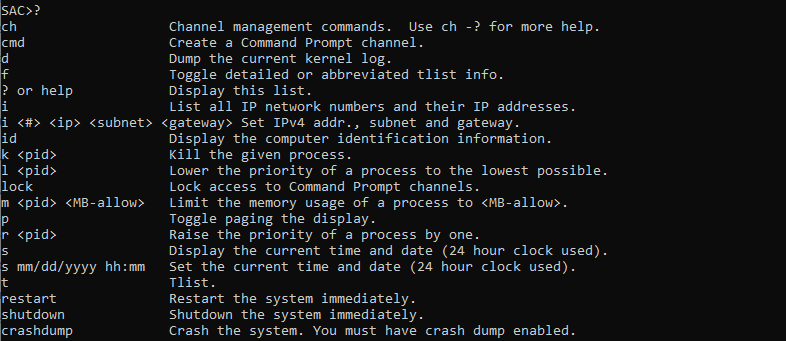
To display the SAC commands, enter ?, and then press Enter.
Expected output
-
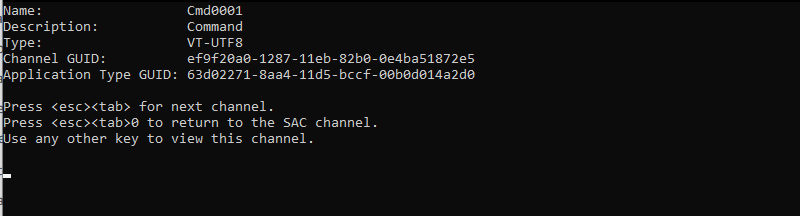
To create a command prompt channel (such as
cmd0001orcmd0002), enter cmd, and then press Enter. -
To view the command prompt channel, press ESC, and then press TAB.
Expected output
-
To switch channels, press ESC+TAB+channel number together. For example, to switch to the
cmd0002channel (if it has been created), press ESC+TAB+2. -
Enter the credentials required by the command prompt channel.

The command prompt is the same full-featured command shell that you get on a desktop, but with the exception that it does not allow the reading of characters that were already output.
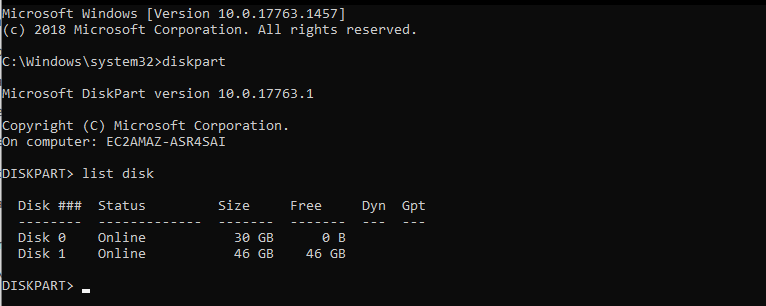
PowerShell can also be used from the command prompt.
Note that you might need to set the progress preference to silent mode.

Use the boot menu
If the instance has the boot menu enabled and is restarted after connecting through SSH, you should see the boot menu, as follows.

Boot menu commands
- ENTER
-
Starts the selected entry of the operating system.
- TAB
-
Switches to the Tools menu.
- ESC
-
Cancels and restarts the instance.
- ESC followed by 8
-
Equivalent to pressing F8. Shows advanced options for the selected item.
- ESC key + left arrow
-
Goes back to the initial boot menu.
The ESC key alone does not take you back to the main menu because Windows is waiting to see if an escape sequence is in progress.

Disable SAC and the boot menu
If you enable SAC and the boot menu, you can disable these features later.
Use one of the following methods to disable SAC and the boot menu on an instance.