Run commands when you launch an EC2 instance with user data input
When you launch an Amazon EC2 instance, you can pass user data to the instance that is used to perform automated configuration tasks, or to run scripts after the instance starts.
If you're interested in more complex automation scenarios, you might consider Amazon CloudFormation. For more information, see Deploying applications on Amazon EC2 with Amazon CloudFormation in the Amazon CloudFormation User Guide.
On Linux instances, you can pass two types of user data to Amazon EC2: shell scripts and cloud-init directives. You can also pass this data into the launch instance wizard as plain text, as a file (this is useful for launching instances with the command line tools), or as base64-encoded text (for API calls).
On Windows instances, the launch agents handle your user data scripts.
Considerations
-
User data is treated as opaque data: what you give is what you get back. It is up to the instance to interpret it.
-
User data must be base64-encoded. The Amazon EC2 console can perform the base64-encoding for your or accept base64-encoded input. If you retrieve the user data using instance metadata or the console, it's base64-decoded for you automatically.
-
User data is limited to 16 KB, in raw form, before it is base64-encoded. The size of a string of length n after base64-encoding is ceil(n/3)*4.
-
User data is an instance attribute. If you create an AMI from an instance, the instance user data is not included in the AMI.
User data in the Amazon Web Services Management Console
You can specify instance user data when you launch the instance. If the root volume of the instance is an EBS volume, you can also stop the instance and update its user data.
Specify instance user data at launch with the Launch Wizard
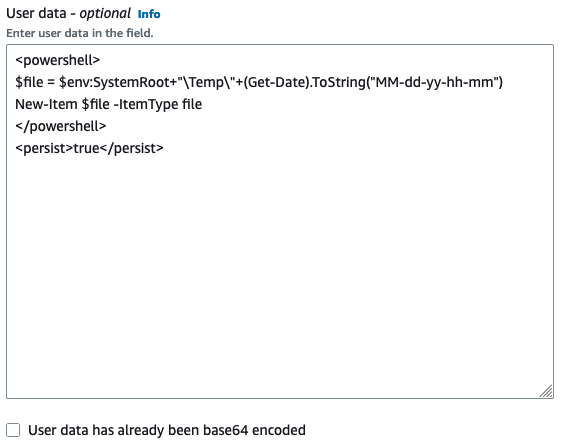
You can specify user data when you launch an instance with the Launch Wizard in the EC2 console. To specify user data on launch, follow the procedure for launching an instance. The User data field is located in the Advanced details section of the launch instance wizard. Enter your PowerShell script in the User data field, and then complete the instance launch procedure.
In the following screenshot of the User data field, the example script
creates a file in the Windows temporary folder, using the current date and time in
the file name. When you include <persist>true</persist>,
the script is run every time you reboot or start the instance. If you leave the
User data has already been base64 encoded checkbox empty,
the Amazon EC2 console performs the base64 encoding for you.
For more information, see Specify instance user data at launch with the Launch Wizard. For a Linux example that uses the Amazon CLI, see User data and the Amazon CLI. For a Windows example that uses the Tools for Windows PowerShell, see User data and the Tools for Windows PowerShell.
View and update the instance user data
You can view the instance user data for any instance, and you can update the instance user data for a stopped instance.
To update the user data for an instance using the console
-
Open the Amazon EC2 console at https://console.amazonaws.cn/ec2/
. -
In the navigation pane, choose Instances.
-
Select the instance and choose Actions, Instance state, Stop instance.
Warning
When you stop an instance, the data on instance store volumes is lost. To preserve this data, back it up to persistent storage.
-
When prompted for confirmation, choose Stop. It can take a few minutes for the instance to stop.
-
With the instance still selected, choose Actions, Instance settings, Edit user data. You can't change the user data if the instance is running, but you can view it.
-
In the Edit user data dialog box, update the user data, and then choose Save. To run user data scripts every time you reboot or start the instance, add
<persist>true</persist>, as shown in the following example: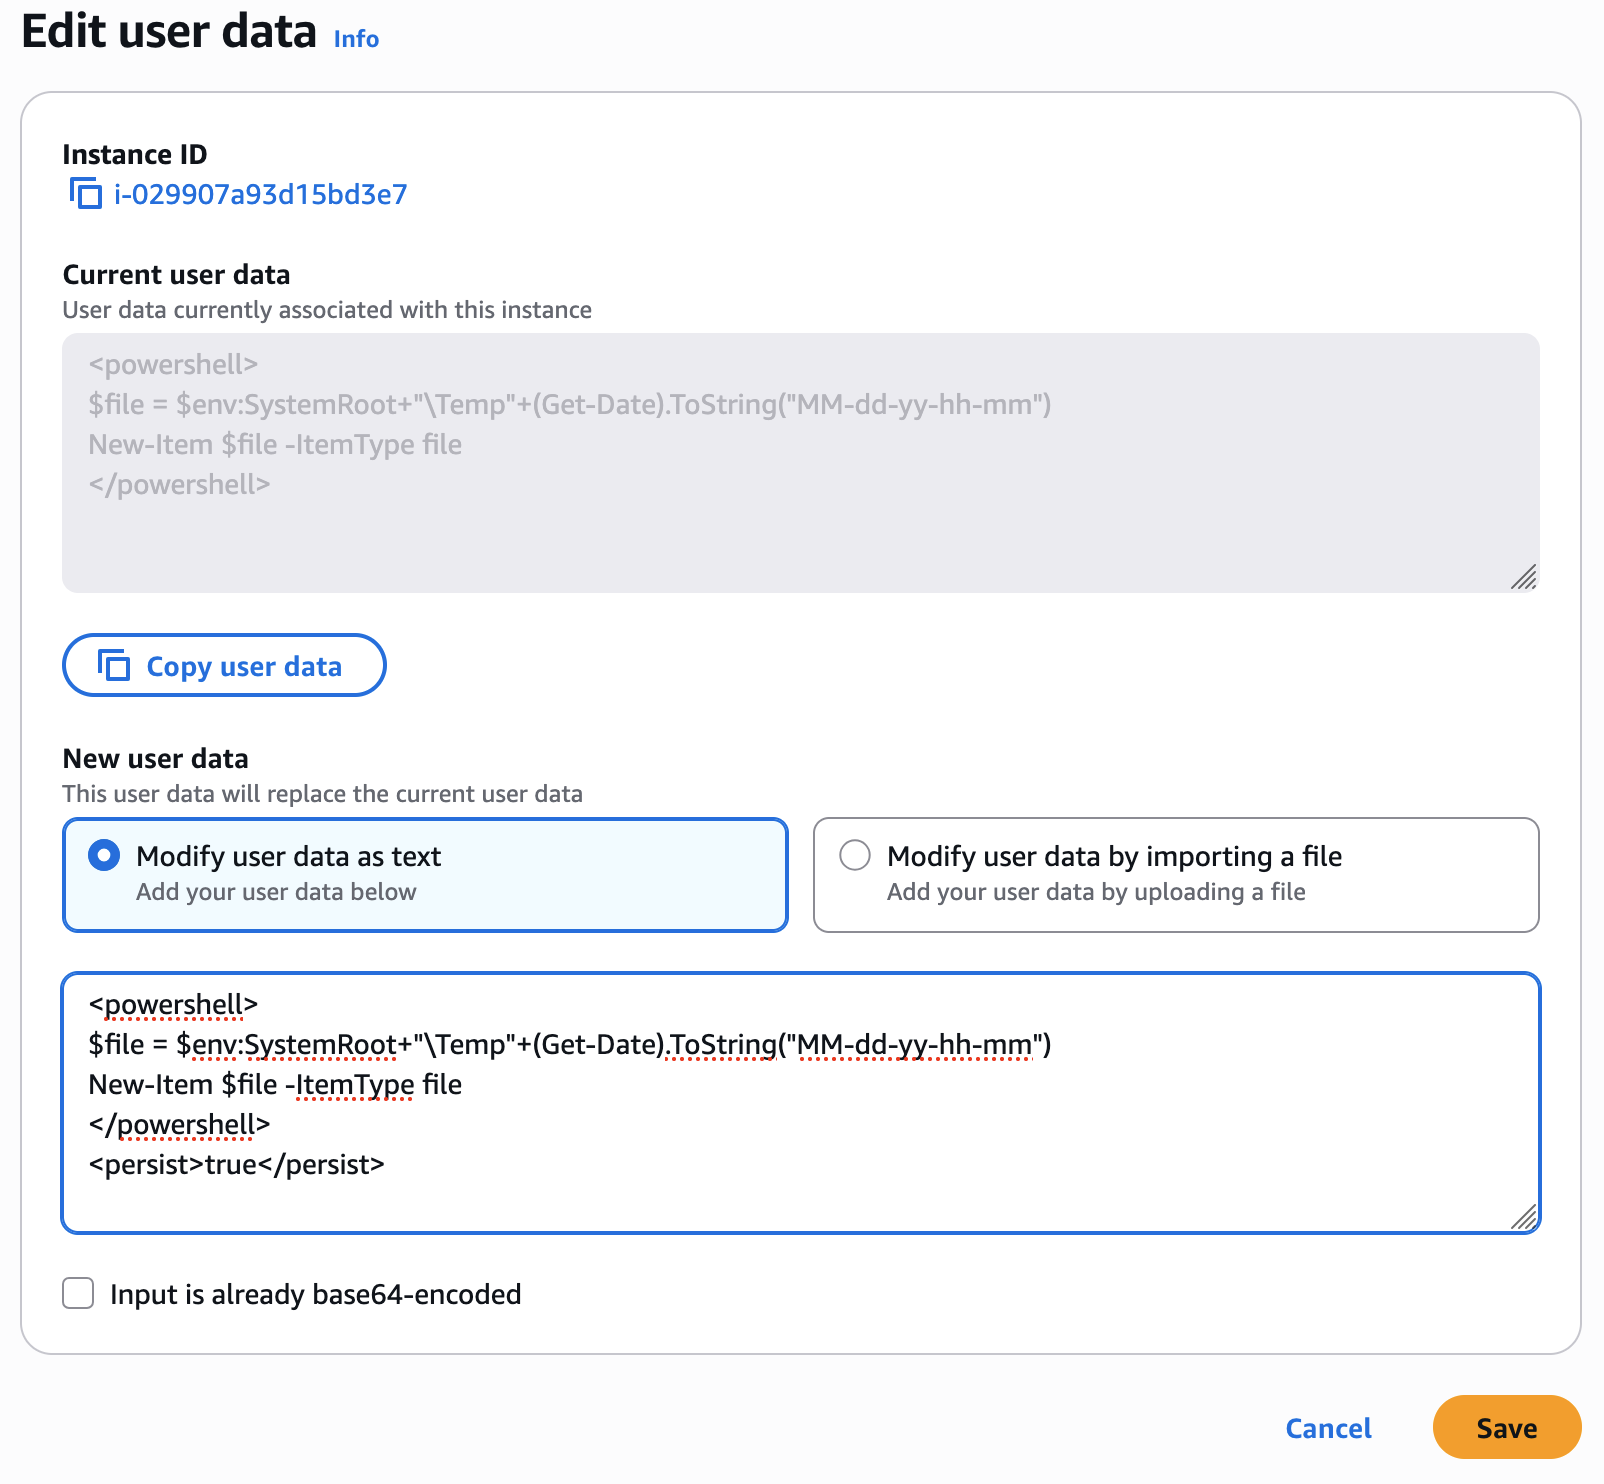
-
Start the instance. If you enabled user data execution for subsequent reboots or starts, the updated user data scripts are run as part of the instance start process.
How Amazon EC2 handles user data for Linux instances
The following examples use user data to run commands that set up a LAMP server when the instance launches. In each example, the following tasks are performed:
-
The distribution software packages are updated.
-
The web server,
php, andmariadbpackages are installed. -
The
httpdservice is started and turned on. -
The user
ec2-useris added to the apache group. -
The appropriate ownership and file permissions are set for the web directory and the files contained within it.
-
A simple web page is created to test the web server and PHP engine.
Contents
Prerequisites
The examples in this topic assume the following:
-
Your instance has a public DNS name that is reachable from the internet.
-
The security group associated with your instance is configured to allow SSH (port 22) traffic so that you can connect to the instance to view the output log files.
-
Your instance is launched using an Amazon Linux AMI. The commands and directives might not work for other Linux distributions. For more information about other distributions, such as their support for cloud-init, see documentation for the specific distribution.
User data and shell scripts
If you are familiar with shell scripting, this is the easiest and most complete way to send instructions to an instance at launch. Adding these tasks at boot time adds to the amount of time it takes to boot the instance. You should allow a few minutes of extra time for the tasks to complete before you test that the user script has finished successfully.
Important
By default, user data scripts and cloud-init directives run only during the boot cycle when you first launch an instance.
You can update your configuration to ensure that your user data scripts and cloud-init directives run every time you restart your instance.
For more information, see How can I utilize user data to automatically run a script with every restart of my Amazon EC2 Linux instance?
User data shell scripts must start with the #! characters and the path to the
interpreter you want to read the script (commonly /bin/bash). For
an introduction on shell scripting, see the Bash Reference
Manual
Scripts entered as user data are run as the root user, so do not use the
sudo command in the script. Remember that any files you
create will be owned by the root user; if you need a non-root user to have file access,
you should modify the permissions accordingly in the script. Also, because the
script is not run interactively, you cannot include commands that require user
feedback (such as yum update without the -y
flag).
If you use an Amazon API, including the Amazon CLI, in a user data script, you must use an instance profile when launching the instance. An instance profile provides the appropriate Amazon credentials required by the user data script to issue the API call. For more information, see Use instance profiles in the IAM User Guide. The permissions you assign to the IAM role depend on which services you are calling with the API. For more information, see IAM roles for Amazon EC2.
The cloud-init output log file captures console output so it is easy to debug your
scripts following a launch if the instance does not behave the way you intended. To
view the log file, connect to the instance
and open /var/log/cloud-init-output.log.
When a user data script is processed, it is copied to and run from
/var/lib/cloud/instances/.
The script is not deleted after it is run. Be sure to delete the user data scripts from
instance-id//var/lib/cloud/instances/
before you create an AMI from the instance. Otherwise, the script will exist in this
directory on any instance launched from the AMI.instance-id/
Update the instance user data
To update the instance user data, you must first stop the instance. If the instance is running, you can view the user data but you cannot modify it.
Warning
When you stop an instance, the data on instance store volumes is lost. To preserve this data, back it up to persistent storage.
To modify instance user data
Open the Amazon EC2 console at https://console.amazonaws.cn/ec2/
. -
In the navigation pane, choose Instances.
-
Select the instance and choose Instance state, Stop instance. If this option is disabled, either the instance is already stopped or its root volume is an instance store volume.
-
When prompted for confirmation, choose Stop. It can take a few minutes for the instance to stop.
-
With the instance still selected, choose Actions, Instance settings, Edit user data.
-
Modify the user data as needed, and then choose Save.
-
Start the instance. The new user data is visible on your instance after you start it; however, user data scripts are not run.
User data and cloud-init directives
The cloud-init package configures specific aspects of a new Amazon Linux instance when it is
launched; most notably, it configures the .ssh/authorized_keys
file for the ec2-user so you can log in with your own private key. For more
information about the configuration tasks that the cloud-init package performs for
Amazon Linux instances, see the following documentation:
-
Amazon Linux 2023 – Customized cloud-init
-
Amazon Linux 2 – Using cloud-init on Amazon Linux 2
The cloud-init user directives can be passed to an instance at launch the same way that a
script is passed, although the syntax is different. For more information about
cloud-init, see https://cloudinit.readthedocs.org/en/latest/index.html
Important
By default, user data scripts and cloud-init directives run only during the boot cycle when you first launch an instance.
You can update your configuration to ensure that your user data scripts and cloud-init directives run every time you restart your instance.
For more information, see How can I utilize user data to automatically run a script with every restart of my Amazon EC2 Linux instance?
Adding these tasks at boot time adds to the amount of time it takes to boot an instance. You should allow a few minutes of extra time for the tasks to complete before you test that your user data directives have completed.
To pass cloud-init directives to an Amazon Linux instance
-
Follow the procedure for launching an instance. The User data field is located in the Advanced details section of the launch instance wizard. Enter your cloud-init directive text in the User data field, and then complete the instance launch procedure.
In the examples below, the directives create and configure a web server on Amazon Linux. The
#cloud-configline at the top is required in order to identify the commands as cloud-init directives. -
Allow enough time for the instance to launch and run the directives in your user data, and then check to see that your directives have completed the tasks you intended.
For this example, in a web browser, enter the URL of the PHP test file the directives created. This URL is the public DNS address of your instance followed by a forward slash and the file name.
http://my.public.dns.amazonaws.com/phpinfo.phpYou should see the PHP information page. If you are unable to see the PHP information page, check that the security group you are using contains a rule to allow HTTP (port 80) traffic. For more information, see Configure security group rules.
-
(Optional) If your directives did not accomplish the tasks you were expecting them to, or if you just want to verify that your directives completed without errors, connect to the instance, examine the output log file (
/var/log/cloud-init-output.log), and look for error messages in the output. For additional debugging information, you can add the following line to your directives:output : { all : '| tee -a /var/log/cloud-init-output.log' }This directive sends runcmd output to
/var/log/cloud-init-output.log.
User data and the Amazon CLI
You can use the Amazon CLI to specify, modify, and view the user data for your instance. For information about viewing user data from your instance using instance metadata, see Access instance metadata for an EC2 instance.
On Windows, you can use the Amazon Tools for Windows PowerShell instead of using the Amazon CLI. For more information, see User data and the Tools for Windows PowerShell .
Example: Specify user data at launch
To specify user data when you launch your instance, use the run-instances
command with the --user-data parameter. With run-instances, the Amazon CLI performs base64 encoding of
the user data for you.
The following example shows how to specify a script as a string on the command line:
aws ec2 run-instances --image-id ami-abcd1234--count1--instance-typem3.medium\ --key-namemy-key-pair--subnet-id subnet-abcd1234--security-group-ids sg-abcd1234\ --user-dataecho user data
The following example shows how to specify a script using a text file. Be sure to use the
file:// prefix to specify the file.
aws ec2 run-instances --image-id ami-abcd1234--count1--instance-typem3.medium\ --key-namemy-key-pair--subnet-id subnet-abcd1234--security-group-ids sg-abcd1234\ --user-data file://my_script.txt
The following is an example text file with a shell script.
#!/bin/bash
yum update -y
service httpd start
chkconfig httpd on
Example: Modify the user data of a stopped instance
You can modify the user data of a stopped instance using the modify-instance-attribute command. With modify-instance-attribute, the Amazon CLI does not perform base64 encoding of the user data for you.
-
On a Linux computer, use the base64 command to encode the user data.
base64 my_script.txt >my_script_base64.txt -
On a Windows computer, use the certutil command to encode the user data. Before you can use this file with the Amazon CLI, you must remove the first (BEGIN CERTIFICATE) and last (END CERTIFICATE) lines.
certutil -encode my_script.txt my_script_base64.txt
notepad my_script_base64.txt
Use the --attribute and --value parameters to use the encoded text file
to specify the user data. Be sure to use the file:// prefix to specify the file.
aws ec2 modify-instance-attribute --instance-idi-1234567890abcdef0--attribute userData --value file://my_script_base64.txt
Example: Clear the user data of a stopped instance
To delete the existing user data, use the modify-instance-attribute command as follows:
aws ec2 modify-instance-attribute --instance-idi-1234567890abcdef0--user-data Value=
Example: View user data
To retrieve the user data for an instance, use the describe-instance-attribute command. With describe-instance-attribute, the Amazon CLI does not perform base64 decoding of the user data for you.
aws ec2 describe-instance-attribute --instance-idi-1234567890abcdef0--attribute userData
The following is example output with the user data base64 encoded.
{
    "UserData": {
        "Value": "IyEvYmluL2Jhc2gKeXVtIHVwZGF0ZSAteQpzZXJ2aWNlIGh0dHBkIHN0YXJ0CmNoa2NvbmZpZyBodHRwZCBvbg=="
    },
    "InstanceId": "i-1234567890abcdef0"
}-
On a Linux computer , use the
--queryoption to get the encoded user data and the base64 command to decode it.aws ec2 describe-instance-attribute --instance-idi-1234567890abcdef0--attribute userData --output text --query "UserData.Value" | base64 --decode -
On a Windows computer, use the
--queryoption to get the coded user data and the certutil command to decode it. Note that the encoded output is stored in a file and the decoded output is stored in another file.aws ec2 describe-instance-attribute --instance-idi-1234567890abcdef0--attribute userData --output text --query "UserData.Value" >my_output.txt certutil -decode my_output.txt my_output_decoded.txt type my_output_decoded.txt
The following is example output.
#!/bin/bash
yum update -y
service httpd start
chkconfig httpd on
Combine shell scripts and cloud-init directives
By default, you can include only one content type in user data at a time. However, you can use the
text/cloud-config and text/x-shellscript content-types in a mime-multi part
file to include both a shell script and cloud-init directives in your user data.
The following shows the mime-multi part format.
Content-Type: multipart/mixed; boundary="//" MIME-Version: 1.0 --// Content-Type: text/cloud-config; charset="us-ascii" MIME-Version: 1.0 Content-Transfer-Encoding: 7bit Content-Disposition: attachment; filename="cloud-config.txt" #cloud-configcloud-init directives--// Content-Type: text/x-shellscript; charset="us-ascii" MIME-Version: 1.0 Content-Transfer-Encoding: 7bit Content-Disposition: attachment; filename="userdata.txt" #!/bin/bashshell script commands--//--
For example, the following user data includes cloud-init directives and a bash shell script.
The cloud-init directives creates a file (/test-cloudinit/cloud-init.txt),
and writes Created by cloud-init to that file. The bash shell script creates a file
(/test-userscript/userscript.txt) and writes Created by bash shell script
to that file.
Content-Type: multipart/mixed; boundary="//"
MIME-Version: 1.0

--//
Content-Type: text/cloud-config; charset="us-ascii"
MIME-Version: 1.0
Content-Transfer-Encoding: 7bit
Content-Disposition: attachment; filename="cloud-config.txt"

#cloud-config
runcmd:
- [ mkdir, /test-cloudinit ]
write_files:
- path: /test-cloudinit/cloud-init.txt
content: Created by cloud-init

--//
Content-Type: text/x-shellscript; charset="us-ascii"
MIME-Version: 1.0
Content-Transfer-Encoding: 7bit
Content-Disposition: attachment; filename="userdata.txt"

#!/bin/bash
mkdir test-userscript
touch /test-userscript/userscript.txt
echo "Created by bash shell script" >> /test-userscript/userscript.txt
--//--
How Amazon EC2 handles user data for Windows instances
On Windows instances, the launch agent performs the tasks related to user data. For more information, see the following:
For examples of the assembly of a UserData property in a Amazon CloudFormation template, see
Base64 Encoded UserData Property and Base64 Encoded UserData Property with AccessKey and SecretKey.
For an example of running commands on an instance within an Auto Scaling group that works with lifecycle hooks, see Tutorial: Configure user data to retrieve the target lifecycle state through instance metadata in the Amazon EC2 Auto Scaling User Guide.
Contents
User data scripts
For EC2Config or EC2Launch to run scripts, you must enclose
the script within a
special tag when you add it to user data. The tag that you use depends on whether the
commands run in a Command Prompt window (batch commands) or use Windows
PowerShell.
If you specify both a batch script and a Windows PowerShell script, the batch script runs first and the Windows PowerShell script runs next, regardless of the order in which they appear in the instance user data.
If you use an Amazon API, including the Amazon CLI, in a user data script, you must use an instance profile when launching the instance. An instance profile provides the appropriate Amazon credentials required by the user data script to make the API call. For more information, see Instance profiles. The permissions you assign to the IAM role depend on which services you are calling with the API. For more information, see IAM roles for Amazon EC2.
Script type
Syntax for batch scripts
Specify a batch script using the script tag. Separate the commands using line
breaks as shown in the following example.
<script>
    echo Current date and time >> %SystemRoot%\Temp\test.log
    echo %DATE% %TIME% >> %SystemRoot%\Temp\test.log
</script>
By default, user data scripts run one time when you launch the instance.
To run the user data scripts every time you reboot or start the instance, add
<persist>true</persist> to the user data.
<script>
    echo Current date and time >> %SystemRoot%\Temp\test.log
    echo %DATE% %TIME% >> %SystemRoot%\Temp\test.log
</script>
<persist>true</persist>
EC2Launch v2 agent
To run an XML user data script as a detached process with the EC2Launch v2
executeScript task in the UserData stage,
add <detach>true</detach> to the user data.
Note
The detach tag is not supported by previous launch agents.
<script>
    echo Current date and time >> %SystemRoot%\Temp\test.log
    echo %DATE% %TIME% >> %SystemRoot%\Temp\test.log
</script>
<detach>true</detach>
Syntax for Windows PowerShell scripts
The Amazon Windows AMIs include the Amazon Tools for Windows PowerShell
Specify a Windows PowerShell script using the <powershell> tag.
Separate the commands using line breaks. The <powershell> tag is
case-sensitive.
For example:
<powershell>
    $file = $env:SystemRoot + "\Temp\" + (Get-Date).ToString("MM-dd-yy-hh-mm")
    New-Item $file -ItemType file
</powershell>
By default, the user data scripts run one time when you launch the instance.
To run the user data scripts every time you reboot or start the instance, add
<persist>true</persist> to the user data.
<powershell>
    $file = $env:SystemRoot + "\Temp\" + (Get-Date).ToString("MM-dd-yy-hh-mm")
    New-Item $file -ItemType file
</powershell>
<persist>true</persist>
You can specify one or more PowerShell arguments with the
<powershellArguments> tag. If no arguments
are passed, EC2Launch and EC2Launch v2 add the following argument by default:
-ExecutionPolicy Unrestricted.
Example:
<powershell>
    $file = $env:SystemRoot + "\Temp" + (Get-Date).ToString("MM-dd-yy-hh-mm")
    New-Item $file -ItemType file
</powershell>
<powershellArguments>-ExecutionPolicy Unrestricted -NoProfile -NonInteractive</powershellArguments>
EC2Launch v2 agent
To run an XML user data script as a detached process with the EC2Launch v2
executeScript task in the UserData stage,
add <detach>true</detach> to the user data.
Note
The detach tag is not supported by previous launch agents.
<powershell>
    $file = $env:SystemRoot + "\Temp\" + (Get-Date).ToString("MM-dd-yy-hh-mm")
    New-Item $file -ItemType file
</powershell>
<detach>true</detach>
Syntax for YAML configuration scripts
If you are using EC2Launch v2 to run scripts, you can use the YAML format. To view configuration tasks, details, and examples for EC2Launch v2, see EC2Launch v2 task configuration.
Specify a YAML script with the executeScript task.
Example YAML syntax to run a PowerShell script
version: 1.0
tasks:
- task: executeScript
  inputs:
  - frequency: always
    type: powershell
    runAs: localSystem
    content: |-
      $file = $env:SystemRoot + "\Temp\" + (Get-Date).ToString("MM-dd-yy-hh-mm")
      New-Item $file -ItemType file
Example YAML syntax to run a batch script
version: 1.1
tasks:
- task: executeScript
  inputs:
  - frequency: always
    type: batch
    runAs: localSystem
    content: |-
      echo Current date and time >> %SystemRoot%\Temp\test.log
      echo %DATE% %TIME% >> %SystemRoot%\Temp\test.log
Base64 encoding
If you're using the Amazon EC2 API or a tool that does not perform base64 encoding of
the user data, you must encode the user data yourself. If not, an error is logged
about being unable to find script or powershell tags to
run. The following is an example that encodes using Windows PowerShell.
$UserData = [System.Convert]::ToBase64String([System.Text.Encoding]::ASCII.GetBytes($Script))
The following is an example that decodes using PowerShell.
$Script = [System.Text.Encoding]::UTF8.GetString([System.Convert]::FromBase64String($UserData))
For more information about base64 encoding, see https://www.ietf.org/rfc/rfc4648.txt
Compressed user data
EC2Launch v2 supports zipped user data as a method to submit user data that's larger than
the 16 KB limit imposed by IMDS. To use this feature, compress your user data script into
a .zip archive and pass it to your EC2 instance. When EC2Launch v2 detects
compressed user data, it automatically unzips the compressed user data script and runs it.
As with standard user data, if you're using the Amazon EC2 API or a tool that does not perform base64 encoding of the user data, you must encode the compressed user data yourself. For more information about the user data size limit and base64 encoding, see Access instance metadata for an EC2 instance.
User data execution
By default, all Amazon Windows AMIs have user data execution enabled for the initial launch. You can specify that user data scripts are run the next time the instance reboots or restarts. Alternatively, you can specify that user data scripts are run every time the instance reboots or restarts.
Note
User data is not enabled to run by default after the initial launch. To enable user data to run when you reboot or start the instance, see Run scripts during subsequent reboots or starts.
User data scripts are run from the local administrator account when a random password is generated. Otherwise, user data scripts are run from the System account.
Instance launch scripts
Scripts in the instance user data are run during the initial launch of the
instance. If the persist tag is found, user data execution is enabled
for subsequent reboots or starts. The log files for EC2Launch v2, EC2Launch, and
EC2Config contain the output from the standard output and standard error
streams.
EC2Launch v2
The log file for EC2Launch v2 is
C:\ProgramData\Amazon\EC2Launch\log\agent.log.
Note
The C:\ProgramData folder might be hidden. To view the
folder, you must show hidden files and folders.
The following information is logged when the user data is run:
-
Info: Converting user-data to yaml format– If the user data was provided in XML format -
Info: Initialize user-data state– The start of user data execution -
Info: Frequency is: always– If the user data task is running on every boot -
Info: Frequency is: once– If the user data task is running just once -
Stage: postReadyUserData execution completed– The end of user data execution
EC2Launch
The log file for EC2Launch is
C:\ProgramData\Amazon\EC2-Windows\Launch\Log\UserdataExecution.log.
The C:\ProgramData folder might be hidden. To view the
folder, you must show hidden files and folders.
The following information is logged when the user data is run:
-
Userdata execution begins– The start of user data execution -
<persist> tag was provided: true– If the persist tag is found -
Running userdata on every boot– If the persist tag is found -
<powershell> tag was provided.. running powershell
								content
– If the powershell tag is found -
<script> tag was provided.. running script content– If the script tag is found -
Message: The output from user scripts– If user data scripts are run, their output is logged
EC2Config
The log file for EC2Config is C:\Program
Files\Amazon\Ec2ConfigService\Logs\Ec2Config.log. The following
information is logged when the user data is run:
-
Ec2HandleUserData: Message: Start running user scripts– The start of user data execution -
Ec2HandleUserData: Message: Re-enabled userdata execution– If the persist tag is found -
Ec2HandleUserData: Message: Could not find <persist> and
								</persist>
– If the persist tag is not found -
Ec2HandleUserData: Message: The output from user scripts– If user data scripts are run, their output is logged
Run scripts during subsequent reboots or starts
When you update instance user data, the updated user data content is automatically reflected in the instance metadata the next time you reboot or start the instance. However, depending on the installed launch agent, additional configuration may be required to configure user data scripts to run on subsequent reboots or starts.
If you choose the Shutdown with Sysprep option, user data scripts run the next time the instance starts or reboots, even if you did not enable user data execution for subsequent reboots or starts.
For instructions to enable user data execution, select the tab that matches your launch agent.
User data and the Tools for Windows PowerShell
You can use the Tools for Windows PowerShell to specify, modify, and view the user data for your instance. For information about viewing user data from your instance using instance metadata, see Access instance metadata for an EC2 instance. For information about user data and the Amazon CLI, see User data and the Amazon CLI.
Example: Specify instance user data at launch
Create a text file with the instance user data. To run user data scripts every
time you reboot or start the instance, add
<persist>true</persist>, as shown in the following
example.
<powershell>
    $file = $env:SystemRoot + "\Temp\" + (Get-Date).ToString("MM-dd-yy-hh-mm")
    New-Item $file -ItemType file
</powershell>
<persist>true</persist>
To specify instance user data when you launch your instance, use the New-EC2Instance command. This
command does not perform base64 encoding of the user data for you. Use the following
commands to encode the user data in a text file named
script.txt.
PS C:\>$Script = Get-Content -Rawscript.txtPS C:\>$UserData = [System.Convert]::ToBase64String([System.Text.Encoding]::ASCII.GetBytes($Script))
Use the -UserData parameter to pass the user data to the
New-EC2Instance command.
PS C:\>New-EC2Instance -ImageIdami-abcd1234-MinCount1-MaxCount1-InstanceTypem3.medium\ -KeyNamemy-key-pair-SubnetIdsubnet-12345678-SecurityGroupIdssg-1a2b3c4d\ -UserData $UserData
Example: Update instance user data for a stopped instance
You can modify the user data of a stopped instance using the Edit-EC2InstanceAttribute command.
Create a text file with the new script. Use the following commands to encode the user
data in the text file named new-script.txt.
PS C:\>$NewScript = Get-Content -Rawnew-script.txtPS C:\>$NewUserData = [System.Convert]::ToBase64String([System.Text.Encoding]::ASCII.GetBytes($NewScript))
Use the -UserData and -Value parameters to specify the user
data.
PS C:\>Edit-EC2InstanceAttribute -InstanceIdi-1234567890abcdef0-Attribute userData -Value $NewUserData
Example: View instance user data
To retrieve the user data for an instance, use the Get-EC2InstanceAttribute command.
PS C:\>(Get-EC2InstanceAttribute -InstanceIdi-1234567890abcdef0-Attribute userData).UserData
The following is example output. Note that the user data is encoded.
PHBvd2Vyc2hlbGw+DQpSZW5hbWUtQ29tcHV0ZXIgLU5ld05hbWUgdXNlci1kYXRhLXRlc3QNCjwvcG93ZXJzaGVsbD4=Use the following commands to store the encoded user data in a variable and then decode it.
PS C:\>$UserData_encoded = (Get-EC2InstanceAttribute -InstanceIdi-1234567890abcdef0-Attribute userData).UserDataPS C:\>[System.Text.Encoding]::UTF8.GetString([System.Convert]::FromBase64String($UserData_encoded))
The following is example output.
<powershell>
    $file = $env:SystemRoot + "\Temp\" + (Get-Date).ToString("MM-dd-yy-hh-mm")
    New-Item $file -ItemType file
</powershell>
<persist>true</persist>
Example: Rename the instance to match the tag value
You can use the Get-EC2Tag
command to read the tag value, rename the instance on first boot to match the tag
value, and reboot. To run this command successfully, you must have a role with
ec2:DescribeTags permissions attached to the instance because tag
information is retrieved by the API call. For more information on settings
permissions by using IAM roles, see Attach an IAM role to an instance.
You can also rename the instance using tags in instance metadata, if your instance is configured to access tags from the instance metadata. For more information, see View tags for your EC2 instances using instance metadata.