Using global datastores (console)
To create a global datastore using the console, follow this two-step process:
-
Create a primary cluster, either by using an existing cluster or creating a new cluster. The engine must be Valkey 7.2 or later, or Redis OSS 5.0.6 or later.
-
Add up to two secondary clusters in different Amazon Regions, again using Valkey 7.2 or later, or Redis OSS 5.0.6 or later.
The following procedures guide you on how to create a global datastore for Valkey or Redis OSS and perform other operations using the ElastiCache console.
Topics
Creating a global datastore using an existing cluster
In this scenario, you use an existing cluster to serve as the primary of the new global datastore. You then create a secondary, read-only cluster in a separate Amazon Region. This secondary cluster receives automatic and asynchronous updates from the primary cluster.
Important
The existing cluster must use an engine that is Valkey 7.2 or later or Redis OSS 5.0.6 or later.
To create a global datastore using an existing cluster
-
Sign in to the Amazon Web Services Management Console and open the ElastiCache console at https://console.amazonaws.cn/elasticache/
. -
On the navigation pane, choose Global Datastores and then choose Create global datastore.
-
On the Primary cluster settings page, do the following:
-
In the Global Datastore info field, enter a name for the new global datastore.
-
(Optional) Enter a Description value.
-
-
Under Regional cluster, select Use existing regional cluster.
-
Under Existing cluster, select the existing cluster you want to use.
-
Keep the following options as they are. They're prepopulated to match the primary cluster configuration, you can't change them.
-
Engine version
-
Node type
-
Parameter group
Note
ElastiCache autogenerates a new parameter group from values of the provided parameter group and applies the new parameter group to the cluster. Use this new parameter group to modify parameters on a global datastore. Each autogenerated parameter group is associated with one and only one cluster and, therefore, only one global datastore.
-
Number of shards
-
Encryption at rest – Enables encryption of data stored on disk. For more information, see Encryption at rest.
Note
You can supply a different encryption key by choosing Customer Managed Amazon KMS key and choosing the key. For more information, see Using Customer Managed Amazon KMS keys.
-
Encryption in-transit – Enables encryption of data on the wire. For more information, see Encryption in transit. For Valkey 7.2 and onwards and Redis OSS 6.0 onwards, if you enable encryption in-transit you are prompted to specify one of the following Access Control options:
-
No Access Control – This is the default setting. This indicates no restrictions.
-
User Group Access Control List – Choose a user group with a defined set of users and permissions on available operations. For more information, see Managing User Groups with the Console and CLI.
-
AUTH Default User – An authentication mechanism for a Valkey or Redis OSS server. For more information, see AUTH.
-
-
-
(Optional) As needed, update the remaining secondary cluster settings. These are prepopulated with the same values as the primary cluster, but you can update them to meet specific requirements for that cluster.
-
Port
-
Number of replicas
-
Subnet group
-
Preferred Availability Zone(s)
-
Security groups
-
Customer Managed (Amazon KMS key)
-
AUTH Token
-
Enable automatic backups
-
Backup retention period
-
Backup window
-
Maintenance window
-
Topic for SNS notification
-
-
Choose Create. Doing this sets the status of the global datastore to Creating. The status transitions to Modifying after the primary cluster is associated to the global datastore and the secondary cluster is in Associating status.
After the primary cluster and secondary clusters are associated with the global datastore, the status changes to Available. At this point, you have a primary cluster that accepts reads and writes and secondary clusters that accept reads replicated from the primary cluster.
The page is updated to indicate whether a cluster is part of a global datastore, including:
-
Global Datastore – The name of the global datastore to which the cluster belongs.
-
Global Datastore Role – The role of the cluster, either primary or secondary.
-
You can add up to one additional secondary cluster in a different Amazon Region. For more information, see Adding a Region to a global datastore.
Creating a new global datastore using a new primary cluster
If you choose to create a global datastore with a new cluster, use the following procedure.
-
Sign in to the Amazon Web Services Management Console and open the ElastiCache console at https://console.amazonaws.cn/elasticache/
. -
On the navigation pane, choose Global Datastores and then choose Create global datastore.
-
Under Primary cluster settings, do the following:
-
For Cluster mode, choose Enabled or Disabled.
-
For Global Datastore info enter a value for Name. ElastiCache uses the suffix to generate a unique name for the global datastore. You can search for the global datastore by using the suffix that you specify here.
-
(Optional) Enter a value for Global Datastore Description.
-
-
Under Regional cluster:
-
For Region, choose an available Amazon Region.
-
Choose Create new regional cluster or Use existing regional cluster
-
If you choose Create new regional cluster, under Cluster info, enter a name and optional description of the cluster.
-
Under Location, we recommend you accept the default settings for Multi-AZ and Auto-failover.
-
-
Under Cluster settings
-
For Engine version, choose an available version, which is 5.0.6 or later.
-
For Port, use the default port, 6379. If you have a reason to use a different port, enter the port number.
-
For Parameter group, choose a parameter group or create a new one. Parameter groups control the runtime parameters of your cluster. For more information on parameter groups, see Valkey and Redis OSS parameters and Creating an ElastiCache parameter group.
Note
When you select a parameter group to set the engine configuration values, that parameter group is applied to all clusters in the global datastore. On the Parameter Groups page, the yes/no Global attribute indicates whether a parameter group is part of a global datastore.
-
For Node type, choose the down arrow (
 ). In the Change node type dialog
box, choose a value for Instance family for the node
type that you want. Then choose the node type that you want to use for this
cluster, and then choose Save.
). In the Change node type dialog
box, choose a value for Instance family for the node
type that you want. Then choose the node type that you want to use for this
cluster, and then choose Save.For more information, see Choosing your node size.
If you choose an r6gd node type, data-tiering is automatically enabled. For more information, see Data tiering in ElastiCache.
-
If you are creating a Valkey or Redis OSS (cluster mode disabled) cluster:
For Number of replicas, choose the number of replicas that you want for this cluster.
-
If you are creating a Valkey or Redis OSS (cluster mode enabled) cluster:
-
For Number of shards, choose the number of shards (partitions/node groups) that you want for this Valkey or Redis OSS (cluster mode enabled) cluster.
For some versions of Valkey or Redis OSS (cluster mode enabled), you can change the number of shards in your cluster dynamically:
-
Redis OSS 3.2.10 and later – If your cluster is running Redis OSS 3.2.10 or later versions, you can change the number of shards in your cluster dynamically. For more information, see Scaling Valkey or Redis OSS (Cluster Mode Enabled) clusters.
-
Other Redis OSS versions – If your cluster is running a version of Redis OSS before version 3.2.10, there's another approach. To change the number of shards in your cluster in this case, create a new cluster with the new number of shards. For more information, see Restoring from a backup into a new cache.
-
-
For Replicas per shard, choose the number of read replica nodes that you want in each shard.
The following restrictions exist for Valkey or Redis OSS (cluster mode enabled).
-
If you have Multi-AZ enabled, make sure that you have at least one replica per shard.
-
The number of replicas is the same for each shard when creating the cluster using the console.
-
The number of read replicas per shard is fixed and cannot be changed. If you find you need more or fewer replicas per shard (API/CLI: node group), you must create a new cluster with the new number of replicas. For more information, see Tutorial: Seeding a new node-based cluster with an externally created backup.
-
-
-
-
For Subnet group settings, choose the subnet that you want to apply to this cluster. ElastiCache provides a default IPv4 subnet group or you can choose to create a new one. For IPv6, you need to create a subnet group with an IPv6 CIDR block. If you choose dual stack, you then must select a Discovery IP type, either IPv6 or IPv4.
For more information see, Create a subnet in your VPC.
-
For Availability zone placements, you have two options:
-
No preference – ElastiCache chooses the Availability Zone.
-
Specify availability zones – You specify the Availability Zone for each cluster.
If you chose to specify the Availability Zones, for each cluster in each shard, choose the Availability Zone from the list.
For more information, see Choosing regions and availability zones for ElastiCache.
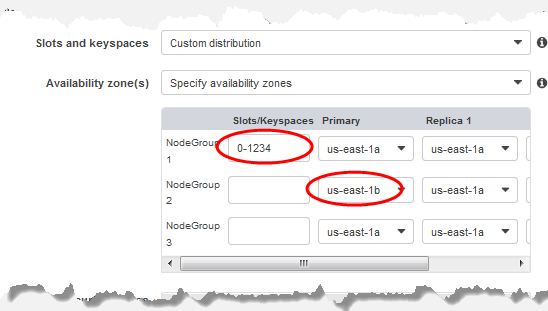
Specifying Keyspaces and Availability Zones
-
-
Choose Next
-
Under Advanced Valkey and Redis OSS settings
-
For Security:
-
To encrypt your data, you have the following options:
-
Encryption at rest – Enables encryption of data stored on disk. For more information, see Encryption at Rest.
Note
You have the option to supply a different encryption key by choosing Customer Managed Amazon KMS key and choosing the key. For more information, see Using customer managed keys from Amazon KMS.
-
Encryption in-transit – Enables encryption of data on the wire. For more information, see encryption in transit. For Valkey 7.2 and above and Redis OSS 6.0 and above, if you enable Encryption in-transit you will be prompted to specify one of the following Access Control options:
-
No Access Control – This is the default setting. This indicates no restrictions on user access to the cluster.
-
User Group Access Control List – Select a user group with a defined set of users that can access the cluster. For more information, see Managing User Groups with the Console and CLI.
-
AUTH Default User – An authentication mechanism for a Valkey or Redis OSS server. For more information, see AUTH.
-
-
AUTH – An authentication mechanism for a Valkey or Redis OSS server. For more information, see AUTH.
Note
For Redis OSS versions between 3.2.6 onward, excluding version 3.2.10, AUTH is the sole option.
-
-
For Security groups, choose the security groups that you want for this cluster. A security group acts as a firewall to control network access to your cluster. You can use the default security group for your VPC or create a new one.
For more information on security groups, see Security groups for your VPC in the Amazon VPC User Guide.
-
-
-
For regularly scheduled automatic backups, select Enable automatic backups and then enter the number of days that you want each automatic backup retained before it is automatically deleted. If you don't want regularly scheduled automatic backups, clear the Enable automatic backups check box. In either case, you always have the option to create manual backups.
For more information on backup and restore, see Snapshot and restore.
-
(Optional) Specify a maintenance window. The maintenance window is the time, generally an hour in length, each week when ElastiCache schedules system maintenance for your cluster. You can allow ElastiCache to choose the day and time for your maintenance window (No preference), or you can choose the day, time, and duration yourself (Specify maintenance window). If you choose Specify maintenance window from the lists, choose the Start day, Start time, and Duration (in hours) for your maintenance window. All times are UCT times.
For more information, see Managing ElastiCache cluster maintenance.
-
(Optional) For Logs:
-
Under Log format, choose either Text or JSON.
-
Under Destination Type, choose either CloudWatch Logs or Kinesis Firehose.
-
Under Log destination, choose either Create new and enter either your CloudWatch Logs log group name or your Firehose stream name, or choose Select existing and then choose either your CloudWatch Logs log group name or your Firehose stream name,
-
-
For Tags, to help you manage your clusters and other ElastiCache resources, you can assign your own metadata to each resource in the form of tags. For mor information, see Tagging your ElastiCache resources.
-
Review all your entries and choices, then make any needed corrections. When you're ready, choose Next.
-
After you have configured the cluster in the previous steps, you now configure your secondary cluster details..
-
Under Regional cluster, choose the Amazon Region where th cluster is located.
-
Under Cluster info, enter a name and optional description of the cluster.
-
The following options are prepopulated to match the primary cluster configuration and cannot be changed:
-
Location
-
Engine version
-
Instance type
-
Node type
-
Number of shards
-
Parameter group
Note
ElastiCache autogenerates a new parameter group from values of the provided parameter group and applies the new parameter group to the cluster. Use this new parameter group to modify parameters on a global datastore. Each autogenerated parameter group is associated with one and only one cluster and, therefore, only one global datastore.
-
Encryption at rest – Enables encryption of data stored on disk. For more information, see Encryption at rest.
Note
You can supply a different encryption key by choosing Customer Managed Amazon KMS key and choosing the key. For more information, see Using Customer Managed Amazon KMS keys.
-
Encryption in-transit – Enables encryption of data on the wire. For more information, see Encryption in transit. For Valkey 7.2 and above and Redis OSS 6.4 and above, if you enable encryption in-transit you are prompted to specify one of the following Access Control options:
-
No Access Control – This is the default setting. This indicates no restrictions on user access to the cluster.
-
User Group Access Control List – Choose a user group with a defined set of users that can access the cluster. For more information, see Managing User Groups with the Console and CLI.
-
AUTH Default User – An authentication mechanism for a Valkey or Redis OSS server. For more information, see AUTH.
-
Note
For Redis OSS versions between 4.0.2, when Encryption in-transit was first supported, and 6.0.4, AUTH is the sole option.
The remaining secondary cluster settings are pre-populated with the same values as the primary cluster, but the following can be updated to meet specific requirements for that cluster:
-
Port
-
Number of replicas
-
Subnet group
-
Preferred Availability Zone(s)
-
Security groups
-
Customer Managed (Amazon KMS key)
-
AUTH Token
-
Enable automatic backups
-
Backup retention period
-
Backup window
-
Maintenance window
-
Topic for SNS notification
-
-
Choose Create. This sets the status of the global datastore to Creating. After the primary cluster and secondary clusters are associated with the global datastore, the status changes to Available. You have a primary cluster that accepts reads and writes and a secondary cluster that accepts reads replicated from the primary cluster.
The page is also updated to indicate whether a cluster is part of a global datastore, including the following:
-
Global Datastore – The name of the global datastore to which the cluster belongs.
-
Global Datastore Role – The role of the cluster, either primary or secondary.
-
You can add up to one additional secondary cluster in a different Amazon Region. For more information, see Adding a Region to a global datastore.
Viewing global datastore details
You can view the details of existing global datastores and also modify them on the Global Datastores page.
To view global datastore details
-
Sign in to the Amazon Web Services Management Console and open the ElastiCache console at https://console.amazonaws.cn/elasticache/
. -
On the navigation pane, choose Global Datastores and then choose an available global datastore.
You can then examine the following global datastore properties:
-
Global Datastore Name: The name of the global datastore
-
Description: A description of the global datastore
-
Status: Options include:
-
Creating
-
Modifying
-
Available
-
Deleting
-
Primary-Only - This status indicates the global datastore contains only a primary cluster. Either all secondary clusters are deleted or not successfully created.
-
-
Cluster Mode: Either enabled or disabled
-
Engine Version: The Valkey or Redis OSS engine version running the global datastore
-
Instance Node Type: The node type used for the global datastore
-
Encryption at-rest: Either enabled or disabled
-
Encryption in-transit: Either enabled or disabled
-
AUTH: Either enabled or disabled
You can make the following changes to the global datastore:
The Global Datastore page also lists the individual clusters that make up the global datastore and the following properties for each:
-
Region - The Amazon Region where the cluster is stored
-
Role - Either primary or secondary
-
Cluster name - The name of the cluster
-
Status - Options include:
-
Associating - The cluster is in the process of being associated to the global datastore
-
Associated - The cluster is associated to the global datastore
-
Disassociating - The process of removing a secondary cluster from the global datastore using the global datastore name. After this, the secondary cluster no longer receives updates from the primary cluster but it remains as a standalone cluster in that Amazon Region.
-
Disassociated - The secondary cluster has been removed from the global datastore and is now a standalone cluster in its Amazon Region.
-
-
Global Datastore Replica lag – Shows one value per secondary Amazon Region in the global datastore. This is the lag between the secondary Region's primary node and the primary Region's primary node. For cluster mode enabled Valkey or Redis OSS, the lag indicates the maximum delay in seconds among the shards.
Adding a Region to a global datastore
You can add up to one additional Amazon Region to an existing global datastore. In this scenario, you are creating a read-only cluster in a separate Amazon Region that receives automatic and asynchronous updates from the primary cluster.
To add an Amazon Region to a global datastore
-
Sign in to the Amazon Web Services Management Console and open the ElastiCache console at https://console.amazonaws.cn/elasticache/
. -
On the navigation pane, choose Global Datastores, and then select an existing global datastore.
-
Choose Add Regional cluster, and choose the Amazon Region where the secondary cluster is to reside.
-
Under Cluster info, enter a value for Name and, optionally, for Description for the cluster.
-
Keep the following options as they are. They're prepopulated to match the primary cluster configuration, and you can't change them.
-
Engine version
-
Instance type
-
Node type
-
Number of shards
-
Parameter group
Note
ElastiCache autogenerates a new parameter group from values of the provided parameter group and applies the new parameter group to the cluster. Use this new parameter group to modify parameters on a global datastore. Each autogenerated parameter group is associated with one and only one cluster and, therefore, only one global datastore.
-
Encryption at rest
Note
You can supply a different encryption key by choosing Customer Managed Amazon KMS key and choosing the key.
-
Encryption in transit
-
AUTH
-
-
(Optional) Update the remaining secondary cluster settings. These are prepopulated with the same values as the primary cluster, but you can update them to meet specific requirements for that cluster:
-
Port
-
Number of replicas
-
Subnet group
-
Preferred Availability Zone(s)
-
Security groups
-
Customer Managed Amazon KMS key)
-
AUTH Token
-
Enable automatic backups
-
Backup retention period
-
Backup window
-
Maintenance window
-
Topic for SNS notification
-
-
Choose Add.
Modifying a global datastore
You can modify properties of regional clusters. Only one modify operation can be in progress on a global datastore, with the exception of promoting a secondary cluster to primary. For more information, see Promoting the secondary cluster to primary.
To modify a global datastore
-
Sign in to the Amazon Web Services Management Console and open the ElastiCache console at https://console.amazonaws.cn/elasticache/
. -
On the navigation pane, choose Global Datastores, and then for Global Datastore Name, choose a global datastore.
-
Choose Modify and choose among the following options:
-
Modify description – Update the description of the global datastore
-
Modify engine version – Only Valkey 7.2 and later or Redis OSS 5.0.6 and later are available.
-
Modify node type – Scale regional clusters both vertically (scaling up and down) and horizontally (scaling in and out). Options include the R5 and M5 node families. For more information on node types, see Supported node types.
-
Modify Automatic Failover – Enable or disable Automatic Failover. When you enable failover and primary nodes in regional clusters shut down unexpectedly, ElastiCache fails over to one of the regional replicas. For more information, see Auto failover.
For Valkey or Redis OSS clusters with cluster-mode enabled:
-
Add shards – Enter the number of shards to add and optionally specify one or more Availability Zones.
-
Delete shards – Choose shards to be deleted in each Amazon Region.
-
Rebalance shards – Rebalance the slot distribution to ensure uniform distribution across existing shards in the cluster.
-
To modify a global datastore's parameters, modify the parameter group of any member cluster for the global datastore. ElastiCache applies this change to all clusters within that global datastore automatically. To modify the parameter group of that cluster, use the Valkey or Redis OSS console or the ModifyCacheCluster API operation. For more information, see Modifying an ElastiCache parameter group. When you modify the parameter group of any cluster contained within a global datastore, it is applied to all the clusters within that global datastore.
To reset an entire parameter group or specific parameters, use the ResetCacheParameterGroup API operation.
Promoting the secondary cluster to primary
If the primary cluster or Amazon Region becomes unavailable or is experiencing performance issues, you can promote a secondary cluster to primary. Promotion is allowed anytime, even if other modifications are in progress. You can also issue multiple promotions in parallel and the global datastore resolves to one primary eventually. If you promote multiple secondary clusters simultaneously, ElastiCache doesn't guarantee which one ultimately resolves to primary.
To promote a secondary cluster to primary
-
Sign in to the Amazon Web Services Management Console and open the ElastiCache console at https://console.amazonaws.cn/elasticache/
. -
On the navigation pane, choose Global Datastores.
-
Choose the global datastore name to view the details.
-
Choose the Secondary cluster.
-
Choose Promote to primary.
You're then prompted to confirm your decision with the following warning:
Promoting a region to primary will make the cluster in this region as read/writable. Are you sure you want to promote thesecondarycluster to primary?The current primary cluster inprimary regionwill become secondary and will stop accepting writes after this operation completes. Please ensure you update your application stack to direct traffic to the new primary region. -
Choose Confirm if you want to continue the promotion or Cancel if you don't.
If you choose to confirm, your global datastore moves to a Modifying state and is unavailable until the promotion is complete.
Removing a Region from a global datastore
You can remove an Amazon Region from a global datastore by using the following procedure.
To remove an Amazon Region from a global datastore
-
Sign in to the Amazon Web Services Management Console and open the ElastiCache console at https://console.amazonaws.cn/elasticache/
. -
On the navigation pane, choose Global Datastores.
-
Choose a global datastore.
-
Choose the Region you want to remove.
-
Choose Remove region.
Note
This option is only available for secondary clusters.
You're then be prompted to confirm your decision with the following warning:
Removing the region will remove your only available cross region replica for the primary cluster. Your primary cluster will no longer be set up for disaster recovery and improved read latency in remote region. Are you sure you want to remove the selected region from the global datastore? -
Choose Confirm if you want to continue the promotion or Cancel if you don't.
If you choose confirm, the Amazon Region is removed and the secondary cluster no longer receives replication updates.
Deleting a global datastore
To delete a global datastore, first remove all secondary clusters. For more information, see Removing a Region from a global datastore. Doing this leaves the global datastore in primary-only status.
To delete a global datastore
-
Sign in to the Amazon Web Services Management Console and open the ElastiCache console at https://console.amazonaws.cn/elasticache/
. -
On the navigation pane, choose Global Datastores.
-
Under Global Datastore Name choose the global datastore you want to delete and then choose Delete.
You're then be prompted to confirm your decision with the following warning:
Are you sure you want to delete this Global Datastore? -
Choose Delete.
The global datastore transitions to Deleting status.