Example 3: Bucket owner granting permissions to objects it does not own
Important
Granting permissions to IAM roles is a better practice than granting permissions to individual users. To learn how to do this, see Understanding cross-account permissions and using IAM roles.
Topics
The scenario for this example is that a bucket owner wants to grant permission to access objects, but the bucket owner doesn't own all objects in the bucket. For this example, the bucket owner is trying to grant permission to users in its own account.
A bucket owner can enable other Amazon Web Services accounts to upload objects. By default, the bucket owner doesn't own objects written to a bucket by another Amazon Web Services account. Objects are owned by the accounts that write them to an S3 bucket. If the bucket owner doesn't own objects in the bucket, the object owner must first grant permission to the bucket owner using an object access control list (ACL). Then, the bucket owner can grant permissions to an object that they don't own. For more information, see Amazon S3 bucket and object ownership.
If the bucket owner applies the bucket owner enforced setting for S3 Object Ownership for the bucket, the bucket owner will own all objects in the bucket, including objects written by another Amazon Web Services account. This approach resolves the issue that objects are not owned by the bucket owner. Then, you can delegate permission to users in your own account or to other Amazon Web Services accounts.
Note
S3 Object Ownership is an Amazon S3 bucket-level setting that you can use to both control ownership of the objects that are uploaded to your bucket and to disable or enable ACLs. By default, Object Ownership is set to the Bucket owner enforced setting, and all ACLs are disabled. When ACLs are disabled, the bucket owner owns all the objects in the bucket and manages access to them exclusively by using access-management policies.
A majority of modern use cases in Amazon S3 no longer require the use of ACLs. We recommend that you keep ACLs disabled, except in circumstances where you need to control access for each object individually. With ACLs disabled, you can use policies to control access to all objects in your bucket, regardless of who uploaded the objects to your bucket. For more information, see Controlling ownership of objects and disabling ACLs for your bucket.
In this example, we assume the bucket owner has not applied the bucket owner enforced setting for Object Ownership. The bucket owner delegates permission to users in its own account. The following is a summary of the walkthrough steps:
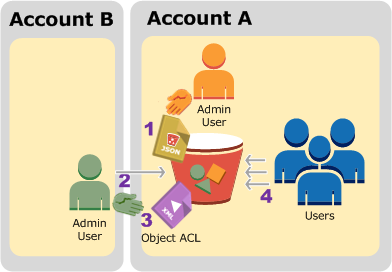
-
Account A administrator user attaches a bucket policy with two statements.
-
Allow cross-account permission to Account B to upload objects.
-
Allow a user in its own account to access objects in the bucket.
-
-
Account B administrator user uploads objects to the bucket owned by Account A.
-
Account B administrator updates the object ACL adding grant that gives the bucket owner full-control permission on the object.
-
User in Account A verifies by accessing objects in the bucket, regardless of who owns them.
For this example, you need two accounts. The following table shows how we refer to these accounts and the administrator users in these accounts. In this walkthrough, you don't use the account root user credentials, according to the recommended IAM guidelines. For more information, see About using an administrator user to create resources and grant permissions. Instead, you create an administrator in each account and use those credentials in creating resources and granting them permissions.
| Amazon Web Services account ID | Account referred to as | Administrator in the account |
|---|---|---|
|
|
Account A |
AccountAadmin |
|
|
Account B |
AccountBadmin |
All the tasks of creating users and granting permissions are done in the Amazon Web Services Management Console. To verify permissions, the walkthrough uses the command line tools, Amazon Command Line Interface (Amazon CLI) and Amazon Tools for Windows PowerShell, so you don't need to write any code.
Step 0: Preparing for the walkthrough
-
Make sure that you have two Amazon Web Services accounts and each account has one administrator as shown in the table in the preceding section.
-
Sign up for an Amazon Web Services account, if needed.
-
Using Account A credentials, sign in to the IAM Console
and do the following to create an administrator user: -
Create user
AccountAadminand note the user's security credentials. For more information about adding users, see Creating an IAM user in your Amazon Web Services account in the IAM User Guide. -
Grant administrator permissions to AccountAadmin by attaching a user policy that gives full access. For instructions, see Managing IAM policies in the IAM User Guide.
-
In the IAM Console
Dashboard, note the IAM User Sign-In URL. Users in this account must use this URL when signing in to the Amazon Web Services Management Console. For more information, see How users sign in to your account in IAM User Guide.
-
-
Repeat the preceding step using Account B credentials and create administrator user
AccountBadmin.
-
-
Set up either the Amazon CLI or the Tools for Windows PowerShell. Make sure that you save the administrator credentials as follows:
-
If using the Amazon CLI, create two profiles,
AccountAadminandAccountBadmin, in the config file. -
If using the Tools for Windows PowerShell, make sure that you store credentials for the session as
AccountAadminandAccountBadmin.
For instructions, see Setting up the tools for the walkthroughs.
-
Step 1: Do the Account A tasks
Perform the following steps for Account A:
Step 1.1: Sign in to the console
Using the IAM user sign-in URL for Account A, sign in to the Amazon Web Services Management Console as
AccountAadmin user. This user will create a bucket and
attach a policy to it.
Step 1.2: Create a bucket and user, and add a bucket policy to grant user permissions
-
In the Amazon S3 console, create a bucket. This exercise assumes that the bucket is created in the US East (N. Virginia) Amazon Web Services Region, and the name is
amzn-s3-demo-bucket1For instructions, see Creating a general purpose bucket.
-
In the IAM Console
, create a user Dave.For step-by-step instructions, see Creating IAM users (console) in the IAM User Guide.
-
Note the user Dave credentials.
-
In the Amazon S3 console, attach the following bucket policy to
amzn-s3-demo-bucket1The policy grants Account B the
s3:PutObjectands3:ListBucketpermissions. The policy also grants userDavethes3:GetObjectpermission.
Step 2: Do the Account B tasks
Now that Account B has permissions to perform operations on Account A's bucket, the Account B administrator does the following:
-
Uploads an object to Account A's bucket
-
Adds a grant in the object ACL to allow Account A, the bucket owner, full control
Using the Amazon CLI
-
Using the
put-objectAmazon CLI command, upload an object. The--bodyparameter in the command identifies the source file to upload. For example, if the file is on theC:drive of a Windows machine, specifyc:\HappyFace.jpg. The--keyparameter provides the key name for the object.aws s3api put-object --bucketamzn-s3-demo-bucket1--key HappyFace.jpg --body HappyFace.jpg --profile AccountBadmin -
Add a grant to the object ACL to allow the bucket owner full control of the object. For information about how to find a canonical user ID, see Find the canonical user ID for your Amazon Web Services account in the Amazon Account Management Reference Guide.
aws s3api put-object-acl --bucketamzn-s3-demo-bucket1--key HappyFace.jpg --grant-full-control id="AccountA-CanonicalUserID" --profile AccountBadmin
Using the Tools for Windows PowerShell
-
Using the
Write-S3Objectcommand, upload an object.Write-S3Object -BucketNameamzn-s3-demo-bucket1-key HappyFace.jpg -file HappyFace.jpg -StoredCredentials AccountBadmin -
Add a grant to the object ACL to allow the bucket owner full control of the object.
Set-S3ACL -BucketNameamzn-s3-demo-bucket1-Key HappyFace.jpg -CannedACLName "bucket-owner-full-control" -StoredCreden
Step 3: Test permissions
Now verify that user Dave in Account A can access the object owned by Account B.
Using the Amazon CLI
-
Add user Dave credentials to the Amazon CLI config file and create a new profile,
UserDaveAccountA. For more information, see Setting up the tools for the walkthroughs.[profile UserDaveAccountA] aws_access_key_id =access-keyaws_secret_access_key =secret-access-keyregion =us-east-1 -
Run the
get-objectCLI command to downloadHappyFace.jpgand save it locally. You provide user Dave credentials by adding the--profileparameter.aws s3api get-object --bucketamzn-s3-demo-bucket1--key HappyFace.jpgOutputfile.jpg--profile UserDaveAccountA
Using the Tools for Windows PowerShell
-
Store user Dave Amazon credentials, as
UserDaveAccountA, to persistent store.Set-AWSCredentials -AccessKeyUserDave-AccessKey-SecretKeyUserDave-SecretAccessKey-storeas UserDaveAccountA -
Run the
Read-S3Objectcommand to download theHappyFace.jpgobject and save it locally. You provide user Dave credentials by adding the-StoredCredentialsparameter.Read-S3Object -BucketNameamzn-s3-demo-bucket1-Key HappyFace.jpg -file HappyFace.jpg -StoredCredentials UserDaveAccountA
Step 4: Clean up
-
After you're done testing, you can do the following to clean up:
-
Sign in to the Amazon Web Services Management Console
using Account A credentials, and do the following: -
In the Amazon S3 console, remove the bucket policy attached to
amzn-s3-demo-bucket1. In the bucket Properties, delete the policy in the Permissions section. -
If the bucket is created for this exercise, in the Amazon S3 console, delete the objects and then delete the bucket.
-
In the IAM Console
, remove the AccountAadmin user. For step-by-step instructions, see Deleting an IAM user in the IAM User Guide.
-
-
-
Sign in to the Amazon Web Services Management Console
using Account B credentials. In the IAM Console , delete the user AccountBadmin.