Tutorial: Transforming data for your application with S3 Object Lambda
Note
As of November 7th, 2025, S3 Object Lambda is available only to existing customers that are currently using the service as well as to select Amazon Partner Network (APN) partners. For capabilities similar to S3 Object Lambda, learn more here - Amazon S3 Object Lambda availability change.
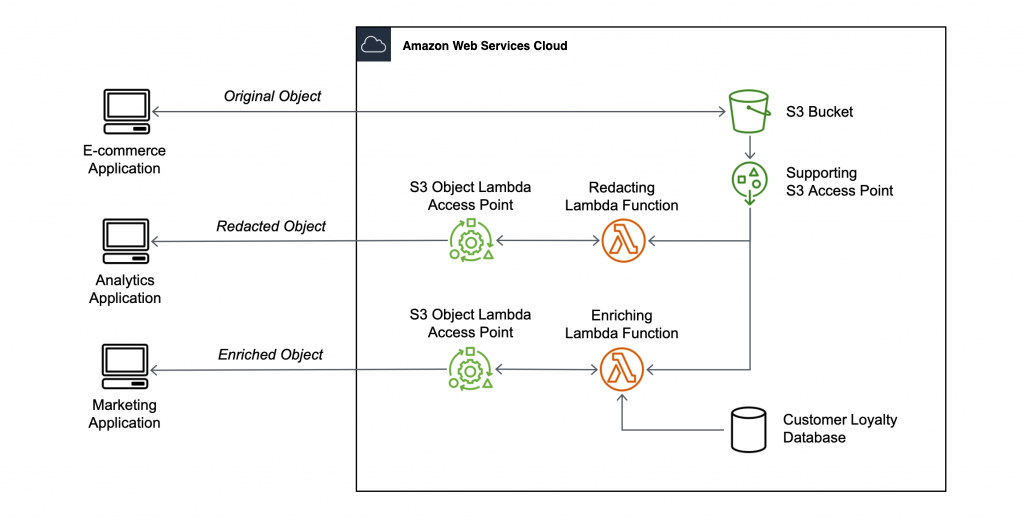
When you store data in Amazon S3, you can easily share it for use by multiple applications. However, each application might have unique data format requirements, and might need modification or processing of your data for a specific use case. For example, a dataset created by an ecommerce application might include personally identifiable information (PII). When the same data is processed for analytics, this PII is not needed and should be redacted. However, if the same dataset is used for a marketing campaign, you might need to enrich the data with additional details, such as information from the customer loyalty database.
With S3 Object Lambda
Objective
In this tutorial, you learn how to add custom code to standard S3 GET requests to modify the requested object retrieved from S3 so that the object suit the needs of the requesting client or application. Specifically, you learn how to transform all the text in the original object stored in an S3 bucket to uppercase through S3 Object Lambda.
Note
This tutorial uses Python code to transform the data, for examples using other Amazon SDKs see Transform data for your application with S3 Object Lambda in the Amazon SDK Code Examples Library.
Prerequisites
Before you start this tutorial, you must have an Amazon Web Services account that you can sign in to as an Amazon Identity and Access Management (IAM) user with correct permissions. You also must install Python version 3.8 or later.
Substeps
Create an IAM user with permissions in your Amazon Web Services account (console)
You can create an IAM user for the tutorial. To complete this tutorial, your IAM user must attach the following IAM policies to access relevant Amazon resources and perform specific actions. For more information about how to create an IAM user, see Creating IAM users (console) in the IAM User Guide.
Your IAM user requires the following policies:
-
AmazonS3FullAccess
– Grants permissions to all Amazon S3 actions, including permissions to create and use an Object Lambda Access Point. -
AWSLambda_FullAccess
– Grants permissions to all Lambda actions. -
IAMFullAccess
– Grants permissions to all IAM actions. -
IAMAccessAnalyzerReadOnlyAccess
– Grants permissions to read all access information provided by IAM Access Analyzer. -
CloudWatchLogsFullAccess
– Grants full access to CloudWatch Logs.
Note
For simplicity, this tutorial creates and uses an IAM user. After completing this tutorial, remember to Delete the IAM user. For production use, we recommend that you follow the Security best practices in IAM in the IAM User Guide. A best practice requires human users to use federation with an identity provider to access Amazon with temporary credentials. Another best practice is to require workloads to use temporary credentials with IAM roles to access Amazon. To learn about using Amazon IAM Identity Center to create users with temporary credentials, see Getting started in the Amazon IAM Identity Center User Guide.
This tutorial also uses full-access Amazon managed policies. For production use, we recommend that you instead grant only the minimum permissions necessary for your use case, in accordance with security best practices.
Install Python 3.8 or later on your local machine
Use the following procedure to install Python 3.8 or later on your local machine.
For more installation instructions, see the Downloading
Python
-
Open your local terminal or shell and run the following command to determine whether Python is already installed, and if so, which version is installed.
python --version -
If you don't have Python 3.8 or later, download the official installer
of Python 3.8 or later that's suitable for your local machine. -
Run the installer by double-clicking the downloaded file, and follow the steps to complete the installation.
For Windows users, choose Add Python 3.X to PATH in the installation wizard before choosing Install Now.
-
Restart your terminal by closing and reopening it.
-
Run the following command to verify that Python 3.8 or later is installed correctly.
For macOS users, run this command:
python3 --versionFor Windows users, run this command:
python --version -
Run the following command to verify that the pip3 package manager is installed. If you see a pip version number and python 3.8 or later in the command response, that means the pip3 package manager is installed successfully.
pip --version
Step 1: Create an S3 bucket
Create a bucket to store the original data that you plan to transform.
Note
Access points may be attached for another data source, such as an Amazon FSx for OpenZFS volume, however this tutorial uses a supporting access point attached to an S3 bucket.
To create a bucket
Sign in to the Amazon Web Services Management Console and open the Amazon S3 console at https://console.amazonaws.cn/s3/
. -
In the left navigation pane, choose Buckets.
-
Choose Create bucket.
The Create bucket page opens.
-
For Bucket name, enter a name (for example,
tutorial-bucket) for your bucket.For more information about naming buckets in Amazon S3, see General purpose bucket naming rules.
-
For Region, choose the Amazon Web Services Region where you want the bucket to reside.
For more information about the bucket Region, see General purpose buckets overview.
-
For Block Public Access settings for this bucket, keep the default settings (Block all public access is enabled).
We recommend that you keep all Block Public Access settings enabled unless you need to turn off one or more of them for your use case. For more information about blocking public access, see Blocking public access to your Amazon S3 storage.
-
For the remaining settings, keep the defaults.
(Optional) If you want to configure additional bucket settings for your specific use case, see Creating a general purpose bucket.
-
Choose Create bucket.
Step 2: Upload a file to the S3 bucket
Upload a text file to the S3 bucket. This text file contains the original data that you will transform to uppercase later in this tutorial.
For example, you can upload a tutorial.txt file that contains the
following text:
Amazon S3 Object Lambda Tutorial:
You can add your own code to process data retrieved from S3 before
returning it to an application.
To upload a file to a bucket
Sign in to the Amazon Web Services Management Console and open the Amazon S3 console at https://console.amazonaws.cn/s3/
. -
In the left navigation pane, choose Buckets.
-
In the Buckets list, choose the name of the bucket that you created in Step 1 (for example,
tutorial-bucket) to upload your file to. -
On the Objects tab for your bucket, choose Upload.
-
On the Upload page, under Files and folders, choose Add files.
-
Choose a file to upload, and then choose Open. For example, you can upload the
tutorial.txtfile example mentioned earlier. -
Choose Upload.
Step 3: Create an S3 access point
To use an S3 Object Lambda Access Point to access and transform the original data, you must create an S3 access point and associate it with the S3 bucket that you created in Step 1. The access point must be in the same Amazon Web Services Region as the objects that you want to transform.
Later in this tutorial, you'll use this access point as a supporting access point for your Object Lambda Access Point.
To create an access point
Sign in to the Amazon Web Services Management Console and open the Amazon S3 console at https://console.amazonaws.cn/s3/
. -
In the left navigation pane, choose Access Points.
-
On the Access Points page, choose Create access point.
-
In the Access point name field, enter the name (for example,
tutorial-access-point) for the access point.For more information about naming access points, see Naming rules for access points.
-
In the Data source field, enter the name of the bucket that you created in Step 1 (for example,
tutorial-bucket). S3 attaches the access point to this bucket.(Optional) You can choose Browse S3 to browse and search the buckets in your account. If you choose Browse S3, choose the desired bucket, and then choose Choose path to populate the Bucket name field with that bucket's name.
-
For Network origin, choose Internet.
For more information about network origins for access points, see Creating access points restricted to a virtual private cloud.
-
By default, all Block Public Access settings are turned on for your access point. We recommend that you keep Block all public access enabled.
For more information, see Managing public access to access points for general purpose buckets.
-
For all other access point settings, keep the default settings.
(Optional) You can modify the access point settings to support your use case. For this tutorial, we recommend keeping the default settings.
(Optional) If you need to manage access to your access point, you can specify an access point policy. For more information, see Policy examples for access points.
-
Choose Create access point.
Step 4: Create a Lambda function
To transform original data, create a Lambda function for use with your S3 Object Lambda Access Point.
Substeps
Write Lambda function code and create a deployment package with a virtual environment
-
On your local machine, create a folder with the folder name
object-lambdafor the virtual environment to use later in this tutorial. -
In the
object-lambdafolder, create a file with a Lambda function that changes all text in the original object to uppercase. For example, you can use the following function written in Python. Save this function in a file namedtransform.py.import boto3 import requests from botocore.config import Config # This function capitalizes all text in the original object def lambda_handler(event, context): object_context = event["getObjectContext"] # Get the presigned URL to fetch the requested original object # from S3 s3_url = object_context["inputS3Url"] # Extract the route and request token from the input context request_route = object_context["outputRoute"] request_token = object_context["outputToken"] # Get the original S3 object using the presigned URL response = requests.get(s3_url) original_object = response.content.decode("utf-8") # Transform all text in the original object to uppercase # You can replace it with your custom code based on your use case transformed_object = original_object.upper() # Write object back to S3 Object Lambda s3 = boto3.client('s3', config=Config(signature_version='s3v4')) # The WriteGetObjectResponse API sends the transformed data # back to S3 Object Lambda and then to the user s3.write_get_object_response( Body=transformed_object, RequestRoute=request_route, RequestToken=request_token) # Exit the Lambda function: return the status code return {'status_code': 200}Note
The preceding example Lambda function loads the entire requested object into memory before transforming it and returning it to the client. Alternatively, you can stream the object from S3 to avoid loading the entire object into memory. This approach can be useful when working with large objects. For more information about streaming responses with Object Lambda Access Points, see the streaming examples in Working with GetObject requests in Lambda.
When you're writing a Lambda function for use with an S3 Object Lambda Access Point, the function is based on the input event context that S3 Object Lambda provides to the Lambda function. The event context provides information about the request being made in the event passed from S3 Object Lambda to Lambda. It contains the parameters that you use to create the Lambda function.
The fields used to create the preceding Lambda function are as follows:
The field of
getObjectContextmeans the input and output details for connections to Amazon S3 and S3 Object Lambda. It has the following fields:-
inputS3Url– A presigned URL that the Lambda function can use to download the original object from the supporting access point. By using a presigned URL, the Lambda function doesn't need to have Amazon S3 read permissions to retrieve the original object and can only access the object processed by each invocation. -
outputRoute– A routing token that is added to the S3 Object Lambda URL when the Lambda function callsWriteGetObjectResponseto send back the transformed object. -
outputToken– A token used by S3 Object Lambda to match theWriteGetObjectResponsecall with the original caller when sending back the transformed object.
For more information about all the fields in the event context, see Event context format and usage and Writing Lambda functions for S3 Object Lambda Access Points.
-
-
In your local terminal, enter the following command to install the
virtualenvpackage:python -m pip install virtualenv -
In your local terminal, open the
object-lambdafolder that you created earlier, and then enter the following command to create and initialize a virtual environment calledvenv.python -m virtualenv venv -
To activate the virtual environment, enter the following command to execute the
activatefile from the environment's folder:For macOS users, run this command:
source venv/bin/activateFor Windows users, run this command:
.\venv\Scripts\activateNow, your command prompt changes to show (venv), indicating that the virtual environment is active.
-
To install the required libraries, run the following commands line by line in the
venvvirtual environment.These commands install updated versions of the dependencies of your
lambda_handlerLambda function. These dependencies are the Amazon SDK for Python (Boto3) and the requests module.pip3 install boto3pip3 install requests -
To deactivate the virtual environment, run the following command:
deactivate -
To create a deployment package with the installed libraries as a
.zipfile namedlambda.zipat the root of theobject-lambdadirectory, run the following commands line by line in your local terminal.Tip
The following commands might need to be adjusted to work in your particular environment. For example, a library might appear in
site-packagesordist-packages, and the first folder might beliborlib64. Also, thepythonfolder might be named with a different Python version. To locate a specific package, use thepip showcommand.For macOS users, run these commands:
cd venv/lib/python3.8/site-packageszip -r ../../../../lambda.zip .For Windows users, run these commands:
cd .\venv\Lib\site-packages\powershell Compress-Archive * ../../../lambda.zipThe last command saves the deployment package to the root of the
object-lambdadirectory. -
Add the function code file
transform.pyto the root of your deployment package.For macOS users, run these commands:
cd ../../../../zip -g lambda.zip transform.pyFor Windows users, run these commands:
cd ..\..\..\powershell Compress-Archive -update transform.py lambda.zipAfter you complete this step, you should have the following directory structure:
lambda.zip$
  │ transform.py
  │ __pycache__
  | boto3/
  │ certifi/
  │ pip/
  │ requests/
  ...
Create a Lambda function with an execution role (console)
Sign in to the Amazon Web Services Management Console and open the Amazon Lambda console at https://console.amazonaws.cn/lambda/
. -
In the left navigation pane, choose Functions.
-
Choose Create function.
-
Choose Author from scratch.
-
Under Basic information, do the following:
-
For Function name, enter
tutorial-object-lambda-function. -
For Runtime, choose Python 3.8 or a later version.
-
-
Expand the Change default execution role section. Under Execution role, choose Create a new role with basic Lambda permissions.
In Step 5 later in this tutorial, you attach the AmazonS3ObjectLambdaExecutionRolePolicy to this Lambda function's execution role.
-
Keep the remaining settings set to the defaults.
-
Choose Create function.
Deploy your Lambda function code with .zip file archives and configure the Lambda function (console)
-
In the Amazon Lambda console at https://console.amazonaws.cn/lambda/
, choose Functions in the left navigation pane. -
Choose the Lambda function that you created earlier (for example,
tutorial-object-lambda-function). -
On the Lambda function's details page, choose the Code tab. In the Code Source section, choose Upload from and then .zip file.
-
Choose Upload to select your local
.zipfile. -
Choose the
lambda.zipfile that you created earlier, and then choose Open. -
Choose Save.
-
In the Runtime settings section, choose Edit.
-
On the Edit runtime settings page, confirm that Runtime is set to Python 3.8 or a later version.
-
To tell the Lambda runtime which handler method in your Lambda function code to invoke, enter
transform.lambda_handlerfor Handler.When you configure a function in Python, the value of the handler setting is the file name and the name of the handler module, separated by a dot. For example,
transform.lambda_handlercalls thelambda_handlermethod defined in thetransform.pyfile. -
Choose Save.
-
(Optional) On your Lambda function's details page, choose the Configuration tab. In the left navigation pane, choose General configuration, then choose Edit. In the Timeout field, enter
1min0sec. Keep the remaining settings set to the defaults, and choose Save.Timeout is the amount of time that Lambda allows a function to run for an invocation before stopping it. The default is 3 seconds. The maximum duration for a Lambda function used by S3 Object Lambda is 60 seconds. Pricing is based on the amount of memory configured and the amount of time that your code runs.
Step 5: Configure an IAM policy for your Lambda function's execution role
To enable your Lambda function to provide customized data and response headers to the
GetObject caller, your Lambda function's execution role must have IAM
permissions to call the WriteGetObjectResponse API.
To attach an IAM policy to your Lambda function role
-
In the Amazon Lambda console at https://console.amazonaws.cn/lambda/
, choose Functions in the left navigation pane. -
Choose the function that you created in Step 4 (for example,
tutorial-object-lambda-function). -
On your Lambda function's details page, choose the Configuration tab, and then choose Permissions in the left navigation pane.
-
Under Execution role, choose the link of the Role name. The IAM console opens.
-
On the IAM console's Summary page for your Lambda function's execution role, choose the Permissions tab. Then, from the Add Permissions menu, choose Attach policies.
-
On the Attach Permissions page, enter
AmazonS3ObjectLambdaExecutionRolePolicyin the search box to filter the list of policies. Select the check box next to the name of the AmazonS3ObjectLambdaExecutionRolePolicy policy. -
Choose Attach policies.
Step 6: Create an S3 Object Lambda Access Point
An S3 Object Lambda Access Point provides the flexibility to invoke a Lambda function directly from an S3 GET request so that the function can process data retrieved from an S3 access point. When creating and configuring an S3 Object Lambda Access Point, you must specify the Lambda function to invoke and provide the event context in JSON format as custom parameters for Lambda to use.
To create an S3 Object Lambda Access Point
Sign in to the Amazon Web Services Management Console and open the Amazon S3 console at https://console.amazonaws.cn/s3/
. -
In the left navigation pane, choose Object Lambda Access Points.
-
On the Object Lambda Access Points page, choose Create Object Lambda Access Point.
-
For Object Lambda Access Point name, enter the name that you want to use for the Object Lambda Access Point (for example,
tutorial-object-lambda-accesspoint). -
For Supporting Access Point, enter or browse to the standard access point that you created in Step 3 (for example,
tutorial-access-point), and then choose Choose supporting Access Point. -
For S3 APIs, to retrieve objects from the S3 bucket for Lambda function to process, select GetObject.
-
For Invoke Lambda function, you can choose either of the following two options for this tutorial.
-
Choose Choose from functions in your account, and then choose the Lambda function that you created in Step 4 (for example,
tutorial-object-lambda-function) from the Lambda function dropdown list. -
Choose Enter ARN, and then enter the Amazon Resource Name (ARN) of the Lambda function that you created in Step 4.
-
-
For Lambda function version, choose $LATEST (the latest version of the Lambda function that you created in Step 4).
-
(Optional) If you need your Lambda function to recognize and process GET requests with range and part number headers, select Lambda function supports requests using range and Lambda function supports requests using part numbers. Otherwise, clear these two check boxes.
For more information about how to use range or part numbers with S3 Object Lambda, see Working with Range and partNumber headers.
-
(Optional) Under Payload - optional, add JSON text to provide your Lambda function with additional information.
A payload is optional JSON text that you can provide to your Lambda function as input for all invocations coming from a specific S3 Object Lambda Access Point. To customize the behaviors for multiple Object Lambda Access Points that invoke the same Lambda function, you can configure payloads with different parameters, thereby extending the flexibility of your Lambda function.
For more information about payload, see Event context format and usage.
-
(Optional) For Request metrics - optional, choose Disable or Enable to add Amazon S3 monitoring to your Object Lambda Access Point. Request metrics are billed at the standard Amazon CloudWatch rate. For more information, see CloudWatch pricing
. -
Under Object Lambda Access Point policy - optional, keep the default setting.
(Optional) You can set a resource policy. This resource policy grants the
GetObjectAPI permission to use the specified Object Lambda Access Point. -
Keep the remaining settings set to the defaults, and choose Create Object Lambda Access Point.
Step 7: View the transformed data
Now, S3 Object Lambda is ready to transform your data for your use case. In this tutorial, S3 Object Lambda transforms all the text in your object to uppercase.
Substeps
View the transformed data in your S3 Object Lambda Access Point
When you request to retrieve a file through your S3 Object Lambda Access Point, you make a
GetObject API call to S3 Object Lambda. S3 Object Lambda invokes the Lambda function to
transform your data, and then returns the transformed data as the response to the
standard S3 GetObject API call.
-
Sign in to the Amazon Web Services Management Console and open the Amazon S3 console at https://console.amazonaws.cn/s3/
. -
In the left navigation pane, choose Object Lambda Access Points.
-
On the Object Lambda Access Points page, choose the S3 Object Lambda Access Point that you created in Step 6 (for example,
tutorial-object-lambda-accesspoint). -
On the Objects tab of your S3 Object Lambda Access Point, select the file that has the same name (for example,
tutorial.txt) as the one that you uploaded to the S3 bucket in Step 2.This file should contain all the transformed data.
-
To view the transformed data, choose Open or Download.
Run a Python script to print the original and transformed data
You can use S3 Object Lambda with your existing applications. To do so, update your application configuration to use the new S3 Object Lambda Access Point ARN that you created in Step 6 to retrieve data from S3.
The following example Python script prints both the original data from the S3 bucket and the transformed data from the S3 Object Lambda Access Point.
-
Sign in to the Amazon Web Services Management Console and open the Amazon S3 console at https://console.amazonaws.cn/s3/
. -
In the left navigation pane, choose Object Lambda Access Points.
-
On the Object Lambda Access Points page, choose the radio button to the left of the S3 Object Lambda Access Point that you created in Step 6 (for example,
tutorial-object-lambda-accesspoint). -
Choose Copy ARN.
-
Save the ARN for use later.
-
Write a Python script on your local machine to print both the original data (for example,
tutorial.txt) from your S3 Bucket and the transformed data (for example,tutorial.txt) from your S3 Object Lambda Access Point). You can use the following example script.import boto3 from botocore.config import Config s3 = boto3.client('s3', config=Config(signature_version='s3v4')) def getObject(bucket, key): objectBody = s3.get_object(Bucket = bucket, Key = key) print(objectBody["Body"].read().decode("utf-8")) print("\n") print('Original object from the S3 bucket:') # Replace the two input parameters of getObject() below with # the S3 bucket name that you created in Step 1 and # the name of the file that you uploaded to the S3 bucket in Step 2 getObject("tutorial-bucket", "tutorial.txt") print('Object transformed by S3 Object Lambda:') # Replace the two input parameters of getObject() below with # the ARN of your S3 Object Lambda Access Point that you saved earlier and # the name of the file with the transformed data (which in this case is # the same as the name of the file that you uploaded to the S3 bucket # in Step 2) getObject("arn:aws:s3-object-lambda:us-west-2:111122223333:accesspoint/tutorial-object-lambda-accesspoint", "tutorial.txt") -
Save your Python script with a custom name (for example,
tutorial_print.py) in the folder (for example,object-lambda) that you created in Step 4 on your local machine. -
In your local terminal, run the following command from the root of the directory (for example,
object-lambda) that you created in Step 4.python3 tutorial_print.pyYou should see both the original data and the transformed data (all text as uppercase) through the terminal. For example, you should see something like the following text.
Original object from the S3 bucket:
Amazon S3 Object Lambda Tutorial:
You can add your own code to process data retrieved from S3 before
returning it to an application.

Object transformed by S3 Object Lambda:
AMAZON S3 OBJECT LAMBDA TUTORIAL:
YOU CAN ADD YOUR OWN CODE TO PROCESS DATA RETRIEVED FROM S3 BEFORE
RETURNING IT TO AN APPLICATION.
Step 8: Clean up
If you transformed your data through S3 Object Lambda only as a learning exercise, delete the Amazon resources that you allocated so that you no longer accrue charges.
Substeps
Delete the Object Lambda Access Point
Sign in to the Amazon Web Services Management Console and open the Amazon S3 console at https://console.amazonaws.cn/s3/
. -
In the left navigation pane, choose Object Lambda Access Points.
-
On the Object Lambda Access Points page, choose the radio button to the left of the S3 Object Lambda Access Point that you created in Step 6 (for example,
tutorial-object-lambda-accesspoint). -
Choose Delete.
-
Confirm that you want to delete your Object Lambda Access Point by entering its name in the text field that appears, and then choose Delete.
Delete the S3 access point
Sign in to the Amazon Web Services Management Console and open the Amazon S3 console at https://console.amazonaws.cn/s3/
. -
In the left navigation pane, choose Access Points.
-
Navigate to the access point that you created in Step 3 (for example,
tutorial-access-point), and choose the radio button next to the name of the access point. -
Choose Delete.
-
Confirm that you want to delete your access point by entering its name in the text field that appears, and then choose Delete.
Delete the execution role for your Lambda function
-
Sign in to the Amazon Web Services Management Console and open the Amazon Lambda console at https://console.amazonaws.cn/lambda/
. -
In the left navigation pane, choose Functions.
-
Choose the function that you created in Step 4 (for example,
tutorial-object-lambda-function). -
On your Lambda function's details page, choose the Configuration tab, and then choose Permissions in the left navigation pane.
-
Under Execution role, choose the link of the Role name. The IAM console opens.
-
On the IAM console's Summary page of your Lambda function's execution role, choose Delete role.
-
In the Delete role dialog box, choose Yes, delete.
Delete the Lambda function
-
In the Amazon Lambda console at https://console.amazonaws.cn/lambda/
, choose Functions in the left navigation pane. -
Select the check box to the left of the name of the function that you created in Step 4 (for example,
tutorial-object-lambda-function). -
Choose Actions, and then choose Delete.
-
In the Delete function dialog box, choose Delete.
Delete the CloudWatch log group
Open the CloudWatch console at https://console.amazonaws.cn/cloudwatch/
. -
In the left navigation pane, choose Log groups.
-
Find the log group whose name ends with the Lambda function that you created in Step 4 (for example,
tutorial-object-lambda-function). -
Select the check box to the left of the name of the log group.
-
Choose Actions, and then choose Delete log group(s).
-
In the Delete log group(s) dialog box, choose Delete.
Delete the original file in the S3 source bucket
Sign in to the Amazon Web Services Management Console and open the Amazon S3 console at https://console.amazonaws.cn/s3/
. -
In the left navigation pane, choose Buckets.
-
In the Bucket name list, choose the name of the bucket that you uploaded the original file to in Step 2 (for example,
tutorial-bucket). -
Select the check box to the left of the name of the object that you want to delete (for example,
tutorial.txt). -
Choose Delete.
-
On the Delete objects page, in the Permanently delete objects? section, confirm that you want to delete this object by entering
permanently
                            delete
in the text box. -
Choose Delete objects.
Delete the S3 source bucket
Sign in to the Amazon Web Services Management Console and open the Amazon S3 console at https://console.amazonaws.cn/s3/
. -
In the left navigation pane, choose Buckets.
-
In the Buckets list, choose the radio button next to the name of the bucket that you created in Step 1 (for example,
tutorial-bucket). -
Choose Delete.
-
On the Delete bucket page, confirm that you want to delete the bucket by entering the bucket name in the text field, and then choose Delete bucket.
Delete the IAM user
Sign in to the Amazon Web Services Management Console and open the IAM console at https://console.amazonaws.cn/iam/
. -
In the left navigation pane, choose Users, and then select the check box next to the user name that you want to delete.
-
At the top of the page, choose Delete.
-
In the Delete
user name? dialog box, enter the user name in the text input field to confirm the deletion of the user. Choose Delete.
Next steps
After completing this tutorial, you can customize the Lambda function for your use case to modify the data returned by standard S3 GET requests.
The following is a list of common use cases for S3 Object Lambda:
-
Masking sensitive data for security and compliance.
For more information, see Tutorial: Detecting and redacting PII data with S3 Object Lambda and Amazon Comprehend.
-
Filtering certain rows of data to deliver specific information.
-
Augmenting data with information from other services or databases.
-
Converting across data formats, such as converting XML to JSON for application compatibility.
-
Compressing or decompressing files as they are being downloaded.
-
Resizing and watermarking images.
For more information, see Tutorial: Using S3 Object Lambda to dynamically watermark images as they are retrieved
. -
Implementing custom authorization rules to access data.
For more information about S3 Object Lambda, see Transforming objects with S3 Object Lambda.