本文属于机器翻译版本。若本译文内容与英语原文存在差异,则一律以英文原文为准。
其他检索功能
Amazon AppConfig Agent 还提供以下附加功能来帮助您检索应用程序的配置。
关于代理清单
要启用这些 Amazon AppConfig 代理功能,您需要创建清单。清单是您提供的一组配置数据,用于控制代理可以执行的操作。清单是用 JSON 编写的。它包含一组顶级密钥,这些密钥对应于您部署的不同配置 Amazon AppConfig。
一份清单可以包含多个配置。此外,清单中的每个配置都可以标识用于指定配置的一个或多个代理功能。清单的内容使用以下格式:
{
    "application_name:environment_name:configuration_name": {
        "agent_feature_to_enable_1": {
            "feature-setting-key": "feature-setting-value"
        },
        "agent_feature_to_enable_2": {
            "feature-setting-key": "feature-setting-value"
        }
    }
}
以下是具有两种配置的清单的 JSON 示例。第一个配置 (MyApp) 不使用任何 Amazon AppConfig 代理功能。第二种配置 (my2ndApp) 使用将配置副本写入磁盘和多账户检索功能:
{
        "MyApp:Test:MyAllowListConfiguration": {},

        "My2ndApp:Beta:MyEnableMobilePaymentsFeatureFlagConfiguration": {
            "credentials": {
                "roleArn": "arn:us-west-1:iam::123456789012:role/MyTestRole",
                "roleExternalId": "00b148e2-4ea4-46a1-ab0f-c422b54d0aac",
                "roleSessionName": "AwsAppConfigAgent",
                "credentialsDuration": "2h"
            },
            "writeTo": {
                "path": "/tmp/aws-appconfig/my-2nd-app/beta/my-enable-payments-feature-flag-configuration.json"
            }
        }
    }
如何提供代理清单
您可以将清单作为文件存储在 Amazon AppConfig 代理可以读取的位置。或者,您可以将清单存储为 Amazon AppConfig 配置并将代理指向它。要提供代理清单,必须使用以下值之一设置MANIFEST环境变量:
| 清单位置 | 环境变量值 | 应用场景 |
|---|---|---|
|
文件 |
文件:/path/to/to/agent-manifest.j |
如果您的清单不经常更改,请使用此方法。 |
|
Amazon AppConfig 配置 |
|
使用此方法进行动态更新。您可以像存储其他 Amazon AppConfig 配置一样更新和部署 Amazon AppConfig 作为配置存储在中的清单。 |
|
环境变量 |
清单内容 (JSON) |
如果您的清单不经常更改,请使用此方法。此方法在容器环境中很有用,在这种环境中,设置环境变量比公开文件更容易。 |
有关为 Amazon AppConfig Agent 设置变量的更多信息,请参阅与您的用例相关的主题:
多账号检索
您可以通过在 Amazon AppConfig 代理清单中输入凭据覆盖 Amazon Web Services 账户 来配置 Amazon AppConfig 代理以从多个中检索配置。证书覆盖包括 (IAM) 角色的 Amazon 资源名称 Amazon Identity and Access Management (ARN)、角色 ID、会话名称以及代理可以担任该角色的时长。
您可以在清单的 “凭证” 部分中输入这些详细信息。“凭证” 部分使用以下格式:
{
    "application_name:environment_name:configuration_name": {
        "credentials": {
            "roleArn": "arn:partition:iam::account_ID:role/roleName",
            "roleExternalId": "string",
            "roleSessionName": "string",
            "credentialsDuration": "time_in_hours"
        }
    }
}
示例如下:
{
    "My2ndApp:Beta:MyEnableMobilePaymentsFeatureFlagConfiguration": {
        "credentials": {
            "roleArn": "arn:us-west-1:iam::123456789012:role/MyTestRole",
            "roleExternalId": "00b148e2-4ea4-46a1-ab0f-c422b54d0aac",
            "roleSessionName": "AWSAppConfigAgent",
            "credentialsDuration": "2h"
        }
    }
}
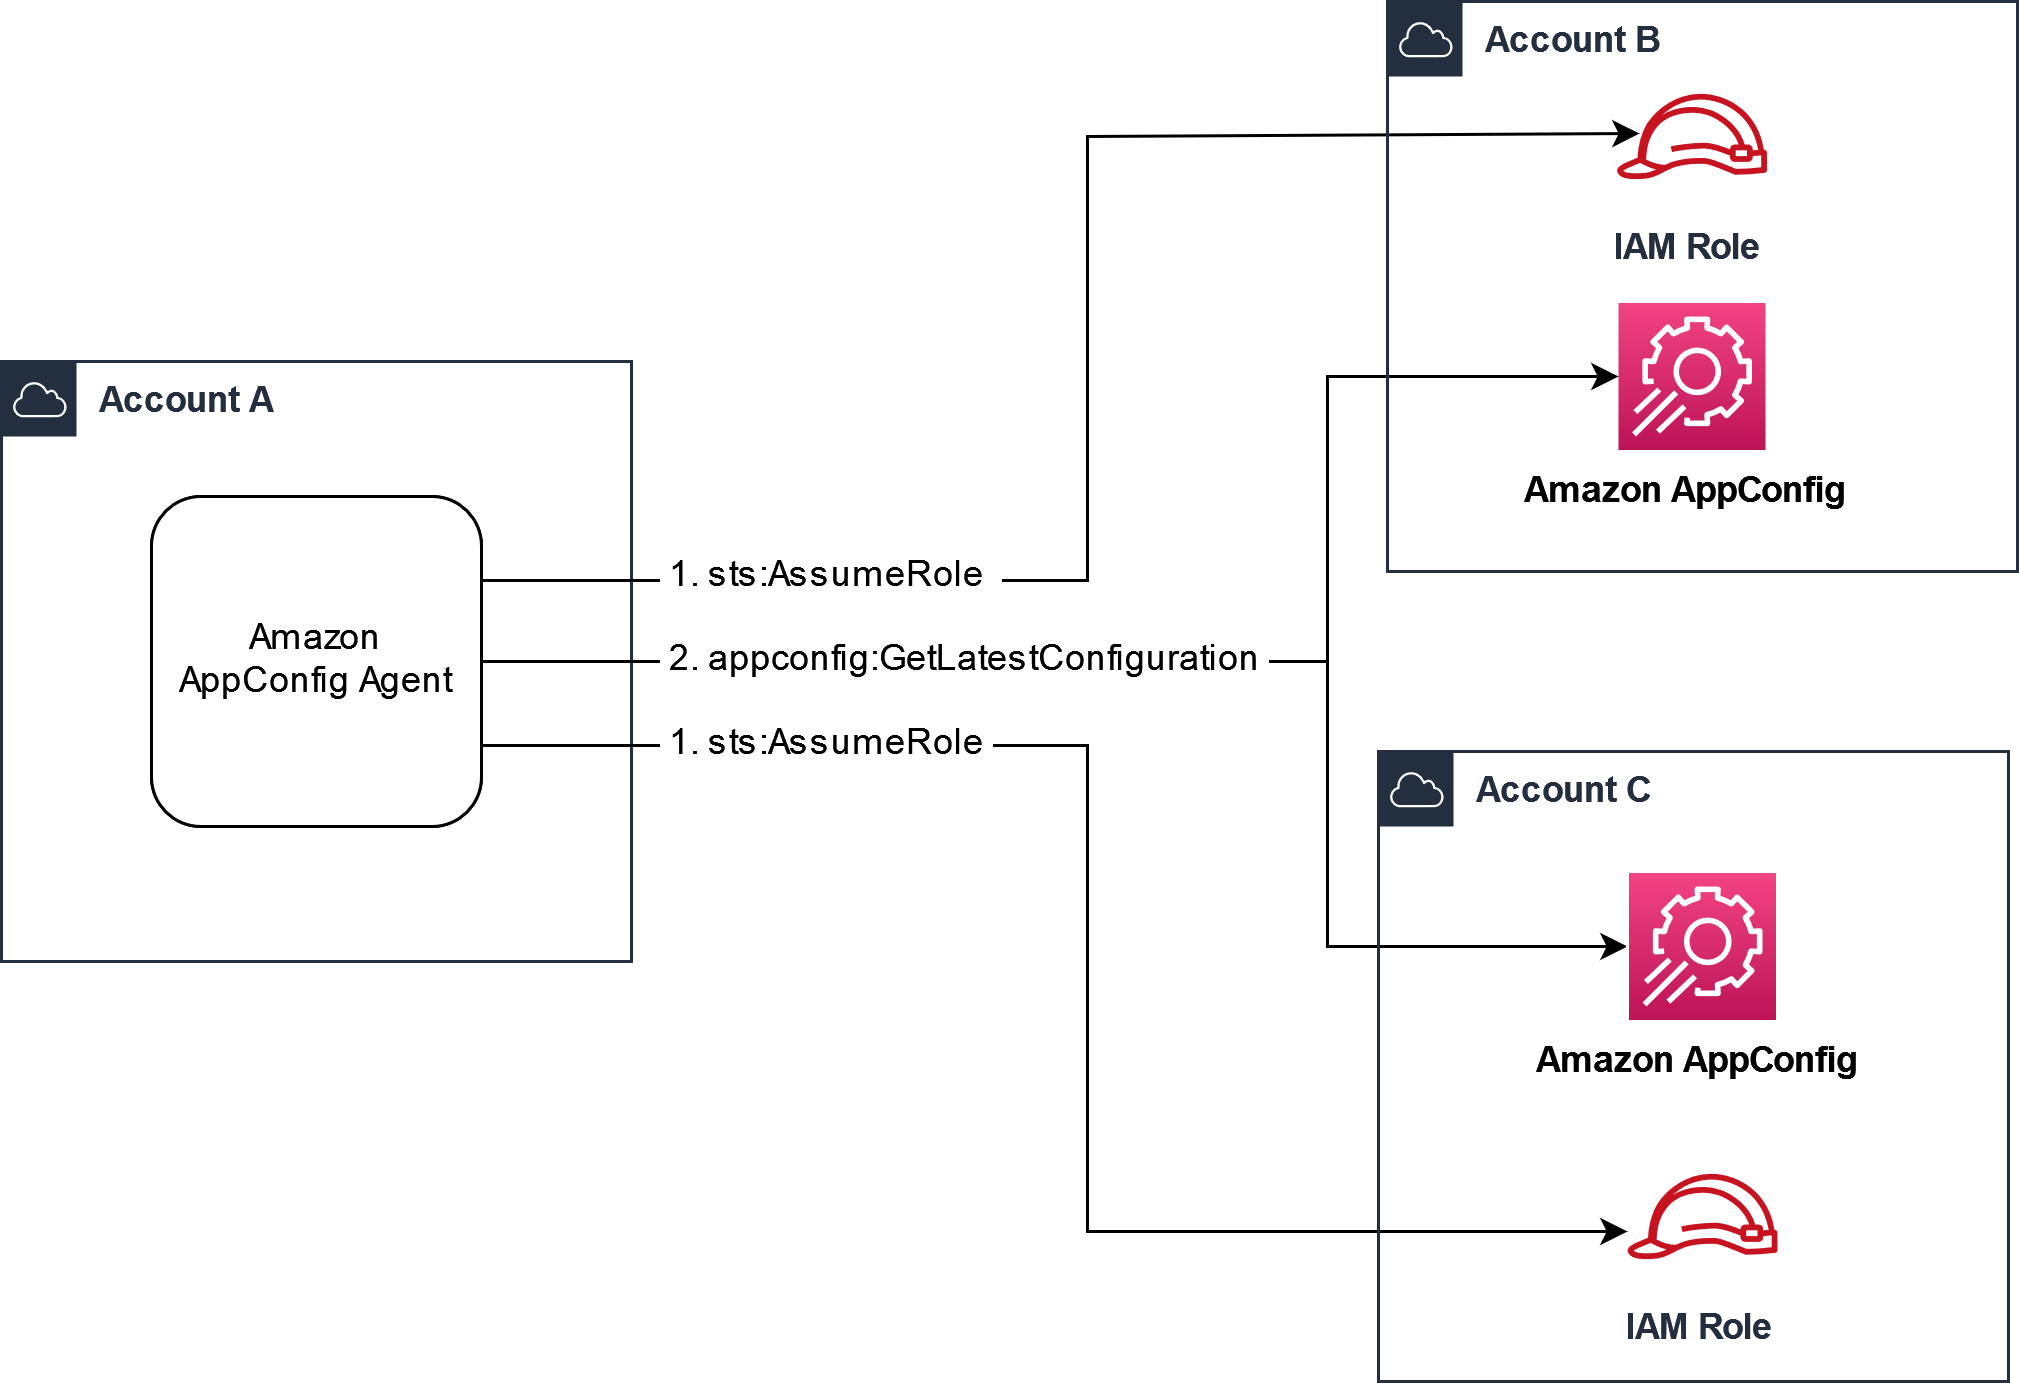
在检索配置之前,代理会从清单中读取配置的凭证详细信息,然后担任为该配置指定的 IAM 角色。您可以在单个清单中为不同的配置指定一组不同的凭据替换。下图显示 Amazon AppConfig 代理在账户 A(检索账户)中运行时,如何扮演为账户 B 和账户 C(供应商账户)指定的不同角色,然后调用 GetLatestConfigurationAPI 操作来检索在这些账户中 Amazon AppConfig 运行的配置数据:
配置从供应商账户检索配置数据的权限
Amazon AppConfig 在检索账户中运行的代理需要权限才能从供应商帐户检索配置数据。您可以通过在每个供应商账户中创建 Amazon Identity and Access Management (IAM) 角色来授予代理权限。 Amazon AppConfig 检索账户中的代理扮演此角色从供应商账户获取数据。完成本节中的步骤,创建 IAM 权限策略、IAM 角色并将代理覆盖添加到清单中。
开始前的准备工作
在 IAM 中创建权限策略和角色之前,请收集以下信息。
-
每个的 ID Amazon Web Services 账户。检索账户是将调用其他账户获取配置数据的账户。供应商账户是将配置数据提供给检索账户的账户。
-
检索账户 Amazon AppConfig 中使用的 IAM 角色的名称。以下是默认情况下使用的 Amazon AppConfig角色列表:
-
对于亚马逊弹性计算云 (Amazon EC2) Amazon AppConfig ,使用实例角色。
-
对于 Amazon Lambda, Amazon AppConfig 使用 Lambda 执行角色。
-
对于亚马逊弹性容器服务 (Amazon ECS) 和亚马逊 Elastic Kubernetes Service (Amazon Amazon AppConfig EKS),使用容器角色。
如果您通过指定
ROLE_ARN环境变量将 A Amazon AppConfig gent 配置为使用不同的 IAM 角色,请记下该名称。 -
创建权限策略
使用以下过程通过 IAM 控制台创建权限策略。完成将为检索帐户提供配置数据的每个 Amazon Web Services 账户 步骤中的步骤。
创建 IAM policy
-
登录供应商账户。 Amazon Web Services Management Console
访问:https://console.aws.amazon.com/iam/
,打开 IAM 控制台。 -
在导航窗格中,选择 Policies (策略),然后选择 Create policy (创建策略)。
-
选择 JSON 选项。
-
在策略编辑器中,将默认 JSON 替换为以下策略声明。使用供应商账户详细信息更新每个
示例资源占位符。{ "Version": "2012-10-17", "Statement": [{ "Effect": "Allow", "Action": [ "appconfig:StartConfigurationSession", "appconfig:GetLatestConfiguration" ], "Resource": "arn:partition:appconfig:region:vendor_account_ID:application/vendor_application_ID/environment/vendor_environment_ID/configuration/vendor_configuration_ID" } ] }示例如下:
{ "Version": "2012-10-17", "Statement": [{ "Effect": "Allow", "Action": [ "appconfig:StartConfigurationSession", "appconfig:GetLatestConfiguration" ], "Resource": "arn:aws:appconfig:us-east-2:111122223333:application/abc123/environment/def456/configuration/hij789" } ] } -
选择下一步。
-
在策略名称字段中,输入名称。
-
(可选)在 “添加标签” 中,添加一个或多个标签键值对来组织、跟踪或控制此策略的访问权限。
-
选择 创建策略。系统将让您返回到 Policies 页面。
-
在每个 Amazon Web Services 账户 将为检索帐户提供配置数据的操作中重复此过程。
创建 IAM 角色
使用以下过程通过 IAM 控制台创建 IAM 角色。完成将为检索帐户提供配置数据的每个 Amazon Web Services 账户 步骤中的步骤。
创建 IAM 角色
-
登录供应商账户。 Amazon Web Services Management Console
通过 https://console.aws.amazon.com/iam/
打开 IAM 控制台。 -
在导航窗格中,选择角色,然后选择创建策略。
-
对于 Trusted entity type(可信实体类型),选择 Amazon Web Services 账户。
-
在该Amazon Web Services 账户部分中,选择其他 Amazon Web Services 账户。
-
在 “账户 ID” 字段中,输入检索账户 ID。
-
(可选)作为此代入角色的安全最佳实践,请选择 “需要外部 ID” 并输入字符串。
-
选择下一步。
-
在添加权限页面上,使用搜索字段查找您在上一个过程中创建的策略。选中其名称旁边的复选框。
-
选择下一步。
-
对于角色名称,输入一个名称。
-
(可选)对于描述,输入描述。
-
对于 “步骤 1:选择可信实体”,选择 “编辑”。将默认 JSON 信任策略替换为以下策略。使用取回账户中的信息更新每个
示例资源占位符。{ "Version": "2012-10-17", "Statement": [ { "Effect": "Allow", "Principal": { "AWS": "arn:aws:iam::retrieval_account_ID:role/appconfig_role_in_retrieval_account" }, "Action": "sts:AssumeRole" } ] } -
(可选)在 Tags(标签)中添加一个或多个标签密钥值对,以组织、跟踪或控制此角色的访问权限。
-
选择 Create role (创建角色)。系统将让您返回到 角色 页面。
-
搜索您刚刚创建的角色。选择该存储桶。在 ARN 部分中,复制 ARN。您将在下一个步骤中指定此信息。
向清单中添加凭证覆盖
在供应商账户中创建 IAM 角色后,更新取回账户中的清单。具体而言,添加证书块和用于从供应商账户检索配置数据的 IAM 角色 ARN。以下是 JSON 格式:
{
    "vendor_application_name:vendor_environment_name:vendor_configuration_name": {
        "credentials": {
            "roleArn": "arn:partition:iam::vendor_account_ID:role/name_of_role_created_in_vendor_account",
            "roleExternalId": "string",
            "roleSessionName": "string",
            "credentialsDuration": "time_in_hours"
        }
    }
}
示例如下:
{
    "My2ndApp:Beta:MyEnableMobilePaymentsFeatureFlagConfiguration": {
        "credentials": {
            "roleArn": "arn:us-west-1:iam::123456789012:role/MyTestRole",
            "roleExternalId": "00b148e2-4ea4-46a1-ab0f-c422b54d0aac",
            "roleSessionName": "AwsAppConfigAgent",
            "credentialsDuration": "2h"
        }
    }
}
验证多账户检索是否有效
您可以通过查看代理日志来验证该代理是否能够从多个账户检索配置数据。 Amazon AppConfig 检索到 'YourApplicationName:YourEnvironmentName:YourConfigurationName' 的初始数据的INFO级别日志是成功检索的最佳指标。如果检索失败,您应该会看到一个指示失败原因的ERROR关卡日志。以下是成功从供应商账户检索的示例:
[appconfig agent] 2023/11/13 11:33:27 INFO AppConfig Agent 2.0.x
[appconfig agent] 2023/11/13 11:33:28 INFO serving on localhost:2772
[appconfig agent] 2023/11/13 11:33:28 INFO retrieved initial data for 'MyTestApplication:MyTestEnvironment:MyDenyListConfiguration' in XX.Xms
将配置副本写入磁盘
您可以将 Amazon AppConfig Agent 配置为以纯文本形式自动将配置副本存储到磁盘。此功能使客户能够使用从磁盘读取配置数据以进行集成的应用程序 Amazon AppConfig。
此功能不是为用作配置备份功能而设计的。 Amazon AppConfig
代理无法读取复制到磁盘的配置文件。如果要将配置备份到磁盘,请参阅在 Amazon EC2 中使用 Amazon AppConfig 代理或在 Amazon ECS BACKUP_DIRECTORY 和 Amazon EKS 中使用 Amazon AppConfig 代理的和PRELOAD_BACKUP环境变量。
警告
请注意有关此功能的以下重要信息:
-
保存到磁盘的配置以纯文本形式存储,便于用户阅读。请勿为包含敏感数据的配置启用此功能。
-
此功能写入本地磁盘。对文件系统权限使用最小权限原则。有关更多信息,请参阅 实施最低权限访问。
启用将配置复制到磁盘
-
编辑清单。
-
选择 Amazon AppConfig 要写入磁盘的配置并添加
writeTo元素。示例如下:{ "application_name:environment_name:configuration_name": { "writeTo": { "path": "path_to_configuration_file" } } }示例如下:
{ "MyTestApp:MyTestEnvironment:MyNewConfiguration": { "writeTo": { "path": "/tmp/aws-appconfig/mobile-app/beta/enable-mobile-payments" } } } -
保存您的更改。每次部署新的配置数据时,configuration.json 文件都会更新。
验证将配置副本写入磁盘是否正常工作
您可以通过查看 Amazon AppConfig 代理日志来验证配置副本是否正在写入磁盘。带有 “INFO 将配置' 应用程序:环境:配置 '写入 f ile_path” 的INFO日志条目表示 Amazon AppConfig 代理将配置副本写入磁盘。
示例如下:
[appconfig agent] 2023/11/13 11:33:27 INFO AppConfig Agent 2.0.x
[appconfig agent] 2023/11/13 11:33:28 INFO serving on localhost:2772
[appconfig agent] 2023/11/13 11:33:28 INFO retrieved initial data for 'MobileApp:Beta:EnableMobilePayments' in XX.Xms
[appconfig agent] 2023/11/13 17:05:49 INFO wrote configuration 'MobileApp:Beta:EnableMobilePayments' to /tmp/configs/your-app/your-env/your-config.json