Tutorial: Configure a lifecycle hook that invokes a Lambda function
In this exercise, you create an Amazon EventBridge rule that includes a filter pattern that when matched, invokes an Amazon Lambda function as the rule target. We provide the filter pattern and sample function code to use.
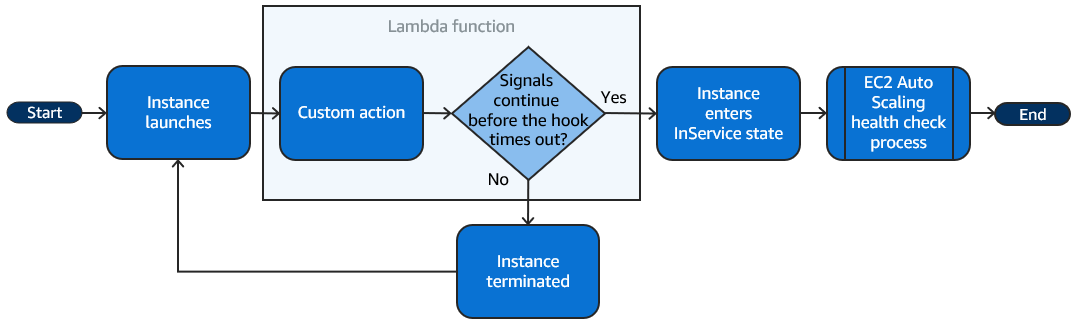
If everything is configured correctly, at the end of this tutorial, the Lambda function performs a custom action when instances launch. The custom action simply logs the event in the CloudWatch Logs log stream associated with the Lambda function.
The Lambda function also performs a callback to let the lifecycle of the instance proceed if this action is successful, but lets the instance abandon the launch and terminate if the action fails.
The following illustration summarizes the flow for a scale-out event when you use a Lambda function to perform a custom action. After an instance launches, the lifecycle of the instance is paused until the lifecycle hook is completed, either by timing out or by Amazon EC2 Auto Scaling receiving a signal to continue.
Note
Depending on your use case, you can configure a lifecycle hook by following the steps below and creating an EventBridge rule. Or, you can use a Lambda function to configure a lifecycle hook directly without creating an EventBridge rule.
Contents
Prerequisites
Before you begin this tutorial, create an Auto Scaling group, if you don't have one
already. To create an Auto Scaling group, open the Auto Scaling groups
page
Step 1: Create an IAM role with permissions to complete lifecycle actions
Before you create a Lambda function, you must first create an execution role and a permissions policy to allow Lambda to complete lifecycle hooks.
To create the policy
-
Open the Policies page
of the IAM console, and then choose Create policy. -
Choose the JSON tab.
-
In the Policy Document box, paste the following policy document into the box, replacing the text in
italicswith your account number and the name of your Auto Scaling group. -
Choose Next.
-
For Policy name, enter
LogAutoScalingEvent-policy. Choose Create policy.
When you finish creating the policy, you can create a role that uses it.
To create the role
-
In the navigation pane on the left, choose Roles.
-
Choose Create role.
-
For Select trusted entity, choose Amazon service.
-
For your use case, choose Lambda and then choose Next.
-
Under Add permissions, choose the policy that you created (LogAutoScalingEvent-policy) and the policy named AWSLambdaBasicExecutionRole. Then, choose Next.
Note
The AWSLambdaBasicExecutionRole policy has the permissions that the function needs to write logs to CloudWatch Logs.
-
On the Name, review, and create page, for Role name, enter
LogAutoScalingEvent-roleand choose Create role.
Step 2: Create a Lambda function
Create a Lambda function to serve as the target for events. The sample Lambda function, written in Node.js, is invoked by EventBridge when a matching event is emitted by Amazon EC2 Auto Scaling.
To create a Lambda function
Open the Functions page
on the Lambda console. -
Choose Create function, Author from scratch.
-
Under Basic information, for Function name, enter
LogAutoScalingEvent. -
For Runtime, choose Node.js 18.x.
-
Scroll down and choose Change default execution role, and then for Execution role, choose Use an existing role.
-
For Existing role, choose LogAutoScalingEvent-role.
-
Leave the other default values.
-
Choose Create function. You are returned to the function's code and configuration.
-
With your
LogAutoScalingEventfunction still open in the console, under Code source, in the editor, paste the following sample code into the file named index.mjs.import { AutoScalingClient, CompleteLifecycleActionCommand } from "@aws-sdk/client-auto-scaling"; export const handler = async(event) => { console.log('LogAutoScalingEvent'); console.log('Received event:', JSON.stringify(event, null, 2)); var autoscaling = new AutoScalingClient({ region: event.region }); var eventDetail = event.detail; var params = { AutoScalingGroupName: eventDetail['AutoScalingGroupName'], /* required */ LifecycleActionResult: 'CONTINUE', /* required */ LifecycleHookName: eventDetail['LifecycleHookName'], /* required */ InstanceId: eventDetail['EC2InstanceId'], LifecycleActionToken: eventDetail['LifecycleActionToken'] }; var response; const command = new CompleteLifecycleActionCommand(params); try { var data = await autoscaling.send(command); console.log(data); // successful response response = { statusCode: 200, body: JSON.stringify('SUCCESS'), }; } catch (err) { console.log(err, err.stack); // an error occurred response = { statusCode: 500, body: JSON.stringify('ERROR'), }; } return response; };This code simply logs the event so that, at the end of this tutorial, you can see an event appear in the CloudWatch Logs log stream that's associated with this Lambda function.
-
Choose Deploy.
Step 3: Create an EventBridge rule
Create an EventBridge rule to run your Lambda function. For more information about using EventBridge, see Use EventBridge to handle Auto Scaling events.
To create a rule using the console
-
Open the EventBridge console
. -
In the navigation pane, choose Rules.
-
Choose Create rule.
-
For Define rule detail, do the following:
-
For Name, enter
LogAutoScalingEvent-rule. -
For Event bus, choose default. When an Amazon Web Services service in your account generates an event, it always goes to your account's default event bus.
-
For Rule type, choose Rule with an event pattern.
-
Choose Next.
-
-
For Build event pattern, do the following:
-
For Event source, choose Amazon events or EventBridge partner events.
-
Scroll down to Event pattern, and do the following:
-
-
For Event source, choose Amazon Web Services services.
-
For Amazon Web Services service, choose Auto Scaling.
-
For Event type, choose Instance Launch and Terminate.
-
By default, the rule matches any scale-in or scale-out event. To create a rule that notifies you when there is a scale-out event and an instance is put into a wait state due to a lifecycle hook, choose Specific instance event(s) and select EC2 Instance-launch Lifecycle Action.
-
By default, the rule matches any Auto Scaling group in the Region. To make the rule match a specific Auto Scaling group, choose Specific group name(s) and select the group.
-
Choose Next.
-
-
-
For Select target(s), do the following:
-
For Target types, choose Amazon Web Services service.
-
For Select a target, choose Lambda function.
-
For Function, choose LogAutoScalingEvent.
-
Choose Next twice.
-
-
On the Review and create page, choose Create rule.
Step 4: Add a lifecycle hook
In this section, you add a lifecycle hook so that Lambda runs your function on instances at launch.
To add a lifecycle hook
-
Open the Auto Scaling groups page
of the Amazon EC2 console. -
Select the check box next to your Auto Scaling group. A split pane opens up in the bottom of the page.
-
In the lower pane, on the Instance management tab, in Lifecycle hooks, choose Create lifecycle hook.
-
To define a lifecycle hook for scale out (instances launching), do the following:
-
For Lifecycle hook name, enter
LogAutoScalingEvent-hook. -
For Lifecycle transition, choose Instance launch.
-
For Heartbeat timeout, enter
300for the number of seconds to wait for a callback from your Lambda function. -
For Default result, choose ABANDON. This means that the Auto Scaling group will terminate a new instance if the hook times out without receiving a callback from your Lambda function.
-
(Optional) Leave Notification metadata empty. The event data that we pass to EventBridge contains all of the necessary information to invoke the Lambda function.
-
-
Choose Create.
Step 5: Test and verify the event
To test the event, update the Auto Scaling group by increasing the desired capacity of the Auto Scaling group by 1. Your Lambda function is invoked within a few seconds after increasing the desired capacity.
To increase the size of the Auto Scaling group
-
Open the Auto Scaling groups page
of the Amazon EC2 console. -
Select the check box next to your Auto Scaling group to view details in a lower pane and still see the top rows of the upper pane.
-
In the lower pane, on the Details tab, choose Group details, Edit.
-
For Desired capacity, increase the current value by 1.
-
Choose Update. While the instance is being launched, the Status column in the upper pane displays a status of Updating capacity.
After increasing the desired capacity, you can verify that your Lambda function was invoked.
To view the output from your Lambda function
-
Open the Log groups page
of the CloudWatch console. -
Select the name of the log group for your Lambda function (
/aws/lambda/LogAutoScalingEvent). -
Select the name of the log stream to view the data provided by the function for the lifecycle action.
Next, you can verify that your instance has successfully launched from the description of scaling activities.
To view the scaling activity
-
Return to the Auto Scaling groups page and select your group.
-
On the Activity tab, under Activity history, the Status column shows whether your Auto Scaling group has successfully launched an instance.
-
If the action was successful, the scaling activity will have a status of "Successful".
-
If it failed, after waiting a few minutes, you will see a scaling activity with a status of "Cancelled" and a status message of "Instance failed to complete user's Lifecycle Action: Lifecycle Action with token e85eb647-4fe0-4909-b341-a6c42EXAMPLE was abandoned: Lifecycle Action Completed with ABANDON Result".
-
To decrease the size of the Auto Scaling group
If you do not need the additional instance that you launched for this test, you can open the Details tab and decrease Desired capacity by 1.
Step 6: Clean up
If you are done working with the resources that you created just for this tutorial, use the following steps to delete them.
To delete the lifecycle hook
-
Open the Auto Scaling groups page
of the Amazon EC2 console. -
Select the check box next to your Auto Scaling group.
-
On the Instance management tab, in Lifecycle hooks, choose the lifecycle hook (
LogAutoScalingEvent-hook). -
Choose Actions, Delete.
-
Choose Delete again to confirm.
To delete the Amazon EventBridge rule
-
Open the Rules page
in the Amazon EventBridge console. -
Under Event bus, choose the event bus that is associated with the rule (
Default). -
Select the check box next to your rule (
LogAutoScalingEvent-rule). -
Choose Delete.
-
When prompted for confirmation, type the name of the rule and then choose Delete.
If you are done working with the example function, delete it. You can also delete the log group that stores the function's logs, and the execution role and permissions policy that you created.
To delete a Lambda function
Open the Functions page
on the Lambda console. -
Choose the function (
LogAutoScalingEvent). -
Choose Actions, Delete.
-
When prompted for confirmation, type
deleteto confirm deleting the specified function and then choose Delete.
To delete the log group
-
Open the Log groups page
of the CloudWatch console. -
Select the function's log group (
/aws/lambda/LogAutoScalingEvent). -
Choose Actions, Delete log group(s).
-
In the Delete log group(s) dialog box, choose Delete.
To delete the execution role
-
Open the Roles page
of the IAM console. -
Select the function's role (
LogAutoScalingEvent-role). -
Choose Delete.
-
When prompted for confirmation, type the name of the role and then choose Delete.
To delete the IAM policy
-
Open the Policies page
of the IAM console. -
Select the policy that you created (
LogAutoScalingEvent-policy). -
Choose Actions, Delete.
-
When prompted for confirmation, type the name of the policy and then choose Delete.
Related resources
The following related topics can be helpful as you create EventBridge rules based on events that happen to the instances in your Auto Scaling group.
-
Use EventBridge to handle Auto Scaling events. This section shows you examples of events for other use cases, including events for scale in.
-
Add lifecycle hooks (console). This procedure shows you how to add lifecycle hooks for both scale out (instances launching) and scale in (instances terminating or returning to a warm pool).
For a tutorial that shows you how to use the Instance Metadata Service (IMDS) to invoke an action from within the instance itself, see Tutorial: Use data script and instance metadata to retrieve lifecycle state.