Tutorial: Build and push a Docker image to Amazon ECR with CodePipeline (V2 type)
This tutorial helps you to create a build action in CodePipeline that runs and pushes your Docker image to Amazon ECR after a change to your source code. This tutorial also shows you how to add an Amazon ECS deploy action that deploys your pushed image.
Important
As part of creating a pipeline in the console, an S3 artifact bucket will be used by CodePipeline for artifacts. (This is different from the bucket used for an S3 source action.) If the S3 artifact bucket is in a different account from the account for your pipeline, make sure that the S3 artifact bucket is owned by Amazon Web Services accounts that are safe and will be dependable.
Note
This tutorial is for the ECRBuildAndPublish build action for a CodePipeline pipeline with a GitHub source repository and an Amazon ECS standard action for deploying to an Amazon ECS cluster. For a tutorial that uses a pipeline with an ECR image repository as the source for an Amazon ECS to CodeDeploy blue/green deployment action in CodePipeline, see Tutorial: Create a pipeline with an Amazon ECR source and ECS-to-CodeDeploy deployment.
Important
This action uses CodePipeline managed CodeBuild compute to run commands in a build environment. Running the commands action will incur separate charges in Amazon CodeBuild.
Prerequisites
There are a few resources that you must have in place before you can use this tutorial to create your CD pipeline. Here are the things you need to get started:
Note
All of these resources should be created within the same Amazon Region.
-
A source control repository (this tutorial uses GitHub) where you will add the following for this tutorial:
-
In Step 1, you will add a sample Dockerfile to your source repository as the input artifact for the ECRBuildAndPublish build action in CodePipeline.
-
In Step 2, you will add a sample imagedefinitions.json file to your source repository as a requirement for the Amazon ECS standard deploy action in CodePipeline.
-
-
An Amazon ECR image repository that contains an image you have built from your Dockerfile. For more information, see Creating a Repository and Pushing an Image in the Amazon Elastic Container Registry User Guide.
-
An Amazon ECS cluster and service created in the same Region as the image repository. For more information, see Creating a Cluster and Creating a Service in the Amazon Elastic Container Service Developer Guide.
After you have satisfied these prerequisites, you can proceed with the tutorial and create your CD pipeline.
Step 1: Add a Dockerfile to your source repository
This tutorial uses the ECRBuildAndPublish action to build your Docker image and push
the image to Amazon ECR. The managed compute action in CodePipeline uses CodeBuild to run the commands
for the ECR login and image push. You do not need to add a
buildspec.yml file to your source code repository to tell CodeBuild
how to do that. You only provide the Dockerfile in your repository as follows for this
example.
Paste this sample text to create your Dockerfile file. This
sample Dockerfile is the same as the sample used in the ECR image instructions in the
prerequisites.
FROM public.ecr.aws/amazonlinux/amazonlinux:latest

# Install dependencies
RUN yum update -y && \
 yum install -y httpd

# Install apache and write hello world message
RUN echo 'Hello World!' > /var/www/html/index.html

# Configure apache
RUN echo 'mkdir -p /var/run/httpd' >> /root/run_apache.sh && \
 echo 'mkdir -p /var/lock/httpd' >> /root/run_apache.sh && \
 echo '/usr/sbin/httpd -D FOREGROUND' >> /root/run_apache.sh && \
 chmod 755 /root/run_apache.sh

EXPOSE 80

CMD /root/run_apache.sh
To add a Dockerfile file to your source repository
-
Open a text editor and then copy and paste the Dockerfile above into a new file.
-
Commit and push your
Dockerfilefile to your source repository.-
Add the file.
git add . -
Commit the change.
git commit -m "Adding Dockerfile." -
Push the commit.
git push
Be sure to place the file at the root level of your repository.
/ Dockerfile -
Step 2: Add an imagedefinitions.json file to your source repository
This tutorial uses theAmazon ECS standard deploy action in CodePipeline to deploy your container to your Amazon ECS cluster. The Amazon ECS standard deploy action requires an imagedefinitions.json file containing your image name and URI. For more information about the imagedefinitions.json file, see imagedefinitions.json file for Amazon ECS standard deployment actions.
Paste this sample text to create your imagedefinitions.json file.
Use the name in your Dockerfile, such as hello-world, and use the URI from
your Amazon ECR repository where the image is stored.
[
  {
    "name": "hello-world",
    "imageUri": "ACCOUNT-ID.dkr.ecr.us-east-1.amazonaws.com/actions/image-repo"
  }
]
To add an imagedefinitions.json file to your source repository
-
Open a text editor and then copy and paste the example above into a new file.
-
Commit and push your
imagedefinitions.jsonfile to your source repository.-
Add the file.
git add . -
Commit the change.
git commit -m "Adding imagedefinitions.json." -
Push the commit.
git push
Be sure to place the file at the root level of your repository.
/ imagedefinitions.json -
Step 3: Creating your pipeline
Use the CodePipeline wizard to create your pipeline stages and connect your source repository.
To create your pipeline
Open the CodePipeline console at https://console.amazonaws.cn/codepipeline/
. -
On the Welcome page, Getting started page, or the Pipelines page, choose Create pipeline.
-
On the Step 1: Choose creation option page, under Creation options, choose the Build custom pipeline option. Choose Next.
-
In Step 2: Choose pipeline settings, in Pipeline name, enter
MyPipeline. -
CodePipeline provides V1 and V2 type pipelines, which differ in characteristics and price. The V2 type is the only type you can choose in the console. For more information, see pipeline types. For information about pricing for CodePipeline, see Pricing
. -
In Service role, choose New service role to allow CodePipeline to create a service role in IAM.
-
Leave the settings under Advanced settings at their defaults, and then choose Next.
-
On the Step 3: Add source stage page, add a source stage:
-
In Source provider, choose GitHub (via GitHub App).
-
Under Connection, choose an existing connection or create a new one. To create or manage a connection for your GitHub source action, see GitHub connections.
-
In Repository name, choose the name of your GitHub repository.
-
In Default branch, choose the branch that you want to specify when the pipeline is started manually or with a source event that is not a Git tag. If the source of the change is not the trigger or if a pipeline execution was started manually, then the change used will be the HEAD commit from the default branch.
Choose Next.
-
-
On the Step 4: Add build stage page, choose Other build providers choose ECRBuildAndPublish.
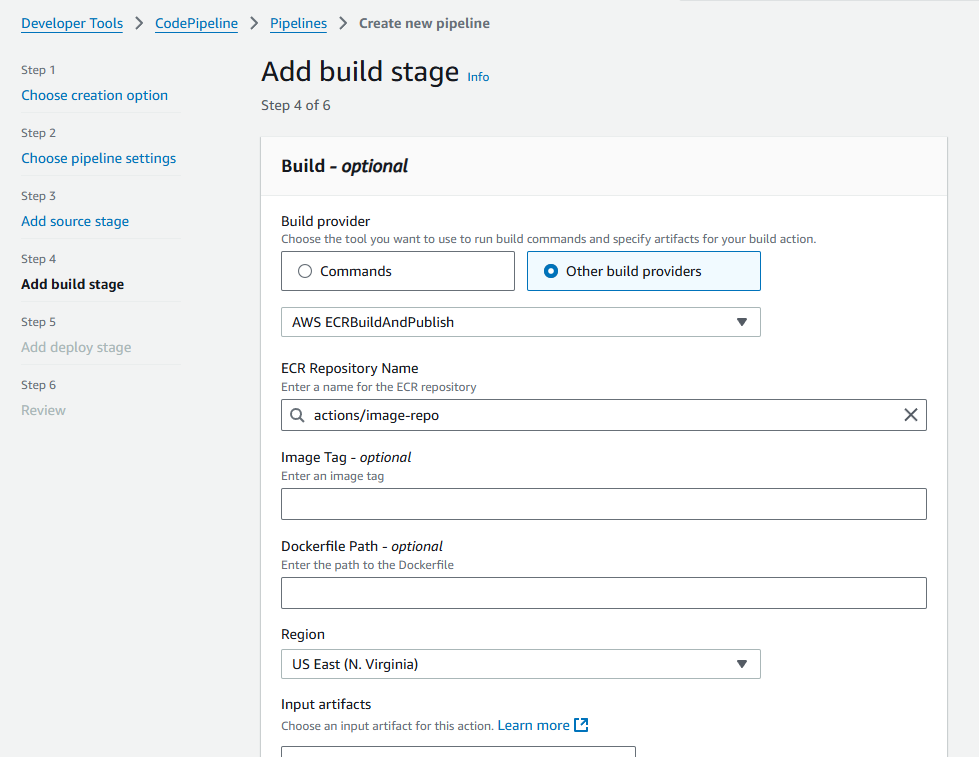
-
For ECR repository name, choose your image repository.
-
Choose Next.
-
-
In Step 5: Add test stage, choose Skip test stage, and then accept the warning message by choosing Skip again.
Choose Next.
-
On the Step 6: Add deploy stage page, choose Skip deploy stage. You will add the ECS action in the following step.
-
On the Step 7: Review page, review your pipeline configuration and choose Create pipeline to create the pipeline.
-
Edit your pipeline to add the Amazon ECS deploy action to your pipeline:
-
In the upper right, choose Edit.
-
At the bottom of the diagram, choose + Add stage. In Stage name, enter a name, such as
Deploy. -
Choose + Add action group.
-
In Action name, enter a name.
-
In Action provider, choose Amazon ECS. Allow Region to default to the pipeline Region.
-
In Input artifacts, choose the input artifact from the source stage, such as
SourceArtifact. -
For Cluster name, choose the Amazon ECS cluster in which your service is running.
-
For Service name, choose the service to update.
-
Choose Save.
-
On the stage you are editing, choose Done. In the Amazon CodePipeline pane, choose Save, and then choose Save on the warning message.
-
To submit your changes and start a pipeline build, choose Release change, and then choose Release.
-
-
After the pipeline runs, view the pipeline structure and status.
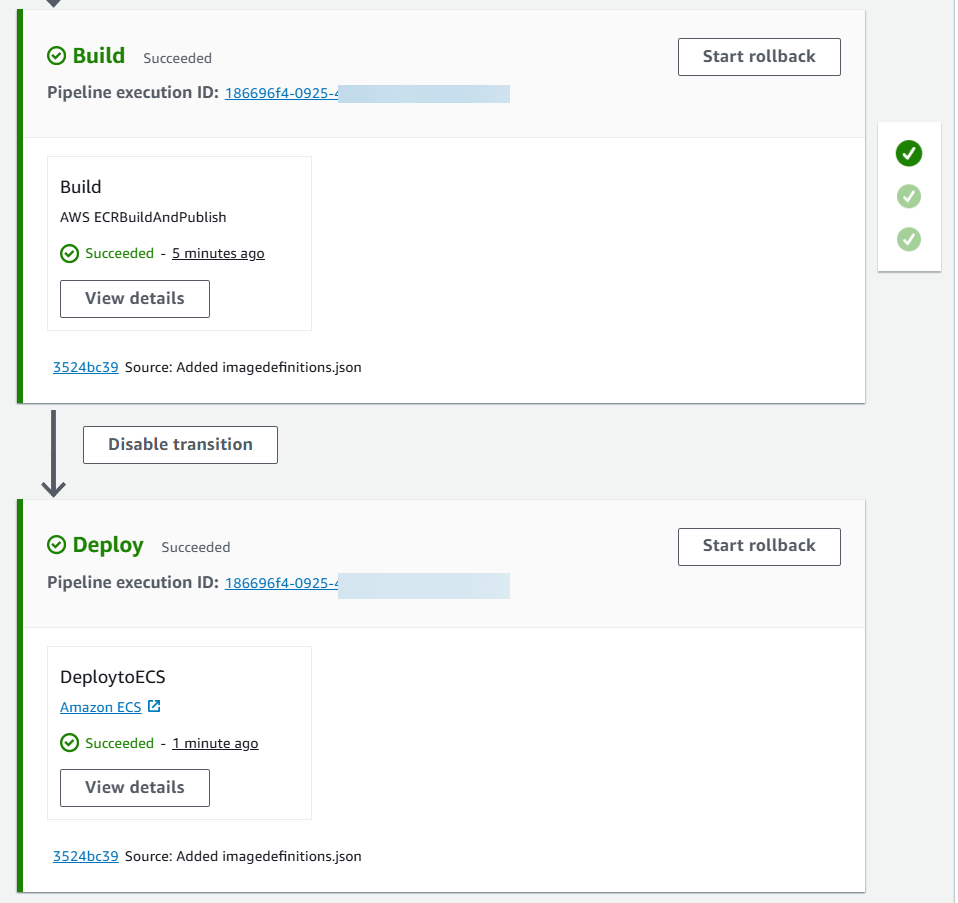
-
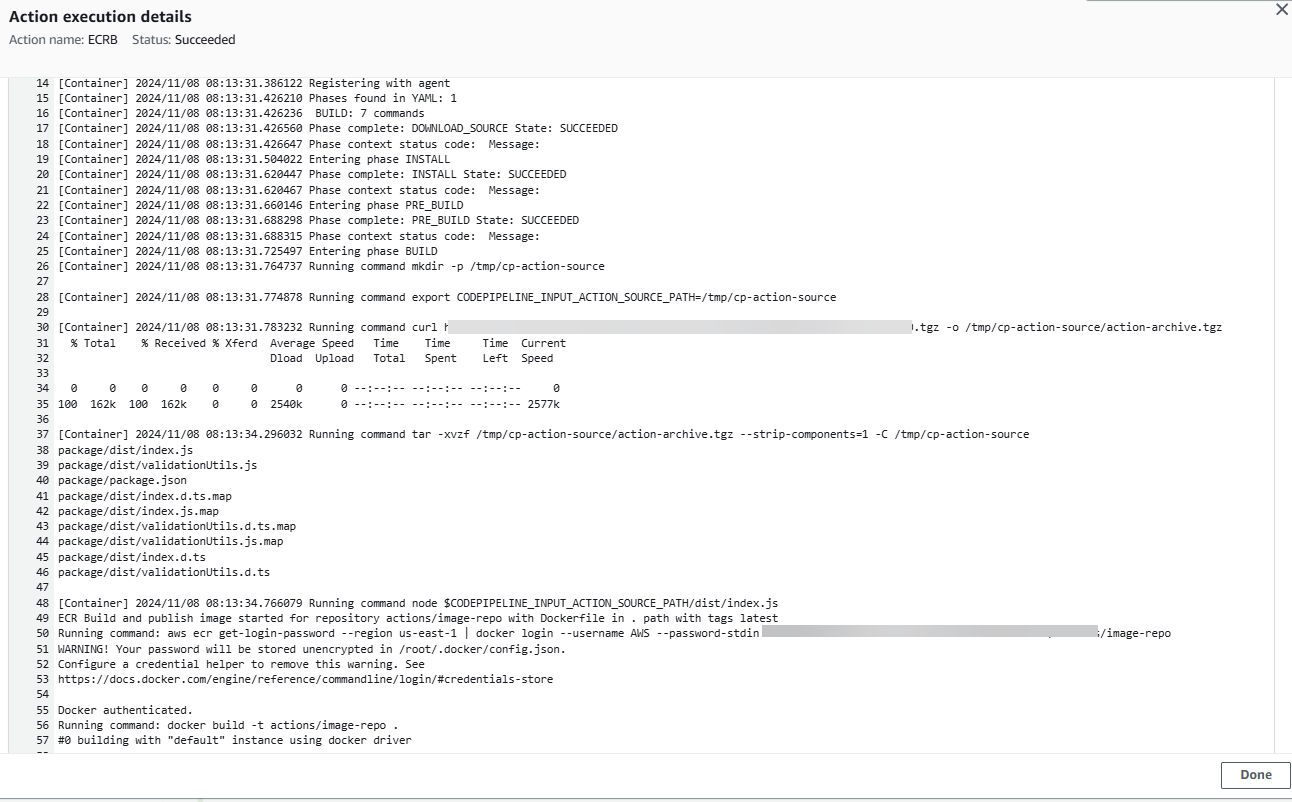
After the pipeline runs successfully, choose View details to view the logs on the action to view the managed compute action output.
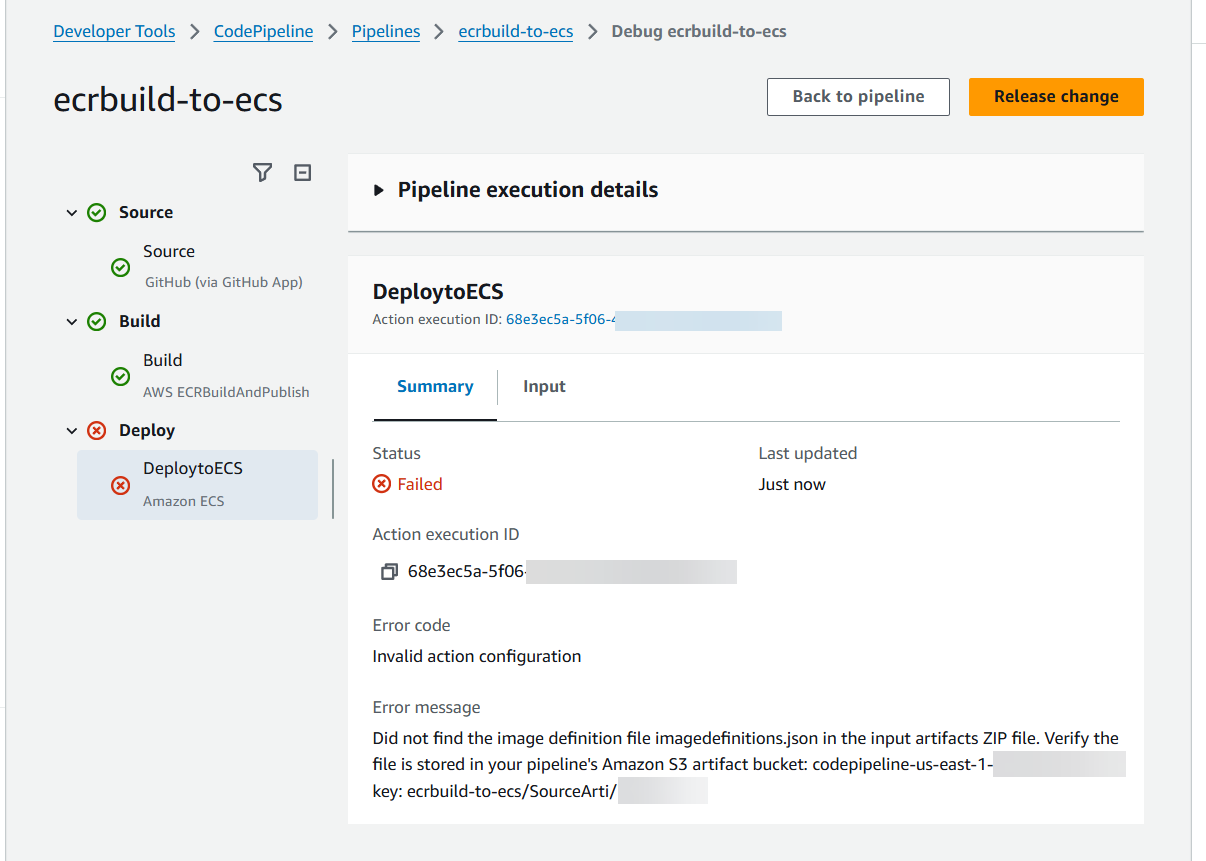
-
Troubleshoot any failed actions. For example, the ECS deploy action can fail if the imagedefinitions.json file is not in the source repository. The following is an example of the error message that displays when the imagedefinitions.json file is missing.
Step 4: Test Your Pipeline
Your pipeline should have everything for running an end-to-end native Amazon continuous deployment. Now, test its functionality by pushing a code change to your source repository.
To test your pipeline
-
Make a code change to your configured source repository, commit, and push the change.
Open the CodePipeline console at https://console.amazonaws.cn/codepipeline/
. -
Choose your pipeline from the list.
-
Watch the pipeline progress through its stages. Your pipeline should complete and your action pushes the Docker image to ECR that was created from your code change.