本文属于机器翻译版本。若本译文内容与英语原文存在差异,则一律以英文原文为准。
部署您的 Amazon DataSync 代理
创建 Amazon DataSync 代理时,第一步是在存储环境中部署代理。你可以在 VMware ESXi、基于 Linux 内核的虚拟机 (KVM)、Nutanix AHV(使用 KVM 镜像)和微软 Hyper-V 虚拟机管理程序上部署代理作为虚拟机 (VM)。您还可以在 Amazon的虚拟私有云(VPC)中将代理部署为 Amazon EC2 实例。
提示
在开始之前,请确认是否需要代 DataSync 理。
在上部署代理 VMware
您可以从 DataSync 控制台下载代理并将其部署到您的 VMware环境中。
开始之前:请确保您的存储环境可以支持 DataSync 代理。有关更多信息,请参阅 虚拟机要求。
要在上部署代理 VMware
打开 Amazon DataSync 控制台,网址为https://console.aws.amazon.com/datasync/
。 -
在左侧的导航窗格中,选择 代理,然后选择 创建代理。
-
对于 “虚拟机管理程序”,选择 VMWare ESXi,然后选择 “下载图像”。
-
增强模式代理下载为
.ova图像文件。 -
基本模式代理下载到包含
.ova图像.zip文件的文件中
-
要最大限度地减少网络延迟,请将代理部署在尽可能靠近 DataSync 需要访问的存储系统附近(如果可能,则部署在同一个本地网络)。有关更多信息,请参阅 本地、自我管理和其他云存储的网络要求。
如果需要,请参阅虚拟机管理程序的文档,了解如何在主机中部署
.ova文件。 VMware-
打开虚拟机监视器电源,登录代理 VM 并获取代理的 IP 地址。您需要此 IP 地址来激活代理。
代理 VM 的默认凭证为登录名
admin和密码password。如果需要,请通过虚拟机的本地控制台更改密码。
下一步为 Amazon DataSync 代理选择服务端点:
在 KVM 上部署代理
您可以从 DataSync 控制台下载代理并将其部署到您的 KVM 环境中。
开始之前:请确保您的存储环境可以支持 DataSync 代理。有关更多信息,请参阅 虚拟机要求。
要在 KVM 上部署代理
打开 Amazon DataSync 控制台,网址为https://console.aws.amazon.com/datasync/
。 -
在左侧的导航窗格中,选择 代理,然后选择 创建代理。
-
对于虚拟机监控器,请选择基于内核的虚拟机 (KVM),然后选择下载映像。
-
增强模式代理下载为
.qcow2图像文件。 -
基本模式代理下载到包含
.qcow2图像.zip文件的文件中
-
要最大限度地减少网络延迟,请将代理部署在尽可能靠近 DataSync 需要访问的存储系统附近(如果可能,则部署在同一个本地网络)。有关更多信息,请参阅 本地、自我管理和其他云存储的网络要求。
-
运行以下命令安装
.qcow2映像。virt-install \ --name "datasync" \ --description "DataSync agent" \ --os-type=generic \ --ram=32768 \ --vcpus=4 \ --disk path=datasync-yyyymmdd-x86_64.qcow2,bus=virtio,size=80 \ --network default,model=virtio \ --graphics none \ --virt-type kvm \ --import有关如何管理此虚拟机和 KVM 主机的信息,请参阅虚拟机监控器文档。
-
打开虚拟机监视器电源,登录 VM 并获取代理的 IP 地址。您需要此 IP 地址来激活代理。
代理 VM 的默认凭证为登录名
admin和密码password。如果需要,请通过虚拟机的本地控制台更改密码。
下一步为 Amazon DataSync 代理选择服务端点:
在 Microsoft Hyper-V 上部署你的基本模式代理
你可以从 DataSync 控制台下载基本模式代理并将其部署到你的 Microsoft Hyper-V 环境中。
开始之前:请确保您的存储环境可以支持 DataSync 代理。有关更多信息,请参阅 虚拟机要求。
在 Hyper-V 上部署基本模式代理
打开 Amazon DataSync 控制台,网址为https://console.aws.amazon.com/datasync/
。 -
在左侧的导航窗格中,选择 代理,然后选择 创建代理。
-
对于虚拟机监控器,请选择 Microsoft Hyper-V,然后选择下载映像。
代理下载到包含
.vhdx图像文件的.zip文件中。 要最大限度地减少网络延迟,请将代理部署在尽可能靠近 DataSync 需要访问的存储系统附近(如果可能,则部署在同一个本地网络)。有关更多信息,请参阅 本地、自我管理和其他云存储的网络要求。
如果需要,请参阅虚拟机监控器文档,了解如何在 Hyper-V 主机部署
.vhdx文件。警告
如果您在使用 Broadcom 网络适配器的 Hyper-V 主机上启用虚拟机队列 (VMQ),可能会发现网络性能不佳。有关工作区的更多信息,请参阅 Microsoft 文档
。 -
打开虚拟机监视器电源,登录 VM 并获取代理的 IP 地址。您需要此 IP 地址来激活代理。
代理 VM 的默认凭证为登录名
admin和密码password。如果需要,请通过虚拟机的本地控制台更改密码。
下一步为 Amazon DataSync 代理选择服务端点:
部署 Amazon EC2 代理
在以下两者之间传输数据时,您可以将 DataSync 代理部署为 Amazon EC2 实例:
-
自我管理的云存储系统(例如,中的 NFS 文件服务器 Amazon)和 Amazon 存储服务。
-
云存储提供商(例如Microsoft Azure Blob Storage)和使用 “基本” 模式的 Amazon 存储服务。
-
商业版中的 S3 存储桶 Amazon Web Services 区域 和广告中的 S3 存储桶 Amazon GovCloud (US) Region。
-
Amazon Amazon Outposts S3 已开 Amazon 启,存储服务使用基本模式。
警告
我们不建议使用带有本地存储的 Amazon EC2 代理,因为网络延迟会增加。相反,应将代理作为 VMware KVM 或 Hyper-V 虚拟机部署在数据中心中,尽可能靠近本地存储。
为您选择代理 AMI Amazon Web Services 区域
-
打开终端并复制以下 Amazon CLI 命令以获取要部署 DataSync Amazon EC2 代理的区域的最新亚马逊系统映像 (AMI) ID。
基本模式代理
aws ssm get-parameter --name /aws/service/datasync/ami --regionyour-region增强模式代理
aws ssm get-parameter --name /aws/service/datasync/ami/v3 --regionyour-region -
运行 命令。在输出中,记下带有 DataSync AMI ID 的
"Value"属性。例命令和输出示例
aws ssm get-parameter --name /aws/service/datasync/ami --region us-east-1

{
    "Parameter": {
        "Name": "/aws/service/datasync/ami",
        "Type": "String",
        "Value": "ami-1234567890abcdef0",
        "Version": 6,
        "LastModifiedDate": 1569946277.996,
        "ARN": "arn:aws:ssm:us-east-1::parameter/aws/service/datasync/ami"
    }
}
部署 Amazon EC2 代理
提示
为避免因跨可用区传输而产生费用,部署代理时应确保其不需要在可用区之间传输网络流量。(要详细了解所有人的数据传输价格 Amazon Web Services 区域,请参阅 Amazon EC2 数据传输定价
例如,在自我管理的云存储系统所在的可用区部署代理。
-
复制以下 URL:
https://console.aws.amazon.com/ec2/v2/home?region=agent-region#LaunchInstanceWizard:ami=ami-id-
将
agent-region -
ami-id
-
-
将该 URL 粘贴到浏览器中。
屏幕上 Amazon Web Services 管理控制台 显示了 Amazon EC2 实例启动页面。
-
对于实例类型,请选择一个推荐的 Amazon EC2 实例 DataSync。
-
对于密钥对,选择现有密钥对或新建一个密钥对。
-
对于 网络设置,选择 编辑,然后执行以下操作:
-
对于 VPC,请选择要在其中部署代理的 VPC。
-
对于自动分配公有 IP,请选择您是否希望代理能够从公共互联网访问。
您稍后使用实例的公有或私有 IP 地址来激活代理。
-
对于防火墙(安全组),请创建或选择一个执行以下操作的安全组:
-
如果需要,允许通过端口 80(HTTP)向 Amazon EC2 实例传入的入站流量。获取代理激活密钥的某些选项需要此连接。
-
在 Amazon EC2 实例与您要向其传入数据或从中传出数据的存储系统之间,允许入站和出站流量。有关更多信息,请参阅 本地、自我管理和其他云存储的网络要求。
注意
根据代理使用的服务端点类型,还需要配置其他端口。
-
-
-
(推荐)要提高从基于云的文件系统传输时的性能,请展开高级详细信息,选择您的存储所在的置放群组值。
-
选择启动实例来启动您的 Amazon EC2 实例。
-
一旦实例的状态为正在运行,选择该实例。
-
如果将实例配置为可从公共互联网访问,请记下该实例的公有 IP 地址。如果没有,请记下私有 IP 地址。
激活代理时需要此 IP 地址。
如果您在 Amazon Web Services 区域中部署 DataSync 代理,以下指南可以帮助解决常见场景问题。
部署基本模式代理,以便在云存储和 Amazon 存储服务之间进行传输
要在云存储系统之间或云存储系统之间传输数据, DataSync 代理必须位于源文件系统 Amazon Web Services 账户 所在的相同 Amazon Web Services 区域 位置。 Amazon Web Services 账户这种类型的传输包括以下传输:
-
在 Amazon EFS 或 Amazon 之间传输 FSx 到不同的 Amazon 存储空间 Amazon Web Services 账户。
-
从自行管理的文件系统传输到 Amazon 存储服务。
重要
部署您的代理,使其不需要可用区之间的网络流量(以避免此类流量产生费用)。
-
要访问您的 Amazon EFS 或 FSx Windows 文件服务器文件系统,请在具有文件系统挂载目标的可用区中部署代理。
-
对于自管理的文件系统,请将代理部署在文件系统所在的可用区中。
要详细了解所有人的数据传输价格 Amazon Web Services 区域,请参阅 Amazon EC2 按需定价
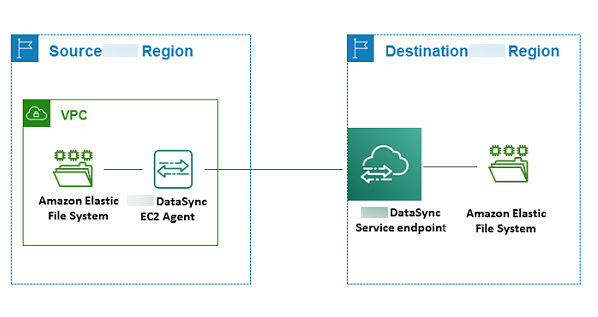
例如,下图显示了将数据从云端网络文件系统 (NFS) 传输到云中 NFS 或 Amazon S3 的 DataSync 架构的高级视图。
在跨 Amazon 存储服务之间传输时,请记住以下几点 Amazon Web Services 账户:
部署您的基本模式代理以在 Amazon S3 和 Amazon 文件系统之间进行传输
下图提供了将数据从 Amazon S3 传输到 Amazon 文件系统(例如 Amazon EFS 或 Amazon)的 DataSync架构的高级视图 FSx。您可以使用此架构将数据从一个架构传输 Amazon Web Services 账户 到另一个架构,或者将数据从 Amazon S3 传输到自行管理的云端文件系统。

在上部署基本模式代理 Amazon Outposts
你可以在你的 Outpost 上启动 DataSync Amazon EC2 实例。要了解有关在上启动 AMI 的更多信息 Amazon Outposts,请参阅Amazon Outposts 用户指南中的在您的 Outpost 上启动实例。
在 Outposts 上使用 DataSync 访问 Amazon S3 时,您必须使用基本模式代理并在允许访问您的 Amazon S3 接入点的 VPC 中启动该代理,然后在 Outpost 的父区域激活该代理。代理还必须能够路由到存储桶的 Amazon S3 on Outposts 端点 。要了解有关使用 Amazon S3 on Outposts 端点的更多信息,请参阅 Amazon S3 用户指南中的使用 Amazon S3 on Outposts。