Configure an Amazon Direct Connect Classic connection
Configure a Classic connection when you have existing Direct Connect connections.
Step 1: Sign up for Amazon
To use Amazon Direct Connect, you need an account if you don't already have one.
Sign up for an Amazon Web Services account
If you do not have an Amazon Web Services account, use the following procedure to create one.
To sign up for Amazon Web Services
Open http://www.amazonaws.cn/
and choose Sign Up. Follow the on-screen instructions.
Amazon sends you a confirmation email after the sign-up process is
complete. At any time, you can view your current account activity and manage your account by
going to http://www.amazonaws.cn/
Secure IAM users
After you sign up for an Amazon Web Services account, safeguard your administrative user by turning on multi-factor authentication (MFA). For instructions, see Enable a virtual MFA device for an IAM user (console) in the IAM User Guide.
To give other users access to your Amazon Web Services account resources, create IAM users. To secure your IAM users, turn on MFA and only give the IAM users the permissions needed to perform their tasks.
For more information about creating and securing IAM users, see the following topics in the IAM User Guide:
Step 2: Request an Amazon Direct Connect dedicated connection
For dedicated connections, you can submit a connection request using the Amazon Direct Connect console. For hosted connections, work with an Amazon Direct Connect Partner to request a hosted connection. Ensure that you have the following information:
-
The port speed that you require. You cannot change the port speed after you create the connection request.
-
The Amazon Direct Connect location at which the connection is to be terminated.
Note
You cannot use the Amazon Direct Connect console to request a hosted connection. Instead, contact an Amazon Direct Connect Partner, who can create a hosted connection for you, which you then accept. Skip the following procedure and go to Accept your hosted connection.
To create a new Amazon Direct Connect connection
Open the Amazon Direct Connect console at https://console.amazonaws.cn/directconnect/v2/home
. -
In the navigation pane choose Connections, and then choose Create a connection.
-
Choose Classic.
-
On the Create Connection pane, under Connection settings, do the following:
-
For Name, enter a name for the connection.
-
For Location, select the appropriate Amazon Direct Connect location.
-
If applicable, for Sub Location, choose the floor closest to you or your network provider. This option is only available if the location has meet-me rooms (MMRs) in multiple floors of the building.
-
For Port Speed, choose the connection bandwidth.
-
For On-premises, select Connect through an Amazon Direct Connect partner when you use this connection to connect to your data center.
-
For Service provider, select the Amazon Direct Connect Partner. If you use a partner that is not in the list, select Other.
-
If you selected Other for Service provider, for Name of other provider, enter the name of the partner that you use.
-
(Optional) Add or remove a tag.
[Add a tag] Choose Add tag and do the following:
For Key, enter the key name.
For Value, enter the key value.
[Remove a tag] Next to the tag, choose Remove tag.
-
-
Choose Create Connection.
It can take up to 72 business hours for Amazon to review your request and provision a port for your connection. During this time, you might receive an email with a request for more information about your use case or the specified location. The email is sent to the email address that you used when you signed up for Amazon. You must respond within 7 days or the connection is deleted.
For more information, see Amazon Direct Connect dedicated and hosted connections.
Accept your hosted connection
You must accept the hosted connection in the Amazon Direct Connect console before you can create a virtual interface. This step only applies to hosted connections.
To accept a hosted virtual interface
Open the Amazon Direct Connect console at https://console.amazonaws.cn/directconnect/v2/home
. -
In the navigation pane, choose Connections.
-
Select the hosted connection, and then choose Accept.
Choose Accept.
(Dedicated connection) Step 3: Download the LOA-CFA
After you request a connection, we make a Letter of Authorization and Connecting Facility Assignment (LOA-CFA) available to you to download, or emails you with a request for more information. The LOA-CFA is the authorization to connect to Amazon, and is required by the colocation provider or your network provider to establish the cross-network connection (cross-connect).
To download the LOA-CFA
Open the Amazon Direct Connect console at https://console.amazonaws.cn/directconnect/v2/home
. -
In the navigation pane, choose Connections.
-
Select the connection and choose View Details.
-
Choose Download LOA-CFA.
The LOA-CFA is downloaded to your computer as a PDF file.
Note
If the link is not enabled, the LOA-CFA is not yet available for you to download. Check your email for a request for more information. If it's still unavailable, or you haven't received an email after 72 business hours, contact Amazon Support
. -
After you download the LOA-CFA, do one of the following:
-
If you're working with an Amazon Direct Connect Partner or network provider, send them the LOA-CFA so that they can order a cross-connect for you at the Amazon Direct Connect location. If they cannot order the cross-connect for you, you can contact the colocation provider directly.
-
If you have equipment at the Amazon Direct Connect location, contact the colocation provider to request a cross-network connection. You must be a customer of the colocation provider. You must also present them with the LOA-CFA that authorizes the connection to the Amazon router, and the necessary information to connect to your network.
-
Amazon Direct Connect locations that are listed as multiple sites (for example, Equinix DC1-DC6 & DC10-DC11) are set up as a campus. If your or your network provider’s equipment is located in any of these sites, you can request a cross-connect to your assigned port even if it resides in a different campus building.
Important
A campus is treated as a single Amazon Direct Connect location. To achieve high availability, configure connections to different Amazon Direct Connect locations.
If you or your network provider experience issues establishing a physical connection, see Troubleshoot layer 1 (physical) issues.
Step 4: Create a virtual interface
To begin using your Amazon Direct Connect connection, you must create a virtual interface. You can create a private virtual interface to connect to your VPC. Or, you can create a public virtual interface to connect to public Amazon services that aren't in a VPC. When you create a private virtual interface to a VPC, you need a private virtual interface for each VPC to which to connect. For example, you need three private virtual interfaces to connect to three VPCs.
Before you begin, ensure that you have the following information:
| Resource | Required information |
|---|---|
| Connection | The Amazon Direct Connect connection or link aggregation group (LAG) for which you are creating the virtual interface. |
| Virtual interface name | A name for the virtual interface. |
| Virtual interface owner | If you're creating the virtual interface for another account, you need the Amazon account ID of the other account. |
| (Private virtual interface only) Connection | For connecting to a VPC in the same Amazon Region, you need the virtual private gateway for your VPC. The ASN for the Amazon side of the BGP session is inherited from the virtual private gateway. When you create a virtual private gateway, you can specify your own private ASN. Otherwise, Amazon provides a default ASN. For more information, see Create a Virtual Private Gateway in the Amazon VPC User Guide. For connecting to a VPC through a Direct Connect gateway, you need the Direct Connect gateway. For more information, see Direct Connect Gateways. |
| VLAN | A unique virtual local area network (VLAN) tag that's
not already in use on your connection. The value must be between 1 and 4094 and must comply
with the Ethernet 802.1Q standard. This tag is required for any traffic traversing the
Amazon Direct Connect connection.
If you have a hosted connection, your Amazon Direct Connect Partner provides this value. You can’t modify the value after you have created the virtual interface. |
| Peer IP addresses | A virtual interface can support a BGP
peering session for IPv4, IPv6, or one of each (dual-stack). Do not use Elastic IPs (EIPs) or Bring your own IP addresses (BYOIP) from the Amazon Pool to create a public virtual interface. You cannot create
multiple BGP sessions for the same IP addressing family on the same virtual interface.
The IP address ranges are assigned to each end of the virtual interface for the BGP peering session.
|
| Address family | Whether the BGP peering session will be over IPv4 or IPv6. |
| BGP information |
|
| (Public virtual interface only) Prefixes you want to advertise | Public IPv4 routes or IPv6 routes to advertise over BGP. You must advertise at least one prefix using BGP, up to a maximum of 1,000 prefixes.
|
| (Private and transit virtual interfaces only) Jumbo frames | The maximum transmission unit (MTU) of packets over Amazon Direct Connect. The default is 1500. Setting the MTU of a virtual interface to 9001 (jumbo frames) can cause an update to the underlying physical connection if it wasn't updated to support jumbo frames. Updating the connection disrupts network connectivity for all virtual interfaces associated with the connection for up to 30 seconds. Jumbo frames apply only to propagated routes from Amazon Direct Connect. If you add static routes to a route table that point to your virtual private gateway, then traffic routed through the static routes is sent using 1500 MTU. To check whether a connection or virtual interface supports jumbo frames, select it in the Amazon Direct Connect console and find Jumbo frame capable on the virtual interface General configuration page. |
We request additional information from you if your public prefixes or ASNs belong to an ISP or network carrier. This can be a document using an official company letterhead or an email from the company's domain name verifying that the network prefix/ASN may be used by you.
For private virtual interface and public virtual interfaces, the maximum transmission unit (MTU) of a network connection is the size, in bytes, of the largest permissible packet that can be passed over the connection. The MTU of a private virtual interface can be either 1500 or 9001 (jumbo frames). The MTU of a transit virtual interface can be either 1500 or 8500 (jumbo frames). You can specify the MTU when you create the interface or update it after you create it. Setting the MTU of a virtual interface to 8500 (jumbo frames) or 9001 (jumbo frames) can cause an update to the underlying physical connection if it wasn't updated to support jumbo frames. Updating the connection disrupts network connectivity for all virtual interfaces associated with the connection for up to 30 seconds. To check whether a connection or virtual interface supports jumbo frames, select it in the Amazon Direct Connect console and find Jumbo Frame Capable on the Summary tab.
When you create a public virtual interface, it can take up to 72 business hours for Amazon to review and approve your request.
To provision a public virtual interface to non-VPC services
Open the Amazon Direct Connect console at https://console.amazonaws.cn/directconnect/v2/home
. -
In the navigation pane, choose Virtual Interfaces.
-
Choose Create virtual interface.
-
Under Virtual interface type, for Type, choose Public.
-
Under Public virtual interface settings, do the following:
-
For Virtual interface name, enter a name for the virtual interface.
-
For Connection, choose the Direct Connect connection that you want to use for this interface.
-
For VLAN, enter the ID number for your virtual local area network (VLAN).
-
For BGP ASN, enter the The Border Gateway Protocol Autonomous System Number of your on-premises peer router for the new virtual interface. The valid values are 1 to 4294967294. This includes support for both ASNs (1-2147483647) and long ASNs (1-4294967294). For more information about ASNs and long ASNs see Long ASN support in Amazon Direct Connect.
-
-
Under Additional settings, do the following:
-
To configure an IPv4 BGP or an IPv6 peer, do the following:
[IPv4] To configure an IPv4 BGP peer, choose IPv4 and do one of the following:
-
To specify these IP addresses yourself, for Your router peer ip, enter the destination IPv4 CIDR address to which Amazon should send traffic.
-
For Amazon router peer IP, enter the IPv4 CIDR address to use to send traffic to Amazon.
[IPv6] To configure an IPv6 BGP peer, choose IPv6. The peer IPv6 addresses are automatically assigned from Amazon's pool of IPv6 addresses. You cannot specify custom IPv6 addresses.
-
-
To provide your own BGP key, enter your BGP MD5 key.
If you do not enter a value, we generate a BGP key.
-
To advertise prefixes to Amazon, for Prefixes you want to advertise, enter the IPv4 CIDR destination addresses (separated by commas) to which traffic should be routed over the virtual interface.
-
(Optional) Add or remove a tag.
[Add a tag] Choose Add tag and do the following:
-
For Key, enter the key name.
-
For Value, enter the key value.
[Remove a tag] Next to the tag, choose Remove tag.
-
-
-
Choose Create virtual interface.
To provision a private virtual interface to a VPC
Open the Amazon Direct Connect console at https://console.amazonaws.cn/directconnect/v2/home
. -
In the navigation pane, choose Virtual Interfaces.
-
Choose Create virtual interface.
-
Under Virtual interface type, for Type, choose Private.
-
Under Private virtual interface settings, do the following:
-
For Virtual interface name, enter a name for the virtual interface.
-
For Connection, choose the Direct Connect connection that you want to use for this interface.
-
For Gateway type, choose Virtual private gateway, or Direct Connect gateway.
-
For Virtual interface owner, choose Another Amazon account, and then enter the Amazon account.
-
For Virtual private gateway, choose the virtual private gateway to use for this interface.
-
For VLAN, enter the ID number for your virtual local area network (VLAN).
-
For BGP ASN, enter the Border Gateway Protocol Autonomous System Number of your on-premises peer router for the new virtual interface.
The valid values are 1 to 4294967294. This includes support for both ASNs (1-2147483647) and long ASNs (1-4294967294). For more information about ASNs and long ASNs see Long ASN support in Amazon Direct Connect.
-
-
Under Additional Settings, do the following:
-
To configure an IPv4 BGP or an IPv6 peer, do the following:
[IPv4] To configure an IPv4 BGP peer, choose IPv4 and do one of the following:
-
To specify these IP addresses yourself, for Your router peer ip, enter the destination IPv4 CIDR address to which Amazon should send traffic.
-
For Amazon router peer ip, enter the IPv4 CIDR address to use to send traffic to Amazon.
Important
When configuring Amazon Direct Connect virtual interfaces, you can specify your own IP addresses using RFC 1918, use other addressing schemes, or opt for Amazon assigned IPv4 /29 CIDR addresses allocated from the RFC 3927 169.254.0.0/16 IPv4 Link-Local range for point-to-point connectivity. These point-to-point connections should be used exclusively for eBGP peering between your customer gateway router and the Direct Connect endpoint. For VPC traffic or tunnelling purposes, such as Amazon Site-to-Site Private IP VPN, or Transit Gateway Connect, Amazon recommends using a loopback or LAN interface on your customer gateway router as the source or destination address instead of the point-to-point connections.
-
For more information about RFC 1918, see Address Allocation for Private Internets
. -
For more information about RFC 3927, see Dynamic Configuration of IPv4 Link-Local Addresses
.
-
[IPv6] To configure an IPv6 BGP peer, choose IPv6. The peer IPv6 addresses are automatically assigned from Amazon's pool of IPv6 addresses. You cannot specify custom IPv6 addresses.
-
-
To change the maximum transmission unit (MTU) from 1500 (default) to 9001 (jumbo frames), select Jumbo MTU (MTU size 9001).
(Optional) Under Enable SiteLink, choose Enabled to enable direct connectivity between Direct Connect points of presence.
-
(Optional) Add or remove a tag.
[Add a tag] Choose Add tag and do the following:
For Key, enter the key name.
For Value, enter the key value.
[Remove a tag] Next to the tag, choose Remove tag.
-
-
Choose Create virtual interface.
-
You need to use your BGP device to advertise the network that you use for the public VIF connection.
Step 5: Download the router configuration
After you have created a virtual interface for your Amazon Direct Connect connection, you can download the router configuration file. The file contains the necessary commands to configure your router for use with your private or public virtual interface.
To download a router configuration
Open the Amazon Direct Connect console at https://console.amazonaws.cn/directconnect/v2/home
. -
In the navigation pane, choose Virtual Interfaces.
-
Select the connection and choose View Details.
-
Choose Download router configuration.
-
For Download router configuration, do the following:
-
For Vendor, select the manufacturer of your router.
-
For Platform, select the model of your router.
-
For Software, select the software version for your router.
-
-
Choose Download, and then use the appropriate configuration for your router to ensure that you can connect to Amazon Direct Connect.
For more information about manually configuring your router, see Download the router configuration file.
After you configure your router, the status of the virtual interface goes to
UP. If the virtual interface remains down and you cannot ping
the Amazon Direct Connect device's peer IP address, see Troubleshoot layer 2 (data link) issues. If you can ping the peer IP address, see Troubleshoot layer 3/4 (Network/Transport) issues. If the BGP peering session
is established but you cannot route traffic, see Troubleshoot routing issues.
Step 6: Verify your virtual interface
After you have established virtual interfaces to the Amazon Cloud or to Amazon VPC, you can verify your Amazon Direct Connect connection using the following procedures.
To verify your virtual interface connection to the Amazon Cloud
-
Run
tracerouteand verify that the Amazon Direct Connect identifier is in the network trace.
To verify your virtual int+erface connection to Amazon VPC
-
Using a pingable AMI, such as an Amazon Linux AMI, launch an EC2 instance into the VPC that is attached to your virtual private gateway. The Amazon Linux AMIs are available in the Quick Start tab when you use the instance launch wizard in the Amazon EC2 console. For more information, see Launch an Instance in the Amazon EC2 User Guide. Ensure that the security group that's associated with the instance includes a rule permitting inbound ICMP traffic (for the ping request).
-
After the instance is running, get its private IPv4 address (for example, 10.0.0.4). The Amazon EC2 console displays the address as part of the instance details.
-
Ping the private IPv4 address and get a response.
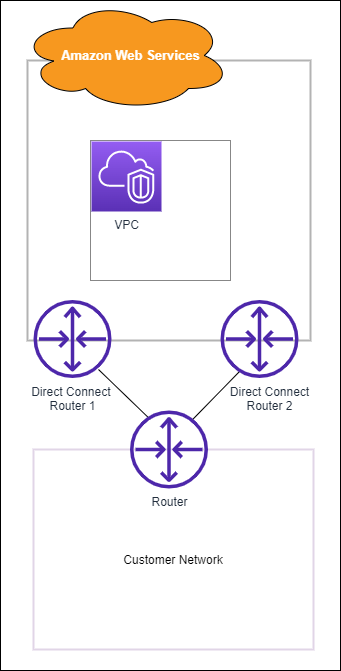
(Recommended) Step 7: Configure redundant connections
To provide for failover, we recommend that you request and configure two dedicated connections to Amazon, as shown in the following figure. These connections can terminate on one or two routers in your network.
There are different configuration choices available when you provision two dedicated connections:
-
Active/Active (BGP multipath). This is the default configuration, where both connections are active. Amazon Direct Connect supports multipathing to multiple virtual interfaces within the same location, and traffic is load-shared between interfaces based on flow. If one connection becomes unavailable, all traffic is routed through the other connection.
-
Active/Passive (failover). One connection is handling traffic, and the other is on standby. If the active connection becomes unavailable, all traffic is routed through the passive connection. You need to prepend the AS path to the routes on one of your links for that to be the passive link.
How you configure the connections doesn't affect redundancy, but it does affect the policies that determine how your data is routed over both connections. We recommend that you configure both connections as active.
If you use a VPN connection for redundancy, ensure that you implement a health check and failover mechanism. If you use either of the following configurations, then you need to check your route table routing to route to the new network interface.
-
You use your own instances for routing, for example the instance is the firewall.
-
You use your own instance that terminates a VPN connection.
To achieve high availability, we strongly recommend that you configure connections to different Amazon Direct Connect locations.
For more information about Amazon Direct Connect resiliency, see Amazon Direct Connect Resiliency Recommendations