Configuring Elastic Load Balancing using the Amazon toolkit for Visual Studio
Elastic Load Balancing is an Amazon web service that helps you improve the availability and scalability of your application. This service makes it easy for you to distribute application loads between two or more Amazon EC2 instances. Elastic Load Balancing enables availability through redundancy and supports traffic growth for your application.
Elastic Load Balancing lets you automatically distribute and balance the incoming application traffic among all the instances you are running. The service also makes it easy to add new instances when you need to increase the capacity of your application.
Elastic Beanstalk automatically provisions Elastic Load Balancing when you deploy an application. You can edit the Elastic Beanstalk environment's Amazon EC2 instance configuration with the Load Balancer tab inside your application environment tab in Amazon Toolkit for Visual Studio.
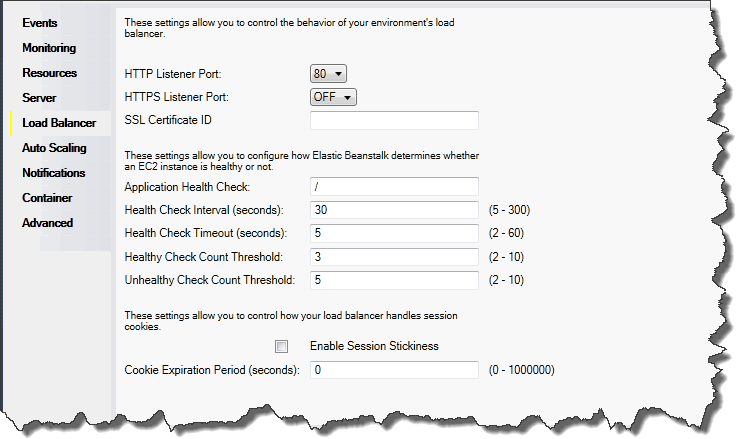
The following sections describe the Elastic Load Balancing parameters you can configure for your application.
Ports
The load balancer provisioned to handle requests for your Elastic Beanstalk application sends requests to the Amazon EC2 instances that are running your application. The provisioned load balancer can listen for requests on HTTP and HTTPS ports and route requests to the Amazon EC2 instances in your Amazon Elastic Beanstalk application. By default, the load balancer handles requests on the HTTP port. At least one of the ports (either HTTP or HTTPS) must be turned on.

Important
Make sure that the port you specified is not locked down; otherwise, users will not be able to connect to your Elastic Beanstalk application.
Controlling the HTTP port
To turn off the HTTP port, select OFF for HTTP Listener Port. To turn on the HTTP port, you select an HTTP port (for example, 80) from the list.
Note
To access your environment using a port other than the default port 80, such as port 8080, add a listener to the existing load balancer and configure the new listener to listen on that port.
For example, using the
Amazon CLI for Classic load balancers,
type the following command, replacing LOAD_BALANCER_NAME with the name of
your load balancer for Elastic Beanstalk.
aws elb create-load-balancer-listeners --load-balancer-name LOAD_BALANCER_NAME --listeners "Protocol=HTTP, LoadBalancerPort=8080, InstanceProtocol=HTTP, InstancePort=80"For example, using the
Amazon CLI for Application Load Balancers,
type the following command, replacing LOAD_BALANCER_ARN with the ARN of
your load balancer for Elastic Beanstalk.
aws elbv2 create-listener --load-balancer-arn LOAD_BALANCER_ARN --protocol HTTP --port 8080If you want Elastic Beanstalk to monitor your environment, do not remove the listener on port 80.
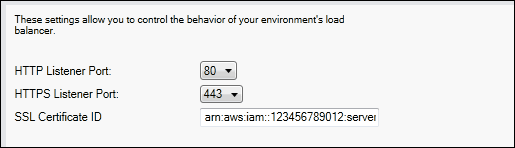
Controlling the HTTPS port
Elastic Load Balancing supports the HTTPS/TLS protocol to enable traffic encryption for client connections to the load balancer. Connections from the load balancer to the EC2 instances use plaintext encryption. By default, the HTTPS port is turned off.
To turn on the HTTPS port
-
Create a new certificate using Amazon Certificate Manager (ACM) or upload a certificate and key to Amazon Identity and Access Management (IAM). For more information about requesting an ACM certificate, see Request a Certificate in the Amazon Certificate Manager User Guide. For more information about importing third-party certificates into ACM, see Importing Certificates in the Amazon Certificate Manager User Guide. If ACM is not available in your region, use Amazon Identity and Access Management (IAM) to upload a third-party certificate. The ACM and IAM services store the certificate and provide an Amazon Resource Name (ARN) for the SSL certificate. For more information about creating and uploading certificates to IAM, see Working with Server Certificates in IAM User Guide.
-
Specify the HTTPS port by selecting a port for HTTPS Listener Port.
-
For SSL Certificate ID, enter the Amazon Resources Name (ARN) of your SSL certificate. For example,
arn:aws-cn:iam::123456789012:server-certificate/abc/certs/buildorarn:aws-cn:acm:us-west-2:123456789012:certificate/12345678-12ab-34cd-56ef-12345678. Use the SSL certificate that you created or uploaded in step 1.
To turn off the HTTPS port, select OFF for HTTPS Listener Port.
Health checks
The health check definition includes a URL to be queried for instance health. By default, Elastic Beanstalk uses TCP:80 for nonlegacy containers and HTTP:80 for
legacy containers. You can override the default URL to match an existing resource in your application (e.g., /myapp/default.aspx)
by entering it in the Application Health Check URL box. If you override the default URL, then Elastic Beanstalk uses HTTP to query the
resource. To check if you are using a legacy container type, see Why are some platform versions marked legacy?
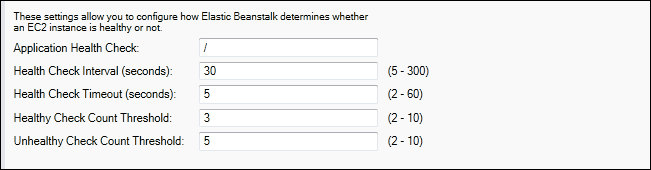
You can control the settings for the health check using the EC2 Instance Health Check section of the Load Balancing panel.
The health check definition includes a URL to be queried for instance health. Override the default URL to match an existing resource in your
application (e.g., /myapp/index.jsp) by entering it in the Application Health Check URL box.
The following list describes the health check parameters you can set for your application.
-
For Health Check Interval (seconds), enter the number of seconds Elastic Load Balancing waits between health checks for your application's Amazon EC2 instances.
-
For Health Check Timeout (seconds), specify the number of seconds Elastic Load Balancing waits for a response before it considers the instance unresponsive.
-
For Healthy Check Count Threshold and Unhealthy Check Count Threshold, specify the number of consecutive successful or unsuccessful URL probes before Elastic Load Balancing changes the instance health status. For example, specifying
5for Unhealthy Check Count Threshold means that the URL would have to return an error message or timeout five consecutive times before Elastic Load Balancing considers the health check failed.
Sessions
By default, a load balancer routes each request independently to the server instance with the smallest load. By comparison, a sticky session binds a user's session to a specific server instance so that all requests coming from the user during the session are sent to the same server instance.
Elastic Beanstalk uses load balancer–generated HTTP cookies when sticky sessions are enabled for an application. The load balancer uses a special load balancer–generated cookie to track the application instance for each request. When the load balancer receives a request, it first checks to see if this cookie is present in the request. If so, the request is sent to the application instance specified in the cookie. If there is no cookie, the load balancer chooses an application instance based on the existing load balancing algorithm. A cookie is inserted into the response for binding subsequent requests from the same user to that application instance. The policy configuration defines a cookie expiry, which establishes the duration of validity for each cookie.
You can use the Sessions section on the Load Balancer tab to specify whether or not the load balancer for your application allows session stickiness.

For more information on Elastic Load Balancing, go to the Elastic Load Balancing Developer Guide.