Tagging resources in your Elastic Beanstalk environments
You can apply tags to your Amazon Elastic Beanstalk environments. Tags are key-value pairs associated with Amazon resources. For information about Elastic Beanstalk resource tagging, use cases, tag key and value constraints, and supported resource types, see Tagging Elastic Beanstalk application resources.
Elastic Beanstalk applies environment tags to the environment resource itself, as well as to other Amazon resources that Elastic Beanstalk creates for the environment. You can use tags to manage permissions at the specific resource level within an environment. For more information, see Tagging Your Amazon EC2 Resources in the Amazon EC2 User Guide.
By default, Elastic Beanstalk applies a few tags to your environment:
-
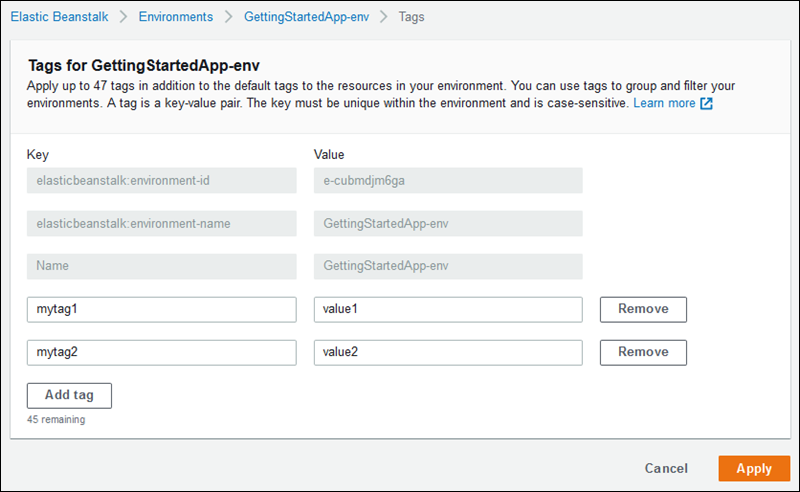
elasticbeanstalk:environment-name– The name of the environment. -
elasticbeanstalk:environment-id– The environment ID. -
Name– Also the name of the environment.Nameis used in the Amazon EC2 dashboard to identify and sort resources.
You can't edit these default tags.
You can specify tags when you create the Elastic Beanstalk environment. In an existing environment, you can add or remove tags, and update the values of existing tags. An environment can have up to 50 tags including the default tags.
Adding tags during environment creation
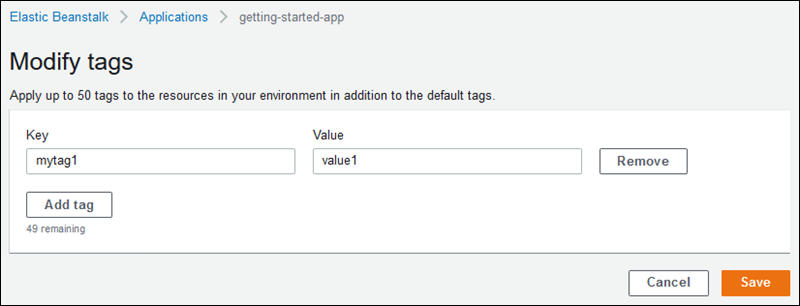
When you use the Elastic Beanstalk console to create an environment, you can specify tag keys and values on the Modify tags configuration page of the Create New Environment wizard.

If you use the EB CLI to create an environment, use the --tags option with eb create to
add tags.
~/workspace/my-app$ eb create --tags mytag1=value1,mytag2=value2With the Amazon CLI or other API-based clients, use the --tags parameter on the create-environment command.
$ aws elasticbeanstalk create-environment \
      --tags Key=mytag1,Value=value1 Key=mytag2,Value=value2 \
      --application-name my-app --environment-name my-env --cname-prefix my-app --version-label v1 --template-name my-saved-config
Saved configurations include user-defined tags. When you apply a saved configuration that contains tags during environment creation, those tags are applied to the new environment, as long as you don't specify any new tags. If you add tags to an environment using one of the preceding methods, any tags defined in the saved configuration are discarded.
Managing tags of an existing environment
You can add, update, and delete tags in an existing Elastic Beanstalk environment. Elastic Beanstalk applies the changes to your environment's resources.
However, you can't edit the default tags that Elastic Beanstalk applies to your environment.
To manage an environment's tags in the Elastic Beanstalk console
Open the Elastic Beanstalk console
, and in the Regions list, select your Amazon Web Services Region. -
In the navigation pane, choose Environments, and then choose the name of your environment from the list.
-
In the navigation pane, choose Tags.
The tag management page shows the list of tags that currently exist in the environment.

-
Add, update, or delete tags:
-
To add a tag, enter it into the empty boxes at the bottom of the list. To add another tag, choose Add tag and Elastic Beanstalk adds another pair of empty boxes.
-
To update a tag's key or value, edit the respective box in the tag's row.
-
To delete a tag, choose Remove next to the tag's value box.
-
-
To save the changes choose Apply at the bottom of the page.
If you use the EB CLI to update your environment, use eb tags to add, update, delete, or list tags.
For example, the following command lists the tags in your default environment.
~/workspace/my-app$ eb tags --listThe following command updates the tag mytag1 and deletes the tag mytag2.
~/workspace/my-app$ eb tags --update mytag1=newvalue --delete mytag2For a complete list of options and more examples, see eb tags.
With the Amazon CLI or other API-based clients, use the list-tags-for-resource command to list the tags of an environment.
$ aws elasticbeanstalk list-tags-for-resource --resource-arn "arn:aws-cn:elasticbeanstalk:us-west-2:my-account-id:environment/my-app/my-env"Use the update-tags-for-resource command to add, update, or delete tags in an environment.
$ aws elasticbeanstalk update-tags-for-resource \
      --tags-to-add Key=mytag1,Value=newvalue --tags-to-remove mytag2 \
      --resource-arn "arn:aws-cn:elasticbeanstalk:us-west-2:my-account-id:environment/my-app/my-env"
Specify both tags to add and tags to update in the --tags-to-add parameter of update-tags-for-resource. A nonexisting tag is
added, and an existing tag's value is updated.
Note
To use these two Amazon CLI commands with an Elastic Beanstalk environment, you need the environment's ARN. You can retrieve the ARN by using the following command.
$ aws elasticbeanstalk describe-environments