Tutorial: Configure a domain with an IAM master user and Amazon Cognito authentication
This tutorial covers a popular Amazon OpenSearch Service use case for fine-grained access control: an IAM master user with Amazon Cognito authentication for OpenSearch Dashboards.
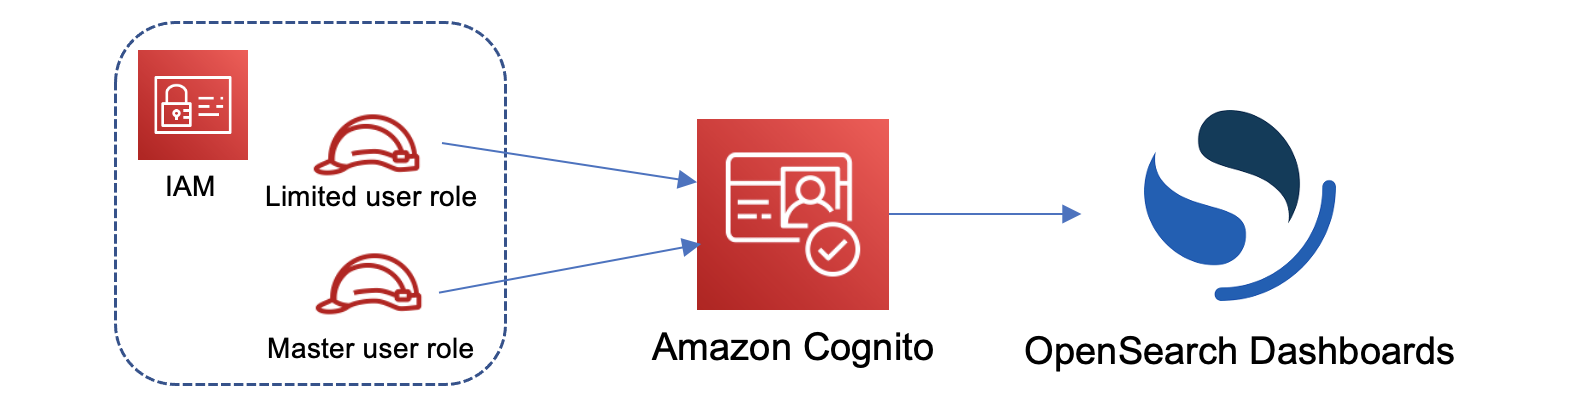
In the tutorial, we'll configure a master IAM role and a limited IAM role, which we'll then associate with users in Amazon Cognito. The master user can then sign in to OpenSearch Dashboards, map the limited user to a role, and use fine-grained access control to limit the user's permissions.
Although these steps use the Amazon Cognito user pool for authentication, this same basic process works for any Cognito authentication provider that lets you assign different IAM roles to different users.
You'll complete the following steps in this tutorial:
Step 1: Create master and limited IAM roles
Navigate to the Amazon Identity and Access Management (IAM) console and create two separate roles:
-
MasterUserRole– The master user, which will have full permissions to the cluster and manage roles and role mappings. -
LimitedUserRole– A more restricted role, which you'll grant limited access to as the master user.
For instructions to create the roles, see Creating a role using custom trust policies.
Both roles must have the following trust policy, which allows your Cognito identity pool to assume the roles:
{
  "Version": "2012-10-17",
  "Statement": [{
    "Effect": "Allow",
    "Principal": {
      "Federated": "cognito-identity.amazonaws.com"
    },
    "Action": "sts:AssumeRoleWithWebIdentity",
    "Condition": {
      "StringEquals": {
        "cognito-identity.amazonaws.com:aud": "{identity-pool-id}"
      },
      "ForAnyValue:StringLike": {
        "cognito-identity.amazonaws.com:amr": "authenticated"
      }
    }
  }]
}
Note
Replace identity-pool-id with the unique identifier of your Amazon Cognito
identity pool. For example,
us-east-1:0c6cdba7-3c3c-443b-a958-fb9feb207aa6.
Step 2: Create a domain with Cognito authentication
Navigate to the Amazon OpenSearch Service console at https://console.aws.amazon.com/aos/home/
-
OpenSearch 1.0 or later, or Elasticsearch 7.8 or later
-
Public access
-
Fine-grained access control enabled with
MasterUserRoleas the master user (created in the previous step) -
Amazon Cognito authentication enabled for OpenSearch Dashboards. For instructions to enable Cognito authentication and select a user and identity pool, see Configuring a domain to use Amazon Cognito authentication.
-
The following domain access policy:
{ "Version": "2012-10-17", "Statement": [ { "Effect": "Allow", "Principal": { "AWS": "arn:aws:iam::{account-id}:root" }, "Action": [ "es:ESHttp*" ], "Resource": "arn:aws:es:{region}:{account-id}:domain/{domain-name}/*" } ] } -
HTTPS required for all traffic to the domain
-
Node-to-node encryption
-
Encryption of data at rest
Step 3: Configure Cognito users
While your domain is being created, configure the master and limited users within Amazon Cognito by following Create a user pool in the Amazon Cognito Developer Guide. Lastly, configure your identity pool by following the steps in Create an identity pool in Amazon Cognito. The user pool and identity pool must be in the same Amazon Web Services Region.
Step 4: Map roles in OpenSearch Dashboards
Now that your users are configured, you can sign in to OpenSearch Dashboards as the master user and map users to roles.
-
Go back to the OpenSearch Service console and navigate to the OpenSearch Dashboards URL for the domain you created. The URL follows this format:
domain-endpoint/_dashboards/ -
Sign in with the
master-usercredentials. -
Choose Add sample data and add the sample flight data.
-
In the left navigation pane, choose Security, Roles, Create role.
-
Name the role
new-role. -
For Index, specify
opensearch_dashboards_sample_data_fli*(kibana_sample_data_fli*on Elasticsearch domains). -
For Index permissions, choose read.
-
For Document level security, specify the following query:
{ "match": { "FlightDelay": true } } -
For field-level security, choose Exclude and specify
FlightNum. -
For Anonymization, specify
Dest. -
Choose Create.
-
Choose Mapped users, Manage mapping. Add the Amazon Resource Name (ARN) for
LimitedUserRoleas an external identity and choose Map. -
Return to the list of roles and choose opensearch_dashboards_user. Choose Mapped users, Manage mapping. Add the ARN for
LimitedUserRoleas a backend role and choose Map.
Step 5: Test the permissions
When your roles are mapped correctly, you can sign in as the limited user and test the permissions.
-
In a new, private browser window, navigate to the OpenSearch Dashboards URL for the domain, sign in using the
limited-usercredentials, and choose Explore on my own. -
Go to Dev Tools and run the default search:
GET _search
{
  "query": {
    "match_all": {}
  }
}
Note the permissions error.
limited-userdoesn't have permissions to run cluster-wide searches. -
Run another search:
GET opensearch_dashboards_sample_data_flights/_search
{
  "query": {
    "match_all": {}
  }
}
Note that all matching documents have a
FlightDelayfield oftrue, an anonymizedDestfield, and noFlightNumfield. -
In your original browser window, signed in as
master-user, choose Dev Tools, and then perform the same searches. Note the difference in permissions, number of hits, matching documents, and included fields.