SAML authentication for OpenSearch Dashboards
SAML authentication for OpenSearch Dashboards lets you use your existing identity provider to offer single sign-on (SSO) for Dashboards on Amazon OpenSearch Service domains running OpenSearch or Elasticsearch 6.7 or later. To use SAML authentication, you must enable fine-grained access control.
Rather than authenticating through Amazon Cognito or the internal user database, SAML authentication for OpenSearch Dashboards lets you use third-party identity providers to log in to Dashboards, manage fine-grained access control, search your data, and build visualizations. OpenSearch Service supports providers that use the SAML 2.0 standard, such as Okta, Keycloak, Active Directory Federation Services (ADFS), Auth0, and Amazon IAM Identity Center.
SAML authentication for Dashboards is only for accessing OpenSearch Dashboards through a web browser. Your SAML credentials do not let you make direct HTTP requests to the OpenSearch or Dashboards APIs.
SAML configuration overview
This documentation assumes that you have an existing identity provider and some familiarity with it. We can't provide detailed configuration steps for your exact provider, only for your OpenSearch Service domain.
The OpenSearch Dashboards login flow can take one of two forms:
-
Service provider (SP) initiated: You navigate to Dashboards (for example,
https://), which redirects you to the login screen. After you log in, the identity provider redirects you to Dashboards.my-domain.us-east-1.es.amazonaws.com/_dashboards -
Identity provider (IdP) initiated: You navigate to your identity provider, log in, and choose OpenSearch Dashboards from an application directory.
OpenSearch Service provides two single sign-on URLs, SP-initiated and IdP-initiated, but you only need the one that matches your desired OpenSearch Dashboards login flow.
Regardless of which authentication type you use, the goal is to log in through your identity provider and receive a SAML assertion that contains your username (required) and any backend roles (optional, but recommended). This information allows fine-grained access control to assign permissions to SAML users. In external identity providers, backend roles are typically called "roles" or "groups."
Considerations
Consider the following when you configure SAML authentication:
-
Due to the size of the IdP metadata file, we strongly recommend using the Amazon console to configure SAML authentication.
-
Domains only support one Dashboards authentication method at a time. If you have Amazon Cognito authentication for OpenSearch Dashboards enabled, you must disable it before you can enable SAML authentication.
-
If you use a network load balancer with SAML, you must first create a custom endpoint. For more information, see Creating a custom endpoint for Amazon OpenSearch Service.
-
Service Control Policies (SCP) will not be applicable or evaluated in the case of non-IAM identities (like SAML in Amazon OpenSearch Serverless & SAML and basic internal user authorization for Amazon OpenSearch Service).
SAML authentication for VPC domains
SAML doesn't require direct communication between your identity provider and your
service provider. Therefore, even if your OpenSearch domain is hosted within a private
VPC, you can still use SAML as long as your browser can communicate with both your
OpenSearch cluster and your identity provider. Your browser essentially acts as the
intermediary between your identity provider and your service provider. For a useful
diagram that explains the SAML authentication flow, see the Okta
documentation
Modifying the domain access policy
Before you configure SAML authentication, you must update the domain access policy to allow SAML users to access the domain. Otherwise, you'll see access denied errors.
We recommend the following domain access
policy, which provides full access to the subresources (/*) on
the domain:
To make the policy more restrictive, you can add an IP address condition to the policy. This conditions limits access to only the specified IP address range or subnet. For example, the following policy allows access only from the 192.0.2.0/24 subnet:
Note
An open domain access policy requires fine-grained access control to be enabled on your domain, otherwise you see the following error:
To protect domains with public access, a restrictive policy or fine-grained
                    access control is required.
If you have a master user or internal user configured with a robust password, keeping the policy open while using fine-grained access control might be acceptable from a security standpoint. For more information, see Fine-grained access control in Amazon OpenSearch Service.
Configuring SP- or IdP-initiated authentication
These steps explain how to enable SAML authentication with SP-initiated or IdP-initiated authentication for OpenSearch Dashboards. For the extra step required to enable both, see Configuring both SP- and IdP-initiated authentication.
Step 1: Enable SAML authentication
You can enable SAML authentication either during domain creation, or by choosing Actions, Edit security configuration on an existing domain. The following steps vary slightly depending on which one you choose.
Within the domain configuration, under SAML authentication for OpenSearch Dashboards/Kibana, select Enable SAML authentication.
Step 2: Configure your identity provider
Perform the following steps depending on when you're configuring SAML authentication.
If you're creating a new domain
If you're in the process of creating a new domain, OpenSearch Service can't yet generate a service provider entity ID or SSO URLs. Your identity provider requires these values in order to properly enable SAML authentication, but they can only be generated after the domain is created. To work around this interdependency during domain creation, you can provide temporary values into your IdP configuration to generate the required metadata and then update them once your domain is active.
If you're using a custom endpoint, you
can infer what the URLs will be. For example, if your custom endpoint is
www., the
service provider entity ID will be
custom-endpoint.comwww., the
IdP-initiated SSO URL will be
custom-endpoint.comwww.,
and the SP-initiated SSO URL will be
custom-endpoint.com/_dashboards/_opendistro/_security/saml/acs/idpinitiatedwww..
You can use the values to configure your identity provider before the domain is
created. See the next section for examples.custom-endpoint.com/_dashboards/_opendistro/_security/saml/acs
Note
You can not sign in with a dual stack endpoint because the FQDN of a HTTP request is different than the FQDN of a SAML request. An OpenSearch administrator will need to set up a custom endpoint and set the CNAME value to dual stack endpoint if you would like to sign in using a dual stack endpoint.
If you're not using a custom endpoint, you can enter temporary values into your IdP to generate the required metadata, and then update them later after the domain is active.
For example, within Okta, you can enter
https://
into the Single sign on URL and Audience URI (SP
Entity ID) fields, which enables you to generate the metadata.
Then, after the domain is active, you can retrieve the correct values from OpenSearch Service
and update them in Okta. For instructions, see Step 6: Update your IdP URLs.temp-endpoint.amazonaws.com
If you're editing an existing domain
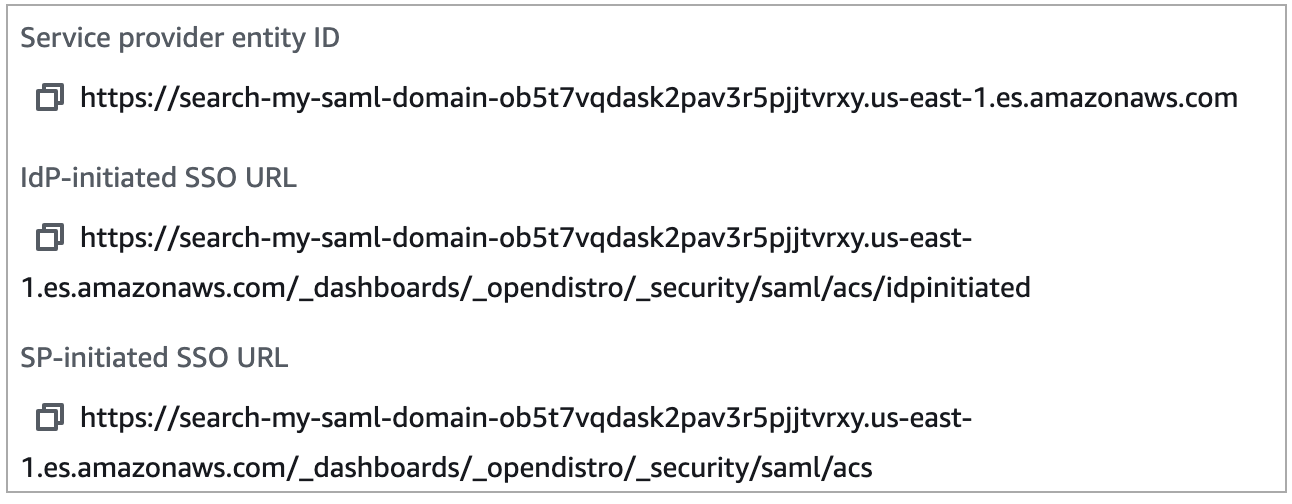
If you're enabling SAML authentication on an existing domain, copy the service provider entity ID and one of the SSO URLs. For guidance on which URL to use, see SAML configuration overview.
Use the values to configure your identity provider. This is the most complex part of the process, and unfortunately, terminology and steps vary wildly by provider. Consult your provider's documentation.
In Okta, for example, you create a SAML 2.0 web application. For Single sign on URL, specify the SSO URL. For Audience URI (SP Entity ID), specify the SP entity ID.
Rather than users and backend roles, Okta has users and groups. For
Group Attribute Statements, we recommend that you add
role to the Name field and the regular
expression .+ to the Filter field. This
statement tells the Okta identity provider to include all user groups under the
role field of the SAML assertion after a user
authenticates.
In IAM Identity Center, you specify the SP entity ID as the Application SAML
audience. You also need to specify the following attribute
mappings: Subject=${user:subject}:format=unspecified
and Role=${user:groups}:format=uri.
In Auth0, you create a regular web application and enable the SAML 2.0 add-on. In Keycloak, you create a client.
Step 3: Import IdP metadata
After you configure your identity provider, it generates an IdP metadata file. This XML file contains information about the provider, such as a TLS certificate, single sign-on endpoints, and the identity provider's entity ID.
Copy the contents of the IdP metadata file and paste it into the Metadata from IdP field in the OpenSearch Service console. Alternately, choose Import from XML file and upload the file. The metadata file should look something like this:
<?xml version="1.0" encoding="UTF-8"?>
<md:EntityDescriptor entityID="entity-id" xmlns:md="urn:oasis:names:tc:SAML:2.0:metadata">
  <md:IDPSSODescriptor WantAuthnRequestsSigned="false" protocolSupportEnumeration="urn:oasis:names:tc:SAML:2.0:protocol">
    <md:KeyDescriptor use="signing">
      <ds:KeyInfo xmlns:ds="http://www.w3.org/2000/09/xmldsig#">
        <ds:X509Data>
          <ds:X509Certificate>tls-certificate</ds:X509Certificate>
        </ds:X509Data>
      </ds:KeyInfo>
    </md:KeyDescriptor>
    <md:NameIDFormat>urn:oasis:names:tc:SAML:1.1:nameid-format:unspecified</md:NameIDFormat>
    <md:NameIDFormat>urn:oasis:names:tc:SAML:1.1:nameid-format:emailAddress</md:NameIDFormat>
    <md:SingleSignOnService Binding="urn:oasis:names:tc:SAML:2.0:bindings:HTTP-POST" Location="idp-sso-url"/>
    <md:SingleSignOnService Binding="urn:oasis:names:tc:SAML:2.0:bindings:HTTP-Redirect" Location="idp-sso-url"/>
  </md:IDPSSODescriptor>
</md:EntityDescriptor>
Step 4: Configure SAML fields
After you input your IdP metadata, configure the following additional fields within the OpenSearch Service console:
-
IdP entity ID – Copy the value of the
entityIDproperty from your metadata file and paste it into this field. Many identity providers also display this value as part of a post-configuration summary. Some providers call it the "issuer". -
SAML master username and SAML master backend role – The user and/or backend role that you specify receive full permissions to the cluster, equivalent to a new master user, but can only use those permissions within OpenSearch Dashboards.
In Okta, for example, you might have a user
jdoewho belongs to the groupadmins. If you addjdoeto the SAML master username field, only that user receives full permissions. If you addadminsto the SAML master backend role field, any user that belongs to theadminsgroup receives full permissions.Note
The contents of the SAML assertion must exactly match the strings that you use for the SAML master username and SAML master role. Some identity providers add a prefix before their usernames, which can cause a hard-to-diagnose mismatch. In the identity provider user interface, you might see
jdoe, but the SAML assertion might containauth0|jdoe. Always use the string from the SAML assertion.
Many identity providers let you view a sample assertion during the configuration
process, and tools like SAML-tracer
<?xml version="1.0" encoding="UTF-8"?> <saml2:Assertion ID="id67229299299259351343340162" IssueInstant="2020-09-22T22:03:08.633Z" Version="2.0" xmlns:saml2="urn:oasis:names:tc:SAML:2.0:assertion"> <saml2:Issuer Format="urn:oasis:names:tc:SAML:2.0:nameid-format:entity">idp-issuer</saml2:Issuer> <saml2:Subject> <saml2:NameIDFormat="urn:oasis:names:tc:SAML:1.1:nameid-format:unspecified">username</saml2:NameID> <saml2:SubjectConfirmation Method="urn:oasis:names:tc:SAML:2.0:cm:bearer"> <saml2:SubjectConfirmationData NotOnOrAfter="2020-09-22T22:08:08.816Z" Recipient="domain-endpoint/_dashboards/_opendistro/_security/saml/acs"/> </saml2:SubjectConfirmation> </saml2:Subject> <saml2:Conditions NotBefore="2020-09-22T21:58:08.816Z" NotOnOrAfter="2020-09-22T22:08:08.816Z"> <saml2:AudienceRestriction> <saml2:Audience>domain-endpoint</saml2:Audience> </saml2:AudienceRestriction> </saml2:Conditions> <saml2:AuthnStatement AuthnInstant="2020-09-22T19:54:37.274Z"> <saml2:AuthnContext> <saml2:AuthnContextClassRef>urn:oasis:names:tc:SAML:2.0:ac:classes:PasswordProtectedTransport</saml2:AuthnContextClassRef> </saml2:AuthnContext> </saml2:AuthnStatement> <saml2:AttributeStatement> <saml2:Attribute Name="role" NameFormat="urn:oasis:names:tc:SAML:2.0:attrname-format:unspecified"> <saml2:AttributeValue xmlns:xs="http://www.w3.org/2001/XMLSchema" xmlns:xsi="http://www.w3.org/2001/XMLSchema-instance" xsi:type="xs:string">GroupName Match Matches regex ".+" (case-sensitive) </saml2:AttributeValue> </saml2:Attribute> </saml2:AttributeStatement> </saml2:Assertion>
Step 5: (Optional) Configure additional settings
Under Additional settings, configure the following optional fields:
-
Subject key – You can leave this field empty to use the
NameIDelement of the SAML assertion for the username. If your assertion doesn't use this standard element and instead includes the username as a custom attribute, specify that attribute here. -
Roles key – If you want to use backend roles (recommended), specify an attribute from the assertion in this field, such as
roleorgroup. This is another situation in which tools like SAML-tracercan help. -
Session time to live – By default, OpenSearch Dashboards logs users out after 24 hours. You can configure this value to any number between 60 and 1,440 (24 hours) by specifying a new value.
After you're satisfied with your configuration, save the domain.
Step 6: Update your IdP URLs
If you enabled SAML authentication while
creating a domain, you had to specify temporary URLs within your IdP in
order to generate the XML metadata file. After the domain status changes to
Active, you can get the correct URLs and modify your IdP.
To retrieve the URLs, select the domain and choose Actions, Edit security configuration. Under SAML authentication for OpenSearch Dashboards/Kibana, you can find the correct service provider entity ID and SSO URLs. Copy the values and use them to configure your identity provider, replacing the temporary URLs that you provided in step 2.
Step 7: Map SAML users to roles
Once your domain status is Active and your IdP is configured correctly, navigate to OpenSearch Dashboards.
-
If you chose the SP-initiated URL, navigate to
domain-endpoint/_dashboards?security_tenant=to the URL.tenant-name -
If you chose the IdP-initiated URL, navigate to your identity provider's application directory.
In both cases, log in as either the SAML master user or a user who belongs to the
SAML master backend role. To continue the example from step 7, log in as either
jdoe or a member of the admins group.
After OpenSearch Dashboards loads, choose Security, Roles. Then, map roles to allow other users to access OpenSearch Dashboards.
For example, you might map your trusted colleague jroe to the
all_access and security_manager roles. You might also
map the backend role analysts to the readall and
opensearch_dashboards_user roles.
If you prefer to use the API rather than OpenSearch Dashboards, see the following sample request:
PATCH _plugins/_security/api/rolesmapping
[
  {
    "op": "add", "path": "/security_manager", "value": { "users": ["master-user", "jdoe", "jroe"], "backend_roles": ["admins"] }
  },
  {
    "op": "add", "path": "/all_access", "value": { "users": ["master-user", "jdoe", "jroe"], "backend_roles": ["admins"] }
  },
  {
    "op": "add", "path": "/readall", "value": { "backend_roles": ["analysts"] }
  },
  {
    "op": "add", "path": "/opensearch_dashboards_user", "value": { "backend_roles": ["analysts"] }
  }
]
Configuring both SP- and IdP-initiated authentication
If you want to configure both SP- and IdP-initiated authentication, you must do so through your identity provider. For example, in Okta, you can perform the following steps:
-
Within your SAML application, go to General, SAML settings.
-
For the Single sign on URL, provide your IdP-initiated SSO URL. For example,
https://search-.domain-hash/_dashboards/_opendistro/_security/saml/acs/idpinitiated -
Enable Allow this app to request other SSO URLs.
-
Under Requestable SSO URLs, add one or more SP-initiated SSO URLs. For example,
https://search-.domain-hash/_dashboards/_opendistro/_security/saml/acs
Configuring SAML authentication (Amazon CLI)
The following Amazon CLI command enables SAML authentication for OpenSearch Dashboards on an existing domain:
aws opensearch update-domain-config \ --domain-namemy-domain\ --advanced-security-options '{"SAMLOptions":{"Enabled":true,"MasterUserName":"my-idp-user","MasterBackendRole":"my-idp-group-or-role","Idp":{"EntityId":"entity-id","MetadataContent":"metadata-content-with-quotes-escaped"},"RolesKey":"optional-roles-key","SessionTimeoutMinutes":180,"SubjectKey":"optional-subject-key"}}'
You must escape all quotes and newline characters in the metadata XML. For example,
use <KeyDescriptor use=\"signing\">\n instead of <KeyDescriptor
use="signing"> and a line break. For detailed information about using the
Amazon CLI, see the Amazon CLI Command Reference.
Configuring SAML authentication (configuration API)
The following request to the configuration API enables SAML authentication for OpenSearch Dashboards on an existing domain:
POST https://es.us-east-1.amazonaws.com/2021-01-01/opensearch/domain/my-domain/config { "AdvancedSecurityOptions": { "SAMLOptions": { "Enabled":true, "MasterUserName": "my-idp-user", "MasterBackendRole": "my-idp-group-or-role", "Idp": { "EntityId": "entity-id", "MetadataContent": "metadata-content-with-quotes-escaped" }, "RolesKey": "optional-roles-key", "SessionTimeoutMinutes":180, "SubjectKey": "optional-subject-key" } } }
You must escape all quotes and newline characters in the metadata XML. For example,
use <KeyDescriptor use=\"signing\">\n instead of <KeyDescriptor
use="signing"> and a line break. For detailed information about using the
configuration API, see the OpenSearch Service API
reference.
SAML troubleshooting
| Error | Details |
|---|---|
|
Verify that you provided the correct SSO URL (step 3) to your identity provider. |
|
|
Your IdP metadata file does not conform to the SAML 2.0 standard. Check for errors using a validation tool. |
|
SAML configuration options aren't visible in the console. |
Update to the latest service software. |
|
|
This generic error can occur for many reasons.
|
|
|
You successfully authenticated, but the username and any backend roles from the SAML assertion are not mapped to any roles and thus have no permissions. These mappings are case-sensitive. Your system administrator can verify the contents of your SAML
assertion using a tool like SAML-tracer
|
|
Your browser continuously redirects or receives HTTP 500 errors when trying to access OpenSearch Dashboards. |
These errors can occur if your SAML assertion contains a large number of roles totaling approximately 1,500 characters. For example, if you pass 80 roles, the average length of which is 20 characters, you might exceed the size limit for cookies in your web browser. Starting with OpenSearch version 2.7, SAML assertion supports roles up to 5000 characters. |
|
You can't log out of ADFS. |
ADFS requires all logout request to be signed, which OpenSearch Service doesn't
support. Remove |
|
|
The entity ID of the IdP provided in the metadata XML to OpenSearch Service is different than the one in the SAML response. To fix this, make sure that they match. Enable CW Application Error logs on your domain to find the error message to debug the SAML integration issue. |
|
|
OpenSearch Service is unable to verify the signature in the SAML response using the certificate of the IdP provided in metadata XML. This could either be a manual error, or your IdP has rotated its certificate. Update the latest certificate from your IdP in the metadata XML provided to OpenSearch Service through the Amazon Web Services Management Console. |
|
|
The audience field in the SAML response doesn't match the domain endpoint. To fix this error, update the SP audience field to match your domain endpoint. If you've enabled custom endpoints, the audience field should match your custom endpoint. Enable CW Application Error logs on your domain to find the error message to debug the SAML integration issue. |
|
Your browser receives a HTTP 400 error with |
This error generally happens if you've configured the
IdP-initiated URL with the format
|
|
The response was received at |
The destination field in SAML response doesn't match one of the following URL formats:
Depending on the login flow you use (SP-initiated or IdP-initiated), enter in a destination field that matches one of the OpenSearch URLs. |
|
The response has an |
You're using the IdP-initiated URL for an SP-initiated login flow. Use the SP-initiated URL instead. |
Disabling SAML authentication
To disable SAML authentication for OpenSearch Dashboards (console)
-
Choose the domain, Actions, and Edit security configuration.
-
Uncheck Enable SAML authentication.
-
Choose Save changes.
-
After the domain finishes processing, verify the fine-grained access control role mapping with the following request:
GET _plugins/_security/api/rolesmappingDisabling SAML authentication for Dashboards does not remove the mappings for the SAML master username and/or the SAML master backend role. If you want to remove these mappings, log in to Dashboards using the internal user database (if enabled), or use the API to remove them:
PUT _plugins/_security/api/rolesmapping/all_access{ "users": [ "master-user" ] }