Getting started with the Espressif ESP32-DevKitC and the ESP-WROVER-KIT
Important
This is an archived version of the FreeRTOS User Guide for use with FreeRTOS release 202012.00. For the latest version of this document, see the FreeRTOS User Guide.
Follow this tutorial to get started with the Espressif ESP32-DevKitC equipped with ESP32-WROOM-32, ESP32-SOLO-1, or ESP-WROVER modules and the ESP-WROVER-KIT-VB. To purchase one from our partner on the Amazon Partner Device catalog, use the following links:
These versions of development boards are supported on FreeRTOS.
For more information about the latest versions of these boards, see
ESP32-DevKitC V4
Note
Currently, the FreeRTOS port for ESP32-WROVER-KIT and ESP DevKitC doesn't support the Symmetric multiprocessing (SMP) feature.
Overview
This tutorial guides you through the following steps:
-
Connecting your board to a host machine
-
Installing software on the host machine for developing and debugging embedded applications for your microcontroller board
-
Cross compiling a FreeRTOS demo application to a binary image
-
Loading the application binary image to your board, and then running the application
-
Interacting with the application running on your board across a serial connection, for monitoring and debugging purposes
Prerequisites
Before you get started with FreeRTOS on your Espressif board, you must set up your Amazon account and permissions.
Sign up for an Amazon Web Services account
If you do not have an Amazon Web Services account, use the following procedure to create one.
To sign up for Amazon Web Services
Open http://www.amazonaws.cn/
and choose Sign Up. Follow the on-screen instructions.
Amazon sends you a confirmation email after the sign-up process is
complete. At any time, you can view your current account activity and manage your account by
going to http://www.amazonaws.cn/
Secure IAM users
After you sign up for an Amazon Web Services account, safeguard your administrative user by turning on multi-factor authentication (MFA). For instructions, see Enable a virtual MFA device for an IAM user (console) in the IAM User Guide.
To give other users access to your Amazon Web Services account resources, create IAM users. To secure your IAM users, turn on MFA and only give the IAM users the permissions needed to perform their tasks.
For more information about creating and securing IAM users, see the following topics in the IAM User Guide:
To provide access, add permissions to your users, groups, or roles:
-
Users managed in IAM through an identity provider:
Create a role for identity federation. Follow the instructions in Create a role for a third-party identity provider (federation) in the IAM User Guide.
-
IAM users:
-
Create a role that your user can assume. Follow the instructions in Create a role for an IAM user in the IAM User Guide.
-
(Not recommended) Attach a policy directly to a user or add a user to a user group. Follow the instructions in Adding permissions to a user (console) in the IAM User Guide.
-
Note
The FreeRTOS 202012.00 release supports ESP-IDF v3.3. If you're using a later version of FreeRTOS, follow the instructions specific to IDFv4.2 at Get started with the ESP-IDF v4.2.
Get started with ESP-IDF v3.3
This section shows you how to use ESP-IDF v3.3 on Espressif hardware. To use ESP-IDF v4.2, see Get started with the ESP-IDF v4.2.
Set up the Espressif hardware
For more information about setting up the ESP32-DevKitC development board hardware, see the ESP32-DevKitC
V4 Getting Started Guide
For information about setting up the ESP-WROVER-KIT development board hardware. see the
ESP-WROVER-KIT V4.1 Getting Started Guide
Important
When you reach the Get Started section of the Espressif guides, stop, and then follow the steps below.
Set up your development environment
To communicate with your board, you must download and install a toolchain.
Setting up the toolchain
Note
ESP-IDF v3.3 doesn't support the latest version of the ESP32 compiler. If you have already installed the latest version of the ESP32 compiler, you should uninstall it and use the compatible version of the compiler that is included in the toolchain installation. See the links in this section. To check the version of your compiler, run the following command.
xtensa-esp32-elf-gcc --version
To set up the toolchain, follow these instructions for your host machine's operating system:
Important
When you reach the "Get ESP-IDF" instructions under Next Steps, stop, and then return to the instructions on this page.
If you followed the "Get ESP-IDF" instructions under Next Steps, just now
or on a previous occasion, you should clear the IDF_PATH environment variable from your
system before you continue. This environment variable was automatically set if you followed
the "Get ESP-IDF" instructions.
Install CMake
The CMake build system is required to build the FreeRTOS demo and test applications for this device. FreeRTOS supports versions 3.13 and later.
You can download the latest version of CMake from CMake.org
For more details about using CMake with FreeRTOS, see Using CMake with FreeRTOS.
Establish a serial connection
To establish a serial connection between your host machine and the ESP32-DevKitC,
you must install CP210x USB to UART Bridge VCP drivers. You can download these
drivers from
Silicon Labs
To establish a serial connection between your host machine and the ESP32-WROVER-KIT, you must install some
FTDI virtual COM port drivers. You can download these drivers from FTDI
For more information, see
Establish Serial Connection with ESP32
Download and configure FreeRTOS
After you set up your environment, you can download FreeRTOS from GitHub
Configure the FreeRTOS demo applications
-
If you're running macOS or Linux, open a terminal prompt. If you're running Windows, open the
mingw32.exe. MinGWis a minimalist development environment for native Microsoft Windows applications. -
To verify that you have Python 2.7.10 or later installed, run
python --versionThe version installed is displayed. If you don't have Python 2.7.10 or later installed, you can install it from the Python
website. -
You need the Amazon Command Line Interface (Amazon CLI) to run Amazon IoT commands. If you're running Windows, use the easy_install awscli to install the Amazon CLI in the mingw32 environment.
If you're running macOS or Linux, see Installing the Amazon CLI.
-
Run aws configure and configure the Amazon CLI with your Amazon access key ID, secret access key, and Amazon Region. For more information, see Configuring the Amazon CLI.
-
Use the following command to install the Amazon SDK for Python (boto3):
-
On Windows, in the mingw32 environment, run
easy_install boto3 -
On macOS or Linux, run
pip install tornado nose --userand then run
pip install boto3 --user
-
FreeRTOS includes the SetupAWS.py script to make it easier to set up your Espressif
board to connect to Amazon IoT. To configure the script, open
freertos/tools/aws_config_quick_start/configure.json
afr_source_dir-
The complete path to the
freertosdirectory on your computer. Make sure that you use forward slashes to specify this path. thing_name-
The name that you want to assign to the Amazon IoT thing that represents your board.
wifi_ssid-
The SSID of your Wi-Fi network.
wifi_password-
The password for your Wi-Fi network.
wifi_security-
The security type for your Wi-Fi network.
The following are valid security types:
-
eWiFiSecurityOpen(Open, no security) -
eWiFiSecurityWEP(WEP security) -
eWiFiSecurityWPA(WPA security) -
eWiFiSecurityWPA2(WPA2 security)
-
To run the configuration script
-
If you're running macOS or Linux, open a terminal prompt. If you're running Windows, open
mingw32.exe. -
Navigate to the
freertos/tools/aws_config_quick_startpython SetupAWS.py setup
The script does the following:
-
Creates an IoT thing, certificate, and policy
-
Attaches the IoT policy to the certificate and the certificate to the Amazon IoT thing
-
Populates the
aws_clientcredential.hfile with your Amazon IoT endpoint, Wi-Fi SSID, and credentials -
Formats your certificate and private key and writes them to the
aws_clientcredential_keys.hheader fileNote
The certificate is hardcoded for demonstration purposes only. Production-level applications should store these files in a secure location.
For more information about SetupAWS.py, see the README.md
in the freertos/tools/aws_config_quick_start
Build, flash, and run the FreeRTOS demo project
You can use CMake to generate the build files, Make to build the application binary, and Espressif's IDF utility to flash your board.
Build FreeRTOS on Linux and MacOS (ESP-IDF v3.3)
If you're using Windows, see Build FreeRTOS on Windows (ESP-IDF v3.3).
Use CMake to generate the build files, and then use Make to build the application.
To generate the demo application's build files with CMake
-
Change directories to the root of your FreeRTOS download directory.
-
Use the following command to generate the build files.
cmake -DVENDOR=espressif -DBOARD=esp32_wrover_kit -DCOMPILER=xtensa-esp32 -S . -Byour-build-directoryNote
If you want to build the application for debugging, add the
-DCMAKE_BUILD_TYPE=Debugflag to this command.If you want to generate the test application build files, add the
-DAFR_ENABLE_TESTS=1flag.The code provided by Espressif uses the lightweight IP (lwIP) stack as the default networking stack. To use the FreeRTOS+TCP networking stack instead, add the
–DAFR_ESP_FREERTOS_TCPflag to the CMake command.To add the lwIP dependency for non-vendor provided code, add the following lines to the CMake dependency file,
CMakeLists.txt, for your custom Wi-Fi component.# Add a dependency on the bluetooth espressif component to the common component set(COMPONENT_REQUIRES lwip)
To build the application with make
-
Change directories to the
builddirectory. -
Use the following command to build the application with Make.
make all -j4Note
You must generate the build files with the cmake command every time you switch between the
aws_demosproject and theaws_testsproject.
Build FreeRTOS on Windows (ESP-IDF v3.3)
On Windows, you must specify a build generator for CMake. Otherwise, CMake defaults to Visual Studio. Espressif officially recommends the Ninja build system because it works on Windows, Linux and MacOS. You must run CMake commands in a native Windows environment like cmd or PowerShell. Running CMake commands in a virtual Linux environment, like MSYS2 or WSL, is not supported.
Use CMake to generate the build files, and then use Make to build the application.
To generate the demo application's build files with CMake
-
Change directories to the root of your FreeRTOS download directory.
-
Use the following command to generate the build files.
cmake -DVENDOR=espressif -DBOARD=esp32_wrover_kit -DCOMPILER=xtensa-esp32 -GNinja -S . -Bbuild-directoryNote
If you want to build the application for debugging, add the
-DCMAKE_BUILD_TYPE=Debugflag to this command.If you want to generate the test application build files, add the
-DAFR_ENABLE_TESTS=1flag.The code provided by Espressif uses the lightweight IP (lwIP) stack as the default networking stack. To use the FreeRTOS+TCP networking stack instead, add the
–DAFR_ESP_FREERTOS_TCPflag to the CMake command.To add the lwIP dependency for non-vendor provided code, add the following lines to the CMake dependency file,
CMakeLists.txt, for your custom Wi-Fi component.# Add a dependency on the bluetooth espressif component to the common component set(COMPONENT_REQUIRES lwip)
To build the application
-
Change directories to the
builddirectory. -
Invoke Ninja to build the application.
ninjaOr, use the generic CMake interface to build the application.
cmake --buildbuild-directoryNote
You must generate the build files with the cmake command every time you switch between the
aws_demosproject and theaws_testsproject.
Flash and run FreeRTOS (ESP-IDF v3.3)
This section shows you how to use ESP-IDF v3.3 on Espressif hardware. To use ESP-IDF v4.2, see Get started with the ESP-IDF v4.2.
Use Espressif's IDF utility
(freertos/vendors/espressif/esp-idf/tools/idf.py
To erase the board's flash, go to the freertos
./vendors/espressif/esp-idf/tools/idf.py erase_flash -Bbuild-directory
To flash the application binary to your board, use make
make flash
You can also use the IDF script to flash your board:
./vendors/espressif/esp-idf/tools/idf.py flash -Bbuild-directory
To monitor:
./vendors/espressif/esp-idf/tools/idf.py monitor -p /dev/ttyUSB1 -Bbuild-directory
Note
You can combine these commands. For example:
./vendors/espressif/esp-idf/tools/idf.py erase_flash flash monitor -p /dev/ttyUSB1 -Bbuild-directory
Get started with the ESP-IDF v4.2
This section shows you how to use ESP-IDF v4.2 on Espressif hardware. To use ESP-IDF v3.3, see Get started with ESP-IDF v3.3.
Note
The Linux commands in this tutorial require that you use the Bash shell.
Set up the Espressif hardware
For information about setting up the ESP32-DevKitC development board hardware, see the
ESP32-DevKitC V4 Getting Started Guide
For information about setting up the ESP-WROVER-KIT development board hardware, see the
ESP-WROVER-KIT V4.1 Getting Started Guide
Important
When you reach the Get Started section of the Espressif guides, stop, and then return to the instructions on this page.
Set up your development environment
To communicate with your board, you must download and install a toolchain.
Setting up the toolchain
To set up the toolchain, follow these instructions for your host machine's operating system:
Important
When you reach the "Get ESP-IDF" instructions under Next Steps, stop, and then return to the instructions on this page.
Complete the installation (Linux / MacOS)
The ESP-IDF Windows installer installs all of the neceesary tools. The Linux and MacOS platforms require an additional step to complete the installation.
-
Open a command line window
-
Navigate to the FreeRTOS download directory, and then run the following script to download and install the espressif toolchain for your platform.
vendors/espressif/esp-idf/install.sh -
Add the ESP-IDF toolchain tools to your terminal's path with the following command.
source vendors/espressif/esp-idf/export.sh
Establish a serial connection
To establish a serial connection between your host machine and the ESP32-DevKitC, you must install the
CP210x USB to UART Bridge VCP drivers. You can download these drivers from
Silicon Labs
To establish a serial connection between your host machine and the ESP32-WROVER-KIT, you must install the
FTDI virtual COM port driver. You can download this driver from FTDI
For more information, see
Establish Serial Connection with ESP32
Download and configure FreeRTOS
After you set up your environment, you can download FreeRTOS from GitHub
Configure the FreeRTOS demo applications
-
If you're running macOS or Linux, open a terminal prompt. If you're running Windows, open mingw32.exe. ( MinGW
is a minimalist development environment for native Microsoft Windows applications.) -
To verify that you have Python3 installed, run
python --versionThe version installed is displayed. If you don't have Python 3.0.1 or later installed, you can install it from the Python
website. -
You need the Amazon Command Line Interface (Amazon CLI) to run Amazon IoT commands. If you're running Windows, use the easy_install awscli to install the Amazon CLI in the mingw32 environment.
If you're running macOS or Linux, see Installing the Amazon CLI.
-
Run
aws configureand configure the Amazon CLI with your Amazon access key ID, secret access key, and default Amazon Region. For more information, see Configuring the Amazon CLI.
-
Use the following command to install the Amazon SDK for Python (boto3):
-
On Windows, in the mingw32 environment, run
easy_install boto3 -
On macOS or Linux, run
pip install tornado nose --userand then run
pip install boto3 --user
-
FreeRTOS includes the SetupAWS.py script to make it easier to set up your Espressif
board to connect to Amazon IoT. To configure the script, open
freertos/tools/aws_config_quick_start/configure.json
afr_source_dir-
The complete path to the
freertosdirectory on your computer. Make sure that you use forward slashes to specify this path. thing_name-
The name that you want to assign to the Amazon IoT thing that represents your board.
wifi_ssid-
The SSID of your Wi-Fi network.
wifi_password-
The password for your Wi-Fi network.
wifi_security-
The security type for your Wi-Fi network.
The following are valid security types:
-
eWiFiSecurityOpen(Open, no security) -
eWiFiSecurityWEP(WEP security) -
eWiFiSecurityWPA(WPA security) -
eWiFiSecurityWPA2(WPA2 security)
-
To run the configuration script
-
If you're running macOS or Linux, open a terminal prompt. If you're running Windows, open the
mingw32.exefile. -
Navigate to the
freertos/tools/aws_config_quick_startpython SetupAWS.py setup
The script does the following:
-
Creates an IoT thing, certificate, and policy
-
Attaches the IoT policy to the certificate and the certificate to the Amazon IoT thing
-
Populates the
aws_clientcredential.hfile with your Amazon IoT endpoint, Wi-Fi SSID, and credentials -
Formats your certificate and private key and writes them to the
aws_clientcredential_keys.hheader fileNote
The certificate is hardcoded for demonstration purposes only. Production-level applications should store these files in a secure location.
For more information about SetupAWS.py, see the
README.md in the
freertos/tools/aws_config_quick_start
Build, flash, and run the FreeRTOS demo project using the idf.py script
You can use Espressif's IDF utility to generate the build files, build the application binary, and flash your board.
Build and flash FreeRTOS on Windows, Linux, and MacOS (ESP-IDF v4.2)
Use the idf.py script to build the project and flash the binaries onto your
device.
Note
Some setups might require that you use the port option
"-p with port-name"idf.py
to specify the correct port, as in the following example.
idf.py -p /dev/cu.usbserial-00101301B flash
To build and flash the project
-
Navigate to the root of your FreeRTOS download directory.
-
In a command line window, enter the following command to add the ESP-IDF tools to your terminal's PATH.
Windows
vendors\espressif\esp-idf\export.batLinux / MacOS
source vendors/espressif/esp-idf/export.sh -
Configure cmake in the
builddirectory and build the firmware image with the following command.idf.py -DVENDOR=espressif -DBOARD=esp32_wrover_kit -DCOMPILER=xtensa-esp32 buildYou should see output like the following.
Running cmake in directory /path/to/hello_world/build
Executing "cmake -G Ninja --warn-uninitialized /path/to/hello_world"...
Warn about uninitialized values.
-- Found Git: /usr/bin/git (found version "2.17.0")
-- Building empty aws_iot component due to configuration
-- Component names: ...
-- Component paths: ...

... (more lines of build system output)

[527/527] Generating hello-world.bin
esptool.py v2.3.1

Project build complete. To flash, run this command:
../../../components/esptool_py/esptool/esptool.py -p (PORT) -b 921600 write_flash --flash_mode dio --flash_size detect --flash_freq 40m 0x10000 build/hello-world.bin  build 0x1000 build/bootloader/bootloader.bin 0x8000 build/partition_table/partition-table.bin
or run 'idf.py -p PORT flash'
If there are no errors, the build will generate the firmware binary .bin files.
-
Erase your development board's flash memory with the following command.
idf.py erase_flash -
Use the
idf.pyscript to flash the application binary to your board.idf.py flash -
Monitor the output from your board's serial port with the following command.
idf.py monitor
Note
You can combine these commands such as in the following example.
idf.py erase_flash flash monitor
Note
For certain host machine setups, you must specify the port when you flash the board such as in the following example.
idf.py erase_flash flash monitor -p/dev/ttyUSB1
Build and Flash FreeRTOS with CMake
In addition to the idf.py script provided by the IDF SDK to build and run your
code, you can also build the project with CMake. Currently, it supports either Unix Makefiles or the
Ninja build system.
To build and flash the project
-
In a command line window, navigate to the root of your FreeRTOS download directory.
-
Run the following script to add the ESP-IDF tools to your shell's PATH.
Windows
vendors\espressif\esp-idf\export.batLinux / MacOS
source vendors/espressif/esp-idf/export.sh -
Enter the following command to generate the build files.
With Unix Makefiles
cmake -DVENDOR=espressif -DBOARD=esp32_wrover_kit -DCOMPILER=xtensa-esp32 -S . -B./YOUR_BUILD_DIRECTORY-DAFR_ENABLE_ALL_MODULES=1 -DAFR_ENABLE_TESTS=0With Ninja
cmake -DVENDOR=espressif -DBOARD=esp32_wrover_kit -DCOMPILER=xtensa-esp32 -S . -B./YOUR_BUILD_DIRECTORY-DAFR_ENABLE_ALL_MODULES=1 -DAFR_ENABLE_TESTS=0 -GNinja -
Erase the flash and then flash the board.
With Unix Makefiles
make -C./YOUR_BUILD_DIRECTORYerase_flashmake -C./YOUR_BUILD_DIRECTORYflashWith Ninja
ninja -C./YOUR_BUILD_DIRECTORYerase_flashninja -C./YOUR_BUILD_DIRECTORYflash
Monitoring MQTT messages on the cloud
You can use the MQTT client in the Amazon IoT console to monitor the messages that your device sends to the Amazon Cloud.
To subscribe to the MQTT topic with the Amazon IoT MQTT client
-
Navigate to the Amazon IoT console
. -
In the navigation pane, choose Test to open the MQTT client.
-
In Subscription topic, enter
your-thing-name/example/topic
Run the Bluetooth Low Energy demos
FreeRTOS supports Bluetooth Low Energy connectivity.
To run the FreeRTOS demo project across Bluetooth Low Energy, you must run the FreeRTOS Bluetooth Low Energy Mobile SDK Demo Application on an iOS or Android mobile device.
To set up the FreeRTOS Bluetooth Low Energy mobile SDK demo application
-
Follow the instructions in Mobile SDKs for FreeRTOS Bluetooth Devices to download and install the SDK for your mobile platform on your host computer.
-
Follow the instructions in FreeRTOS Bluetooth Low Energy Mobile SDK Demo Application to set up the demo mobile application on your mobile device.
For instructions about how to run the MQTT over Bluetooth Low Energy demo on your board, see the MQTT over Bluetooth Low Energy Demo Application.
For instructions about how to run the Wi-Fi provisioning demo on your board, see the Wi-Fi Provisioning Demo Application.
Using FreeRTOS in your own CMake project for ESP32
If you want to consume FreeRTOS in your own CMake project, you can set it up as a subdirectory and build it
together with your application. First, get a copy of FreeRTOS from GitHub
git submodule add -b release https://github.com/aws/amazon-freertos.gitfreertos
If a later version is released, you can update your local copy with these commands.
# Pull the latest changes from the remote tracking branch. git submodule update --remote --freertos
# Commit the submodule change because it is pointing to a different revision now. git addfreertos
git commit -m "Update FreeRTOS to a new release"
If your project has the following directory structure:
- freertos (the copy that you obtained from GitHub or the Amazon IoT console)
- src
  - main.c (your application code)
- CMakeLists.txt
Then the following is an example of the top-level CMakeLists.txt file that can be used
to build your application together with FreeRTOS.
To build the project, run the following CMake commands. Make sure the ESP32 compiler is in the PATH environment variable.
cmake -S . -Bbuild-directory-DCMAKE_TOOLCHAIN_FILE=freertos/tools/cmake/toolchains/xtensa-esp32.cmake -GNinja
cmake --build build
To flash the application to your board, run the following command.
cmake --buildbuild-directory--target flash
Using components from FreeRTOS
After running CMake, you can find all available components in the summary output. It should look something like the following example.
====================Configuration for FreeRTOS====================
  Version:                 201910.00
  Git version:             201910.00-388-gcb3612cb7

Target microcontroller:
  vendor:                  Espressif
  board:                   ESP32-DevKitC
  description:             Development board produced by Espressif that comes in two
                           variants either with ESP-WROOM-32 or ESP32-WROVER module
  family:                  ESP32
  data ram size:           520KB
  program memory size:     4MB

Host platform:
  OS:                      Linux-4.15.0-66-generic
  Toolchain:               xtensa-esp32
  Toolchain path:          /opt/xtensa-esp32-elf
  CMake generator:         Ninja

FreeRTOS modules:
  Modules to build:        ble, ble_hal, ble_wifi_provisioning, common, crypto, defender,
                           dev_mode_key_provisioning, freertos_plus_tcp, greengrass,
                           https, kernel, mqtt, ota, pkcs11, pkcs11_implementation,
                           platform, secure_sockets, serializer, shadow, tls, wifi
  Enabled by user:         ble, ble_hal, ble_wifi_provisioning, defender, greengrass,
                           https, mqtt, ota, pkcs11, pkcs11_implementation, platform,
                           secure_sockets, shadow, wifi
  Enabled by dependency:   common, crypto, demo_base, dev_mode_key_provisioning,
                           freertos, freertos_plus_tcp, kernel, pkcs11_mbedtls,
                           secure_sockets_freertos_plus_tcp, serializer, tls, utils
  3rdparty dependencies:   http_parser, jsmn, mbedtls, pkcs11, tinycbor
  Available demos:         demo_ble, demo_ble_numeric_comparison, demo_defender,
                           demo_greengrass_connectivity, demo_https, demo_mqtt, demo_ota,
                           demo_shadow, demo_tcp, demo_wifi_provisioning
  Available tests:
=========================================================================
You can reference any components from the Modules to build list. To link them into your
application, put the AFR:: namespace in front of the name, for example, AFR::mqtt,
AFR::ota, and so on.
Add custom components to ESP-IDF
You can add more components to the ESP-IDF build environment. For example, assuming you want to add a
component called example_component, and your project looks like this
- freertos
- components
  - example_component
    - include
      - example_component.h
    - src
      - example_component.c
    - CMakeLists.txt
- src
  - main.c
- CMakeLists.txt
then the following is an example of the CMakeLists.txt file for your
component.
You can also specify dependencies using the standard CMake function
target_link_libraries. Note that the target name for your component
is stored in the variable COMPONENT_TARGET, defined by the ESP-IDF.
For ESP components, this is done by setting two variables COMPONENT_REQUIRES and
COMPONENT_PRIV_REQUIRES. See
Build System (CMake)
Then, in the top level CMakeLists.txt file, you tell ESP-IDF where to find these
components. Add the following lines anywhere before add_subdirectory(freertos).
This component is now automatically linked to your application code by default. You should be able to include its header files and call the functions it defines.
Override the configurations for FreeRTOS
There's currently no well-defined approach to redefining the configs outside of the FreeRTOS source tree.
By default, CMake will look for the
freertos/vendors/espressif/boards/esp32/aws_demos/config_files/freertos/demos/include/
- freertos
- freertos-configs
  - aws_clientcredential.h
  - aws_clientcredential_keys.h
  - iot_mqtt_agent_config.h
  - iot_config.h
- components
- src
- CMakeLists.txt
The files under freertos-configs are copied from the
freertos/vendors/espressif/boards/esp32/aws_demos/config_files/freertos/demos/include/CMakeLists.txt file, add this line before add_subdirectory(freertos)
so that the compiler will search this directory first.
include_directories(BEFORE freertos-configs)
Providing your own sdkconfig for ESP-IDF
In case you want to provide your own sdkconfig.default, you can set the CMake variable
IDF_SDKCONFIG_DEFAULTS, from the command line:
cmake -S . -Bbuild-directory-DIDF_SDKCONFIG_DEFAULTS=path_to_your_sdkconfig_defaults-DCMAKE_TOOLCHAIN_FILE=freertos/tools/cmake/toolchains/xtensa-esp32.cmake -GNinja
If you don’t specify a location for your own sdkconfig.default file, FreeRTOS
will use the default file located at
freertos/vendors/espressif/boards/esp32/aws_demos/sdkconfig.defaults
Summary
If you have a project with a component called example_component, and you want to override some
configurations, here's a complete example of the top level CMakeLists.txt file.
Troubleshooting
-
If you're running macOS and the operating system doesn't recognize your ESP-WROVER-KIT, make sure you don't have the D2XX drivers installed. To uninstall them, follow the instructions in the FTDI Drivers Installation Guide for macOS X
. -
The monitor utility provided by ESP-IDF (and invoked using make monitor) helps you decode addresses. For this reason, it can help you get some meaningful backtraces in the event the application stops working. For more information, see Automatic Address Decoding
on the Espressif website. -
It's also possible to enable GDBstub for communication with gdb without requiring any special JTAG hardware. For more information, see Launching GDB with GDBStub
on the Espressif website. -
For information about setting up an OpenOCD-based environment if JTAG hardware-based debugging is required, see JTAG Debugging
on the Espressif website. -
If
pyserialcan't be installed usingpipon macOS, download it from the pyserial website. -
If the board resets continuously, try erasing the flash by entering the following command on the terminal.
make erase_flash -
If you see errors when you run
idf_monitor.py, use Python 2.7. -
Required libraries from ESP-IDF are included in FreeRTOS, so there is no need to download them externally. If the
IDF_PATHenvironment variable is set, we recommend that you clear it before you build FreeRTOS. -
On Windows, it can take 3-4 minutes for the project to build. You can use the
-j4switch on the make command to reduce the build time:make flash monitor -j4 -
If your device has trouble connecting to Amazon IoT, open the
aws_clientcredential.hfile, and verify that the configuration variables are properly defined in the file.clientcredentialMQTT_BROKER_ENDPOINT[]should look like1234567890123-ats.iot.us-east-1.amazonaws.com -
If you're following the steps in Using FreeRTOS in your own CMake project for ESP32 and you see undefined reference errors from the linker, it's usually because of missing dependent libraries or demos. To add them, update the
CMakeLists.txtfile (under the root directory) using the standard CMake functiontarget_link_libraries.
-
ESP-IDF v4.2 supports the use of the xtensa-esp32-elf-gcc 8.2.0. toolchain. If you're using an earlier version of the Xtensa toolchain, download the required version.
-
If you see an error log like the following about python dependencies that are not being met for ESP-IDF v4.2.
The following Python requirements are not satisfied:
click>=5.0
pyserial>=3.0
future>=0.15.2
pyparsing>=2.0.3,<2.4.0
pyelftools>=0.22
gdbgui==0.13.2.0
pygdbmi<=0.9.0.2
reedsolo>=1.5.3,<=1.5.4
bitstring>=3.1.6
ecdsa>=0.16.0
Please follow the instructions found in the "Set up the tools" section of ESP-IDF Getting Started Guide
Install the python dependencies on your platform using the following Python command:
root/vendors/espressif/esp-idf/requirements.txt
For more troubleshooting information, see Troubleshooting getting started.
Debugging
Debugging code on Espressif ESP32-DevKitC and ESP-WROVER-KIT (ESP-IDF v3.3)
This section shows you how to debug Espressif hardware using ESP-IDF v3.3. To debug using ESP-IDF v4.2, see Debugging code on Espressif ESP32-DevKitC and ESP-WROVER-KIT (ESP-IDF v4.2).
You need a JTAG to USB cable. We use a USB to MPSSE cable (for example, the FTDI C232HM-DDHSL-0
ESP-DevKitC JTAG setup
For the FTDI C232HM-DDHSL-0 cable, these are the connections to the ESP32 DevkitC.
| C232HM-DDHSL-0 Wire Color | ESP32 GPIO Pin | JTAG Signal Name |
|---|---|---|
|
Brown (pin 5) |
IO14 |
TMS |
|
Yellow (pin 3) |
IO12 |
TDI |
|
Black (pin 10) |
GND |
GND |
|
Orange (pin 2) |
IO13 |
TCK |
|
Green (pin 4) |
IO15 |
TDO |
ESP-WROVER-KIT JTAG setup
For the FTDI C232HM-DDHSL-0 cable, these are the connections to the ESP32-WROVER-KIT.
| C232HM-DDHSL-0 Wire Color | ESP32 GPIO Pin | JTAG Signal Name |
|---|---|---|
|
Brown (pin 5) |
IO14 |
TMS |
|
Yellow (pin 3) |
IO12 |
TDI |
|
Orange (pin 2) |
IO13 |
TCK |
|
Green (pin 4) |
IO15 |
TDO |
These tables were developed from the
FTDI C232HM-DDHSL-0 datasheet
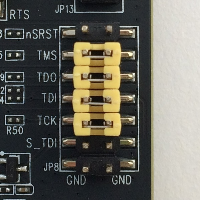
To enable JTAG on the ESP-WROVER-KIT, place jumpers on the TMS, TDO, TDI, TCK, and S_TDI pins as shown here.
Debugging on Windows (ESP-IDF v3.3)
To set up for debugging on Windows
-
Connect the USB side of the FTDI C232HM-DDHSL-0 to your computer and the other side as described in Debugging code on Espressif ESP32-DevKitC and ESP-WROVER-KIT (ESP-IDF v3.3). The FTDI C232HM-DDHSL-0 device should appear in Device Manager under Universal Serial Bus Controllers.
-
Under the list of universal serial bus devices, right-click the C232HM-DDHSL-0 device, and choose Properties.
Note
The device might be listed as USB Serial Port.
In the properties window, choose the Details tab to see the properties of the device. If the device isn't listed, install the Windows driver for FTDI C232HM-DDHSL-0
. -
On the Details tab, choose Property, and then choose Hardware IDs. You should see something like this in the Value field.
FTDIBUS\COMPORT&VID_0403&PID_6014In this example, the vendor ID is 0403 and the product ID is 6014.
Verify these IDs match the IDs in
projects/espressif/esp32/make/aws_demos/esp32_devkitj_v1.cfg. The IDs are specified in a line that begins withftdi_vid_pidfollowed by a vendor ID and a product ID.ftdi_vid_pid 0x0403 0x6014 -
Download OpenOCD for Windows
. -
Unzip the file to
C:\and addC:\openocd-esp32\binto your system path. -
OpenOCD requires libusb, which is not installed by default on Windows.
To install libusb
-
Download zadig.exe
. -
Run
zadig.exe. From the Options menu, choose List All Devices. -
From the drop-down menu, choose C232HM-DDHSL-0.
-
In the target driver field, to the right of the green arrow, choose WinUSB.
-
From the dropdown list under the target driver field, choose the arrow, and then choose Install Driver. Choose Replace Driver.
-
-
Open a command prompt, navigate to
projects/espressif/esp32/make/aws_demosand run the following command.For ESP32-WROOM-32 and ESP32-WROVER
openocd.exe -f esp32_devkitj_v1.cfg -f esp-wroom-32.cfgFor ESP32-SOLO-1
openocd.exe -f esp32_devkitj_v1.cfg -f esp-solo-1.cfgLeave this command prompt open.
-
Open a new command prompt, navigate to your
msys32directory, and runmingw32.exe. -
In the mingw32 terminal, navigate to
projects/espressif/esp32/make/aws_demosand runmake flash monitor -
Open another mingw32 terminal, navigate to
projects/espressif/esp32/make/aws_demosand wait until the demo starts running on your board. When it does, runxtensa-esp32-elf-gdb -x gdbinit build/aws_demos.elf. The program should stop in themainfunction.
Note
The ESP32 supports a maximum of two break points.
Debugging on macOS (ESP-IDF v3.3)
-
Download the FTDI driver for macOS
. -
Download OpenOCD
. -
Extract the downloaded .tar file and set the path in
.bash_profiletoOCD_INSTALL_DIR/openocd-esp32/bin -
Use the following command to install
libusbon macOS.brew install libusb -
Use the following command to unload the serial port driver.
sudo kextunload -b com.FTDI.driver.FTDIUSBSerialDriver -
If you're running a macOS version later than 10.9, use the following command to unload the Apple FTDI driver.
sudo kextunload -b com.apple.driver.AppleUSBFTDI -
Use the following command to get the product ID and vendor ID of the FTDI cable. It lists the attached USB devices.
system_profiler SPUSBDataTypeThe output from
system_profilershould look like the following.DEVICE: Product ID:product-IDVendor ID:vendor-ID(Future Technology Devices International Limited) -
Open the
projects/espressif/esp32/make/aws_demos/esp32_devkitj_v1.cfgfile. The vendor ID and product ID for your device are specified in a line that begins withftdi_vid_pid. Change the IDs to match the IDs from thesystem_profileroutput in the previous step. -
Open a terminal window, navigate to
projects/espressif/esp32/make/aws_demos, and use the following command to run OpenOCD.For ESP32-WROOM-32 and ESP32-WROVER:
openocd -f esp32_devkitj_v1.cfg -f esp-wroom-32.cfgFor ESP32-SOLO-1:
openocd -f esp32_devkitj_v1.cfg -f esp-solo-1.cfg -
Open a new terminal, and use the following command to load the FTDI serial port driver.
sudo kextload -b com.FTDI.driver.FTDIUSBSerialDriver -
Navigate to
projects/espressif/esp32/make/aws_demos, and run the following command.make flash monitor -
Open another new terminal, navigate to
projects/espressif/esp32/make/aws_demos, and run the following command.xtensa-esp32-elf-gdb -x gdbinit build/aws_demos.elfThe program should stop at
main().
Debugging on Linux (ESP-IDF v3.3)
-
Download OpenOCD
. Extract the tarball and follow the installation instructions in the readme file. -
Use the following command to install libusb on Linux.
sudo apt-get install libusb-1.0 -
Open a terminal and enter
ls -l /dev/ttyUSB*to list all USB devices connected to your computer. This helps you check if the board's USB ports are recognized by the operating system. You should see output like the following.$ls -l /dev/ttyUSB* crw-rw---- 1 root dialout 188, 0 Jul 10 19:04 /dev/ttyUSB0 crw-rw---- 1 root dialout 188, 1 Jul 10 19:04 /dev/ttyUSB1 -
Sign off and then sign in and cycle the power to the board to make the changes take effect. In a terminal prompt, list the USB devices. Make sure the group owner has changed from
dialouttoplugdev.$ls -l /dev/ttyUSB* crw-rw---- 1 root plugdev 188, 0 Jul 10 19:04 /dev/ttyUSB0 crw-rw---- 1 root plugdev 188, 1 Jul 10 19:04 /dev/ttyUSB1The
/dev/ttyUSBninterface with the lower number is used for JTAG communication. The other interface is routed to the ESP32's serial port (UART) and is used for uploading code to the ESP32’s flash memory. -
In a terminal window, navigate to
projects/espressif/esp32/make/aws_demos, and use the following command to run OpenOCD.For ESP32-WROOM-32 and ESP32-WROVER:
openocd -f esp32_devkitj_v1.cfg -f esp-wroom-32.cfgFor ESP32-SOLO-1:
openocd -f esp32_devkitj_v1.cfg -f esp-solo-1.cfg -
Open another terminal, navigate to
projects/espressif/esp32/make/aws_demos, and run the following command.make flash monitor -
Open another terminal, navigate to
projects/espressif/esp32/make/aws_demos, and run the following command:xtensa-esp32-elf-gdb -x gdbinit build/aws_demos.elfThe program should stop in
main().
Debugging code on Espressif ESP32-DevKitC and ESP-WROVER-KIT (ESP-IDF v4.2)
This section shows you how to debug Espressif hardware using ESP-IDF v4.2. To debug using ESP-IDF v3.3, see Debugging code on Espressif ESP32-DevKitC and ESP-WROVER-KIT (ESP-IDF v3.3).
You need a JTAG to USB cable. We use a USB to MPSSE cable (for example, the FTDI C232HM-DDHSL-0
ESP-DevKitC JTAG setup
For the FTDI C232HM-DDHSL-0 cable, these are the connections to the ESP32 DevkitC.
| C232HM-DDHSL-0 Wire Color | ESP32 GPIO Pin | JTAG Signal Name |
|---|---|---|
|
Brown (pin 5) |
IO14 |
TMS |
|
Yellow (pin 3) |
IO12 |
TDI |
|
Black (pin 10) |
GND |
GND |
|
Orange (pin 2) |
IO13 |
TCK |
|
Green (pin 4) |
IO15 |
TDO |
ESP-WROVER-KIT JTAG setup
For the FTDI C232HM-DDHSL-0 cable, these are the connections to the ESP32-WROVER-KIT.
| C232HM-DDHSL-0 Wire Color | ESP32 GPIO Pin | JTAG Signal Name |
|---|---|---|
|
Brown (pin 5) |
IO14 |
TMS |
|
Yellow (pin 3) |
IO12 |
TDI |
|
Orange (pin 2) |
IO13 |
TCK |
|
Green (pin 4) |
IO15 |
TDO |
These tables were developed from the
FTDI C232HM-DDHSL-0 datasheet
To enable JTAG on the ESP-WROVER-KIT, place jumpers on the TMS, TDO, TDI, TCK, and S_TDI pins as shown here.
Debugging on Windows (ESP-IDF v4.2)
To set up for debugging on Windows
-
Connect the USB side of the FTDI C232HM-DDHSL-0 to your computer and the other side as described in Debugging code on Espressif ESP32-DevKitC and ESP-WROVER-KIT (ESP-IDF v4.2). The FTDI C232HM-DDHSL-0 device should appear in Device Manager under Universal Serial Bus Controllers.
-
Under the list of universal serial bus devices, right-click the C232HM-DDHSL-0 device, and choose Properties.
Note
The device might be listed as USB Serial Port.
In the properties window, choose the Details tab to see the properties of the device. If the device isn't listed, install the Windows driver for FTDI C232HM-DDHSL-0
. -
On the Details tab, choose Property, and then choose Hardware IDs. You should see something like this in the Value field.
FTDIBUS\COMPORT&VID_0403&PID_6014In this example, the vendor ID is 0403 and the product ID is 6014.
Verify these IDs match the IDs in
projects/espressif/esp32/make/aws_demos/esp32_devkitj_v1.cfg. The IDs are specified in a line that begins withftdi_vid_pidfollowed by a vendor ID and a product ID.ftdi_vid_pid 0x0403 0x6014 -
Download OpenOCD for Windows
. -
Unzip the file to
C:\and addC:\openocd-esp32\binto your system path. -
OpenOCD requires libusb, which is not installed by default on Windows.
To install libusb
-
Download zadig.exe
. -
Run
zadig.exe. From the Options menu, choose List All Devices. -
From the drop-down menu, choose C232HM-DDHSL-0.
-
In the target driver field, to the right of the green arrow, choose WinUSB.
-
From the dropdown list under the target driver field, choose the arrow, and then choose Install Driver. Choose Replace Driver.
-
-
Open a command prompt, navigate to the root of your FreeRTOS download directory, and run the following command.
idf.py openocdLeave this command prompt open.
-
Open a new command prompt, navigate to the root of your FreeRTOS download directory, and run
idf.py flash monitor -
Open another command prompt, navigate to the root of your FreeRTOS download directory, and wait until the demo starts running on your board. When it does, run
idf.py gdbThe program should stop in the
mainfunction.
Note
The ESP32 supports a maximum of two break points.
Debugging on macOS (ESP-IDF v4.2)
-
Download the FTDI driver for macOS
. -
Download OpenOCD
. -
Extract the downloaded .tar file and set the path in
.bash_profiletoOCD_INSTALL_DIR/openocd-esp32/bin -
Use the following command to install
libusbon macOS.brew install libusb -
Use the following command to unload the serial port driver.
sudo kextunload -b com.FTDI.driver.FTDIUSBSerialDriver -
If you're running a macOS version later than 10.9, use the following command to unload the Apple FTDI driver.
sudo kextunload -b com.apple.driver.AppleUSBFTDI -
Use the following command to get the product ID and vendor ID of the FTDI cable. It lists the attached USB devices.
system_profiler SPUSBDataTypeThe output from
system_profilershould look like the following.DEVICE: Product ID:product-IDVendor ID:vendor-ID(Future Technology Devices International Limited) -
Open the
projects/espressif/esp32/make/aws_demos/esp32_devkitj_v1.cfgfile. The vendor ID and product ID for your device are specified in a line that begins withftdi_vid_pid. Change the IDs to match the IDs from thesystem_profileroutput in the previous step. -
Open a terminal window, navigate to the root of your FreeRTOS download directory, and use the following command to run OpenOCD.
idf.py openocdLeave this terminal window open.
-
Open a new terminal, and use the following command to load the FTDI serial port driver.
sudo kextload -b com.FTDI.driver.FTDIUSBSerialDriver -
Navigate to the root of your FreeRTOS download directory, and run
idf.py flash monitor -
Open another new terminal, navigate to the root of your FreeRTOS download directory, and run
idf.py gdbThe program should stop at
main.
Debugging on Linux (ESP-IDF v4.2)
-
Download OpenOCD
. Extract the tarball and follow the installation instructions in the readme file. -
Use the following command to install libusb on Linux.
sudo apt-get install libusb-1.0 -
Open a terminal and enter
ls -l /dev/ttyUSB*to list all USB devices connected to your computer. This helps you check if the board's USB ports are recognized by the operating system. You should see output like the following.$ls -l /dev/ttyUSB* crw-rw---- 1 root dialout 188, 0 Jul 10 19:04 /dev/ttyUSB0 crw-rw---- 1 root dialout 188, 1 Jul 10 19:04 /dev/ttyUSB1 -
Sign off and then sign in and cycle the power to the board to make the changes take effect. In a terminal prompt, list the USB devices. Make sure the group owner has changed from
dialouttoplugdev.$ls -l /dev/ttyUSB* crw-rw---- 1 root plugdev 188, 0 Jul 10 19:04 /dev/ttyUSB0 crw-rw---- 1 root plugdev 188, 1 Jul 10 19:04 /dev/ttyUSB1The
/dev/ttyUSBninterface with the lower number is used for JTAG communication. The other interface is routed to the ESP32's serial port (UART) and is used for uploading code to the ESP32’s flash memory. -
In a terminal window, navigate to the root of your FreeRTOS download directory, and use the following command to run OpenOCD.
idf.py openocd -
Open another terminal, navigate to the root of your FreeRTOS download directory, and run the following command.
idf.py flash monitor -
Open another terminal, navigate the root of your FreeRTOS download directory, and run the following command:
idf.py gdbThe program should stop in
main().