Provisioning iSCSI for Linux
FSx for ONTAP supports the iSCSI protocol. You need to provision iSCSI on both the Linux client and your file system in order to use the iSCSI protocol to transport data between clients and your file system. The iSCSI protocol is available on all file systems that have 6 or fewer high-availability (HA) pairs.
There are three main steps to process of configuring iSCSI on your Amazon FSx for NetApp ONTAP, which are covered in the following procedures:
Install and configure the iSCSI client on the Linux host.
Configure iSCSI on the file system's SVM.
Create an iSCSI initiator group.
Map the initiator group to the LUN.
Mount an iSCSI LUN on the Linux client.
Before you begin
Before you begin the process of configuring your file system for iSCSI, you need to have the following items completed.
Create an FSx for ONTAP file system. For more information, see Creating file systems.
Create an iSCSI LUN on the file system. For more information, see Creating an iSCSI LUN.
Create an EC2 instance running the Amazon Linux 2 Amazon Machine Image (AMI) in the same VPC as the file system. This is the Linux host on which you will configure iSCSI and access your file data.
Beyond the scope of these procedures, if the host is located in another VPC, you can use VPC peering or Amazon Transit Gateway to grant other VPCs access to the volume's iSCSI endpoints. For more information, see Accessing data from outside the deployment VPC.
Configure the Linux host's VPC security groups to allow inbound and outbound traffic as described in File System Access Control with Amazon VPC.
Obtain the credentials for the ONTAP user with
fsxadminprivileges that you will use to access the ONTAP CLI. For more information, see ONTAP roles and users.The Linux host that you will configure for iSCSI and use to access the FSx for ONTAP file system are located in the same VPC and Amazon Web Services account.
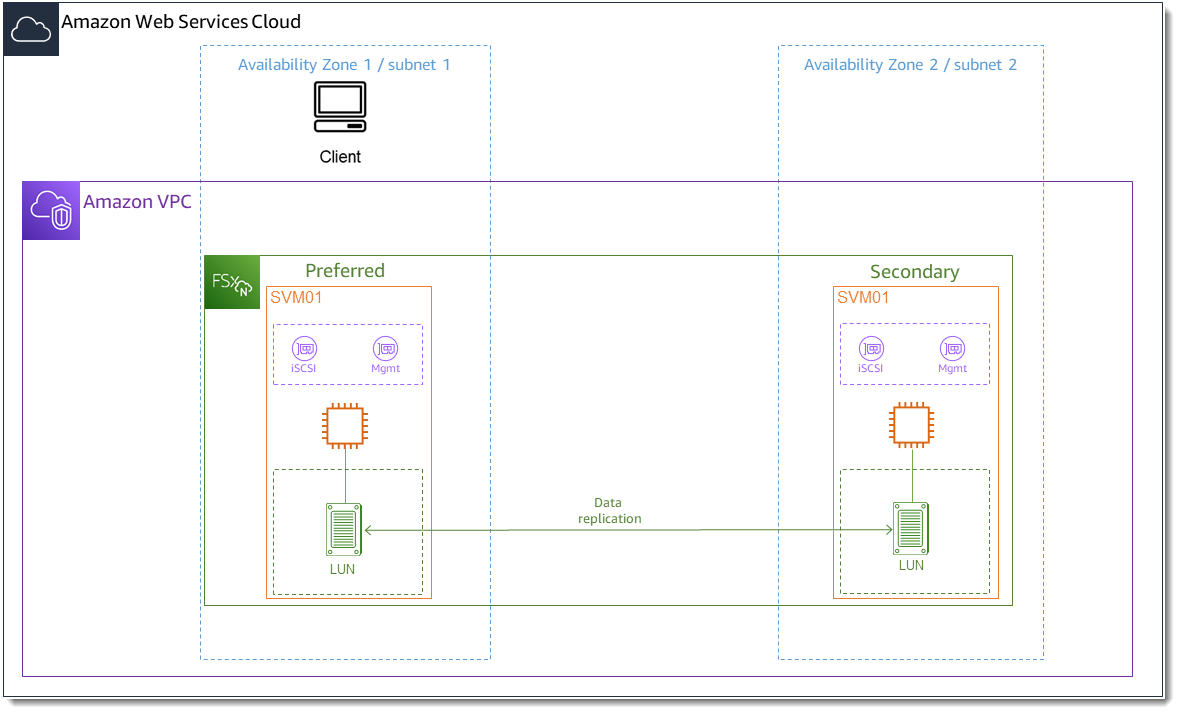
We recommend that the EC2 instance be in the same availability zone as your file system's preferred subnet, as shown in the following graphic.
If your EC2 instance runs a different Linux AMI than Amazon Linux 2, some of the utilities used in these procedures and examples might already be installed, and you might use different commands to install required packages. Aside from installing packages, the commands used in this section are valid for other EC2 Linux AMIs.
Topics
Install and configure iSCSI on the Linux host
To install the iSCSI client
-
Confirm that
iscsi-initiator-utilsanddevice-mapper-multipathare installed on your Linux device. Connect to your Linux instance using an SSH client. For more information, see Connect to your Linux instance using SSH. Install
multipathand the iSCSI client using the following command. Installingmultipathis required if you want to automatically failover between your file servers.~$sudo yum install -y device-mapper-multipath iscsi-initiator-utils-
To facilitate a faster response when automatically failing over between file servers when using
multipath, set the replacement timeout value in the/etc/iscsi/iscsid.conffile to a value of5instead of using the default value of120.~$sudo sed -i 's/node.session.timeo.replacement_timeout = .*/node.session.timeo.replacement_timeout = 5/' /etc/iscsi/iscsid.conf; sudo cat /etc/iscsi/iscsid.conf | grep node.session.timeo.replacement_timeout Start the iSCSI service.
~$sudo service iscsid startNote that depending on your Linux version, you may have to use this command instead:
~$sudo systemctl start iscsid-
Confirm that the service is running using the following command.
~$sudo systemctl status iscsid.serviceThe system responds with the following output:
iscsid.service - Open-iSCSI
    Loaded: loaded (/usr/lib/systemd/system/iscsid.service; disabled; vendor preset: disabled)
    Active: active (running) since Fri 2021-09-02 00:00:00 UTC; 1min ago
    Docs: man:iscsid(8)
    man:iscsiadm(8)
    Process: 14658 ExecStart=/usr/sbin/iscsid (code=exited, status=0/SUCCESS)
    Main PID: 14660 (iscsid)
    CGroup: /system.slice/iscsid.service
    ├─14659 /usr/sbin/iscsid
    └─14660 /usr/sbin/iscsid
To configure iSCSI on your Linux client
-
To enable your clients to automatically failover between your file servers, you must configure multipath. Use the following command:
~$sudo mpathconf --enable --with_multipathd y -
Determine the initiator name of your Linux host using the following command. The location of the initiator name depends on your iSCSI utility. If you are using
iscsi-initiator-utils, the initiator name is located in the file/etc/iscsi/initiatorname.iscsi.~$sudo cat /etc/iscsi/initiatorname.iscsiThe system responds with the initiator name.
InitiatorName=iqn.1994-05.com.redhat:abcdef12345
Configure iSCSI on the FSx for ONTAP file system
-
Connect to the NetApp ONTAP CLI on the FSx for ONTAP file system on which you created the iSCSI LUN using the following command. For more information, see Using the NetApp ONTAP CLI.
~$ssh fsxadmin@your_management_endpoint_ip -
Create the initiator group (
igroup) using the NetApp ONTAP CLI lun igroup createcommand. An initiator group maps to iSCSI LUNs and control which initiators (clients) have access to LUNs. Replace host_initiator_namewith the initiator name from your Linux host that you retrieved in the previous procedure.::>lun igroup create -vserversvm_nameigroup_name-initiatorhost_initiator_name-protocol iscsi -ostype linuxIf you want to make the LUNs mapped to this igroup available to multiple hosts, you can specify multiple initiator names separated with a comma. For more information, see lun igroup create
in the NetApp ONTAP Documentation Center. -
Confirm that the
igroupexists using the lun igroup showcommand: ::>lun igroup showThe system responds with the following output:
Vserver Igroup Protocol OS Type Initiators --------- ------------ -------- -------- ------------------------------------svm_nameigroup_nameiscsi linux iqn.1994-05.com.redhat:abcdef12345 -
This step assumes that you have already created an iSCSI LUN. If you have not, see Creating an iSCSI LUN for step-by-step instructions to do so.
Create a mapping from the LUN you created to the igroup you created, using the lun mapping create
, specifying the following attributes: -
svm_name -
vol_name -
lun_name -
igroup_name -
lun_id
::>lun mapping create -vserversvm_name-path /vol/vol_name/lun_name-igroupigroup_name-lun-idlun_id -
-
Use the
lun show -pathcommand to confirm the LUN is created, online, and mapped. ::>lun show -path /vol/vol_name/lun_name-fields state,mapped,serial-hexThe system responds with the following output:
Vserver Path serial-hex state mapped --------- ------------------------------- ------------------------ -------- --------svm_name/vol/vol_name/lun_name6c5742314e5d52766e796150 online mappedSave the
serial_hexvalue (in this example, it is6c5742314e5d52766e796150), you will use it in a later step to create a friendly name for the block device. -
Use the
network interface show -vservercommand to retrieve the addresses of the iscsi_1andiscsi_2interfaces for the SVM in which you've created your iSCSI LUN.::>network interface show -vserversvm_nameThe system responds with the following output:
Logical Status Network Current Current Is Vserver Interface Admin/Oper Address/Mask Node Port Home ----------- ---------- ---------- ------------------ ------------- ------- ----svm_nameiscsi_1 up/up 172.31.0.143/20 FSxId0123456789abcdef8-01 e0e true iscsi_2 up/up 172.31.21.81/20 FSxId0123456789abcdef8-02 e0e true nfs_smb_management_1 up/up 198.19.250.177/20 FSxId0123456789abcdef8-01 e0e true 3 entries were displayed.In this example, the IP address of
iscsi_1is172.31.0.143andiscsi_2is172.31.21.81.
Mount an iSCSI LUN on your Linux client
The process of mounting the iSCSI LUN on your Linux client involves three steps:
Discovering the target iSCSI nodes
Partitioning the iSCSI LUN
Mounting the iSCSI LUN on the client
These are covered in the following procedures.
To discover the target iSCSI nodes
On your Linux client, use the following command to discover the target iSCSI nodes using
iscsi_1’s IP addressiscsi_1_IP.~$sudo iscsiadm --mode discovery --op update --type sendtargets --portaliscsi_1_IP172.31.0.143:3260,1029 iqn.1992-08.com.netapp:sn.9cfa2c41207a11ecac390182c38bc256:vs.3 172.31.21.81:3260,1028 iqn.1992-08.com.netapp:sn.9cfa2c41207a11ecac390182c38bc256:vs.3In this example,
iqn.1992-08.com.netapp:sn.9cfa2c41207a11ecac390182c38bc256:vs.3corresponds to thetarget_initiatorfor the iSCSI LUN in the preferred availability zone.(Optional) To drive higher throughput than the Amazon EC2 single client maximum of 5 Gbps (~625 MBps) to your iSCSI LUN, follow the procedures described in Amazon EC2 instance network bandwidth in the Amazon Elastic Compute Cloud User Guide for Linux Instances to establish additional sessions for greater throughput.
The following command establishes 8 sessions per initiator per ONTAP node in each availability zone, enabling the client to drive up to 40 Gbps (5,000 MBps) of aggregate throughput to the iSCSI LUN.
~$sudo iscsiadm --mode node -Ttarget_initiator--op update -n node.session.nr_sessions -v 8Log into the target initiators. Your iSCSI LUNs are presented as available disks.
~$sudo iscsiadm --mode node -Ttarget_initiator--loginLogging in to [iface: default, target: iqn.1992-08.com.netapp:sn.9cfa2c41207a11ecac390182c38bc256:vs.3, portal: 172.31.14.66,3260] (multiple) Login to [iface: default, target: iqn.1992-08.com.netapp:sn.9cfa2c41207a11ecac390182c38bc256:vs.3, portal: 172.31.14.66,3260] successful.The output above is truncated; you should see one
Logging inand oneLogin successfulresponse for each session on each file server. In the case of 4 sessions per node, there will be 8Logging inand 8Login successfulresponses.Use the following command to verify that
dm-multipathhas identified and merged the iSCSI sessions by showing a single LUN with multiple policies. There should be an equal number of devices that are listed asactiveand those listed asenabled.~$sudo multipath -llIn the output, the disk name is formatted as
dm-xyz, wherexyzis an integer. If there are no other multipath disks, this value isdm-0.3600a09806c5742314e5d52766e79614fdm-xyzNETAPP ,LUN C-Mode size=10G features='4 queue_if_no_path pg_init_retries 50 retain_attached_hw_handle' hwhandler='0' wp=rw |-+- policy='service-time 0' prio=50 status=active | |- 0:0:0:1 sda 8:0 active ready running | |- 1:0:0:1 sdc 8:32 active ready running | |- 3:0:0:1 sdg 8:96 active ready running | `- 4:0:0:1 sdh 8:112 active ready running `-+- policy='service-time 0' prio=10 status=enabled |- 2:0:0:1 sdb 8:16 active ready running |- 7:0:0:1 sdf 8:80 active ready running |- 6:0:0:1 sde 8:64 active ready running `- 5:0:0:1 sdd 8:48 active ready runningYour block device is now connected to your Linux client. It is located under the path
/dev/. You should not use this path for administrative purposes; instead, use the symbolic link that is under the pathdm-xyz/dev/mapper/, wherewwidwwidwwid
To assign the block device a friendly name
To provide your device a friendly name, create an alias in the
/etc/multipath.conffile. To do this, add the following entry to the file using your preferred text editor, replacing the following placeholders:Replace
serial_hexwith the value the you saved in the Configure iSCSI on the FSx for ONTAP file system procedure.Add the prefix
3600a0980to theserial_hexvalue as shown in the example. This is a unique preamble for the NetApp ONTAP distribution that Amazon FSx for NetApp ONTAP uses.Replace
device_namewith the friendly name you want to use for your device.
multipaths { multipath { wwid 3600a0980serial_hexaliasdevice_name} }As an alternative, you can copy and save the following script as a bash file, such as
multipath_alias.sh. You can run the script with sudo privileges, replacingserial_hexdevice_namemultipathssection in the/etc/multipath.conffile. If one exists, it appends amultipathentry to that section; otherwise, it will create a newmultipathssection with amultipathentry for your block device.#!/bin/bash SN=serial_hex ALIAS=device_name CONF=/etc/multipath.conf grep -q '^multipaths {' $CONF UNCOMMENTED=$? if [ $UNCOMMENTED -eq 0 ] then sed -i '/^multipaths {/a\\tmultipath {\n\t\twwid 3600a0980'"${SN}"'\n\t\talias '"${ALIAS}"'\n\t}\n' $CONF else printf "multipaths {\n\tmultipath {\n\t\twwid 3600a0980$SN\n\t\talias $ALIAS\n\t}\n}" >> $CONF fiRestart the
multipathdservice for the changes to/etc/multipathd.conftake effect.~$systemctl restart multipathd.service
To partition the LUN
The next step is to format and partition your LUN using fdisk.
-
Use the following command to verify that the path to your
device_nameis present.~$ls /dev/mapper/device_name/dev/device_name Partition the disk using
fdisk. You’ll enter an interactive prompt. Enter the options in the order shown. You can make multiple partitions by using a value smaller than the last sector (20971519in this example).Note
The
Last sectorvalue will vary depending on the size of your iSCSI LUN (10GB in this example).~$sudo fdisk /dev/mapper/device_nameThe
fsdiskinteractive prompt starts.Welcome to fdisk (util-linux 2.30.2). Changes will remain in memory only, until you decide to write them. Be careful before using the write command. Device does not contain a recognized partition table. Created a new DOS disklabel with disk identifier 0x66595cb0. Command (m for help):nPartition type p primary (0 primary, 0 extended, 4 free) e extended (container for logical partitions) Select (default p):pPartition number (1-4, default 1):1First sector (2048-20971519, default 2048):2048Last sector, +sectors or +size{K,M,G,T,P} (2048-20971519, default 20971519):20971519Created a new partition 1 of type 'Linux' and of size 512 B. Command (m for help):wThe partition table has been altered. Calling ioctl() to re-read partition table. Syncing disks.After entering
w, your new partition/dev/mapper/becomes available. Thepartition_namepartition_namehas the format<device_name><partition_number>.1was used as the partition number used in thefdiskcommand in the previous step.-
Create your file system using
/dev/mapper/as the path.partition_name~$sudo mkfs.ext4 /dev/mapper/partition_nameThe system responds with the following output:
mke2fs 1.42.9 (28-Dec-2013)
Discarding device blocks: done
Filesystem label=
OS type: Linux
Block size=4096 (log=2)
Fragment size=4096 (log=2)
Stride=0 blocks, Stripe width=16 blocks
655360 inodes, 2621184 blocks
131059 blocks (5.00%) reserved for the super user
First data block=0
Maximum filesystem blocks=2151677952
80 block groups
32768 blocks per group, 32768 fragments per group
8192 inodes per group
Superblock backups stored on blocks:
     32768, 98304, 163840, 229376, 294912, 819200, 884736, 1605632
Allocating group tables: done
Writing inode tables: done
Creating journal (32768 blocks): done
Writing superblocks and filesystem accounting information: done
To mount the LUN on the Linux client
-
Create a directory
directory_pathas the mount point for your file system.~$sudo mkdir /directory_path/mount_point -
Mount the file system using the following command.
~$sudo mount -t ext4 /dev/mapper/partition_name/directory_path/mount_point -
(Optional) If you want to give a specific user ownership of the mount directory, replace
username~$sudo chownusername:username/directory_path/mount_point -
(Optional) Verify that you can read from and write data to the file system.
~$echo "Hello world!" > /directory_path/mount_point/HelloWorld.txt~$catdirectory_path/HelloWorld.txtHello world!You have successfully created and mounted an iSCSI LUN on your Linux client.