Using simultaneous TCP connections in a secure tunnel
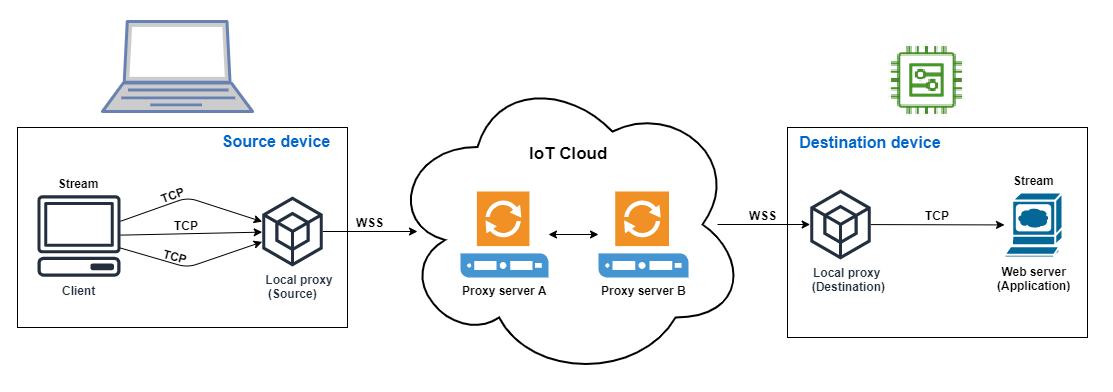
Amazon IoT secure tunneling supports more than one TCP connection simultaneously for each data stream. You can use this capability when you require simultaneous connections to a remote device. Using simultaneous TCP connections reduces the potential for a time-out in case of multiple requests from the client. For example, when accessing a web server that has multiple components running on it, simultaneous TCP connections can reduce the time it takes to load the site.
Note
Simultaneous TCP connections have a bandwidth limit of 800 Kilobytes per second for each Amazon Web Services account. Amazon IoT secure tunneling can configure this limit for you depending on the number of incoming requests.
Example use case
Say you need to remotely access a web server that's local to the destination device and has multiple components running on it. With a single TCP connection, while trying to access the web server, sequential loading can increase the amount of time it takes to load the resources on the site. The simultaneous TCP connections can reduce the loading time by meeting the resource requirements of the site, thereby reducing the access time. The following diagram shows how simultaneous TCP connections are supported for the data stream to the web server application running on the remote device.
Note
If you want to access multiple applications running on the remote device using the tunnel, you can use tunnel multiplexing. For more information, see Multiplexing multiple data streams in a secure tunnel.

How to use simultaneous TCP connections
The following procedure walks you through how to use simultaneous TCP connections for accessing the web browser on the remote device. When there are multiple requests from the client, Amazon IoT secure tunneling automatically sets up simultaneous TCP connections to handle the requests, thereby reducing the loading time.
-
Open a tunnel
Open a tunnel using the
OpenTunnelAPI operation or theopen-tunnelCLI command. Configure the destination by specifyingHTTPas the service and the name of the Amazon IoT thing that corresponds to your remote device. Your web server application is running on this remote device. You must have already created the IoT thing in the Amazon IoT registry. For more information, see Managing things with the registry.aws iotsecuretunneling open-tunnel \ --destination-config thingName=RemoteDevice1,services=HTTPRunning this command generates the source and destination access tokens which you'll use to run the local proxy.
{ "tunnelId": "b2de92a3-b8ff-46c0-b0f2-afa28b00cecd", "tunnelArn": "arn:aws:iot:us-west-2:431600097591:tunnel/b2de92a3-b8ff-46c0-b0f2-afa28b00cecd", "sourceAccessToken":source_client_access_token, "destinationAccessToken":destination_client_access_token} -
Configure and start the local proxy
Before you can run the local proxy, download the local proxy source code from GitHub
and build it for the platform of your choice. You can then start the destination and the source local proxy to connect to the secure tunnel and start using the remote web server application. Note
For Amazon IoT secure tunneling to use simultaneous TCP connections, you must upgrade to the latest version of the local proxy. This feature is not available if you configure the local proxy using the Amazon IoT Device Client.
// Start the destination local proxy ./localproxy -rus-east-1-d HTTP=80-tdestination_client_access_token// Start the source local proxy ./localproxy -rus-east-1-s HTTP=5555-tsource_client_access_tokenFor more information about configuring and using the local proxy, see How to use the local proxy.
You can now use the tunnel to access the web server application. Amazon IoT secure tunneling will automatically set up and handle the simultaneous TCP connections when there are multiple requests from the client.