Services or capabilities described in Amazon Web Services documentation might vary by Region. To see the differences applicable to the China Regions,
see Getting Started with Amazon Web Services in China
(PDF).
Uploading device-side logs by using Amazon IoT rules
You can use the Amazon IoT rules engine to upload log records from existing device-side log
files (system, application, and device-client logs) to Amazon CloudWatch. When device-side logs are
published to an MQTT topic, the CloudWatch Logs rules action transfers the messages to CloudWatch Logs. This
process outlines how to upload device logs in batches using the rules action
batchMode parameter turned on (set to true).
To begin uploading device-side logs to CloudWatch, complete the following
prerequisites.
Prerequisites
Before you begin, do the following:
For more information about these prerequisites, see Upload device-side logs
to CloudWatch.
Creating a CloudWatch log group
To create a CloudWatch log group, complete the following steps. Choose the appropriate tab
depending on whether you prefer to perform the steps through the Amazon Web Services Management Console or the
Amazon Command Line Interface (Amazon CLI).
- Amazon Web Services Management Console
-
To create a CloudWatch log group by using the Amazon Web Services Management Console
-
Open the Amazon Web Services Management Console and navigate to CloudWatch.
-
On the navigation bar, choose Logs, and then
Log groups.
-
Choose Create log group.
-
Update the Log group name and, optionally, update the
Retention setting fields.
-
Choose Create.
- Amazon CLI
-
To create a CloudWatch log group by using the Amazon CLI
-
To create the log group, run the following command. For more information,
see
create-log-group
in the Amazon CLI v2 Command Reference.
Replace the log group name in the example (uploadLogsGroup)
with your preferred name.
aws logs create-log-group --log-group-name uploadLogsGroup
-
To confirm that the log group was created correctly, run the following
command.
aws logs describe-log-groups --log-group-name-prefix uploadLogsGroup
Sample output:
{
    "logGroups": [
        {
            "logGroupName": "uploadLogsGroup",
            "creationTime": 1674521804657,
            "metricFilterCount": 0,
            "arn": "arn:aws:logs:us-east-1:111122223333:log-group:uploadLogsGroup:*",
            "storedBytes": 0
        }
    ]
}
Creating a topic rule
To create an Amazon IoT rule, complete the following steps. Choose the appropriate tab
depending on whether you prefer to perform the steps through the Amazon Web Services Management Console or the
Amazon Command Line Interface (Amazon CLI).
- Amazon Web Services Management Console
-
To create a topic rule by using the Amazon Web Services Management Console
-
Open the Rule hub.
-
Open the Amazon Web Services Management Console
and navigate to Amazon IoT .
-
On the navigation bar, choose Message routing
and then Rules.
-
Choose Create rule.
-
Enter the rule properties.
-
Enter an alphanumeric Rule name.
-
(Optional) Enter a Rule description and
Tags.
-
Choose Next.
-
Enter a SQL statement.
-
Enter a SQL statement using the MQTT topic that you defined for
ingestion.
For example, SELECT * FROM
'$aws/rules/things/thing_name/logs'
-
Choose Next.
-
Enter rule actions.
-
On the Action 1 menu, choose CloudWatch
logs.
-
Choose the Log group name and then choose the log
group that you created.
-
Select Use batch mode.
-
Specify the IAM role for the rule.
If you have an IAM role for the rule, do the following.
-
On the IAM role menu, choose your IAM
role.
If you don't have an IAM role for the rule, do the following.
-
Choose Create new role.
-
For Role name, enter a unique name and choose
Create.
-
Confirm that the IAM role name is correct in the IAM
role field.
-
Choose Next.
-
Review the template configuration.
-
Review the settings for the Job template to verify they're
correct.
-
When you're done, choose Create.
- Amazon CLI
-
To create an IAM role and a topic rule by using the Amazon CLI
-
Create an IAM role that grants rights to the Amazon IoT rule.
-
Create an IAM policy.
To create an IAM policy, run the following command. Make sure you
update the policy-name parameter value. For more information,
see create-policy in the Amazon CLI v2 Command
Reference.
If you're using a Microsoft Windows operating system, you might need
to replace the end of line marker (\) with a tick (`) or another
character.
aws iam create-policy \
    --policy-name uploadLogsPolicy \
    --policy-document \
'{
    "Version": "2012-10-17",
    "Statement": {
        "Effect": "Allow",
        "Action": [
            "iot:CreateTopicRule",
            "iot:Publish",
            "logs:CreateLogGroup",
            "logs:CreateLogStream",
            "logs:PutLogEvents",
            "logs:GetLogEvents"
        ],
        "Resource": "*"
    }
}'
-
Copy the policy ARN from your output into a text editor.
Sample output:
{
    "Policy": {
        "PolicyName": "uploadLogsPolicy",
        "PermissionsBoundaryUsageCount": 0,
        "CreateDate": "2023-01-23T18:30:10Z",
        "AttachmentCount": 0,
        "IsAttachable": true,
        "PolicyId": "AAABBBCCCDDDEEEFFFGGG",
        "DefaultVersionId": "v1",
        "Path": "/",
        "Arn": "arn:aws:iam::111122223333:policy/uploadLogsPolicy",
        "UpdateDate": "2023-01-23T18:30:10Z"
    }
}
-
Create an IAM role and trust policy.
To create an IAM policy, run the following command. Make sure you
update the role-name parameter value. For more information, see
create-role in the Amazon CLI v2 Command
Reference.
aws iam create-role \
--role-name uploadLogsRole \
--assume-role-policy-document \
'{
    "Version": "2012-10-17",
    "Statement": [
        {
            "Sid": "",
            "Effect": "Allow",
            "Principal": {
                "Service": "iot.amazonaws.com"
            },
            "Action": "sts:AssumeRole"
        }
    ]
}'
-
Attach the IAM policy to the rule.
To create an IAM policy, run the following command. Make sure you
update the role-name and policy-arn parameter
values. For more information, see attach-role-policy in the Amazon CLI v2 Command
Reference.
aws iam attach-role-policy \
--role-name uploadLogsRole \
--policy-arn arn:aws:iam::111122223333:policy/uploadLogsPolicy
-
Review the role.
To confirm that the IAM role was created correctly, run the following
command. Make sure you update the role-name parameter value.
For more information, see get-role in the Amazon CLI v2 Command Reference.
aws iam get-role --role-name uploadLogsRole
Sample output:
{
    "Role": {
        "Path": "/",
        "RoleName": "uploadLogsRole",
        "RoleId": "AAABBBCCCDDDEEEFFFGGG",
        "Arn": "arn:aws:iam::111122223333:role/uploadLogsRole",
        "CreateDate": "2023-01-23T19:17:15+00:00",
        "AssumeRolePolicyDocument": {
            "Version": "2012-10-17",
            "Statement": [
                {
                    "Sid": "Statement1",
                    "Effect": "Allow",
                    "Principal": {
                        "Service": "iot.amazonaws.com"
                    },
                    "Action": "sts:AssumeRole"
                }
            ]
        },
        "Description": "",
        "MaxSessionDuration": 3600,
        "RoleLastUsed": {}
    }
}
-
Create an Amazon IoT topic rule in the Amazon CLI.
-
To create an Amazon IoT topic rule, run the following command. Make sure you
update the --rule-name,sql statement,
description,roleARN , and
logGroupName parameter values. For more information, see
create-topic-rule in the Amazon CLI v2 Command Reference.
aws iot create-topic-rule \
--rule-name uploadLogsRule \
--topic-rule-payload \
	'{
		"sql":"SELECT * FROM 'rules/things/thing_name/logs'",
		"description":"Upload logs test rule",
		"ruleDisabled":false,
		"awsIotSqlVersion":"2016-03-23",
		"actions":[
			{"cloudwatchLogs":
				{"roleArn":"arn:aws:iam::111122223333:role/uploadLogsRole",
				"logGroupName":"uploadLogsGroup",
				"batchMode":true}
				}
			]
}'
-
To confirm that the rule was created correctly, run the following
command. Make sure you update the role-name parameter value.
For more information, see get-topic-rule in the Amazon CLI v2 Command Reference.
aws iot get-topic-rule --rule-name uploadLogsRule
Sample output:
{
    "ruleArn": "arn:aws:iot:us-east-1:111122223333:rule/uploadLogsRule",
    "rule": {
        "ruleName": "uploadLogsRule",
        "sql": "SELECT * FROM rules/things/thing_name/logs",
        "description": "Upload logs test rule",
        "createdAt": "2023-01-24T16:28:15+00:00",
        "actions": [
            {
                "cloudwatchLogs": {
                    "roleArn": "arn:aws:iam::111122223333:role/uploadLogsRole",
                    "logGroupName": "uploadLogsGroup",
                    "batchMode": true
                }
            }
        ],
        "ruleDisabled": false,
        "awsIotSqlVersion": "2016-03-23"
    }
}
Sending device-side logs to Amazon IoT
To send device-side logs to Amazon IoT
-
To send historical logs to Amazon IoT, communicate with your devices to ensure the
following.
-
The log information is sent to the correct topic namespace as specified within
the Prerequisites section of this procedure.
For example, $aws/rules/things/thing_name/logs
-
The MQTT message payload is formatted correctly. For more information about
MQTT topic and recommended naming convention, see the MQTT topics
section within Upload device-side logs to Amazon CloudWatch
.
-
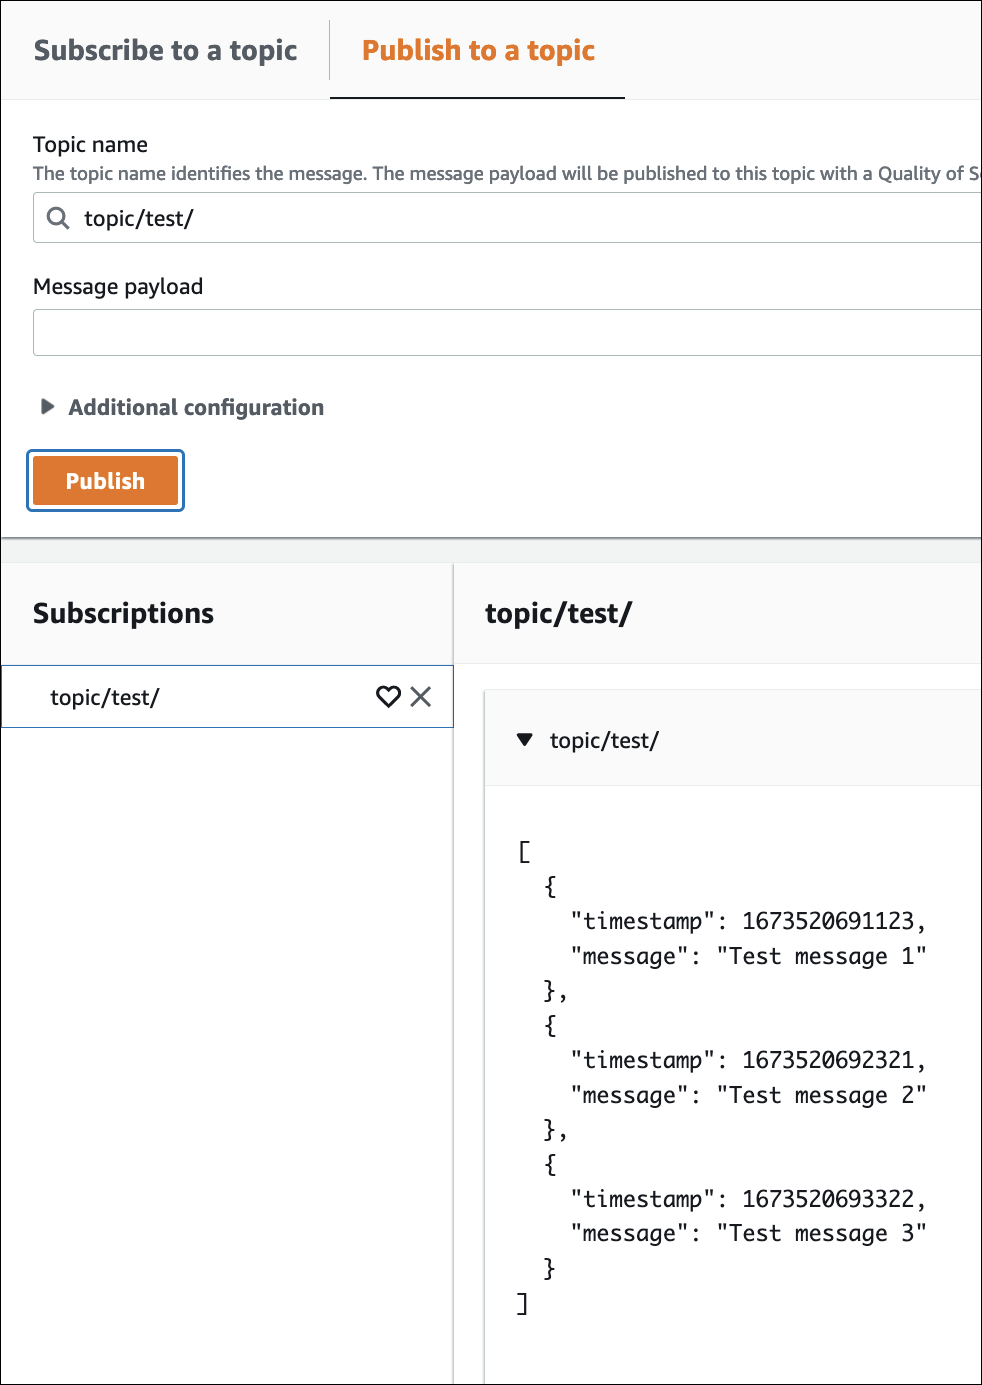
Confirm that the MQTT messages are received within the Amazon IoT MQTT client.
-
Open the Amazon Web Services Management Console and navigate to Amazon IoT.
-
To view the MQTT test client, on the navigation bar,
choose Test,MQTT test client.
-
For Subscribe to a topic,Topic
filter, enter the topic namespace.
-
Choose Subscribe.
MQTT messages appear in the Subscriptions and
Topic table, as seen in the following. These messages can
take up to five minutes to appear.
Viewing the log data
To review your log records in CloudWatch Logs
-
Open the Amazon Web Services Management Console, and navigate to CloudWatch.
-
On the navigation bar, choose Logs,Logs
Insights.
-
On the Select log group(s) menu, choose the log group you
specified in the Amazon IoT rule.
-
On the Logs insights page, choose Run
query.