Specifying input files and input clips
You can use MediaConvert for assembly workflows. An assembly workflow is a MediaConvert job that performs basic input clipping and stitching to assemble output assets from different sources without requiring separate editing software. For example, an assembly workflow can put together a bumper followed by feature content that is interleaved with advertisements. The feature content might have a logo graphic overlay at the beginning of each feature segment.
With these kinds of jobs, you assemble your outputs from multiple inputs by using input stitching, or portions of inputs by using input clipping. MediaConvert creates all of a job's outputs from this assembly. If you want outputs with different clips of the input files or with different arrangements of the inputs, you must create a separate job for each assembly.
Topics
How MediaConvert uses timelines to assemble jobs
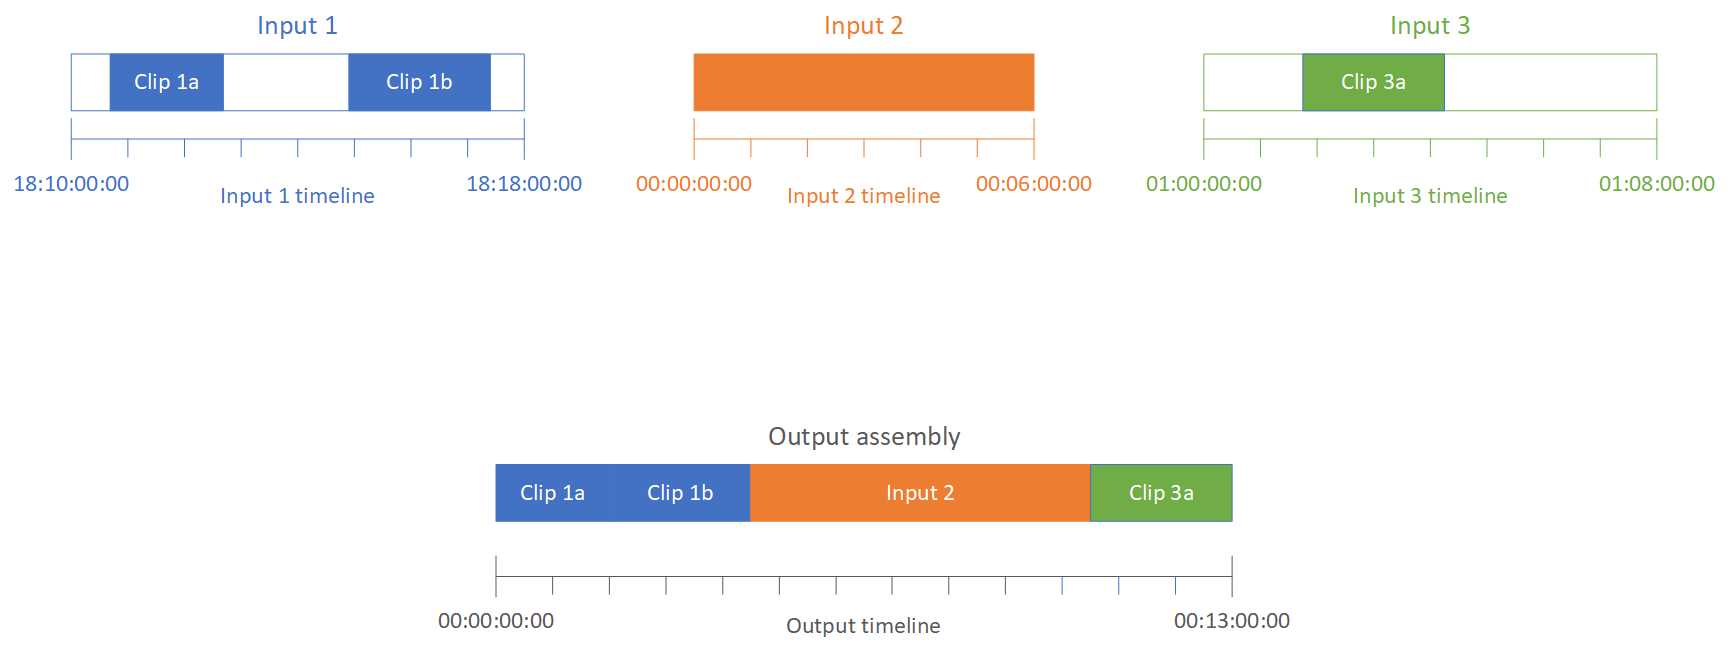
MediaConvert assembles inputs and input clips according to input timelines and the output timeline. The service constructs these timelines based on your settings, and then assembles your inputs into outputs based on them. The following illustration shows three independent input timelines and an output timeline.
Input timelines
Each input has its own input timeline. An input timeline is a series of timecodes that MediaConvert generates to represent each frame of the input file.
By default, the input timeline is the same as any timecodes embedded in the input
video. You can specify a different starting timecode in the input setting
Timecode source. If you use the API or an SDK, you can find this setting in the JSON file of your job. The setting name is
TimecodeSource, located in Settings,
Inputs. For more information, see Adjusting the input timeline with the input timecode source.
MediaConvert uses the input timeline for the following:
-
Determining when input graphic overlays (inserted images) appear in the video. For more information about the difference between input and output overlays, see Choosing between input and output overlays.
-
Determining when motion graphic overlays (inserted images) appear in the video. For more information about the different types of graphic overlays, see Image insertion.
-
Synchronizing your video with sidecar captions that are in a timecode-based format. Sidecar captions are captions that you provide as input files that are separate from the video.
-
Interpreting the timecodes that you provide when you specify input clips.
Output timeline
The output timeline is the series of timecodes that MediaConvert generates to embed in the outputs. MediaConvert also uses the timecodes of the output timeline for features that apply to every output in the job.
By default, the output timeline is the same as any timecodes embedded in the video
of your first input file. You can specify a different starting timecode in the
job-wide Timecode configuration settings under Job
settings. If you use the API or an SDK, you can find these settings in the JSON file of your job. These settings are under Settings,
TimecodeConfig. For more information, see Adjusting the output timeline with the job-wide timecode configuration.
MediaConvert uses the output timeline for the following:
-
Determining which timecodes to embed in the output video, when you enable Timecode insertion in your output timecode settings.
-
Determining when output overlays (inserted images) appear in the video. For more information about the different types of graphic overlays, see Image insertion.
-
Determining how your HLS variant playlists show time.
-
Interpreting the timecode that you provide when you specify a value for Anchor timecode.
Setting up an assembly workflow job
Follow these steps to set up a job that combines assembly workflow features such as input clipping, input stitching, graphic overlay, and sidecar captions sync. Doing these tasks in this order can make setup easier. In particular, we recommend that you specify your input clips last. This is because each input timeline counts frames from the entire input, not from each individual clip.
This procedure relies on the concept of input and output timelines. For more information, see How MediaConvert uses timelines to assemble jobs.
To set up an assembly workflow job (console)
-
Specify your video input files.
You can have up to 150 inputs in a job. MediaConvert stitches together the inputs in the order that you add them. To use multiple clips from the same input file in chronological order without other inputs in between them, specify the input file only once.
For full instructions, see Step 1: Specify input files.
-
Set up your audio selectors.
In each input, you create audio selectors to map your input audio to your outputs. For instructions, see Step 2: Create input selectors for video, audio, and captions.
With sidecar audio files, MediaConvert synchronizes audio and video without regard to timecodes. MediaConvert lines up the start of the audio file with the start of the video file.
Whether your audio is in a sidecar file or embedded in the video, you can adjust its sync using the Offset setting in the input audio selector. Use a positive number for Offset to move the audio later in the input timeline; use a negative number to move it earlier.
-
Synchronize any sidecar captions.
How you set up your sidecar captions sync depends on the input captions format:
-
If your input captions format is timecode-based (for example, SCC or STL), the service synchronizes the timecode in the captions file with the input timeline.
-
If your input captions format is timestamp-based (for example, SRT, SMI, or TTML), the service synchronizes the captions with the video without regard to timecodes.
-
-
Set up when you want any graphic overlays or motion graphic overlays to appear.
How you specify the time that the overlay appears depends on what kind of overlay you specify:
-
For input still graphic overlays, specify the overlay in the input where you want the overlay to appear. Specify the start and end times with timecodes that match with that input's timeline.
-
For output still graphic overlays, specify when you want the overlay to appear based on the output timeline.
-
For motion graphic overlays, specify when you want the overlay to appear based on the inputs' timelines.
-
-
Specify input clips.
Unless you want MediaConvert to include the full duration of the input, specify input clips for each input. Specify the start and end times with timecodes that match with that input's timeline.
Set up input clips as follows:
-
On the Create job page, in the Job pane on the left, choose an input.
-
In the Input clips section, choose Add input clip.
-
Enter the starting and ending timecodes for the first clip that you want to include. Use the following 24-hour format with a frame number: HH:MM:SS:FF.
When you specify an input clip for an audio-only input, the last numbers in the timecode that you enter correspond to hundredths of a second. For example, 00:00:30:75 is the same as 30.75 seconds.
Make sure that you provide timecodes that align with your input timeline. By default, MediaConvert bases input clipping on timecodes that are embedded in your input video. How you align your timecodes depends on whether your input video has embedded timecodes:
-
If your input doesn't have embedded timecodes, set Timecode source to Start at 0 or Specified start.
-
If your input does have embedded timecodes and you want MediaConvert to use them, for Timecode source, keep the default value, Embedded. Specify your clip start and end times accordingly.
For example, if an input Timecode source is set to Embedded with video embedded timecodes that start at 01:00:00:00, define the start timecode for a clip 30 seconds in 01:00:30:00 (not 00:00:30:00). By default, the input timeline is the same as the timecodes that are embedded in the video. You can change what determines the input timeline by adjusting the input Timecode source setting.
-
Specify an input clip duration that is less than 12 hours long.
For more information, see Adjusting the input timeline with the input timecode source.
-
-
Specify any additional clips. Multiple clips must be in chronological order and can't overlap; each Start timecode must come after the previous clip's End timecode.
If you specify more than one input clip, they all appear in the output, one after the other, in the order that you specify them.
-