Chaining IAM roles in Amazon Neptune
Important
The new bulk load cross-account feature introduced in engine release 1.2.1.0.R3 that takes advantage of chaining IAM roles may in some cases cause you to observe degraded bulk load performance. As a result, upgrades to engine releases that support this feature have been temporarily suspended until this problem is resolved.
When you attach a role to your cluster, your cluster can assume that role to gain access to data stored in Amazon S3. Starting with engine release 1.2.1.0.R3, if that role doesn't have access to all the resources you need, you can chain one or more additional roles that your cluster can assume to gain access to other resources. Each role in the chain assumes the next role in the chain, until your cluster has assumed the role at the end of chain.
To chain roles, you establish a trust relationship between them. For example,
to chain RoleB onto RoleA, RoleA must
have a permissions policy that allows it to assume RoleB, and
RoleB must have a trust policy that allows it to pass its permissions
back to RoleA. For more information, see Using IAM roles.
The first role in a chain must be attached to the cluster that is loading data.
The first role, and each subsequent role that assumes the following role in the chain, must have:
A policy that includes a specific statement with the
Alloweffect on thests:AssumeRoleaction.The Amazon Resource Name (ARN) of the next role in a
Resourceelement.
Note
The target Amazon S3 bucket must be in the same Amazon Region as the cluster.
Cross-account access using chained roles
You can grant cross-account access by chaining a role or roles that belong to another account. When your cluster temporarily assumes a role belonging to another account, it can gain access to resources there.
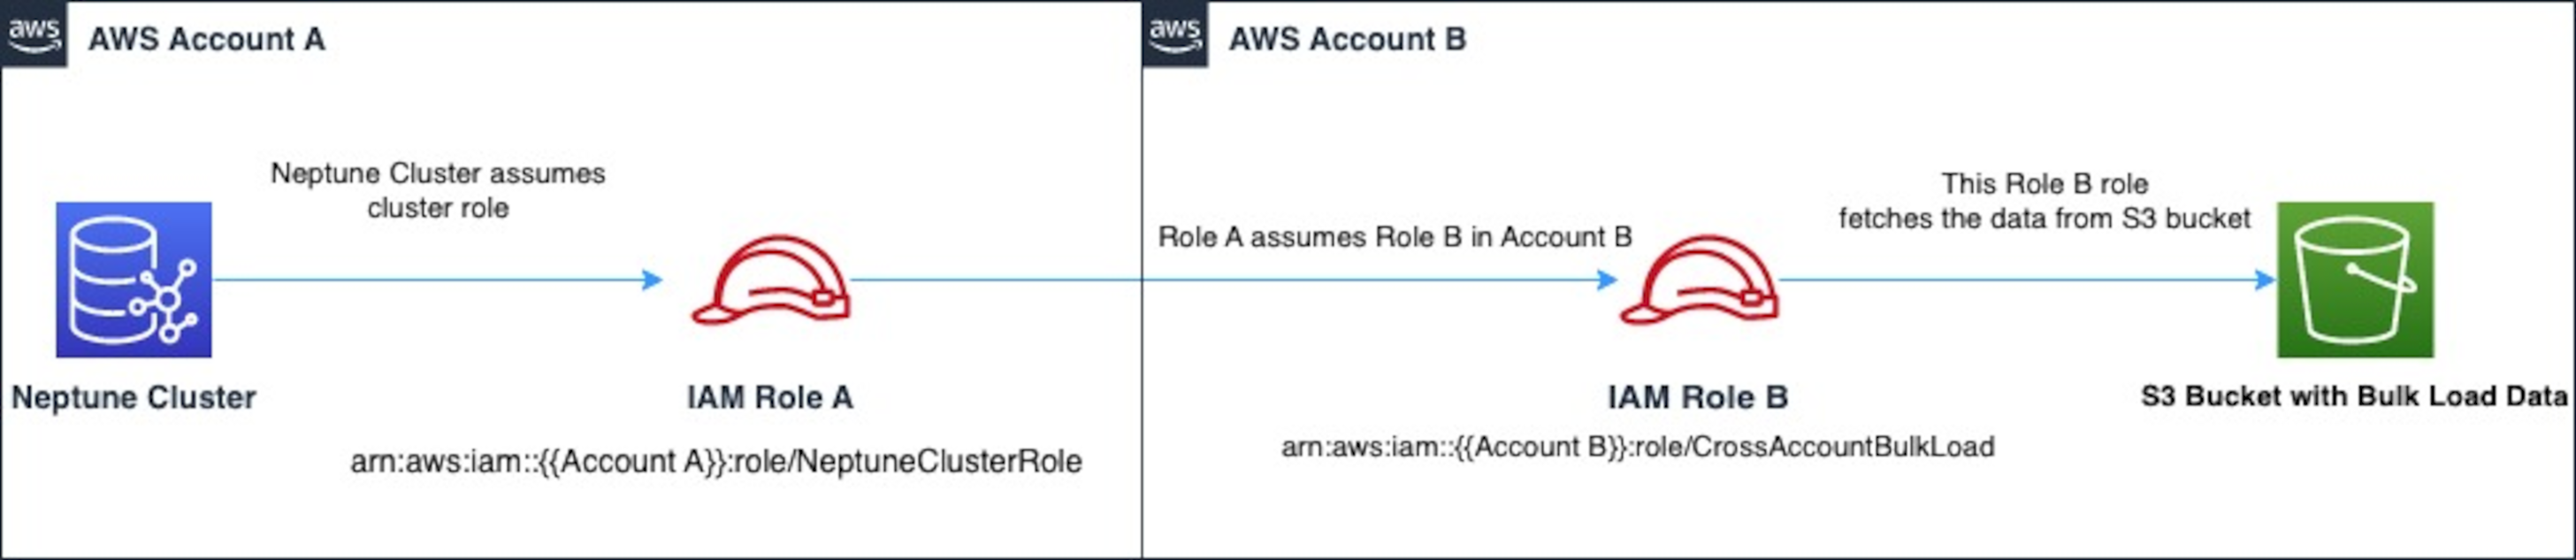
For example, suppose Account A wants to access data in an Amazon S3 bucket that belongs to Account B:
Account A creates an Amazon service role for Neptune named
RoleAand attaches it to a cluster.Account B creates a role named
RoleBthat's authorized to access the data in an Account B bucket.Account A attaches a permissions policy to
RoleAthat allows it to assumeRoleB.Account B attaches a trust policy to
RoleBthat allows it to pass its permissions back toRoleA.To access the data in the Account B bucket, Account A runs a loader command using an
iamRoleArnparameter that chainsRoleAandRoleB. For the duration of the loader operation,RoleAthen temporarily assumesRoleBto access the Amazon S3 bucket in Account B.
For example, RoleA would have a trust policy that establishes a
trust relationship with Neptune:
RoleA would also have a permission policy that allows it to
assume RoleB, which is owned by Account B:
Conversely, RoleB would have a trust policy to establish a
trust relationship with RoleA:
RoleB would also need permission to access data in the Amazon S3 bucket
located in Account B.
Creating an Amazon Security Token Service (STS) VPC endpoint
The Neptune loader requires a VPC endpoint for Amazon STS when you are chaining IAM roles to privately access Amazon STS APIs through private IP addresses. You can connect directly from an Amazon VPC to Amazon STS through a VPC Endpoint in a secure and scalable manner. When you use an interface VPC endpoint, it provides a better security posture because you don't need to open outbound traffic firewalls. It also provides the other benefits of using Amazon VPC endpoints.
When using a VPC Endpoint, traffic to Amazon STS does not transmit over the internet and never leaves the Amazon network. Your VPC is securely connected to Amazon STS without availability risks or bandwidth constraints on your network traffic. For more information, see Using Amazon STS interface VPC endpoints.
To set up access for Amazon Security Token Service (STS)
Sign in to the Amazon Web Services Management Console and open the Amazon VPC console at https://console.amazonaws.cn/vpc/
. In the navigation pane, choose Endpoints.
Choose Create Endpoint.
Choose the Service Name:
com.amazonaws.region.stsfor the Interface type endpoint.Choose the VPC that contains your Neptune DB instance and EC2 instance.
Select the check box next to the subnet in which your EC2 instance is present. You can't select multiple subnets from the same Availability Zone.
-
For IP address type, choose from the following options:
IPv4 – Assign IPv4 addresses to your endpoint network interfaces. This option is supported only if all selected subnets have IPv4 address ranges.
IPv6 – Assign IPv6 addresses to your endpoint network interfaces. This option is supported only if all selected subnets are IPv6-only subnets.
Dualstack – Assign both IPv4 and IPv6 addresses to your endpoint network interfaces. This option is supported only if all selected subnets have both IPv4 and IPv6 address ranges.
For Security groups, select the security groups to associate with the endpoint network interfaces for the VPC endpoint. You would need to select all the security groups that is attached to your Neptune DB instance and EC2 instance.
For Policy, select Full access to allow all operations by all principals on all resources over the VPC endpoint. Otherwise, select Custom to attach a VPC endpoint policy that controls the permissions that principals have for performing actions on resources over the VPC endpoint. This option is available only if the service supports VPC endpoint policies. For more information, see Endpoint policies.
(Optional) To add a tag, choose Add new tag and enter the tag key and the tag value you want.
Choose Create endpoint.
For information about creating the endpoint, see VPC Endpoints in the Amazon VPC User Guide. Please note that Amazon STS VPC Endpoint is a required prerequisite for IAM role chaining.
Now that you have granted access to the Amazon STS endpoint, you can prepare to load data. For information about supported formats, see Load Data Formats.
Chaining roles within a loader command
You can specify role chaining when you run a loader command by including a
comma-separated list of role ARNs in the iamRoleArn parameter.
Although you'll mostly only need to have two roles in a chain, it is certainly possible to chain three or more together. For example, this loader command chains three roles: