Tutorial: Ingesting data into a domain using Amazon OpenSearch Ingestion
This tutorial shows you how to use Amazon OpenSearch Ingestion to configure a simple pipeline and ingest data into an Amazon OpenSearch Service domain. A pipeline is a resource that OpenSearch Ingestion provisions and manages. You can use a pipeline to filter, enrich, transform, normalize, and aggregate data for downstream analytics and visualization in OpenSearch Service.
This tutorial walks you through the basic steps to get a pipeline up and running quickly. For more comprehensive instructions, see Creating pipelines.
You'll complete the following steps in this tutorial:
Within the tutorial, you'll create the following resources:
-
A domain named
ingestion-domainthat the pipeline writes to -
A pipeline named
ingestion-pipeline
Required permissions
To complete this tutorial, your user or role must have an attached identity-based policy
with the following minimum permissions. These permissions allow you to create a pipeline
role and attach a policy (iam:Create* and iam:Attach*), create
or modify a domain (es:*), and work with pipelines
(osis:*).
Step 1: Create the pipeline role
First, create a role that the pipeline will assume in order to access the OpenSearch Service domain sink. You'll include this role within the pipeline configuration later in this tutorial.
To create the pipeline role
-
Open the Amazon Identity and Access Management console at https://console.aws.amazon.com/iamv2/
. -
Choose Policies, and then choose Create policy.
-
In this tutorial, you'll ingest data into a domain called
ingestion-domain, which you'll create in the next step. Select JSON and paste the following policy into the editor. Replaceyour-account-idIf you want to write data to an existing domain, replace
ingestion-domainwith the name of your domain.Note
For simplicity in this tutorial, we use a broad access policy. In production environments, however, we recommend that you apply a more restrictive access policy to your pipeline role. For an example policy that provides the minimum required permissions, see Granting Amazon OpenSearch Ingestion pipelines access to domains.
-
Choose Next, choose Next, and name your policy pipeline-policy.
-
Choose Create policy.
-
Next, create a role and attach the policy to it. Choose Roles, and then choose Create role.
-
Choose Custom trust policy and paste the following policy into the editor:
-
Choose Next. Then search for and select pipeline-policy (which you just created).
-
Choose Next and name the role PipelineRole.
-
Choose Create role.
Remember the Amazon Resource Name (ARN) of the role (for example,
arn:aws:iam::).
You'll need it when you create your pipeline.your-account-id:role/PipelineRole
Step 2: Create a domain
First, create a domain named ingestion-domain to ingest data into.
Navigate to the Amazon OpenSearch Service console at https://console.aws.amazon.com/aos/home
-
Is running OpenSearch 1.0 or later, or Elasticsearch 7.4 or later
-
Uses public access
-
Does not use fine-grained access control
Note
These requirements are meant to ensure simplicity in this tutorial. In production environments, you can configure a domain with VPC access and/or use fine-grained access control. To use fine-grained access control, see Map the pipeline role.
The domain must have an access policy that grants permission to the
OpenSearchIngestion-PipelineRole IAM role, which OpenSearch Service will create for
you in the next step. The pipeline will assume this role in order to send data to the
domain sink.
Make sure that the domain has the following domain-level access policy, which grants the pipeline role access to the domain. Replace the Region and account ID with your own:
For more information about creating domain-level access policies, see Resource-based policies.
If you already have a domain created, modify its existing access policy to provide the
above permissions to OpenSearchIngestion-PipelineRole.
Step 3: Create a pipeline
Now that you have a domain, you can create a pipeline.
To create a pipeline
-
Within the Amazon OpenSearch Service console, choose Pipelines from the left navigation pane.
-
Choose Create pipeline.
-
Select the Blank pipeline, then choose Select blueprint.
-
In this tutorial, we'll create a simple pipeline that uses the HTTP source
plugin. The plugin accepts log data in a JSON array format. We'll specify a single OpenSearch Service domain as the sink, and ingest all data into the application_logsindex.In the Source menu, choose HTTP. For the Path, enter /logs.
-
For simplicity in this tutorial, we'll configure public access for the pipeline. For Source network options, choose Public access. For information about configuring VPC access, see Configuring VPC access for Amazon OpenSearch Ingestion pipelines.
-
Choose Next.
-
For Processor, enter Date and choose Add.
-
Enable From time received. Leave all other settings as their defaults.
-
Choose Next.
-
Configure sink details. For OpenSearch resource type, choose Managed cluster. Then choose the OpenSearch Service domain that you created in the previous section.
For Index name, enter application_logs. OpenSearch Ingestion automatically creates this index in the domain if it doesn't already exist.
-
Choose Next.
-
Name the pipeline ingestion-pipeline. Leave the capacity settings as their defaults.
-
For Pipeline role, select Create and use a new service role. The pipeline role provides the required permissions for a pipeline to write to the domain sink and read from pull-based sources. By selecting this option, you allow OpenSearch Ingestion to create the role for you, rather than manually creating it in IAM. For more information, see Setting up roles and users in Amazon OpenSearch Ingestion.
-
For Service role name suffix, enter PipelineRole. In IAM, the role will have the format
arn:aws:iam::.your-account-id:role/OpenSearchIngestion-PipelineRole -
Choose Next. Review your pipeline configuration and choose Create pipeline. The pipeline takes 5–10 minutes to become active.
Step 4: Ingest some sample data
When the pipeline status is Active, you can start ingesting data into it.
You must sign all HTTP requests to the pipeline using Signature Version 4
Note
The principal signing the request must have the osis:Ingest IAM
permission.
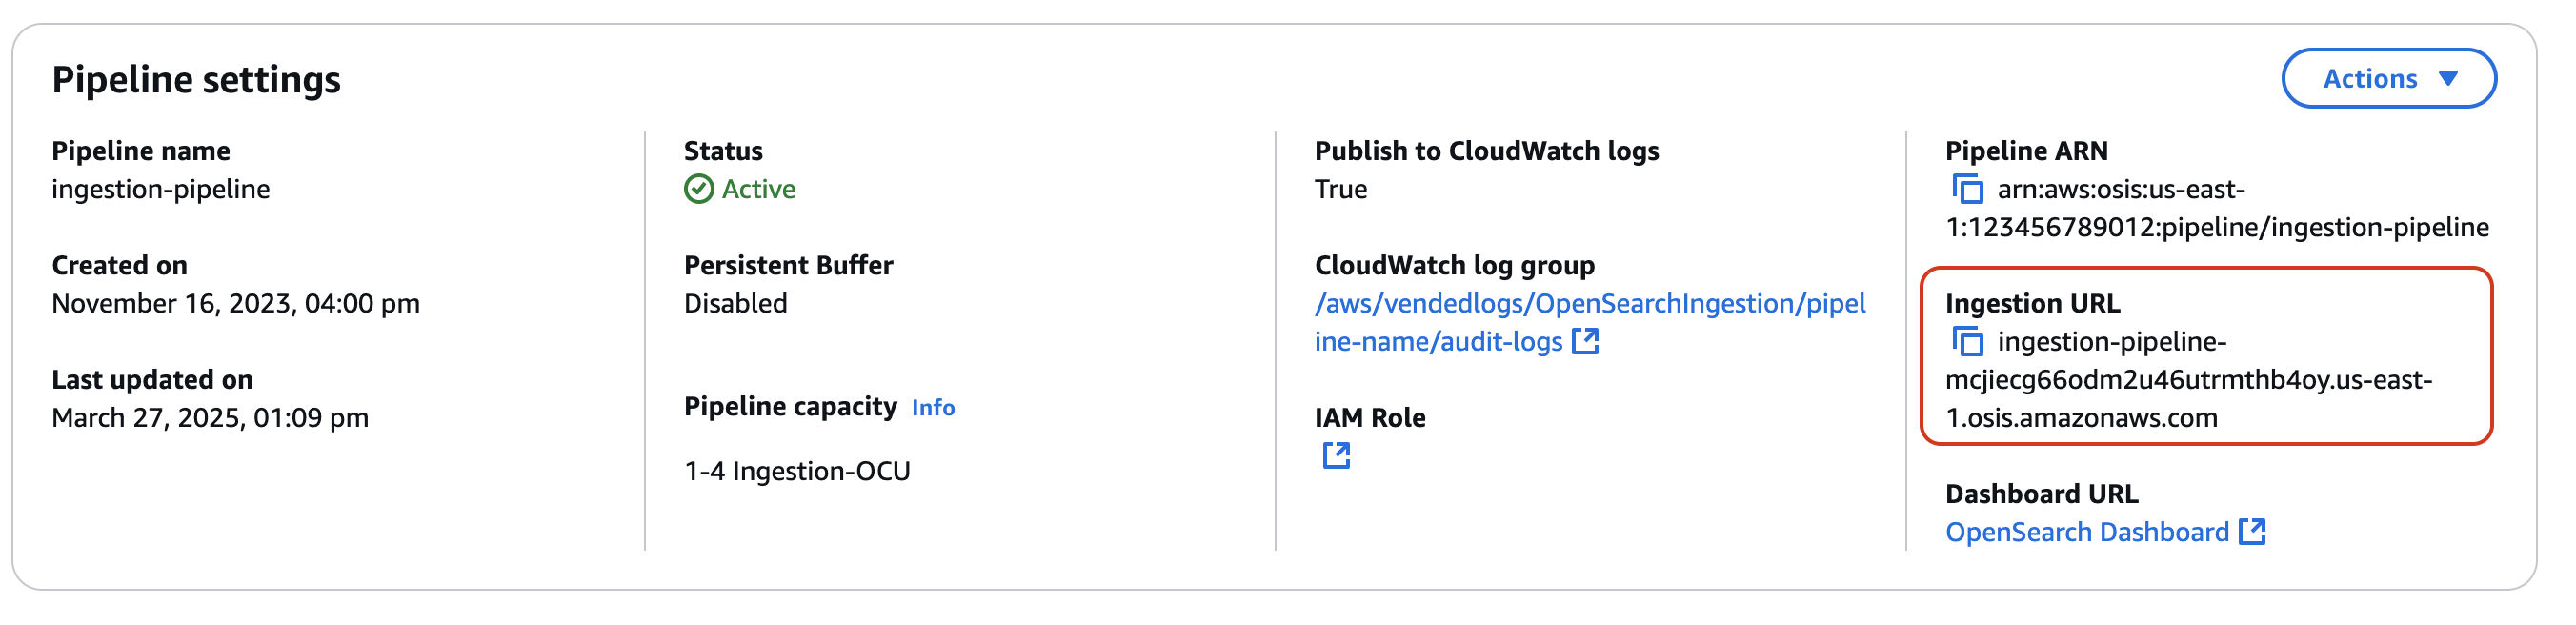
First, get the ingestion URL from the Pipeline settings page:
Then, ingest some sample data. The following request uses awscurl
awscurl --service osis --regionus-east-1\ -X POST \ -H "Content-Type: application/json" \ -d '[{"time":"2014-08-11T11:40:13+00:00","remote_addr":"122.226.223.69","status":"404","request":"GET http://www.k2proxy.com//hello.html HTTP/1.1","http_user_agent":"Mozilla/4.0 (compatible; WOW64; SLCC2;)"}]' \ https://pipeline-endpoint.us-east-1.osis.amazonaws.com/logs
You should see a 200 OK response. If you get an authentication error, it
might be because you're ingesting data from a separate account than the pipeline is in.
See Fixing permissions issues.
Now, query the application_logs index to ensure that your log entry was
successfully ingested:
awscurl --service es --regionus-east-1\ -X GET \ https://search-ingestion-domain.us-east-1.es.amazonaws.com/application_logs/_search | json_pp
Sample response:
{
   "took":984,
   "timed_out":false,
   "_shards":{
      "total":1,
      "successful":5,
      "skipped":0,
      "failed":0
   },
   "hits":{
      "total":{
         "value":1,
         "relation":"eq"
      },
      "max_score":1.0,
      "hits":[
         {
            "_index":"application_logs",
            "_type":"_doc",
            "_id":"z6VY_IMBRpceX-DU6V4O",
            "_score":1.0,
            "_source":{
               "time":"2014-08-11T11:40:13+00:00",
               "remote_addr":"122.226.223.69",
               "status":"404",
               "request":"GET http://www.k2proxy.com//hello.html HTTP/1.1",
               "http_user_agent":"Mozilla/4.0 (compatible; WOW64; SLCC2;)",
               "@timestamp":"2022-10-21T21:00:25.502Z"
            }
         }
      ]
   }
}
Fixing permissions issues
If you followed the steps in the tutorial and you still see authentication errors when
you try to ingest data, it might be because the role that is writing to a pipeline is in
a different Amazon Web Services account than the pipeline itself. In this case, you need to create and
assume a role
Related resources
This tutorial presented a simple use case of ingesting a single document over HTTP. In production scenarios, you'll configure your client applications (such as Fluent Bit, Kubernetes, or the OpenTelemetry Collector) to send data to one or more pipelines. Your pipelines will likely be more complex than the simple example in this tutorial.
To get started configuring your clients and ingesting data, see the following resources: