Amazon Redshift will no longer support the use of Python UDFs after June 30, 2026.
We will start enforcing it in phases. For more information on the details of Python end of life
and migration options, see the
blog post
External schemas in Amazon Redshift Spectrum
This topic describes how to create and use external schemas with Redshift Spectrum. External schemas are collections of tables that you use as references to access data outside your Amazon Redshift cluster. These tables contain metadata about the external data that Redshift Spectrum reads.
All external tables must be created in an external schema, which you create using a CREATE EXTERNAL SCHEMA statement.
Note
Some applications use the term database and schema interchangeably. In Amazon Redshift, we use the term schema.
An Amazon Redshift external schema references an external database in an external data catalog. You can create the external database in Amazon Redshift, in Amazon Athena, in Amazon Glue Data Catalog, or in an Apache Hive metastore, such as Amazon EMR. If you create an external database in Amazon Redshift, the database resides in the Athena Data Catalog. To create a database in a Hive metastore, you need to create the database in your Hive application.
Amazon Redshift needs authorization to access the Data Catalog in Athena and the data files in Amazon S3
on your behalf. To provide that authorization, you first create an Amazon Identity and Access Management (IAM) role.
Then you attach the role to your cluster and provide Amazon Resource Name (ARN) for the
role in the Amazon Redshift CREATE EXTERNAL SCHEMA statement. For more information about
authorization, see IAM policies for Amazon Redshift Spectrum.
To create an external database at the same time you create an external schema, specify
FROM DATA CATALOG and include the CREATE EXTERNAL DATABASE
clause in your CREATE EXTERNAL SCHEMA statement.
The following example creates an external schema named spectrum_schema
using the external database spectrum_db.
create external schema spectrum_schema from data catalog
database 'spectrum_db'
iam_role 'arn:aws:iam::123456789012:role/MySpectrumRole'
create external database if not exists;
If you manage your data catalog using Athena, specify the Athena database name and the Amazon Region in which the Athena Data Catalog is located.
The following example creates an external schema using the default sampledb
database in the Athena Data Catalog.
create external schema athena_schema from data catalog
database 'sampledb'
iam_role 'arn:aws:iam::123456789012:role/MySpectrumRole'
region 'us-east-2';
Note
The region parameter references the Amazon Region in which the Athena Data
Catalog is located, not the location of the data files in Amazon S3.
If you manage your data catalog using a Hive metastore, such as Amazon EMR, your security groups must be configured to allow traffic between the clusters.
In the CREATE EXTERNAL SCHEMA statement, specify FROM HIVE METASTORE and
include the metastore's URI and port number. The following example creates an external
schema using a Hive metastore database named hive_db.
create external schema hive_schema
from hive metastore
database 'hive_db'
uri '172.10.10.10' port 99
iam_role 'arn:aws:iam::123456789012:role/MySpectrumRole'
To view external schemas for your cluster, query the PG_EXTERNAL_SCHEMA catalog table or the SVV_EXTERNAL_SCHEMAS view. The following example queries SVV_EXTERNAL_SCHEMAS, which joins PG_EXTERNAL_SCHEMA and PG_NAMESPACE.
select * from svv_external_schemas
For the full command syntax and examples, see CREATE EXTERNAL SCHEMA.
Working with external catalogs in Amazon Redshift Spectrum
The metadata for Amazon Redshift Spectrum external databases and external tables is stored in an external data catalog. By default, Redshift Spectrum metadata is stored in an Athena Data Catalog. You can view and manage Redshift Spectrum databases and tables in your Athena console.
You can also create and manage external databases and external tables using Hive data definition language (DDL) using Athena or a Hive metastore, such as Amazon EMR.
Note
We recommend using Amazon Redshift to create and manage external databases and external tables in Redshift Spectrum.
Viewing Redshift Spectrum databases in Athena and Amazon Glue
You can create an external database by including the CREATE EXTERNAL DATABASE IF NOT EXISTS clause as part of your CREATE EXTERNAL SCHEMA statement. In such cases, the external database metadata is stored in your Data Catalog. The metadata for external tables that you create qualified by the external schema is also stored in your Data Catalog.
Athena and Amazon Glue maintain a Data Catalog for each supported Amazon Web Services Region. To view table metadata, log on to the Athena or Amazon Glue console. In Athena, choose Data sources, your Amazon Glue, then view the details of your database. In Amazon Glue, choose Databases, your external database, then view the details of your database.
If you create and manage your external tables using Athena, register the database
using CREATE EXTERNAL SCHEMA. For example, the following command registers the Athena
database named sampledb.
create external schema athena_sample
from data catalog
database 'sampledb'
iam_role 'arn:aws:iam::123456789012:role/mySpectrumRole'
region 'us-east-1';
When you query the SVV_EXTERNAL_TABLES system view, you see tables in the Athena
sampledb database and also tables that you created in Amazon
Redshift.
select * from svv_external_tables;
schemaname    | tablename        | location
--------------+------------------+--------------------------------------------------------
athena_sample | elb_logs         | s3://athena-examples/elb/plaintext
athena_sample | lineitem_1t_csv  | s3://myspectrum/tpch/1000/lineitem_csv
athena_sample | lineitem_1t_part | s3://myspectrum/tpch/1000/lineitem_partition
spectrum      | sales            | s3://redshift-downloads/tickit/spectrum/sales
spectrum      | sales_part       | s3://redshift-downloads/tickit/spectrum/sales_part
Registering an Apache Hive metastore database
If you create external tables in an Apache Hive metastore, you can use CREATE EXTERNAL SCHEMA to register those tables in Redshift Spectrum.
In the CREATE EXTERNAL SCHEMA statement, specify the FROM HIVE METASTORE clause and provide the Hive metastore URI and port number. The IAM role must include permission to access Amazon S3 but doesn't need any Athena permissions. The following example registers a Hive metastore.
create external schema if not exists hive_schema
from hive metastore
database 'hive_database'
uri 'ip-10-0-111-111.us-west-2.compute.internal' port 9083
iam_role 'arn:aws:iam::123456789012:role/mySpectrumRole';
Enabling your Amazon Redshift cluster to access your Amazon EMR cluster
If your Hive metastore is in Amazon EMR, you must give your Amazon Redshift cluster access to your Amazon EMR cluster. To do so, you create an Amazon EC2 security group. You then allow all inbound traffic to the EC2 security group from your Amazon Redshift cluster's security group and your Amazon EMR cluster's security group. Then you add the EC2 security to both your Amazon Redshift cluster and your Amazon EMR cluster.
View your Amazon Redshift cluster's security group name
To display the security group, do the following:
-
Sign in to the Amazon Web Services Management Console and open the Amazon Redshift console at https://console.amazonaws.cn/redshiftv2/
. -
On the navigation menu, choose Clusters, then choose the cluster from the list to open its details.
-
Choose Properties and view the Network and security settings section.
-
Find your security group in VPC security group and take note of it.
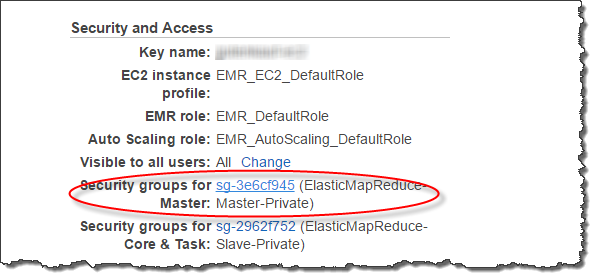
View the Amazon EMR master node security group name
Open your Amazon EMR cluster. For more information, see Use security configurations to set up cluster security in the Amazon EMR Management Guide.
Under Security and access, make a note of the Amazon EMR master node security group name.
To create or modify an Amazon EC2 security group to allow connection between Amazon Redshift and Amazon EMR
In the Amazon EC2 dashboard, choose Security groups. For more information, see Security group rules in the Amazon EC2 User Guide
Choose Create security group.
If you are using VPC, choose the VPC that your Amazon Redshift and Amazon EMR clusters are in.
Add an inbound rule.
For Type, choose Custom TCP.
For Source, choose Custom.
Enter the name of your Amazon Redshift security group.
Add another inbound rule.
For Type, choose TCP.
For Port Range, enter 9083.
Note
The default port for an EMR HMS is 9083. If your HMS uses a different port, specify that port in the inbound rule and in the external schema definition.
For Source, choose Custom.
Enter a security group name and description.
Choose Create security group.
To add the Amazon EC2 security group you created in the previous procedure to your Amazon Redshift cluster
In Amazon Redshift, choose your cluster.
Choose Properties.
View the Network and security settings and choose Edit.
In VPC security group, choose the new security group name.
Choose Save changes.
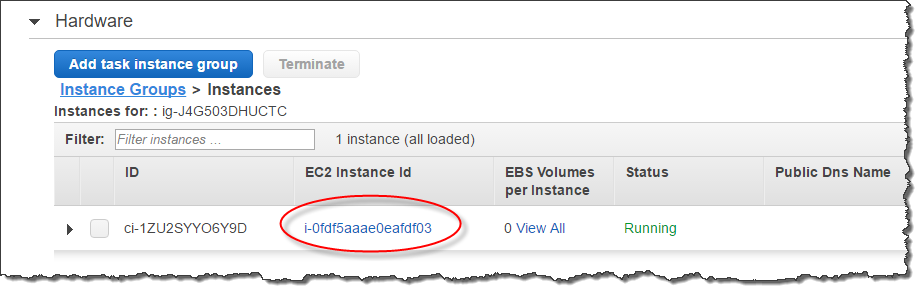
To add the Amazon EC2 security group to your Amazon EMR cluster
In Amazon EMR, choose your cluster. For more information, see Use security configurations to set up cluster security in the Amazon EMR Management Guide.
Under Hardware, choose the link for the Master node.
Choose the link in the EC2 instance ID column.
For Actions, choose Security, Change security groups.
In Associated sercurity groups, choose the new security group, and choose Add security group.
Choose Save.