Tutorial: Get Started in the Amazon A2I Console
Note
After careful consideration, we have made the decision to close new customer access to Amazon A2I, effective 7/30/26. Existing customers can continue to use the service as normal. Amazon continues to invest in security and availability improvements for A2I, but we do not plan to introduce new features.
The following tutorial shows you how to get started using Amazon A2I in the Amazon A2I console.
The tutorial gives you the option to use Augmented AI with Amazon Textract for document review or Amazon Rekognition for image content review.
Prerequisites
To get started using Amazon A2I, complete the following prerequisites.
-
Create an Amazon S3 bucket in the same Amazon Region as the workflow for your input and output data. For example, if you are using Amazon A2I with Amazon Textract in us-east-1, create your bucket in us-east-1. To create a bucket, follow the instructions in Create a Bucket in the Amazon Simple Storage Service Console User Guide.
-
Do one of the following:
-
If you want to complete the tutorial using Amazon Textract, download the following image and place it in your Amazon S3 bucket.

-
If you want to complete the tutorial using Amazon Rekognition, download the following image and place it in your Amazon S3 bucket.

-
Note
The Amazon A2I console is embedded in the SageMaker AI console.
Step 1: Create a Work Team
First, create a work team in the Amazon A2I console and add yourself as a worker so that you can preview the worker review task.
Important
This tutorial uses a private work team. The Amazon A2I private workforce is configured in the Ground Truth area of the SageMaker AI console and is shared between Amazon A2I and Ground Truth.
To create a private workforce using worker emails
-
Open the SageMaker AI console at https://console.amazonaws.cn/sagemaker/
. -
In the navigation pane, choose Labeling workforces under Ground Truth.
-
Choose Private, then choose Create private team.
-
Choose Invite new workers by email.
-
For this tutorial, enter your email and any others that you want to be able to preview the human task UI. You can paste or type a list of up to 50 email addresses, separated by commas, into the email addresses box.
-
Enter an organization name and contact email.
-
Optionally, choose an Amazon SNS topic to which to subscribe the team so workers are notified by email when new Ground Truth labeling jobs become available. Amazon SNS notifications are supported by Ground Truth and are not supported by Augmented AI. If you subscribe workers to Amazon SNS notifications, they only receive notifications about Ground Truth labeling jobs. They do not receive notifications about Augmented AI tasks.
-
Choose Create private team.
If you add yourself to a private work team, you receive an email from
no-reply@verificationemail.com with login information. Use the link
in this email to reset your password and log in to your worker portal. This is where
your human review tasks appear when you create a human loop.
Step 2: Create a Human Review Workflow
In this step, you create a human review workflow. Each human review workflow is created for a specific task type. This tutorial allows you to choose between the built-in task types: Amazon Rekognition and Amazon Textract.
To create a human review workflow:
-
Open the Augmented AI console at https://console.amazonaws.cn/a2i
to access the Human review workflows page. -
Select Create human review workflow.
-
In Workflow settings, enter a workflow Name, S3 bucket, and the IAM role that you created for this tutorial, with the Amazon managed policy
AmazonAugmentedAIIntegratedAPIAccessattached. -
For Task type, select Textract – Key-value pair extraction or Rekognition – Image moderation.
-
Select the task type that you chose from the following table for instructions for that task type.
-
Under Worker task template creation, select Create from a default template.
-
Enter a Template name.
-
In Task description field, enter the following text:
Read the instructions carefully and complete the task. -
Under Workers, select Private.
-
Select the private team that you created.
-
Choose Create.


Once your human review workflow is created, it appears in the table on the
Human review workflows page. When the
Status is Active, copy and save the Workflow
ARN. You need it for the next step.
Step 3: Start a Human Loop
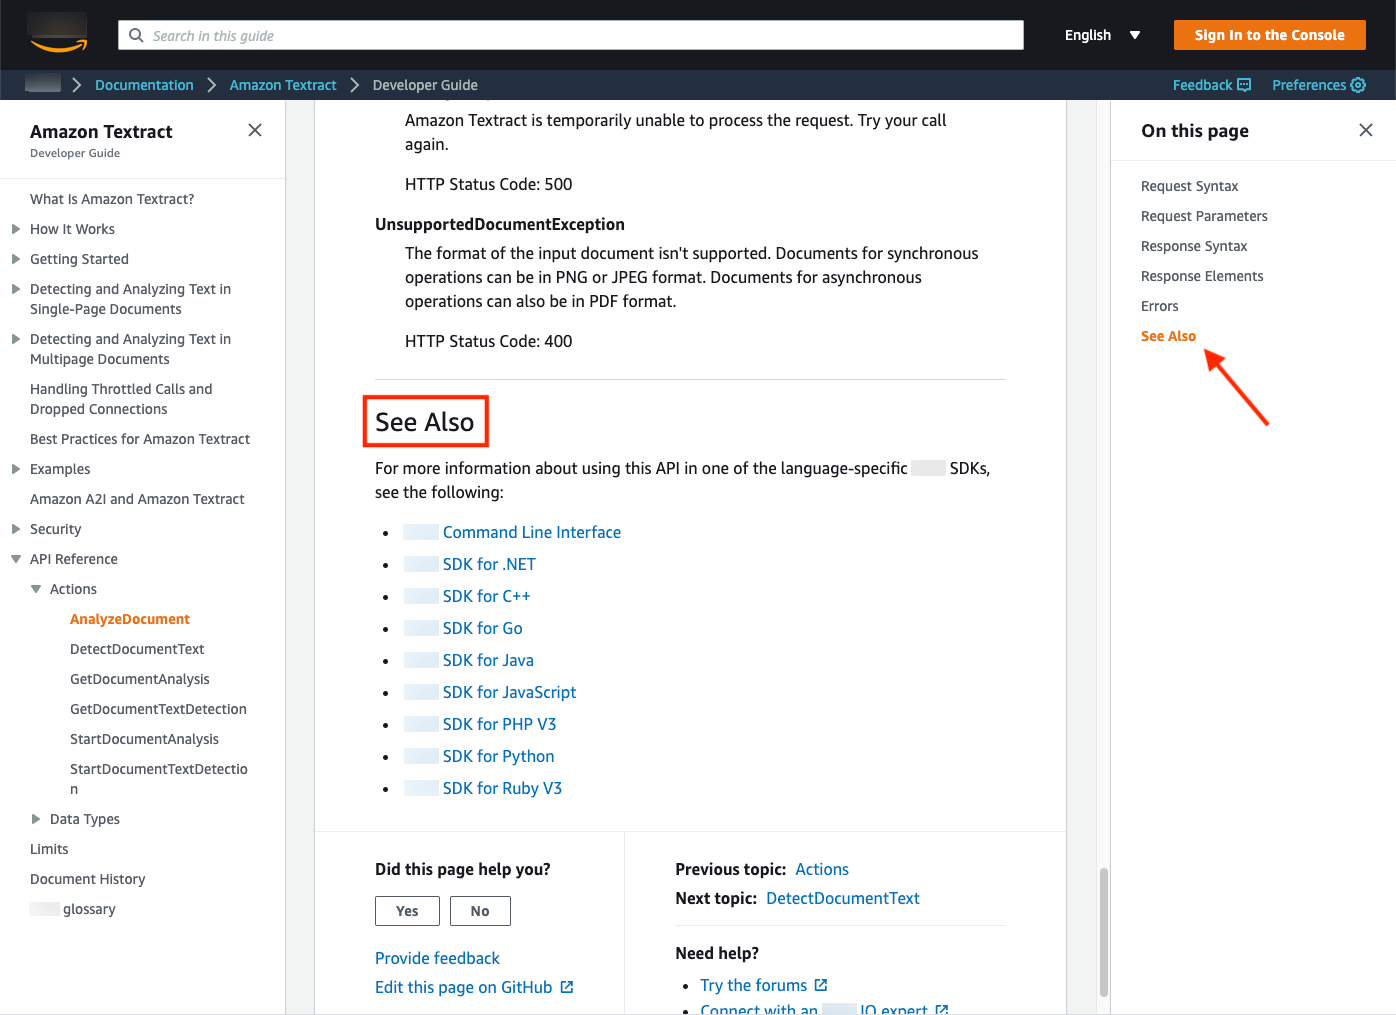
You must use an API operation to start a human loop. There are a variety of language-specific SDKs that you can use to interact with these API operations. To see documentation for each of these SDKs, refer to the See Also section in the API documentation, as shown in the following image.
For this tutorial, you use one of the following APIs:
-
If you chose the Amazon Textract task type, you use the
AnalyzeDocumentoperation. -
If you chose the Amazon Rekognition task type, you use the
DetectModerationLabelsoperation.
You can interact with these APIs using a SageMaker notebook instance (recommended for new users) or the Amazon Command Line Interface (Amazon CLI). Choose one of the following to learn more about these options:
-
To learn more about and set up a notebook instance, see Amazon SageMaker notebook instances.
-
To learn more about and get started using the Amazon CLI, see What Is the Amazon Command Line Interface? in the Amazon Command Line Interface User Guide.
Select your task type in the following table to see example requests for Amazon Textract and Amazon Rekognition using the Amazon SDK for Python (Boto3).
Step 4: View Human Loop Status in Console
When you start a human loop, you can view its status in the Amazon A2I console.
To view your human loop status
-
Open the Augmented AI console at https://console.amazonaws.cn/a2i
to access the Human review workflows page. -
Select the human review workflow that you used to start your human loop.
-
In the Human loops section, you can see your human loop. View its status in the Status column.
Step 5: Download Output Data
Your output data is stored in the Amazon S3 bucket you specified when you created a human review workflow.
To view your Amazon A2I output data
-
Open the Amazon S3 console
. -
Select the Amazon S3 bucket you specified when you created your human review workflow in step 2 of this example.
-
Starting with the folder that is named after your human review workflow, navigate to your output data by selecting the folder with the following naming convention:
s3://output-bucket-specified-in-human-review-workflow/human-review-workflow-name/YYYY/MM/DD/hh/mm/ss/human-loop-name/output.json -
Select
output.jsonand choose Download.