Testing models with production variants
In production ML workflows, data scientists and engineers frequently try to improve performance using various methods, such as Automatic model tuning with SageMaker AI, training on additional or more-recent data, improving feature selection, using better updated instances and serving containers. You can use production variants to compare your models, instances and containers, and choose the best performing candidate to respond to inference requests.
With SageMaker AI multi-variant endpoints you can distribute endpoint invocation requests across multiple production variants by providing the traffic distribution for each variant, or you can invoke a specific variant directly for each request. In this topic, we look at both methods for testing ML models.
Topics
Test models by specifying traffic distribution
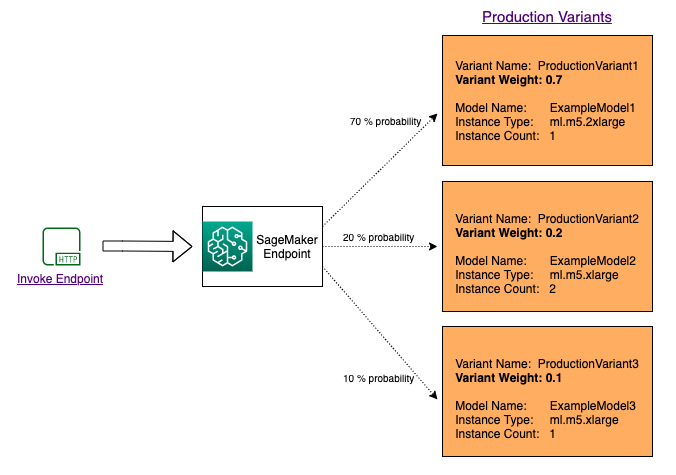
To test multiple models by distributing traffic between them, specify the percentage of the traffic that gets routed to each model by specifying the weight for each production variant in the endpoint configuration. For information, see CreateEndpointConfig. The following diagram shows how this works in more detail.
Test models by invoking specific variants
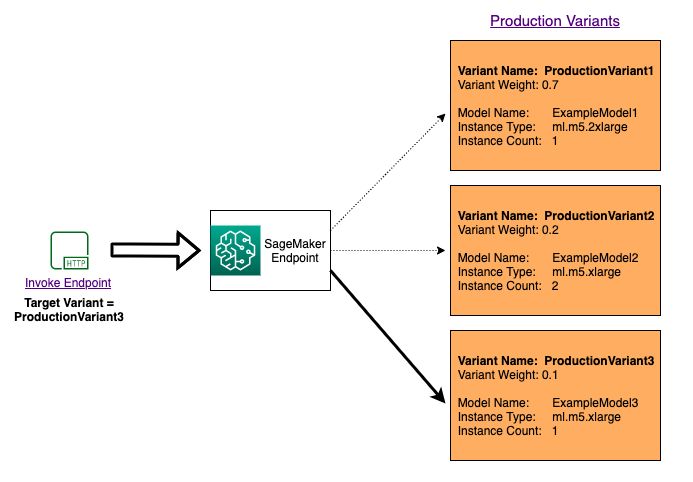
To test multiple models by invoking specific models for each request, specify the specific version of the
model you want to invoke by providing a value for the TargetVariant parameter when you call
InvokeEndpoint. SageMaker AI ensures that the request is processed by the production variant you
specify. If you have already provided traffic distribution and specify a value for the
TargetVariant parameter, the targeted routing overrides the random traffic distribution. The
following diagram shows how this works in more detail.
Model A/B test example
Performing A/B testing between a new model and an old model with production traffic can be an effective final step in the validation process for a new model. In A/B testing, you test different variants of your models and compare how each variant performs. If the newer version of the model delivers better performance than the previously existing version, replace the old version of the model with the new version in production.
The following example shows how to perform A/B model testing. For a sample notebook that implements this
example, see "A/B Testing ML models in production
Step 1: Create and deploy models
First, we define where our models are located in Amazon S3. These locations are used when we deploy our models in subsequent steps:
model_url = f"s3://{path_to_model_1}"
model_url2 = f"s3://{path_to_model_2}"
Next, we create the model objects with the image and model data. These model objects are used to deploy production variants on an endpoint. The models are developed by training ML models on different data sets, different algorithms or ML frameworks, and different hyperparameters:
from sagemaker.core import image_uris

model_name = f"DEMO-xgb-churn-pred-{datetime.now():%Y-%m-%d-%H-%M-%S}"
model_name2 = f"DEMO-xgb-churn-pred2-{datetime.now():%Y-%m-%d-%H-%M-%S}"
image_uri = get_image_uri(boto3.Session().region_name, 'xgboost', '0.90-1')
image_uri2 = get_image_uri(boto3.Session().region_name, 'xgboost', '0.90-2')

sm_session.create_model(
    name=model_name,
    role=role,
    container_defs={
        'Image': image_uri,
        'ModelDataUrl': model_url
    }
)

sm_session.create_model(
    name=model_name2,
    role=role,
    container_defs={
        'Image': image_uri2,
        'ModelDataUrl': model_url2
    }
)
We now create two production variants, each with its own different model and resource requirements (instance type and counts). This enables you to also test models on different instance types.
We set an initial_weight of 1 for both variants. This means that 50% of requests go to
Variant1, and the remaining 50% of requests to Variant2. The sum of weights
across both variants is 2 and each variant has weight assignment of 1. This means that each variant
receives 1/2, or 50%, of the total traffic.
from sagemaker.session import production_variant

variant1 = production_variant(
               model_name=model_name,
               instance_type="ml.m5.xlarge",
               initial_instance_count=1,
               variant_name='Variant1',
               initial_weight=1,
           )

variant2 = production_variant(
               model_name=model_name2,
               instance_type="ml.m5.xlarge",
               initial_instance_count=1,
               variant_name='Variant2',
               initial_weight=1,
           )
Finally we’re ready to deploy these production variants on a SageMaker AI endpoint.
endpoint_name = f"DEMO-xgb-churn-pred-{datetime.now():%Y-%m-%d-%H-%M-%S}"
print(f"EndpointName={endpoint_name}")

sm_session.endpoint_from_production_variants(
    name=endpoint_name,
    production_variants=[variant1, variant2]
)
Step 2: Invoke the deployed models
Now we send requests to this endpoint to get inferences in real time. We use both traffic distribution and direct targeting.
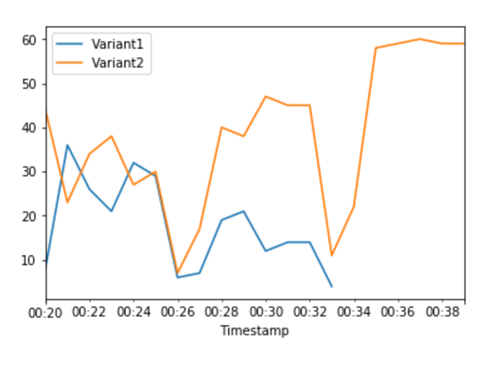
First, we use traffic distribution that we configured in the previous step. Each inference response contains the name of the production variant that processes the request, so we can see that traffic to the two production variants is roughly equal.
# get a subset of test data for a quick test
!tail -120 test_data/test-dataset-input-cols.csv > test_data/test_sample_tail_input_cols.csv
print(f"Sending test traffic to the endpoint {endpoint_name}. \nPlease wait...")

with open('test_data/test_sample_tail_input_cols.csv', 'r') as f:
    for row in f:
        print(".", end="", flush=True)
        payload = row.rstrip('\n')
        sm_runtime.invoke_endpoint(
            EndpointName=endpoint_name,
            ContentType="text/csv",
            Body=payload
        )
        time.sleep(0.5)

print("Done!")
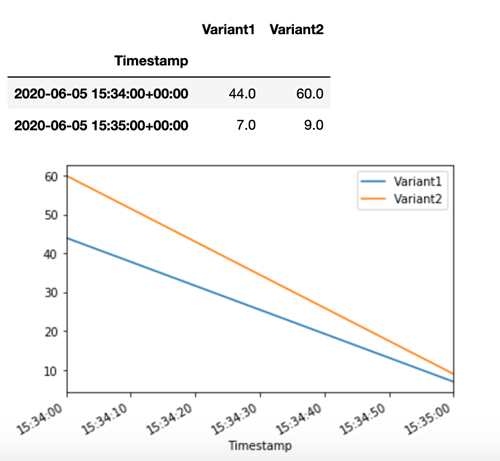
SageMaker AI emits metrics such as Latency and Invocations for each variant in
Amazon CloudWatch. For a complete list of metrics that SageMaker AI emits, see Amazon SageMaker AI metrics in Amazon CloudWatch. Let’s query CloudWatch to get the number of invocations per variant,
to show how invocations are split across variants by default:
Now let's invoke a specific version of the model by specifying Variant1 as the
TargetVariant in the call to invoke_endpoint.
print(f"Sending test traffic to the endpoint {endpoint_name}. \nPlease wait...")
with open('test_data/test_sample_tail_input_cols.csv', 'r') as f:
    for row in f:
        print(".", end="", flush=True)
        payload = row.rstrip('\n')
        sm_runtime.invoke_endpoint(
            EndpointName=endpoint_name,
            ContentType="text/csv",
            Body=payload,
            TargetVariant="Variant1"
        )
        time.sleep(0.5)
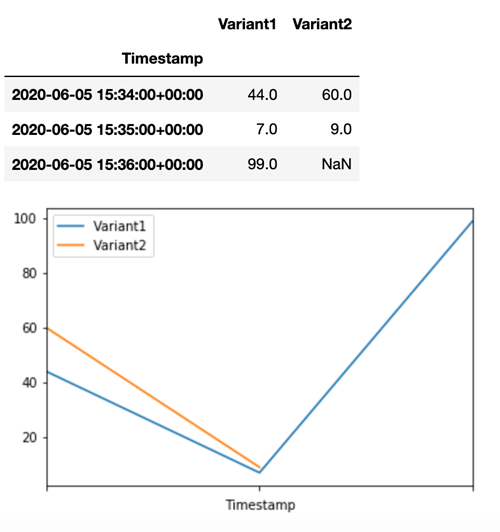
To confirm that all new invocations were processed by Variant1, we can query CloudWatch to get
the number of invocations per variant. We see that for the most recent invocations (latest timestamp),
all requests were processed by Variant1, as we had specified. There were no invocations
made for Variant2.
Step 3: Evaluate model performance
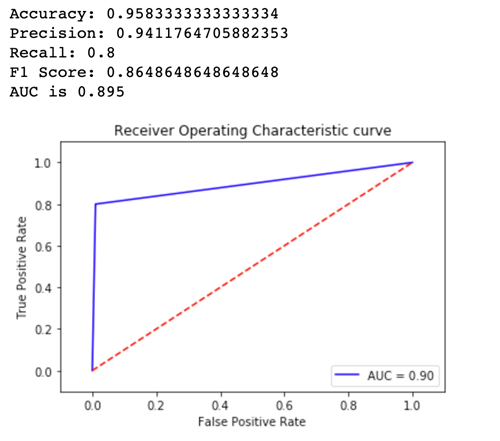
To see which model version performs better, let's evaluate the accuracy, precision, recall, F1 score,
and Receiver operating charactersistic/Area under the curve for each variant. First, let's look at these
metrics for Variant1:
Now let's look at the metrics for Variant2:
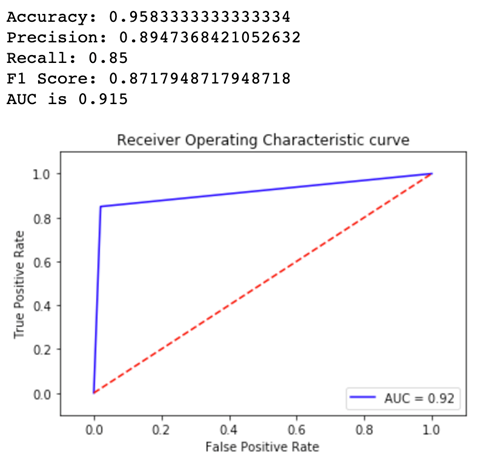
For most of our defined metrics, Variant2 is performing better, so this is the one that we
want to use in production.
Step 4: Increase traffic to the best model
Now that we have determined that Variant2 performs better than Variant1, we
shift more traffic to it. We can continue to use TargetVariant to invoke a specific model
variant, but a simpler approach is to update the weights assigned to each variant by calling UpdateEndpointWeightsAndCapacities. This changes the traffic distribution to your production
variants without requiring updates to your endpoint. Recall from the setup section that we set variant
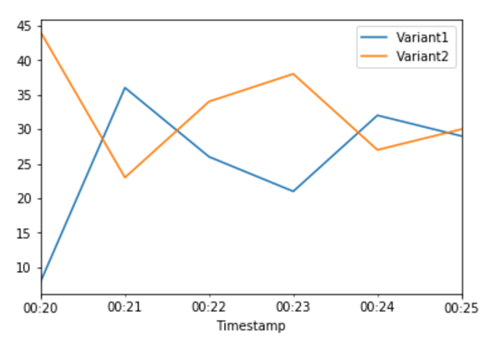
weights to split traffic 50/50. The CloudWatch metrics for the total invocations for each variant below show
us the invocation patterns for each variant:
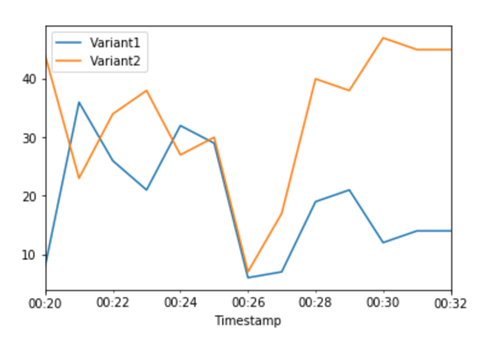
Now we shift 75% of the traffic to Variant2 by assigning new weights to each variant using
UpdateEndpointWeightsAndCapacities. SageMaker AI now sends 75% of the inference requests to
Variant2 and remaining 25% of requests to Variant1.
sm.update_endpoint_weights_and_capacities(
    EndpointName=endpoint_name,
    DesiredWeightsAndCapacities=[
        {
            "DesiredWeight": 25,
            "VariantName": variant1["VariantName"]
        },
        {
            "DesiredWeight": 75,
            "VariantName": variant2["VariantName"]
        }
    ]
)
The CloudWatch metrics for total invocations for each variant shows us higher invocations for
Variant2 than for Variant1:
We can continue to monitor our metrics, and when we're satisfied with a variant's performance, we can
route 100% of the traffic to that variant. We use UpdateEndpointWeightsAndCapacities
to update the traffic assignments for the variants. The weight for Variant1 is set to 0 and
the weight for Variant2 is set to 1. SageMaker AI now sends 100% of all inference requests to
Variant2.
sm.update_endpoint_weights_and_capacities(
    EndpointName=endpoint_name,
    DesiredWeightsAndCapacities=[
        {
            "DesiredWeight": 0,
            "VariantName": variant1["VariantName"]
        },
        {
            "DesiredWeight": 1,
            "VariantName": variant2["VariantName"]
        }
    ]
)
The CloudWatch metrics for the total invocations for each variant show that all inference requests are being
processed by Variant2 and there are no inference requests processed by
Variant1.
You can now safely update your endpoint and delete Variant1 from your endpoint. You can
also continue testing new models in production by adding new variants to your endpoint and following
steps 2 - 4.