Create or Open an Amazon SageMaker Studio Classic Notebook
Important
Custom IAM policies that allow Amazon SageMaker Studio or Amazon SageMaker Studio Classic to create Amazon SageMaker resources must also grant permissions to add tags to those resources. The permission to add tags to resources is required because Studio and Studio Classic automatically tag any resources they create. If an IAM policy allows Studio and Studio Classic to create resources but does not allow tagging, "AccessDenied" errors can occur when trying to create resources. For more information, see Provide permissions for tagging SageMaker AI resources.
Amazon managed policies for Amazon SageMaker AI that give permissions to create SageMaker resources already include permissions to add tags while creating those resources.
Note
As of November 30, 2023, the previous Amazon SageMaker Studio experience is now named Amazon SageMaker Studio Classic. The following section is specific to using the Studio Classic application. For information about using the updated Studio experience, see Amazon SageMaker Studio.
Studio Classic is still maintained for existing workloads but is no longer available for onboarding. You can only stop or delete existing Studio Classic applications and cannot create new ones. We recommend that you migrate your workload to the new Studio experience.
When you Create a Notebook from the File Menu in Amazon SageMaker Studio Classic or Open a notebook in Studio Classic for the first time, you are
prompted to set up your environment by choosing a SageMaker image, a kernel, an instance type, and,
optionally, a lifecycle configuration script that runs on image start-up. SageMaker AI launches the
notebook on an instance of the chosen type. By default, the instance type is set to
ml.t3.medium (available as part of the Amazon
Free Tierml.g4dn.xlarge.
If you create or open additional notebooks that use the same instance type, whether or not the notebooks use the same kernel, the notebooks run on the same instance of that instance type.
After you launch a notebook, you can change its instance type, SageMaker image, and kernel from within the notebook. For more information, see Change the Instance Type for an Amazon SageMaker Studio Classic Notebook and Change the Image or a Kernel for an Amazon SageMaker Studio Classic Notebook.
Note
You can have only one instance of each instance type. Each instance can have multiple SageMaker images running on it. Each SageMaker image can run multiple kernels or terminal instances.
Billing occurs per instance and starts when the first instance of a given instance type is launched. If you want to create or open a notebook without the risk of incurring charges, open the notebook from the File menu and choose No Kernel from the Select Kernel dialog box. You can read and edit a notebook without a running kernel but you can't run cells.
Billing ends when the SageMaker image for the instance is shut down. For more information, see Usage Metering for Amazon SageMaker Studio Classic Notebooks.
For information about shutting down the notebook, see Shut down resources.
Topics
Open a notebook in Studio Classic
Amazon SageMaker Studio Classic can only open notebooks listed in the Studio Classic file browser. For instructions on uploading a notebook to the file browser, see Upload Files to Amazon SageMaker Studio Classic or Clone a Git Repository in Amazon SageMaker Studio Classic.
To open a notebook
-
In the left sidebar, choose the File Browser icon (
 ) to display the file browser.
 -
Browse to a notebook file and double-click it to open the notebook in a new tab.
Create a Notebook from the File Menu
To create a notebook from the File menu
-
From the Studio Classic menu, choose File, choose New, and then choose Notebook.
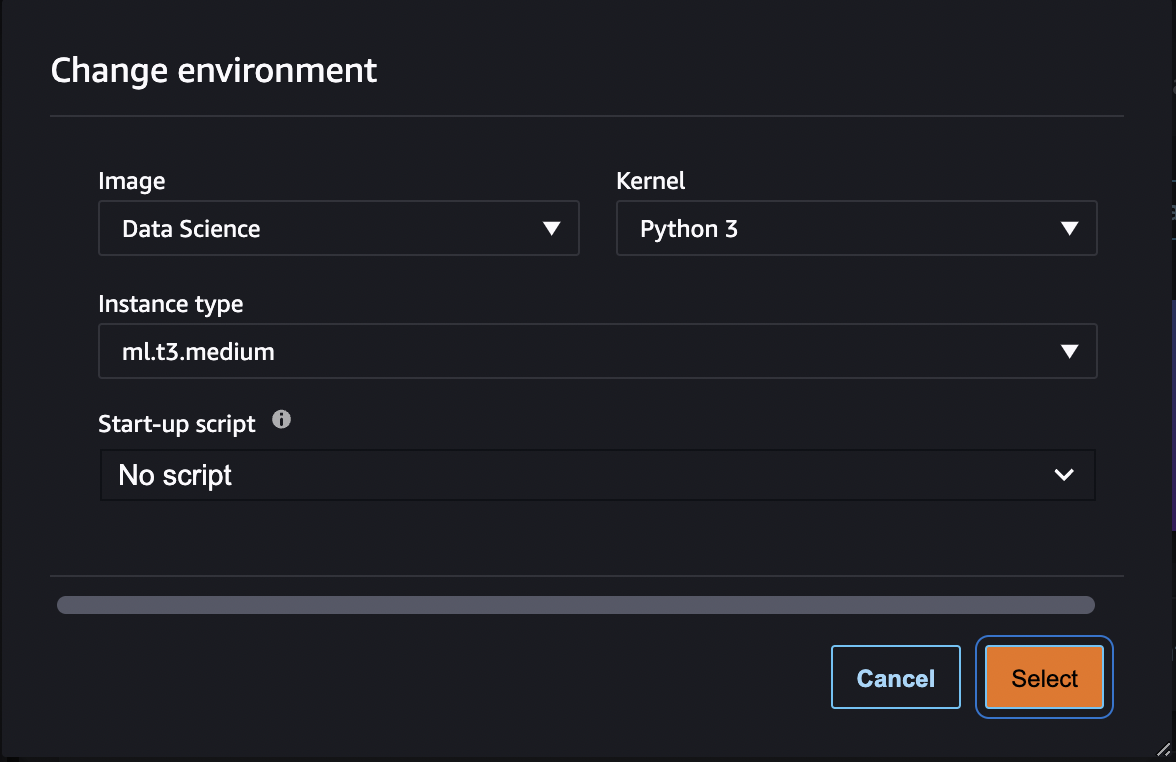
-
In the Change environment dialog box, use the dropdown menus to select your Image, Kernel, Instance type, and Start-up script, then choose Select. Your notebook launches and opens in a new Studio Classic tab.
Create a Notebook from the Launcher
To create a notebook from the Launcher
-
To open the Launcher, choose Amazon SageMaker Studio Classic at the top left of the Studio Classic interface or use the keyboard shortcut
Ctrl + Shift + L.To learn about all the available ways to open the Launcher, see Use the Amazon SageMaker Studio Classic Launcher
-
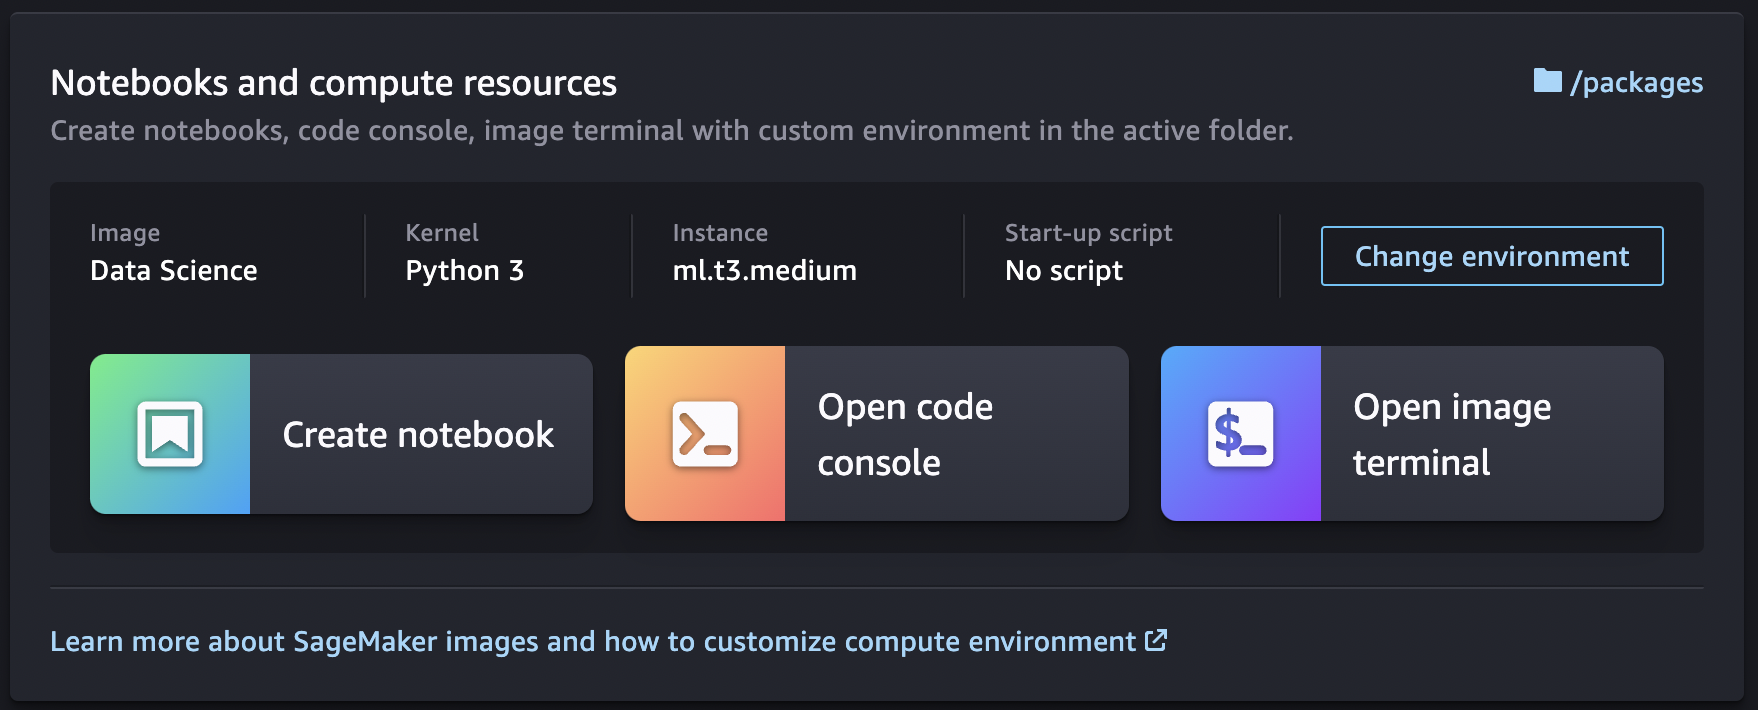
In the Launcher, in the Notebooks and compute resources section, choose Change environment.
-
In the Change environment dialog box, use the dropdown menus to select your Image, Kernel, Instance type, and Start-up script, then choose Select.
-
In the Launcher, choose Create notebook. Your notebook launches and opens in a new Studio Classic tab.
To view the notebook's kernel session, in the left sidebar, choose the Running
Terminals and Kernels icon (
![]() ). You can stop the notebook's kernel session from this view.
). You can stop the notebook's kernel session from this view.
List of the available instance types, images, and kernels
For a list of all available resources, see: