Adding Amazon Web Services Marketplace Products to Your Portfolio
You can add Amazon Web Services Marketplace products to your portfolios to make those products available to your Amazon Service Catalog end users.
Amazon Web Services Marketplace is an online store in which you can find, subscribe to, and
immediately start using a large selection of software and services. The types of products in
Amazon Web Services Marketplace include databases, application servers, testing tools, monitoring tools, content
management tools, and business intelligence software. Amazon Web Services Marketplace is available at http://www.amazonaws.cn/marketplace
You distribute an Amazon Web Services Marketplace product to Amazon Service Catalog end users by copying the product with the Amazon CloudFormation template to Amazon Service Catalog, and then adding the product to a portfolio.
Note
Amazon Service Catalog does not support distributing Amazon Web Services Marketplace products to Amazon Service Catalog end users using a Terraform Open Source or Terraform Cloud product template.
Amazon Web Services Marketplace supports Amazon Service Catalog directly or subscribe and add products using the manual option. We recommend adding products using the functionality specifically designed for Amazon Service Catalog.
Managing Amazon Web Services Marketplace Products Using Amazon Service Catalog
You can add your subscribed Amazon Web Services Marketplace products directly to Amazon Service Catalog using a custom interface. In
Amazon Web Services Marketplace
Managing and Adding Amazon Web Services Marketplace Products Manually
Complete the following steps to subscribe to an Amazon Web Services Marketplace product, define that product in an Amazon CloudFormation template, and add the template to a Amazon Service Catalog portfolio.
To subscribe to an Amazon Web Services Marketplace product
-
Go to Amazon Web Services Marketplace at http://www.amazonaws.cn/marketplace
. -
Browse the products or search to find the product that you want to add to your Amazon Service Catalog portfolio. Choose the product to view the product details page.
-
Choose Continue to view the fulfillment page, and then choose the Manual Launch tab.
The information on the fulfillment page includes the supported Amazon Elastic Compute Cloud (Amazon EC2) instance types, the supported Amazon Web Services Regions, and the Amazon Machine Image (AMI) ID that the product uses for each Amazon region. Note that some choices will affect cost. You will use this information to customize the Amazon CloudFormation template in later steps.
-
Choose Accept Terms to subscribe to the product.
After you subscribe to a product, you can access the information on the product fulfillment page in Amazon Web Services Marketplace at any time by choosing Your Software, and then choosing the product.
To define your Amazon Web Services Marketplace product in an Amazon CloudFormation template
To complete the following steps, you will use one of the Amazon CloudFormation sample templates as a starting point, and you will customize the template so that it represents your Amazon Web Services Marketplace product. To access the sample templates, see Sample Templates in the Amazon CloudFormation User Guide.
-
On the Sample Templates page in the Amazon CloudFormation User Guide, choose an Amazon Region for your product. The Amazon Region must be supported by your Amazon Web Services Marketplace product. You can view the supported regions on the product fulfillment page in Amazon Web Services Marketplace.
-
To view a list of service sample templates that are appropriate for the Region, choose the Services link.
-
You can use any of the samples that are appropriate for your needs as a starting point. The steps in this procedure use the Amazon EC2 instance in a security group template. To view the sample template, choose View , and then save a copy of the template locally so that you can edit it. Your local file must have the
.templateextension. -
Open your template file in a text editor.
-
Customize the description at the top of the template. Your description might look like the following example:
"Description": "Launches a LAMP stack from Amazon Web Services Marketplace", -
Customize the
InstanceTypeparameter so that it includes only EC2 instance types that are supported by your product. If your template includes unsupported EC2 instance types, the product will fail to launch for your end users.-
On the product fulfillment page in Amazon Web Services Marketplace, view the supported EC2 instance types in the Pricing Details section.
-
In your template, change the default instance type to a supported EC2 instance type of your choice.
-
Edit the
AllowedValueslist so that it includes only EC2 instance types that are supported by your product. -
Remove any EC2 instance types that you do not want your end users to use when they launch the product from the
AllowedValueslist .
When you are done editing the
InstanceTypeparameter, it might look similar to the following example:"InstanceType" : { "Description" : "EC2 instance type", "Type" : "String", "Default" : "m1.small", "AllowedValues" : [ "t1.micro", "m1.small", "m1.medium", "m1.large", "m1.xlarge", "m2.xlarge", "m2.2xlarge", "m2.4xlarge", "c1.medium", "c1.xlarge", "c3.large", "c3.large", "c3.xlarge", "c3.xlarge", "c3.4xlarge", "c3.8xlarge" ], "ConstraintDescription" : "Must be a valid EC2 instance type." }, -
-
In the
Mappingssection of your template, edit theAWSInstanceType2Archmappings so that only supported EC2 instance types and architectures are included.-
Edit the list of mappings by removing all EC2 instance types that are not included in the
AllowedValueslist for theInstanceTypeparameter. -
Edit the
Archvalue for each EC2 instance type to be the architecture type that is supported by your product. Valid values arePV64,HVM64, andHVMG2. To learn which architecture your product supports, refer to the product details page in Amazon Web Services Marketplace. To learn which architectures are supported by EC2 instance families, see Amazon Linux AMI Instance Type Matrix.
When you have finished editing the
AWSInstanceType2Archmappings, it might look similar to the following example:"AWSInstanceType2Arch" : { "t1.micro" : { "Arch" : "PV64" }, "m1.small" : { "Arch" : "PV64" }, "m1.medium" : { "Arch" : "PV64" }, "m1.large" : { "Arch" : "PV64" }, "m1.xlarge" : { "Arch" : "PV64" }, "m2.xlarge" : { "Arch" : "PV64" }, "m2.2xlarge" : { "Arch" : "PV64" }, "m2.4xlarge" : { "Arch" : "PV64" }, "c1.medium" : { "Arch" : "PV64" }, "c1.xlarge" : { "Arch" : "PV64" }, "c3.large" : { "Arch" : "PV64" }, "c3.xlarge" : { "Arch" : "PV64" }, "c3.2xlarge" : { "Arch" : "PV64" }, "c3.4xlarge" : { "Arch" : "PV64" }, "c3.8xlarge" : { "Arch" : "PV64" } } , -
-
In the
Mappingssection of your template, edit theAWSRegionArch2AMImappings to associate each Amazon Region with the corresponding architecture and AMI ID for your product.-
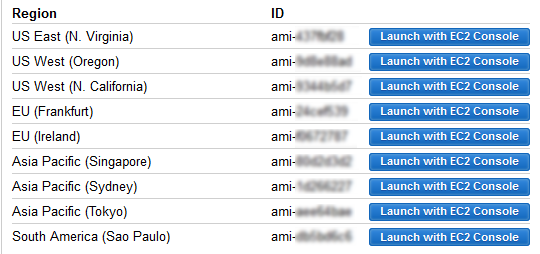
On the product fulfillment page in Amazon Web Services Marketplace, view the AMI ID that your product uses for each Amazon Region, as in the following example:
-
In your template, remove the mappings for any Amazon Regions that you do not support.
-
Edit the mapping for each region to remove the unsupported architectures (
PV64,HVM64, orHVMG2) and their associated AMI IDs. -
For each remaining Amazon Region and architecture mapping, specify the corresponding AMI ID from the product details page in Amazon Web Services Marketplace.
When you have finished editing the
AWSRegionArch2AMImappings, your code might look similar to the following example:"AWSRegionArch2AMI" : { "us-east-1" : {"PV64" : "ami-nnnnnnnn"}, "us-west-2" : {"PV64" : "ami-nnnnnnnn"}, "us-west-1" : {"PV64" : "ami-nnnnnnnn"}, "eu-west-1" : {"PV64" : "ami-nnnnnnnn"}, "eu-central-1" : {"PV64" : "ami-nnnnnnnn"}, "ap-northeast-1" : {"PV64" : "ami-nnnnnnnn"}, "ap-southeast-1" : {"PV64" : "ami-nnnnnnnn"}, "ap-southeast-2" : {"PV64" : "ami-nnnnnnnn"}, "sa-east-1" : {"PV64" : "ami-nnnnnnnn"} }You can now use the template to add the product to a Amazon Service Catalog portfolio. If you want to make additional changes, see Working with Amazon CloudFormation Templates to learn more about templates.
-
To add your Amazon Web Services Marketplace product to a Amazon Service Catalog portfolio
-
Sign in to the Amazon Web Services Management Console and navigate to the Amazon Service Catalog administrator console at https://console.amazonaws.cn/servicecatalog/
. -
On the Portfolios page, choose the portfolio to which you want to add your Amazon Web Services Marketplace product.
-
On the portfolio details page, choose Upload new product.
-
Type the requested product and support details.
-
On the Version details page, choose Upload a template file, choose Browse, and then choose your template file.
-
Type a version title and description.
-
Choose Next.
-
On the Review page, verify that the summary is accurate, and then choose Confirm and upload. The product is added your portfolio. It is now available to end users who have access to the portfolio.