Developing workflows in Step Functions Workflow Studio
When editing a workflow in the Amazon Step Functions console, you'll use a visual tool called Workflow Studio. With Workflow Studio, you can drag-and-drop states onto a canvas to build your workflows. You can add, edit, and configure states, set input and output filters, transform results, and set up error handling.
As you modify states in your workflow, Workflow Studio will validate and auto-generate the state machine definition. You can review the generated code, edit the configuration, and even modify the text definition with the built-in code editor. When you're finished, you can save your workflow, run it, and then examine the results.
You can access Workflow Studio from the Step Functions console, when you create or edit a workflow.
You can also use Workflow Studio from within Amazon Infrastructure Composer, a visual designer to create infrastructure as code with Amazon Serverless Application Model and Amazon CloudFormation. To discover the benefits of this approach, see Using Workflow Studio in Infrastructure Composer.
Workflow Studio has three modes: Design, Code, and Config. In Design mode, you can drag-and-drop states onto the canvas. Code mode provides a built-in code editor for editing your workflow definitions within the console. In Config mode, you can manage your workflow configuration.
Working with Workflow Studio in Visual Studio Code
With the Amazon toolkit, you can use Workflow Studio from within VS Code to visualize, build, and even test individual states in your state machines. You provide state inputs and set variables, start the test, then you can see how your data is transformed. You can adjust the workflow and re-test. When finished, you can apply the changes to update the state machine. For more information, see Working with Workflow Studio in the Amazon Toolkit for Visual Studio Code.
Design mode
Design mode provides a graphical interface to visualize your workflows as you build their prototypes. The following image shows the states browser, workflow canvas, inspector, and contextual help panels in the Design mode of Workflow Studio.
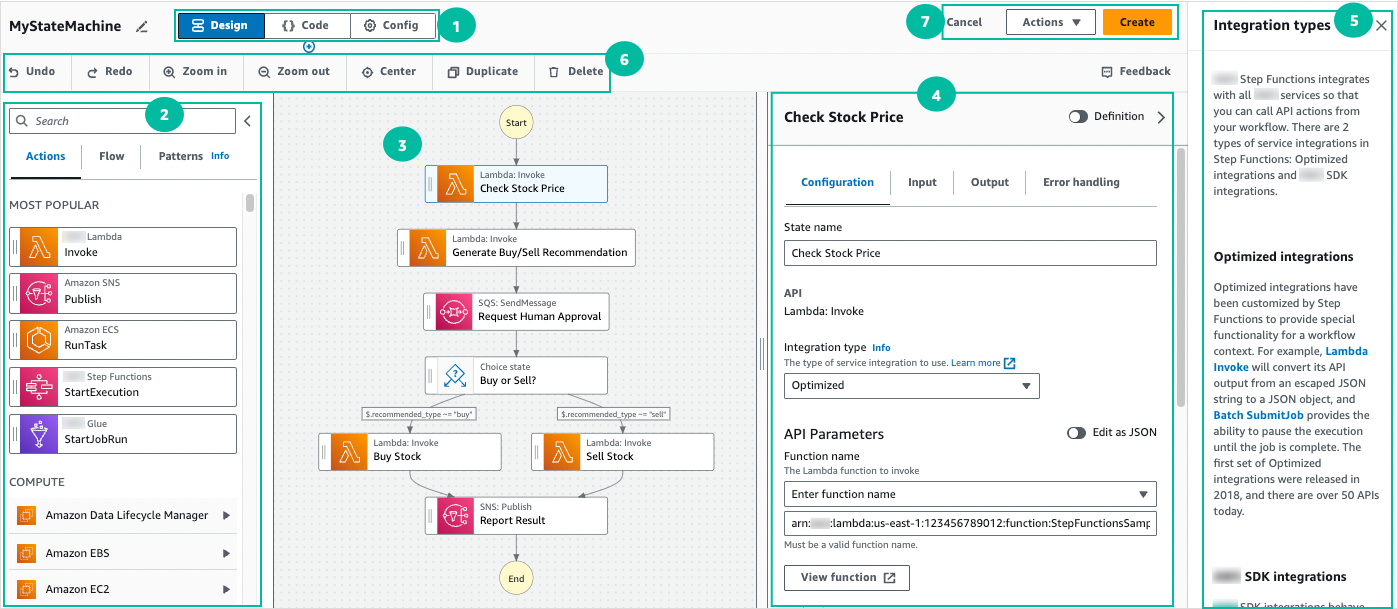
Mode buttons switch between the three modes. You cannot switch modes if your ASL workflow definition is invalid.
-
The States browser contains the following three tabs:
-
The Actions tab provides a list of Amazon APIs that you can drag and drop into your workflow graph in the canvas. Each action represents a Task workflow state state.
-
The Flow tab provides a list of flow states that you can drag and drop into your workflow graph in the canvas.
-
The Patterns tab provides several ready-to-use, reusable building blocks that you can use for a variety of use cases. For example, you can use these patterns to iteratively process data in an Amazon S3 bucket.
-
-
The Canvas and workflow graph is where you drag and drop states into your workflow graph, change the order of states, and select states to configure or view.
-
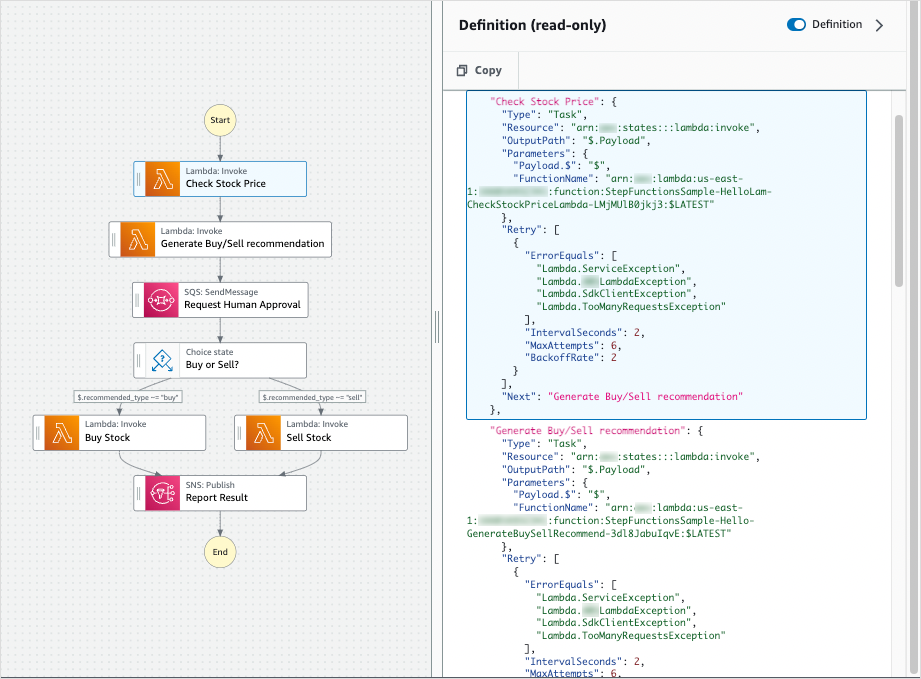
The Inspector panel panel is where you can view and edit the properties of any state you've selected on the canvas. Turn on the Definition toggle to view the Amazon States Language code for your workflow, with the currently selected state highlighted.
-
Info links open a panel with contextual information when you need help. These panels also include links to related topics in the Step Functions documentation.
-
Design toolbar – Contains a set of buttons to perform common actions, such as undo, delete, and zoom in.
Utility buttons – A set of buttons to perform tasks, such as saving your workflows or exporting their ASL definitions in a JSON or YAML file.
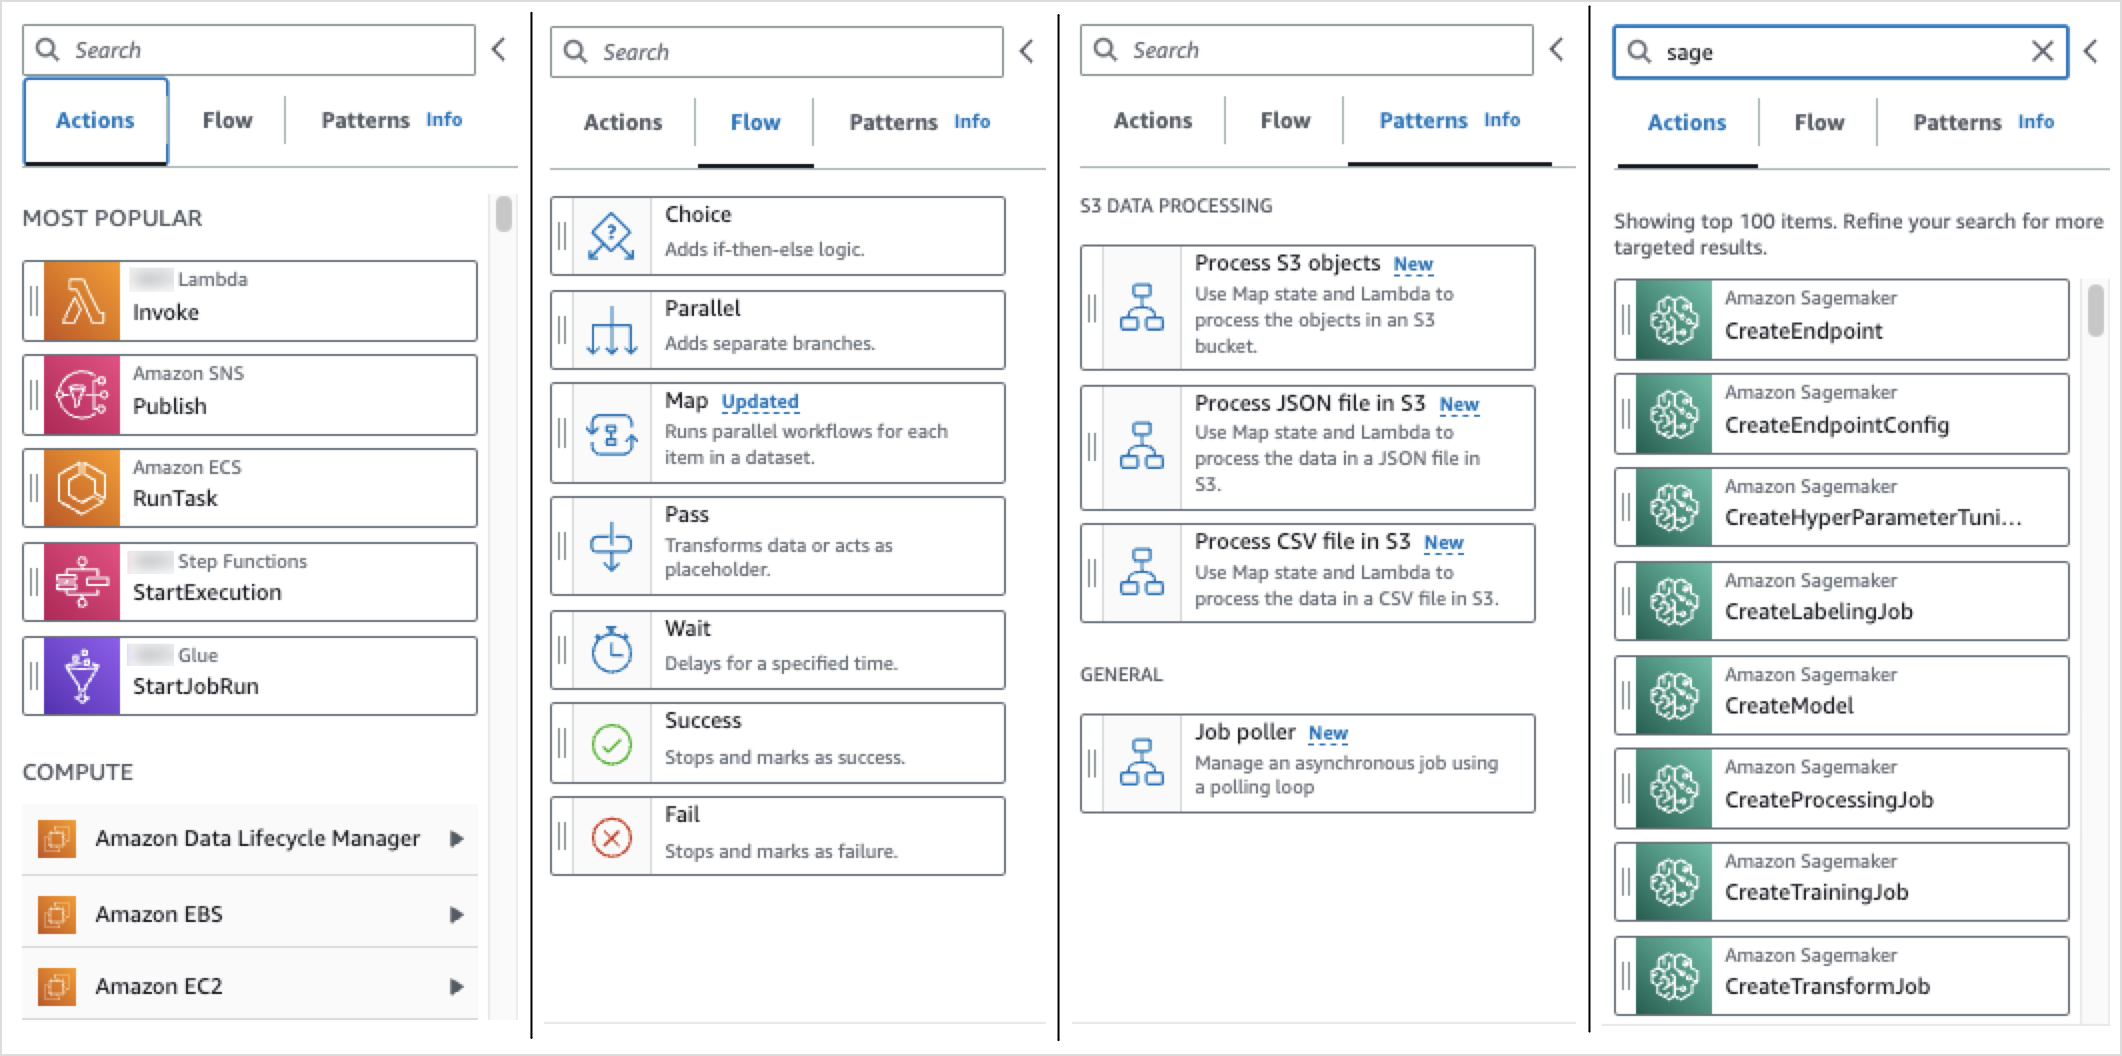
States browser
From the States browser, you can select states to drag and drop on to your workflow canvas. The Actions tab provides a list of task states that connect to 3rd party HTTP endpoints and Amazon APIs. The Flow tab provides a list of states with which you can direct and control your workflow. Flow states include: Choice, Parallel, Map, Pass, Wait, Success, and Fail. The Patterns tab provides ready-to-use, reusable pre-defined building blocks. You can search among all state types with the search box at the top of the panel.
Canvas and workflow graph
After you choose a state to add to your workflow, you can drag it to the canvas and drop it into your workflow graph. You can also drag and drop states to move them within your workflow. If your workflow is large, you can zoom in or out to view different parts of your workflow graph in the canvas.
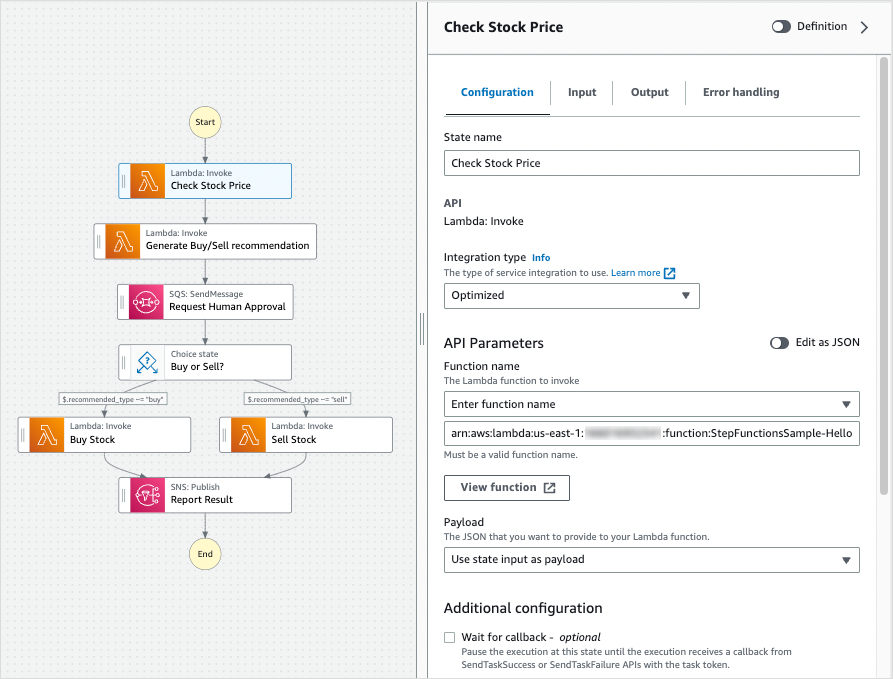
Inspector panel
You can configure any states that you add to your workflow from the Inspector panel on the right. Choose the state you want to configure, and you will see its configuration options in the Inspector panel. To see the auto-generated ASL definition for your workflow code, turn on the Definition toggle. The ASL definition associated with the state you've selected will appear highlighted.
Code mode
In Code mode of Workflow Studio, you can use an integrated code editor to view, write, and edit the Using Amazon States Language to define Step Functions workflows (ASL) definition of your workflows within the Step Functions console. The following screenshot shows the components in the Code mode.
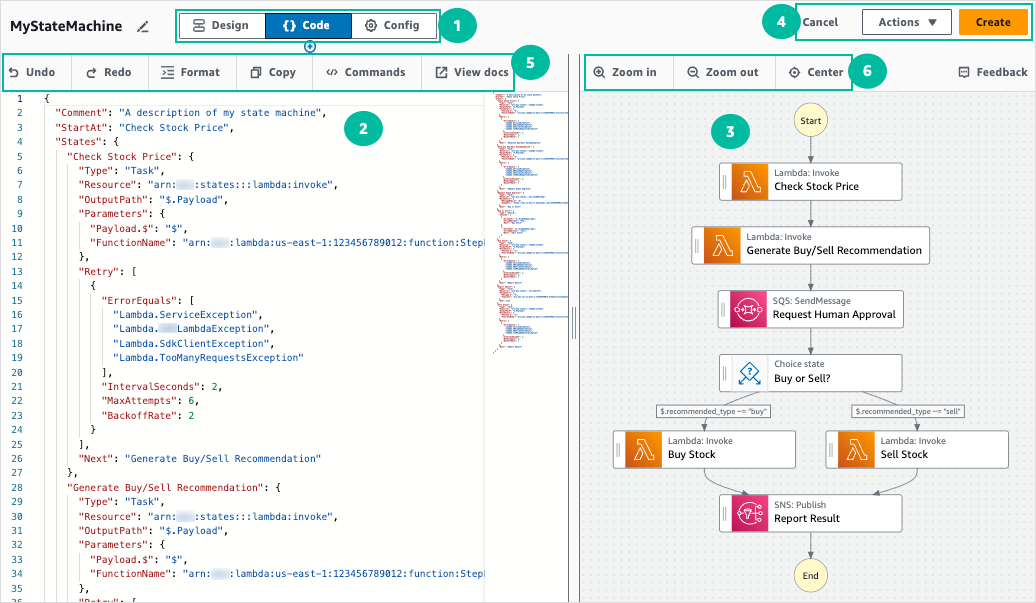
Mode buttons switch between the three modes. You cannot switch modes if your ASL workflow definition is invalid.
-
The Code editor is where you write and edit the ASL definition of your workflows within the Workflow Studio. The code editor also provides features, such as syntax highlighting and auto-completion.
-
Graph visualization – Shows a real-time graphical visualization of your workflow.
Utility buttons – A set of buttons to perform tasks, such as saving your workflows or exporting their ASL definitions in a JSON or YAML file.
-
Code toolbar – Contains a set of buttons to perform common actions, such as undoing an action or formatting the code.
-
Graph toolbar – Contains a set of buttons to perform common actions, such as zooming in and zooming out the workflow graph.
Code editor
The code editor provides an IDE-like experience to write and edit your workflow definitions using JSON within the Workflow Studio. The code editor includes several features, such as syntax highlighting, auto-complete suggestions, ASL definition validation, and context-sensitive help display. As you update your workflow definition, the Graph visualization renders a real-time graph of your workflow. You can also see the updated workflow graph in the Design mode.
If you select a state in the Design mode or the graph visualization pane, the ASL definition of that state appears highlighted in the code editor. The ASL definition of your workflow is automatically updated if you reorder, delete, or add a state in the Design mode or the graph visualization pane.
The code editor can make suggestions to auto-complete fields and states.
-
To see a list of fields you can include within a specific state, press
Ctrl+Space. -
To generate a code snippet for a new state in your workflow press
Ctrl+Spaceafter the current state's definition. -
To display a list of all available commands and keyboard shortcuts, press
F1.
Graph visualization
The graph visualization panel shows your workflow in a graphical format. When you write your workflow definitions in the Code editor of Workflow Studio, the graph visualization pane renders a real-time graph of your workflow.
As you reorder, delete, or duplicate a state in the graph visualization pane, the workflow definition in the Code editor is automatically updated. Similarly, as you update your workflow definitions, reorder, delete, or add a state in the Code editor, the visualization is automatically updated.
If the JSON in the ASL definition of your workflow is invalid, the graph visualization panel pauses the rendering and displays a status message at the bottom of the pane.
Config mode
In the Config mode of Workflow Studio, you can manage the general configuration of your state machines. In this mode, you can specify settings, such as the following:
-
Details: Set the workflow name and type. Note that both cannot be changed after you create the state machine.
-
Permissions : you can create a new role (recommended), choose an existing role, or enter an ARN for a specific role. If you select the option to create a new role, Step Functions creates an execution role for your state machines using least privileges. The generated IAM roles are valid for the Amazon Web Services Region in which you create the state machine. Prior to creation, you can review the permissions that Step Functions will automatically generate for your state machine.
-
Logging: You can enable and set a log level for your state machine. Step Functions logs the execution history events based on your selection. You can optionally use a customer managed key to encrypt your logs. For more information about log levels, see Log levels for Step Functions execution events.
In Additional configuration, you can set one or more of the following optional configuration options:
-
Enable X-Ray tracing: You can send traces to X-Ray for state machine executions, even when a trace ID is not passed by an upstream service. For more information, see Trace Step Functions request data in Amazon X-Ray.
-
Publish version on creation: A version is a numbered, immutable snapshot of a state machine that you can run. Choose this option to publish a version of your state machine while creating the state machine. Step Functions publishes version 1 as the first revision of the state machine. For more information about versions, see State machine versions in Step Functions workflows.
-
Encrypt with customer managed key : You can provide a key that you mange directly to encrypt your data. For information, see Data at rest encryption
-
Tags: Choose this box to add tags that can help you track and manage the costs associated with your resources, and provide better security in your IAM policies. For more information about tags, see Tagging state machines and activities in Step Functions.