Creating a workflow with Workflow Studio in Step Functions
Learn to create, edit, and run workflows using Step Functions Workflow Studio. After your workflow is ready, you can save, run, and export it.
In this topic
Create a state machine
In Workflow Studio, you can either choose a starter template or a blank template to create a workflow.
A starter template is a ready-to-run sample project that automatically creates the workflow prototype and definition, and deploys all the related Amazon resources that your project needs to your Amazon Web Services account. You can use these starter templates to deploy and run them as is, or use the workflow prototypes to build on them. For more information about starter templates, see Deploy a state machine using a starter template for Step Functions.
With a blank template, you use the Design or Code mode to create your custom workflow.
Create a state machine using a starter template
-
Open the Step Functions console
and choose Create state machine. -
In the Choose a template dialog box, do one of the following to choose a sample project:
-
Type
Task Timerin the Search by keyword box, and then choose Task Timer from the search results. -
Browse through the sample projects listed under All on the right pane, and then choose Task Timer.
-
-
Choose Next to continue.
-
Choose how to use the template:
-
Choose Use template to continue with your selection.
-
Run a demo – creates a read-only state machine. After review, you can create the workflow and all related resources.
-
Build on it – provides an editable workflow definition that you can review, customize, and deploy with your own resources. (Related resources, such as functions or queues, will not be created automatically.)
Create a workflow using a blank template
When you want to start from a clean canvas, create a workflow from the blank template.
-
Open the Step Functions console
. -
Choose Create state machine.
-
Choose Create from blank.
-
Name your state machine, then choose Continue to edit your state machine in Workflow Studio.
You can now start designing your workflow in Design mode or writing your workflow definition in Code mode.
-
Choose Config to manage the configuration of your workflow in the Config mode. For example, provide a name for your workflow and choose its type.
Design a workflow
When you know the name of the state you want to add, use the search box at the top of the States browser to find it. Otherwise, look for the state you need in the browser and add it onto the canvas.
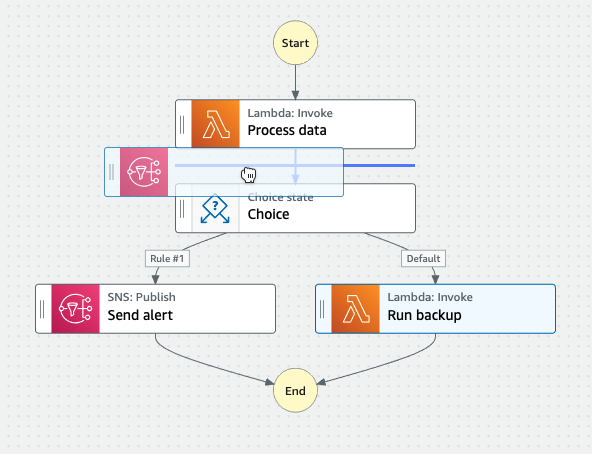
You can reorder states in your workflow by dragging them to a different location in your workflow. As you drag a state onto the canvas, a line appears to show where the state will be inserted into your workflow, as shown in the following screenshot:
After a state is dropped onto the canvas, its code is auto-generated and added inside the workflow definition. To see the definition, turn on the Definition toggle on the Inspector panel. You can choose Code mode to edit the definition with the built-in code editor.
After you drop a state onto the canvas, you can configure it in the Inspector panel panel on the right. This panel contains the Configuration, Input, Output, and Error Handling tabs for each of the state or API action that you place on the canvas. You configure the states you include in your workflows in the Configuration tab.
For example, the Configuration tab for Lambda Invoke API action provides the following options:
-
State name: You can identify the state with a custom name or accept the default generated name.
-
API shows which API action is used by the state.
-
Integration type: You can choose the service integration type used to call API actions on other services.
-
Function name provides options to:
-
Enter a function name: You can enter your function name or its ARN.
-
Get function name at runtime from state input: You can use this option to dynamically get the function name from the state input based on the path you specify.
-
Select function name: You can directly select from the functions available in your account and region.
-
-
Payload : you can choose to use the state input, a JSON object, or no payload to pass as the payload to your Lambda function. If you choose JSON, you can include both static values and values selected from the state input.
-
(Optional) Some states will have an option to select Wait for task to complete or Wait for callback. When available, you can choose one of the following service integration patterns:
-
No option selected: Step Functions will use the Request Response integration pattern. Step Functions will wait for an HTTP response and then progress to the next state. Step Functions will not wait for a job to complete. When no options are available, the state will use this pattern.
-
Wait for task to complete: Step Functions will use the Run a Job (.sync) integration pattern.
-
Wait for callback: Step Functions will use the Wait for a Callback with Task Token integration pattern.
-
-
(Optional) To access resources configured in different Amazon Web Services accounts within your workflows, Step Functions provides cross-account access. IAM role for cross-account access provides options to:
-
Provide IAM role ARN: Specify the IAM role that contains appropriate resource access permissions. These resources are available in a target account, which is an Amazon Web Services account to which you make cross-account calls.
-
Get IAM role ARN at runtime from state input: Specify a reference path to an existing key-value pair in the state’s JSON input which contains the IAM role.
-
-
Next state lets you to select the state you want to transition to next.
-
(Optional) Comment field will not affect the workflow, but you can be use it to annotate your workflow.
Some states will have additional generic configuration options. For example, the Amazon ECS
RunTask state configuration contains an API Parameters
field populated with placeholder values. For these states, you can replace the
placeholder values with configurations that are suited to your needs.
To delete a state
You can press backspace, right-click and choose Delete state, or choose Delete on the Design toolbar.
Run your workflow
When your workflow is ready to go, you can run it and view its execution from the Step Functions console
To run a workflow in Workflow Studio
-
In the Design, Code, or Config mode, choose Execute.
The Start execution dialog box opens in a new tab.
-
In the Start execution dialog box, do the following:
-
(Optional) Enter a custom execution name to override the generated default.
Non-ASCII names and logging
Step Functions accepts names for state machines, executions, activities, and labels that contain non-ASCII characters. Because such characters will prevent Amazon CloudWatch from logging data, we recommend using only ASCII characters so you can track Step Functions metrics.
-
(Optional) In the Input box, enter input values in JSON format to run your workflow.
-
Choose Start execution.
-
The Step Functions console directs you to a page that's titled with your execution ID, known as the Execution Details page. You can review the execution results as the workflow progresses and after it completes.
To review the execution results, choose individual states on the Graph view, and then choose the individual tabs on the Step details pane to view each state's details including input, output, and definition respectively. For details about the execution information you can view on the Execution Details page, see Execution details overview.
-
Edit your workflow
You can edit an existing workflow visually in the Design mode of Workflow Studio.
In the Step Functions console
You can also edit the workflow definition in Code mode. Choose the Code button to view or edit the workflow definition in Workflow Studio.
Note
If you see errors in your workflow, you must fix them in Design mode. You can't switch to the Code or Config mode if any errors exist in your workflow.
When you save changes to your workflow, you have the option to also publish a new version. With versions, you can choose to run the original or alternate versions of your workflow. To learn more about managing workflows with versions, see State machine versions in Step Functions workflows
Export your workflow
You can export your workflow's Amazon States Language (ASL) definition and your workflow graph:
-
Choose your workflow in the Step Functions console
. -
On the State machine detail page, choose Edit.
-
Choose the Actions dropdown button, and then do one or both of the following:
-
To export the workflow graph to an SVG or PNG file, under Export graph, select the format you want.
-
To export the workflow definition as a JSON or YAML file, under Export definition, select the format you want.
-
Creating a workflow prototype with placeholders
You can use Workflow Studio or Workflow Studio in Infrastructure Composer to create prototypes of new workflows that contain placeholder resources which are named resources that do not exist yet.
To create a workflow prototype:
-
Sign in to the Step Functions console
. -
Choose Create state machine.
-
Choose Create from blank.
-
Name your state machine, then choose Continue to edit your state machine in Workflow Studio.
-
The Design mode of Workflow Studio opens. Design your workflow in Workflow Studio. To include placeholder resources:
-
Choose the state for which you want to include a placeholder resource, and then in Configuration:
-
For Lambda Invoke states, choose Function name, then choose Enter function name. You can also enter a custom name for your function.
-
For Amazon SQS Send Message states, choose Queue URL, then choose Enter queue URL. Enter a placeholder queue URL.
-
For Amazon SNS Publish states, from Topic, choose a topic ARN.
-
For all other states listed under Actions, you can use the default configuration.
Note
If you see errors in your workflow, you must fix them in Design mode. You can't switch to the Code or Config mode if any errors exist in your workflow.
-
-
(Optional) To view the auto-generated ASL definition of your workflow, choose Definition.
-
(Optional) To update the workflow definition in Workflow Studio, choose the Code button.
Note
If you see errors in your workflow definition, you must fix them in Code mode. You can't switch to the Design or Config mode if any errors exist in your workflow definition.
-
-
(Optional) To edit the state machine name, choose the edit icon next to the default state machine name of MyStateMachine and specify a name in the State machine name box.
You can also switch to the Config mode to edit the default state machine name.
-
Specify your workflow settings, such as state machine type and its execution role.
-
Choose Create.
You've now created a new workflow with placeholder resources that can be used to prototype. You can export your workflow definition and the workflow graph.
-
To export your workflow definition as a JSON or YAML file, in the Design or Code mode, choose the Actions dropdown button. Then, under Export definition, select the format you want to export. You can use this exported definition as the starting point for local development with the Amazon Toolkit for Visual Studio Code.
-
To export your workflow graph to an SVG or PNG file, in the Design or Code mode, choose the Actions dropdown button. Then, under Export definition, select the format you want.