Basic Amazon Lambda Project Creating Docker Image
You can use the Toolkit for Visual Studio to deploy your Amazon Lambda function as a Docker image. Using Docker, you have more control over your runtime. For example, you can choose custom runtimes like .NET 8.0. You deploy your Docker image in the same way as any other container image. This tutorial closely mimics Tutorial: Basic Lambda Project, with two differences:
-
A Dockerfile is included in the project.
-
An alternate publishing configuration is chosen.
For information about Lambda container images, see Lambda Deployment Packages in the Amazon Lambda Developer Guide.
For additional information about working with Lambda Amazon Toolkit for Visual Studio, see the Using the Amazon Lambda Templates in the Amazon Toolkit for Visual Studio topic in this User Guide.
Create a Visual Studio .NET Core Lambda Project
You can use Lambda Visual Studio templates and blueprints to help speed up your project initialization. Lambda blueprints contain pre-written functions that simplify the creation of a flexible project foundation.
To create a Visual Studio .NET Core Lambda project
-
From Visual Studio expand the File menu, expand New, then choose Project.
-
From the New Project dialog box, set the Language, Platform, and Project type drop-down boxes to "All", then type
aws lambdain the Search field. Choose the Amazon Lambda Project (.NET Core - C#) template. -
In the Project Name field, enter
AWSLambdaDocker, specify your file Location, then choose Create. -
On the Select Blueprint page, choose the .NET 8 (Container Image) blueprint, and then choose Finish to create the Visual Studio project. You can now review the project's structure and code.
Reviewing Project Files
The following sections examine the three project files created by the .NET 8 (Container Image) blueprint:
-
Dockerfile -
aws-lambda-tools-defaults.json -
Function.cs
1. Dockerfile
A Dockerfile performs three primary actions:
-
FROM: Establishes the base image to utilize for this image. This base image provides .NET Runtime, Lambda runtime, and a shell script that provides an entry point for the Lambda .NET process. -
WORKDIR: Establishes the image's internal work directory as/var/task. -
COPY: Will copy the files generated from the build process from their local location into the work directory of the image.
The following are optional Dockerfile actions that you can
specify:
-
ENTRYPOINT: The base image already includes anENTRYPOINT, which is the start-up process executed when the image is started. If you wish to specify your own, then you are overriding that base entry point. -
CMD: Instructs Amazon which custom code you want executed. It expects a fully-qualified name to your custom method. This line either needs to be included directly in the Dockerfile or can be specified during the publish process.# Example of alternative way to specify the Lambda target method rather than during the publish process. CMD [ "AWSLambdaDocker::AWSLambdaDocker.Function::FunctionHandler"]
The following is an example of a Dockerfile created by the .NET 8 (Container Image) blueprint.
FROM public.ecr.aws/lambda/dotnet:8

WORKDIR /var/task

# This COPY command copies the .NET Lambda project's build artifacts from the host machine into the image.
# The source of the COPY should match where the .NET Lambda project publishes its build artifacts. If the Lambda function is being built
# with the AWS .NET Lambda Tooling, the `--docker-host-build-output-dir` switch controls where the .NET Lambda project
# will be built. The .NET Lambda project templates default to having `--docker-host-build-output-dir`
# set in the aws-lambda-tools-defaults.json file to "bin/Release/lambda-publish".
#
# Alternatively Docker multi-stage build could be used to build the .NET Lambda project inside the image.
# For more information on this approach checkout the project's README.md file.
COPY "bin/Release/lambda-publish"  .
2. aws-lambda-tools-defaults.json
The aws-lambda-tools-defaults.json file is used to specify
default values for the Toolkit for Visual Studio deployment wizard and .NET Core CLI. The following list
describes fields that you can set in your
aws-lambda-tools-defaults.json file.
-
profile: sets your Amazon profile. -
region: sets the Amazon region where your resources are stored. -
configuration: sets the configuration used to publish your function. -
package-type: sets the deployment package-type to a container image or .zip file archive. -
function-memory-size: sets the memory allocation for your function in MB. -
function-timeout: Timeout is the maximum amount of time in seconds that a Lambda function can run. You can adjust this in increments of 1 second up to a maximum value of 15 minutes. -
docker-host-build-output-dir: sets the output directory of the build process that correlates with the instructions in theDockerfile. -
image-command: is a fully-qualified name to your method, the code you want the Lambda function to run. The syntax is:{Assembly}::{Namespace}.{ClassName}::{MethodName}. For more information, see Handler signatures. Settingimage-commandhere pre-populates this value in Visual Studio's Publish wizard later on.
The following is an example of an aws-lambda-tools-defaults.json created by the .NET 8 (Container Image) blueprint.
{
  "Information": [
    "This file provides default values for the deployment wizard inside Visual Studio and the AWS Lambda commands added to the .NET Core CLI.",
    "To learn more about the Lambda commands with the .NET Core CLI execute the following command at the command line in the project root directory.",
    "dotnet lambda help",
    "All the command line options for the Lambda command can be specified in this file."
  ],
  "profile": "default",
  "region": "us-west-2",
  "configuration": "Release",
  "package-type": "image",
  "function-memory-size": 512,
  "function-timeout": 30,
  "image-command": "AWSLambdaDocker::AWSLambdaDocker.Function::FunctionHandler",
  "docker-host-build-output-dir": "./bin/Release/lambda-publish"
}
3. Function.cs
The Function.cs file defines the c# functions to be exposed as
Lambda functions. The FunctionHandler is the Lambda functionality that runs
when the Lambda function runs. In this project, FunctionHandler calls
ToUpper() on the input text.
Publish to Lambda
Docker images that are generated by the build process are uploaded to Amazon Elastic Container Registry (Amazon ECR). Amazon ECR is a fully-managed Docker container registry that you use to store, manage, and deploy Docker container images. Amazon ECR hosts the image, which Lambda then references to provide the programmed Lambda functionality when invoked.
To publish your function to Lambda
-
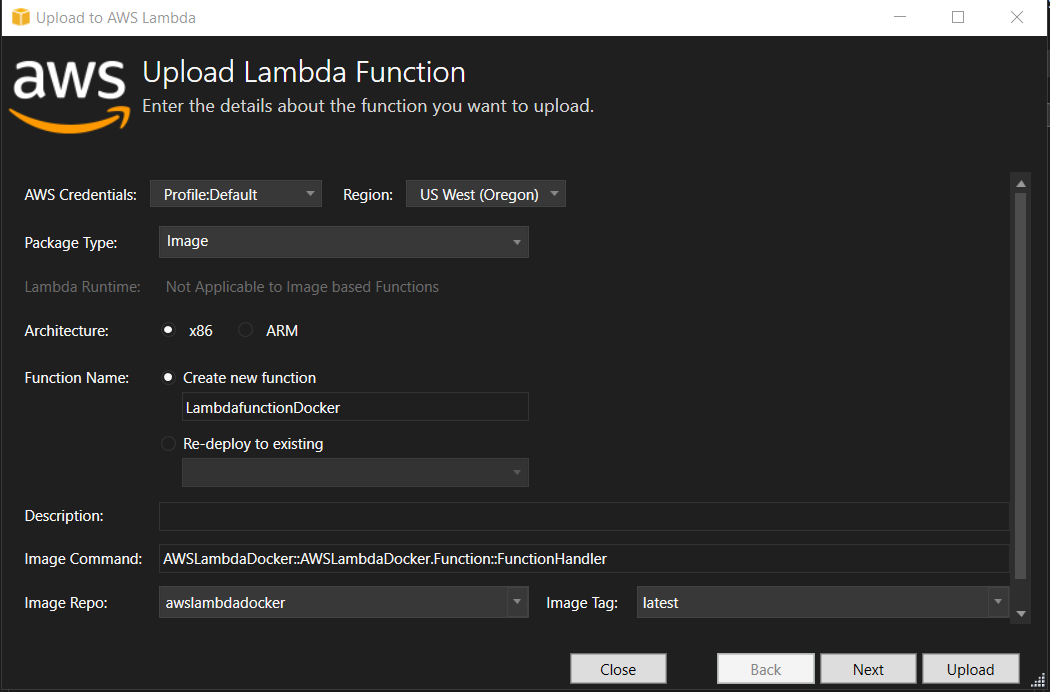
From the Solution Explorer, open the context menu for (right-click) the project, then choose Publish to Amazon Lambda to open the Upload Lambda Function window.
-
From the Upload Lambda Function page, do the following:

-
For Package Type,
Imagehas been automatically selected as your Package Type because the publish wizard detected aDockerfilewithin your project. -
For Function Name, enter a display name for your Lambda instance. This name is the reference name displayed in the both the Amazon Explorer in Visual Studio and the Amazon Web Services Management Console.
-
For Description, enter text to display with your instance in the Amazon Web Services Management Console.
-
For Image Command, enter a fully-qualified path to the method you want the Lambda function to run:
AWSLambdaDocker::AWSLambdaDocker.Function::FunctionHandlerNote
Any method name entered here will override any CMD instruction within the Dockerfile. Entering Image Command is optional only IF your
Dockerfileincludes aCMDto instruct how to launch the Lambda function. -
For Image Repo, enter the name of a new or existing Amazon Elastic Container Registry. The Docker image the build process creates is uploaded to this registry. The Lambda definition that is being published will reference that Amazon ECR image.
-
For Image Tag, enter a Docker tag to associate with your image in the repository.
-
Choose Next.
-
-
On the Advanced Function Details page, in Role Name choose a role associated with your account. The role is used to provide temporary credentials for any Amazon Web Services calls made by the code in the function. If you do not have a role, choose New Role based on Amazon Managed Policy and then choose AWSLambdaBasicExecutionRole.
Note
Your account must have permission to run the IAM ListPolicies action, or the Role Name list will be empty.
-
Choose Upload to start the uploading and publishing processes.
Note
The Uploading Function page displays while the function is uploading. The publish process then builds the image based on the configuration parameters, creates the Amazon ECR repository if necessary, uploads the image into the repository, and creates the Lambda referencing that repo with that image.
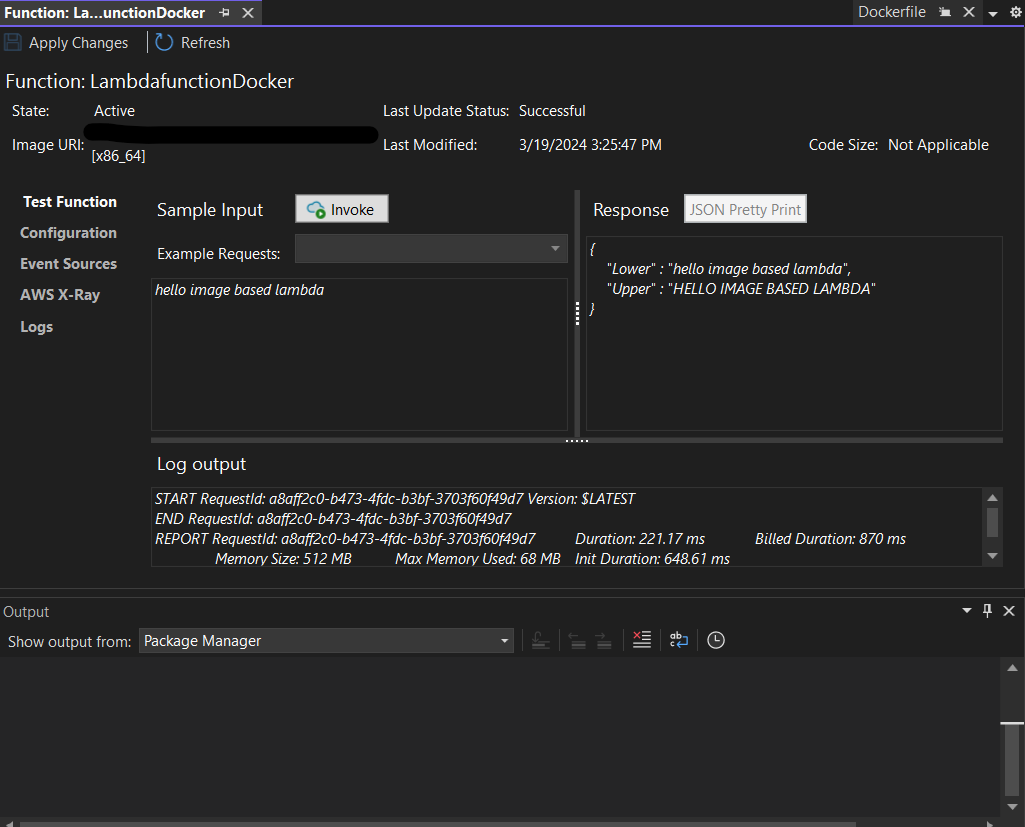
After the function is uploaded, the Function page opens and displays your new Lambda function’s configuration.
-
To manually invoke the Lambda function, on the Test Function tab, enter
hello image based lambdainto the request free-text input field and then choose Invoke. Your text, converted to uppercase, will appear in Response.
-
To view the repository, in the Amazon Explorer, under Amazon Elastic Container Service, choose Repositories.
You can reopen the Function: view at any time by double-clicking on your deployed instance located in the Amazon Explorer under the Amazon Lambda node.
Note
If your Amazon Explorer window is not open, you can dock it via View -> Amazon Explorer
-
Note additional image-specific configuration options on the Configuration tab. This tab provides a way to override the
ENTRYPOINT,CMD, andWORKDIRthat may have been specified within the Dockerfile. Description is the description you entered (if any) during upload/publish.
Clean-up
If you are not going to continue developing with this example, remember to delete the function and ECR image that was deployed so that you do not get billed for unused resources in your account.
-
Functions can be deleted by right-clicking your deployed instance located in the Amazon Explorer under the Amazon Lambda node.
-
Repositories can be deleted in the Amazon Explorer under the Amazon Elastic Container Service -> Repositories.
Next Steps
For information about creating and testing Lambda images, see Using Container Images with Lambda.
For information about container image deployment, permissions, and overriding configuration settings, see Configuring Functions.