Tagging resources
A tag is a custom metadata label that you can add to a resource to make it easier to identify, organize, and find in a search. Tags are comprised of two individual parts: A tag key and a tag value. This is referred to as a key:value pair.
A tag key typically represents a larger category, while a tag value represents a subset of
that category. For example you could have tag key=Color and
tag value=Blue, which would produce the key:value pair
Color:Blue. Note that you can set the value of a tag to an empty string, but you
can't set the value of a tag to null. Omitting the tag value is the same as using an empty
string.
Tip
Amazon Billing and Cost Management can use tags to separate your bills into dynamic categories. For
example, if you add tags to represent different departments within your company, such as
Department:Sales or Department:Legal, Amazon
can provide you with your cost distribution per department.
In Amazon Transcribe, you can tag the following resources:
Transcription jobs
Medical transcription jobs
Call analytics post call transcription jobs
Custom vocabularies
Custom medical vocabularies
Custom vocabulary filters
Call analytics categories
Custom language models
Tag keys can be up to 128 characters in length and tag values can be up to 256
characters in length; both are case sensitive. Amazon Transcribe supports up to 50 tags per resource. For a
given resource, each tag key must be unique with only one value. Note that your tags cannot begin
with aws: because Amazon reserves this prefix for system-generated tags. You
cannot add, modify, or delete aws:* tags, and they don't count against your
tags-per-resource limit.
API operations specific to resource tagging
ListTagsForResource,
TagResource,
UntagResource
To use the tagging APIs, you must include an Amazon Resource Name (ARN) with your
request. ARNs have the format
arn:partition:service:region:account-id:resource-type/resource-id. For
example, the ARN associated with a transcription job may look like:
arn:.aws:transcribe:us-west-2:111122223333:transcription-job/my-transcription-job-name
To learn more about tagging, including best practices, see Tagging Amazon resources.
Tag-based access control
You can use tags to control access within your Amazon Web Services accounts. For tag-based access control, you provide tag information in the condition element of an IAM policy. You can then use tags and their associated tag condition key to control access to:
Resources: Control access to your Amazon Transcribe resources based on the tags you've assigned to those resources.
Use the
aws:ResourceTag/condition key to specify which tag key:value pair must be attached to the resource.key-name
Requests: Control which tags can be passed in a request.
Use the
aws:RequestTag/condition key to specify which tags can be added, modified, or removed from an IAM user or role.key-name
Authorization processes: Control tag-based access for any part of your authorization process.
Use the
aws:TagKeys/condition key to control whether specific tag keys can be used on a resource, in a request, or by a principal. In this case, the key value doesn't matter.
For an example tag-based access control policy, see Viewing transcription jobs based on tags.
For more detailed information on tag-based access control, see Controlling access to Amazon resources using tags.
Adding tags to your Amazon Transcribe resources
You can add tags before or after you run your Amazon Transcribe job. Using the existing Create* and Start* APIs, you can add add tags with your transcription request.
You can add, modify or delete tags using the Amazon Web Services Management Console, Amazon CLI, or Amazon SDKs; see the following for examples:
-
Sign in to the Amazon Web Services Management Console
. -
In the navigation pane, choose Transcription jobs, then select Create job (top right). This opens the Specify job details page.
-
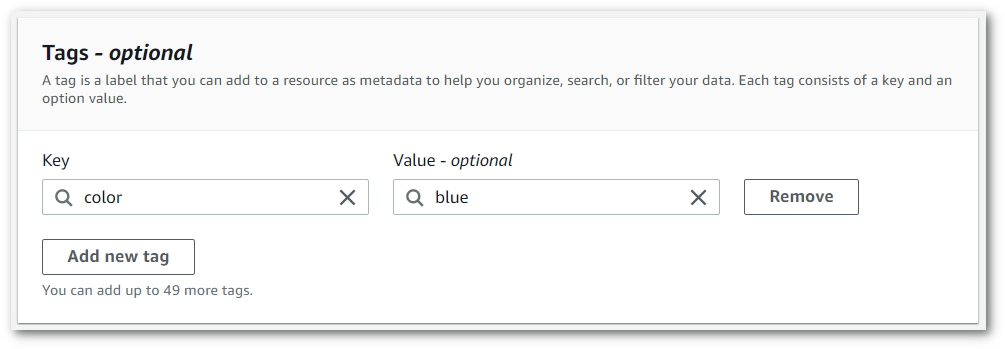
Scroll to the bottom of the Specify job details page to find the Tags - optional box and select Add new tag.

-
Enter information for the Key field and, optionally, the Value field.

-
Fill in any other fields you want to include on the Specify job details page, then select Next. This takes you to the Configure job - optional page.
Select Create job to run your transcription job.
-
You can view the tags associated with a transcription job by navigating to the Transcription jobs page, selecting a transcription job, and scrolling to the bottom of that job's information page. If you want to edit your tags, you can do so by selecting Manage tags.

This example uses the start-transcription-jobTags parameter. For more
information, see StartTranscriptionJob and
Tag.
aws transcribe start-transcription-job \ --regionus-west-2\ --transcription-job-namemy-first-transcription-job\ --media MediaFileUri=s3://amzn-s3-demo-bucket/my-input-files/my-media-file.flac\ --output-bucket-nameamzn-s3-demo-bucket\ --output-keymy-output-files/ \ --language-codeen-US\ --tags Key=color,Value=blueKey=shape,Value=square
Here's another example using the start-transcription-job
aws transcribe start-transcription-job \ --regionus-west-2\ --cli-input-json file://filepath/my-first-tagging-job.json
The file my-first-tagging-job.json contains the following request body.
{
  "TranscriptionJobName": "my-first-transcription-job",
  "Media": {
        "MediaFileUri": "s3://amzn-s3-demo-bucket/my-input-files/my-media-file.flac"
  },
  "OutputBucketName": "amzn-s3-demo-bucket",
  "OutputKey": "my-output-files/",
  "LanguageCode": "en-US",
  "Tags": [
        {
           "Key": "color",
           "Value": "blue"
        },
        {
           "Key": "shape",
           "Value": "square"
        }
  ]
}
The following example uses the Amazon SDK for Python (Boto3) to add a tag by using the
Tags argument for the
start_transcription_jobStartTranscriptionJob and
Tag.
For additional examples using the Amazon SDKs, including feature-specific, scenario, and cross-service examples, refer to the Code examples for Amazon Transcribe using Amazon SDKs chapter.
from __future__ import print_function
import time
import boto3
transcribe = boto3.client('transcribe', 'us-west-2')
job_name = "my-first-transcription-job"
job_uri = "s3://amzn-s3-demo-bucket/my-input-files/my-media-file.flac"
transcribe.start_transcription_job(
    TranscriptionJobName = job_name,
    Media = {
        'MediaFileUri': job_uri
    },
    OutputBucketName = 'amzn-s3-demo-bucket',
    OutputKey = 'my-output-files/',
    LanguageCode = 'en-US',
    Tags = [
        {
            'Key':'color',
            'Value':'blue'
        }
    ]
)

while True:
    status = transcribe.get_transcription_job(TranscriptionJobName = job_name)
    if status['TranscriptionJob']['TranscriptionJobStatus'] in ['COMPLETED', 'FAILED']:
        break
    print("Not ready yet...")
    time.sleep(5)
print(status)