Using Amazon Lambda to integrate your identity provider
This topic describes how to create an Amazon Lambda function that connects to your custom identity provider. You can use any custom identity provider, such as Okta, Secrets Manager, OneLogin, or a custom data store that includes authorization and authentication logic.
For most use cases, the recommended way to configure a custom identity provider is to use the Custom identity provider solution.
Note
Before you create a Transfer Family server that uses Lambda as the identity provider, you must create the function. For an example Lambda function, see Example Lambda functions. Or, you can deploy a CloudFormation stack that uses one of the Lambda function templates. Also, make sure your Lambda function uses a resource-based policy that trusts Transfer Family. For an example policy, see Lambda resource-based policy.
-
Open the Amazon Transfer Family console
. -
Choose Create server to open the Create server page. For Choose an identity provider, choose Custom Identity Provider, as shown in the following screenshot.
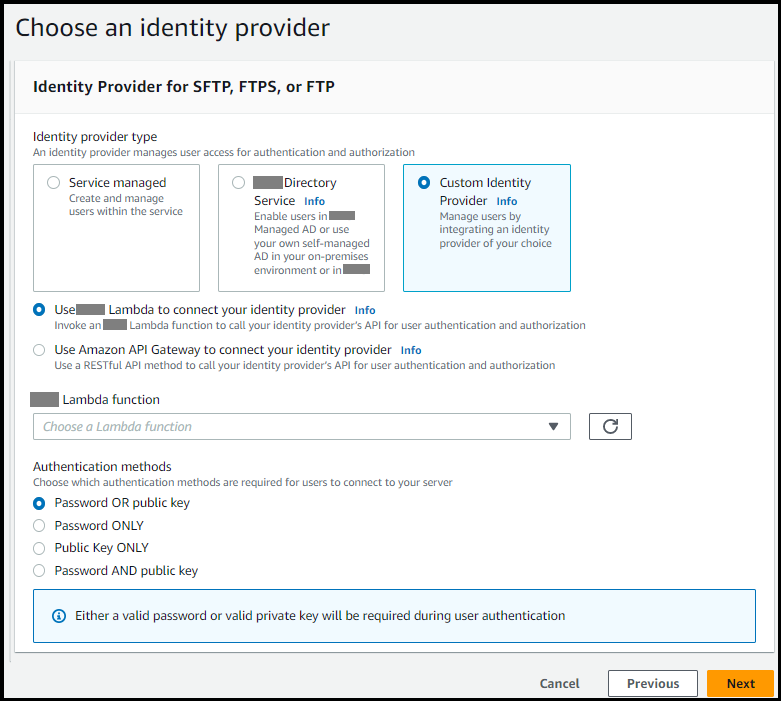
Note
The choice of authentication methods is only available if you enable SFTP as one of the protocols for your Transfer Family server.
-
Make sure the default value, Use Amazon Lambda to connect your identity provider, is selected.
-
For Amazon Lambda function, choose the name of your Lambda function.
-
Fill in the remaining boxes, and then choose Create server. For details on the remaining steps for creating a server, see Configuring an SFTP, FTPS, or FTP server endpoint.
Lambda resource-based policy
You must have a policy that references the Transfer Family server and Lambda ARNs. For example, you could use the following policy with your Lambda function that connects to your identity provider. The policy is escaped JSON as a string.
-
"Policy":
"{\"Version\":\"2012-10-17\",
\"Id\":\"default\",
\"Statement\":[
  {\"Sid\":\"AllowTransferInvocation\",
  \"Effect\":\"Allow\",
  \"Principal\":{\"Service\":\"transfer.amazonaws.com\"},
  \"Action\":\"lambda:InvokeFunction\",
  \"Resource\":\"arn:aws-cn:lambda:region:123456789012:function:my-lambda-auth-function\",
  \"Condition\":{\"ArnLike\":{\"AWS:SourceArn\":\"arn:aws-cn:transfer:region:123456789012:server/server-id\"}}}
]}"
Note
In the example policy above, replace each user input
placeholder with your own information.
Event message structure
The event message structure from SFTP server sent to the authorizer Lambda function for a custom IDP is as follows.
{
    "username": "value",
    "password": "value",
    "protocol": "SFTP",
    "serverId": "s-abcd123456",
    "sourceIp": "192.168.0.100"
}
Where username and password are the values for the
sign-in credentials that are sent to the server.
For example, you enter the following command to connect:
sftp bobusa@server_hostname
You are then prompted to enter your password:
Enter password:
    mysecretpassword
You can check this from your Lambda function by printing the passed event from within the Lambda function. It should look similar to the following text block.
{
    "username": "bobusa",
    "password": "mysecretpassword",
    "protocol": "SFTP",
    "serverId": "s-abcd123456",
    "sourceIp": "192.168.0.100"
}
The event structure is similar for FTP and FTPS: the only difference is those
values are used for the protocol parameter, rather than SFTP.
Lambda functions for authentication
To implement different authentication strategies, edit the Lambda function. To help you meet your application's needs, you can deploy a CloudFormation stack. For more information about Lambda, see the Amazon Lambda Developer Guide or Building Lambda functions with Node.js.
Topics
Valid Lambda values
The following table describes details for the values that Transfer Family accepts for Lambda functions that are used for custom identity providers.
| Value | Description | Required |
|---|---|---|
|
|
Specifies the Amazon Resource Name (ARN) of the IAM role that controls your users' access to your Amazon S3 bucket or Amazon EFS file system. The policies attached to this role determine the level of access that you want to provide your users when transferring files into and out of your Amazon S3 or Amazon EFS file system. The IAM role should also contain a trust relationship that allows the server to access your resources when servicing your users' transfer requests. For details on establishing a trust relationship, see To establish a trust relationship. |
Required |
|
|
The full POSIX identity, including user ID
( |
Required for Amazon EFS backing storage |
|
|
A list of SSH public key values that are valid for this user. An empty list implies that this is not a valid login. Must not be returned during password authentication. |
Optional |
|
|
A session policy for your user so that you can use the same IAM role across multiple users. This policy scopes down user access to portions of their Amazon S3 bucket. For more information about using session policies with custom identity providers, see the session policy examples in this topic. |
Optional |
|
|
The type of landing directory (folder) that you want your users' home directory to be when they log in to the server.
|
Optional |
|
|
Logical directory mappings that specify which Amazon S3 or
Amazon EFS paths and keys should be visible to your user and how
you want to make them visible. You must specify the
|
Required if |
|
|
The landing directory for a user when they log in to the server using the client. The format depends on your storage backend:
ImportantThe bucket name or Amazon EFS file system ID must be included in the path. Omitting this information will result in "File not found" errors during file transfers. |
Optional |
Note
HomeDirectoryDetails is a string representation of a JSON
map. This is in contrast to PosixProfile, which is an actual
JSON map object, and PublicKeys which is a JSON array of
strings. See the code examples for the language-specific details.
HomeDirectory Format Requirements
When using the HomeDirectory parameter, ensure you include
the complete path format:
-
For Amazon S3 storage: Always include the bucket name in the format
/bucket-name/path -
For Amazon EFS storage: Always include the file system ID in the format
/fs-12345/path
A common cause of "File not found" errors is omitting the bucket name or
EFS file system ID from the HomeDirectory path. Setting
HomeDirectory to just / without the storage
identifier will cause authentication to succeed but file operations to
fail.
Example Lambda functions
This section presents some example Lambda functions, in both NodeJS and Python.
Note
In these examples, the user, role, POSIX profile, password, and home directory details are all examples, and must be replaced with your actual values.
Testing your configuration
After you create your custom identity provider, you should test your configuration.
If user authentication succeeds, the test returns a StatusCode:
200 HTTP response, an empty string Message: "" (which
would contain a reason for failure otherwise), and a Response
field.
Note
In the response example below, the Response field is a JSON
object that has been "stringified" (converted into a flat JSON string that
can be used inside a program), and contains the details of the user's roles
and permissions.
{
    "Response":"{\"Policy\":\"{\\\"Version\\\":\\\"2012-10-17\\\",\\\"Statement\\\":[{\\\"Sid\\\":\\\"ReadAndListAllBuckets\\\",\\\"Effect\\\":\\\"Allow\\\",\\\"Action\\\":[\\\"s3:ListAllMybuckets\\\",\\\"s3:GetBucketLocation\\\",\\\"s3:ListBucket\\\",\\\"s3:GetObjectVersion\\\",\\\"s3:GetObjectVersion\\\"],\\\"Resource\\\":\\\"*\\\"}]}\",\"Role\":\"arn:aws-cn:iam::000000000000:role/MyUserS3AccessRole\",\"HomeDirectory\":\"/\"}",
    "StatusCode": 200,
    "Message": ""
}
Lambda function templates
You can deploy an Amazon CloudFormation stack that uses a Lambda function for authentication. We provide several templates that authenticate and authorize your users using sign-in credentials. You can modify these templates or Amazon Lambda code to further customize user access.
Note
You can create a FIPS-enabled Amazon Transfer Family server through Amazon CloudFormation by specifying a FIPS-enabled security policy in your template. Available security policies are described in Security policies for Amazon Transfer Family servers
To create an Amazon CloudFormation stack to use for authentication
-
Open the Amazon CloudFormation console at https://console.amazonaws.cn/cloudformation
. -
Follow the instructions for deploying an Amazon CloudFormation stack from an existing template in Selecting a stack template in the Amazon CloudFormation User Guide.
-
Use one of the following templates to create a Lambda function to use for authentication in Transfer Family.
-
Classic (Amazon Cognito) stack template
A basic template for creating a Amazon Lambda for use as a custom identity provider in Amazon Transfer Family. It authenticates against Amazon Cognito for password-based authentication and public keys are returned from an Amazon S3 bucket if public key based authentication is used. After deployment, you can modify the Lambda function code to do something different.
-
Amazon Secrets Manager stack template
A basic template that uses Amazon Lambda with an Amazon Transfer Family server to integrate Secrets Manager as an identity provider. It authenticates against an entry in Amazon Secrets Manager of the format
aws/transfer/. Additionally, the secret must hold the key-value pairs for all user properties returned to Transfer Family. After deployment, you can modify the Lambda function code to do something different.server-id/username -
Okta stack template
: A basic template that uses Amazon Lambda with an Amazon Transfer Family server to integrate Okta as a custom identity provider. -
Okta-mfa stack template
: A basic template that uses Amazon Lambda with an Amazon Transfer Family server to integrate Okta, with Multi Factor Authentication, as a custom identity provider. -
Azure Active Directory template
: details for this stack are described in the blog post Authenticating to Amazon Transfer Family with Azure Active Directory and Amazon Lambda .
After the stack has been deployed, you can view details about it on the Outputs tab in the CloudFormation console.
Deploying one of these stacks is the easiest way to integrate a custom identity provider into the Transfer Family workflow.
-