Working with service-managed users
You can add either Amazon S3 or Amazon EFS service-managed users to your server, depending on the server's Domain setting. For more information, see Configuring an SFTP, FTPS, or FTP server endpoint.
If you use a service-managed identity type, you add users to your file transfer protocol enabled server. When you do so, each username must be unique on your server.
To add a service-managed user programmatically, see the example for the CreateUser API.
Note
For service-managed users there is a limit of 2,000 logical directory entries. For information about using logical directories see Using logical directories to simplify your Transfer Family directory structures.
Topics
Adding Amazon S3 service-managed users
Note
If you want to configure a cross account Amazon S3 bucket, follow the steps
mentioned in this Knowledge Center article: How do I configure my Amazon Transfer Family server to use an Amazon Simple Storage Service bucket that's in
another Amazon account?
To add an Amazon S3 service-managed user to your server
-
Open the Amazon Transfer Family console at https://console.amazonaws.cn/transfer/
, then select Servers from the navigation pane. -
On the Servers page, select the check box of the server that you want to add a user to.
-
Choose Add user.
-
In the User configuration section, for Username, enter the username. This username must be a minimum of 3 and a maximum of 100 characters. You can use the following characters in the username: a–z, A-Z, 0–9, underscore '_', hyphen '-', period '.' and at sign '@'. The username can't start with a hyphen '-', period '.' or at sign '@'.
-
For Access, choose the IAM role that you previously created that provides access to your Amazon S3 bucket.
You created this IAM role using the procedure in Create an IAM role and policy. That IAM role includes an IAM policy that provides access to your Amazon S3 bucket. It also includes a trust relationship with the Amazon Transfer Family service, defined in another IAM policy. If you need fine-grained access control for your users, refer to the Enhance data access control with Amazon Transfer Family and Amazon S3
blog post. -
(Optional) For Policy, select one of the following:
-
None
-
Existing policy
-
Select a policy from IAM: allows you to choose an existing session policy. Choose View to see a JSON object containing the details of the policy.
-
Auto-generate policy based on home folder: generates a session policy for you. Choose View to see a JSON object containing the details of the policy.
Note
If you choose Auto-generate policy based on home folder, do not select Restricted for this user.
To learn more about session policies, see Create an IAM role and policy, Creating a session policy for an Amazon S3 bucket, or Dynamic permission management approaches.
-
-
For Home directory, choose the Amazon S3 bucket to store the data to transfer using Amazon Transfer Family. Enter the path to the
homedirectory where your user lands when they log in using their client.If you keep this parameter blank, the
rootdirectory of your Amazon S3 bucket is used. In this case, make sure that your IAM role provides access to thisrootdirectory.Note
We recommend that you choose a directory path that contains the user name of the user, which enables you to effectively use a session policy. The session policy limits user access in the Amazon S3 bucket to that user's
homedirectory. -
(Optional) For Restricted, select the check box so that your users can't access anything outside of that folder and can't see the Amazon S3 bucket or folder name.
Note
Assigning the user a home directory and restricting the user to that home directory should be sufficient to lock down the user's access to the designated folder. If you need to apply further controls, use a session policy.
If you select Restricted for this user, you cannot select Auto-generate policy based on home folder, because home folder is not a defined value for Restricted users.
-
For SSH public key, enter the public SSH key portion of the SSH key pair.
Your key is validated by the service before you can add your new user.
Note
For instructions on how to generate an SSH key pair, see Generate SSH keys for service-managed users.
-
(Optional) For Key and Value, enter one or more tags as key-value pairs, and choose Add tag.
-
Choose Add to add your new user to the server that you chose.
The new user appears in the Users section of the Server details page.
Next steps – For the next step, continue on to Transferring files over a server endpoint using a client.
Adding Amazon EFS service-managed users
Amazon EFS uses the Portable Operating System Interface (POSIX) file permission model to represent file ownership.
-
For more details on Amazon EFS file ownership, see Amazon EFS file ownership.
-
For more details on setting up directories for your EFS users, see Set up Amazon EFS users for Transfer Family.
To add an Amazon EFS service-managed user to your server
-
Open the Amazon Transfer Family console at https://console.amazonaws.cn/transfer/
, then select Servers from the navigation pane. -
On the Servers page, select the Amazon EFS server that you want to add a user to.
-
Choose Add user to display the Add user page.
-
In the User configuration section, use the following settings.
-
The Username, must be a minimum of 3 and a maximum of 100 characters. You can use the following characters in the username: a–z, A-Z, 0–9, underscore '_', hyphen '-', period '.', and at sign "@". The username can't start with a hyphen '-', period '.', or at sign "@".
-
For User ID and Group ID, note the following:
-
For the first user that you create, we recommend that you enter a value of
0for both Group ID and User ID. This grants the user administrator privileges for Amazon EFS. -
For additional users, enter the user's POSIX user ID and group ID. These IDs are used for all Amazon Elastic File System operations performed by the user.
-
For User ID and Group ID, do not use any leading zeroes. For example,
12345is acceptable,012345is not.
-
-
(Optional) For Secondary Group IDs, enter one or more additional POSIX group IDs for each user, separated by commas.
-
For Access, choose the IAM role that:
-
Gives the user access to only the Amazon EFS resources (file systems) that you want them to access.
-
Defines which file system operations that the user can and cannot perform.
We recommend that you use the IAM role for Amazon EFS file system selection with mount access and read/write permissions. For example, the combination of the following two Amazon managed policies, while quite permissive, grants the necessary permissions for your user:
-
AmazonElasticFileSystemClientFullAccess
-
AWSTransferConsoleFullAccess
For more information, see the blog post Amazon Transfer Family support for Amazon Elastic File System
. -
-
For Home directory, do the following:
-
Choose the Amazon EFS file system that you want to use for storing the data to transfer using Amazon Transfer Family.
-
Decide whether to set the home directory to Restricted. Setting the home directory to Restricted has the following effects:
-
Amazon EFS users can't access any files or directories outside of that folder.
-
Amazon EFS users can't see the Amazon EFS file system name (fs-xxxxxxx).
Note
When you select the Restricted option, symlinks don't resolve for Amazon EFS users.
-
-
(Optional) Enter the path to the home directory that you want users to be in when they log in using their client.
If you don't specify a home directory, the root directory of your Amazon EFS file system is used. In this case, make sure that your IAM role provides access to this root directory.
-
-
-
For SSH public key, enter the public SSH key portion of the SSH key pair.
Your key is validated by the service before you can add your new user.
Note
For instructions on how to generate an SSH key pair, see Generate SSH keys for service-managed users.
-
(Optional) Enter any tags for the user. For Key and Value, enter one or more tags as key-value pairs, and choose Add tag.
-
Choose Add to add your new user to the server that you chose.
The new user appears in the Users section of the Server details page.
Issues that you might encounter when you first SFTP to your Transfer Family server:
-
If you run the
sftpcommand and the prompt doesn't appear, you might encounter the following message:Couldn't canonicalize: Permission deniedNeed cwdIn this case, you must increase the policy permissions for your user's role. You can add an Amazon managed policy, such as
AmazonElasticFileSystemClientFullAccess. -
If you enter
pwdat thesftpprompt to view the user's home directory, you might see the following message, whereUSER-HOME-DIRECTORYis the home directory for the SFTP user:remote readdir("/USER-HOME-DIRECTORY"): No such file or directoryIn this case, you should be able to navigate to the parent directory (
cd ..), and create the user's home directory (mkdir) .username
Next steps – For the next step, continue on to Transferring files over a server endpoint using a client.
Managing service-managed users
In this section, you can find information about how to view a list of users, how to edit user details, and how to add an SSH public key.
To find a list of your users
-
Open the Amazon Transfer Family console at https://console.amazonaws.cn/transfer/
. -
Select Servers from the navigation pane to display the Servers page.
-
Choose the identifier in the Server ID column to see the Server details page.
-
Under Users, view a list of users.
To view or edit user details
-
Open the Amazon Transfer Family console at https://console.amazonaws.cn/transfer/
. -
Select Servers from the navigation pane to display the Servers page.
-
Choose the identifier in the Server ID column to see the Server details page.
-
Under Users, choose a username to see the User details page.
You can change the user's properties on this page by choosing Edit.
-
On the Users details page, choose Edit next to User configuration.
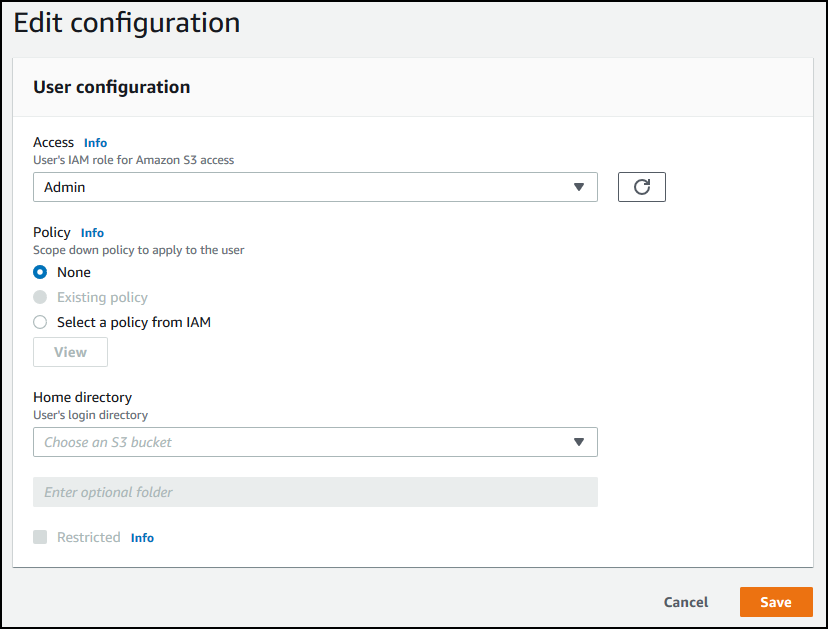
-
On the Edit configuration page, for Access, choose the IAM role that you previously created that provides access to your Amazon S3 bucket.
You created this IAM role using the procedure in Create an IAM role and policy. That IAM role includes an IAM policy that provides access to your Amazon S3 bucket. It also includes a trust relationship with the Amazon Transfer Family service, defined in another IAM policy.
-
(Optional) For Policy, choose one of the following:
-
None
-
Existing policy
-
Select a policy from IAM to choose an existing policy. Choose View to see a JSON object containing the details of the policy.
To learn more about session policies, see Create an IAM role and policy. To learn more about creating a session policy, see Creating a session policy for an Amazon S3 bucket.
-
-
For Home directory, choose the Amazon S3 bucket to store the data to transfer using Amazon Transfer Family. Enter the path to the
homedirectory where your user lands when they log in using their client.If you leave this parameter blank, the
rootdirectory of your Amazon S3 bucket is used. In this case, make sure that your IAM role provides access to thisrootdirectory.Note
We recommend that you choose a directory path that contains the user name of the user, which enables you to effectively use a session policy. The session policy limits user access in the Amazon S3 bucket to that user's
homedirectory. -
(Optional) For Restricted, select the check box so that your users can't access anything outside of that folder and can't see the Amazon S3 bucket or folder name.
Note
When assigning the user a home directory and restricting the user to that home directory, this should be sufficient enough to lock down the user's access to the designated folder. Use a session policy when you need to apply further controls.
-
Choose Save to save your changes.
To delete a user
-
Open the Amazon Transfer Family console at https://console.amazonaws.cn/transfer/
. -
Select Servers from the navigation pane to display the Servers page.
-
Choose the identifier in the Server ID column to see the Server details page.
-
Under Users, choose a username to see the User details page.
-
On the Users details page, choose Delete to the right of the username.
-
In the confirmation dialog box that appears, enter the word
delete, and then choose Delete to confirm that you want to delete the user.
The user is deleted from the users list.
To add an SSH public key for a user
-
Open the Amazon Transfer Family console at https://console.amazonaws.cn/transfer/
. -
In the navigation pane, choose Servers.
-
Choose the identifier in the Server ID column to see the Server details page.
-
Under Users, choose a username to see the User details page.
-
Choose Add SSH public key to add a new SSH public key to a user.
Note
SSH keys are used only by servers that are enabled for Secure Shell (SSH) File Transfer Protocol (SFTP). For information about how to generate an SSH key pair, see Generate SSH keys for service-managed users.
-
For SSH public key, enter the SSH public key portion of the SSH key pair.
Your key is validated by the service before you can add your new user. The format of the SSH key is
ssh-rsa. To generate an SSH key pair, see Generate SSH keys for service-managed users.string -
Choose Add key.
To delete an SSH public key for a user
-
Open the Amazon Transfer Family console at https://console.amazonaws.cn/transfer/
. -
In the navigation pane, choose Servers.
-
Choose the identifier in the Server ID column to see the Server details page.
-
Under Users, choose a username to see the User details page.
-
To delete a public key, select its SSH key check box and choose Delete.