Services or capabilities described in Amazon Web Services documentation might vary by Region. To see the differences applicable to the China Regions,
see Getting Started with Amazon Web Services in China
(PDF).
Advanced example
This section contains an advanced example that will help you
understand how VPC Block Public Access feature works in different scenarios. Each scenario builds off the scenario
before it, so it's important to complete the steps in order.
Do not go through this example in a production account. We strongly recommend that you thoroughly review the workloads that require Internet access prior to enabling VPC BPA in your production accounts.
To fully understand the VPC BPA feature, you'll need certain resources in your
account. In this section, we provide an CloudFormation template that you can use to
provision the resources you need to fully understand how this feature works. There are
costs associated with the resources you provision with the CloudFormation template and
the analyses you perform with Network Access Analyzer and Reachability Analyzer. If you use the template in this section,
ensure that you complete the Cleanup
steps when you're done with this example.
Deploy CloudFormation template (optional)
To demonstrate how this feature works, you need a VPC, subnets, instances, and
other resources. To make it easier to complete this demonstration, we’ve provided an
Amazon CloudFormation template below that you can use to quickly spin up the resources required for
the scenarios in this demo. This step is optional and you may want to just view the
diagrams in the Scenarios in this section.
There are costs associated with the resources you create in this section
with the CloudFormation template, such as the cost of the NAT gateway and public
IPv4 addresses. To avoid excess costs, ensure that you complete the Cleanup
steps to remove all resources created for the purpose of this example.
This CloudFormation template creates the underlying resources needed for VPC BPA but does not
enable the VPC BPA feature itself. The resources deployed here are
intended to help you understand and test VPC BPA functionality once you
choose to enable it separately.
The template creates the following resources in your account:
-
Egress-only internet gateway
-
Internet gateway
-
NAT gateway
-
Two public subnets
-
One private subnet
-
Two EC2 instances with public and private IPv4 addresses
-
One EC2 instance with an IPv6 address and a private IPv4 address
-
One EC2 instance with a private IPv4 address only
-
Security group with SSH and ICMP inbound traffic allowed and ALL outbound traffic allowed
-
VPC flow log
-
One EC2 Instance Connect endpoint in Subnet B
Copy the template below and save it to a .yaml file.
AWSTemplateFormatVersion: '2010-09-09'
Description: Creates a VPC with public and private subnets, NAT gateway, and EC2 instances for VPC BPA.

Parameters:
  InstanceAMI:
    Description: ID of the Amazone Machine Image (AMI) to use with the instances launched by this template
    Type: AWS::EC2::Image::Id
  InstanceType:
    Description: EC2 Instance type to use with the instances launched by this template
    Type: String
    Default: t2.micro

Resources:

  # VPC
  VPCBPA:
    Type: AWS::EC2::VPC
    Properties:
      CidrBlock: 10.0.0.0/16
      EnableDnsHostnames: true
      EnableDnsSupport: true
      InstanceTenancy: default
      Tags:
        - Key: Name
          Value: VPC BPA

  # VPC IPv6 CIDR
  VPCBPAIpv6CidrBlock:
    Type: AWS::EC2::VPCCidrBlock
    Properties:
      VpcId: !Ref VPCBPA
      AmazonProvidedIpv6CidrBlock: true

  # EC2 Key Pair
  VPCBPAKeyPair:
    Type: AWS::EC2::KeyPair
    Properties:
      KeyName: vpc-bpa-key

  # Internet Gateway
  VPCBPAInternetGateway:
    Type: AWS::EC2::InternetGateway
    Properties:
      Tags:
        - Key: Name
          Value: VPC BPA Internet Gateway

  VPCBPAInternetGatewayAttachment:
    Type: AWS::EC2::VPCGatewayAttachment
    Properties:
      VpcId: !Ref VPCBPA
      InternetGatewayId: !Ref VPCBPAInternetGateway

  # Egress-Only Internet Gateway
  VPCBPAEgressOnlyInternetGateway:
    Type: AWS::EC2::EgressOnlyInternetGateway
    Properties:
      VpcId: !Ref VPCBPA

  # Subnets
  VPCBPAPublicSubnetA:
    Type: AWS::EC2::Subnet
    Properties:
      VpcId: !Ref VPCBPA
      CidrBlock: 10.0.1.0/24
      MapPublicIpOnLaunch: true
      Tags:
        - Key: Name
          Value: VPC BPA Public Subnet A

  VPCBPAPublicSubnetB:
    Type: AWS::EC2::Subnet
    Properties:
      VpcId: !Ref VPCBPA
      CidrBlock: 10.0.2.0/24
      MapPublicIpOnLaunch: true
      Tags:
        - Key: Name
          Value: VPC BPA Public Subnet B

  VPCBPAPrivateSubnetC:
    Type: AWS::EC2::Subnet
    Properties:
      VpcId: !Ref VPCBPA
      CidrBlock: 10.0.3.0/24
      MapPublicIpOnLaunch: false
      Ipv6CidrBlock: !Select [0, !GetAtt VPCBPA.Ipv6CidrBlocks]
      AssignIpv6AddressOnCreation: true
      Tags:
        - Key: Name
          Value: VPC BPA Private Subnet C

  # NAT Gateway
  VPCBPANATGateway:
    Type: AWS::EC2::NatGateway
    Properties:
      AllocationId: !GetAtt VPCBPANATGatewayEIP.AllocationId
      SubnetId: !Ref VPCBPAPublicSubnetB
      Tags:
        - Key: Name
          Value: VPC BPA NAT Gateway

  VPCBPANATGatewayEIP:
    Type: AWS::EC2::EIP
    Properties:
      Domain: vpc
      Tags:
        - Key: Name
          Value: VPC BPA NAT Gateway EIP

  # Route Tables
  VPCBPAPublicRouteTable:
    Type: AWS::EC2::RouteTable
    Properties:
      VpcId: !Ref VPCBPA
      Tags:
        - Key: Name
          Value: VPC BPA Public Route Table

  VPCBPAPublicRoute:
    Type: AWS::EC2::Route
    DependsOn: VPCBPAInternetGatewayAttachment
    Properties:
      RouteTableId: !Ref VPCBPAPublicRouteTable
      DestinationCidrBlock: 0.0.0.0/0
      GatewayId: !Ref VPCBPAInternetGateway

  VPCBPAPublicSubnetARouteTableAssoc:
    Type: AWS::EC2::SubnetRouteTableAssociation
    Properties:
      SubnetId: !Ref VPCBPAPublicSubnetA
      RouteTableId: !Ref VPCBPAPublicRouteTable

  VPCBPAPublicSubnetBRouteTableAssoc:
    Type: AWS::EC2::SubnetRouteTableAssociation
    Properties:
      SubnetId: !Ref VPCBPAPublicSubnetB
      RouteTableId: !Ref VPCBPAPublicRouteTable

  VPCBPAPrivateRouteTable:
    Type: AWS::EC2::RouteTable
    Properties:
      VpcId: !Ref VPCBPA
      Tags:
        - Key: Name
          Value: VPC BPA Private Route Table

  VPCBPAPrivateRoute:
    Type: AWS::EC2::Route
    Properties:
      RouteTableId: !Ref VPCBPAPrivateRouteTable
      DestinationCidrBlock: 0.0.0.0/0
      NatGatewayId: !Ref VPCBPANATGateway

  VPCBPAPrivateSubnetCRoute:
    Type: AWS::EC2::Route
    Properties:
      RouteTableId: !Ref VPCBPAPrivateRouteTable
      DestinationIpv6CidrBlock: ::/0
      EgressOnlyInternetGatewayId: !Ref VPCBPAEgressOnlyInternetGateway

  VPCBPAPrivateSubnetCRouteTableAssociation:
    Type: AWS::EC2::SubnetRouteTableAssociation
    Properties:
      SubnetId: !Ref VPCBPAPrivateSubnetC
      RouteTableId: !Ref VPCBPAPrivateRouteTable

  # EC2 Instances Security Group
  VPCBPAInstancesSecurityGroup:
    Type: AWS::EC2::SecurityGroup
    Properties:
      GroupName: VPC BPA Instances Security Group
      GroupDescription: Allow SSH and ICMP access
      SecurityGroupIngress:
        - IpProtocol: tcp
          FromPort: 22
          ToPort: 22
          CidrIp: 0.0.0.0/0
        - IpProtocol: icmp
          FromPort: -1
          ToPort: -1
          CidrIp: 0.0.0.0/0
      VpcId: !Ref VPCBPA
      Tags:
        - Key: Name
          Value: VPC BPA Instances Security Group

  # EC2 Instances
  VPCBPAInstanceA:
    Type: AWS::EC2::Instance
    Properties:
      ImageId: !Ref InstanceAMI
      InstanceType: t2.micro
      KeyName: !Ref VPCBPAKeyPair
      SubnetId: !Ref VPCBPAPublicSubnetA
      SecurityGroupIds:
        - !Ref VPCBPAInstancesSecurityGroup
      Tags:
        - Key: Name
          Value: VPC BPA Instance A

  VPCBPAInstanceB:
    Type: AWS::EC2::Instance
    Properties:
      ImageId: !Ref InstanceAMI
      InstanceType: !Ref InstanceType
      KeyName: !Ref VPCBPAKeyPair
      SubnetId: !Ref VPCBPAPublicSubnetB
      SecurityGroupIds:
        - !Ref VPCBPAInstancesSecurityGroup
      Tags:
        - Key: Name
          Value: VPC BPA Instance B

  VPCBPAInstanceC:
    Type: AWS::EC2::Instance
    Properties:
      ImageId: !Ref InstanceAMI
      InstanceType: !Ref InstanceType
      KeyName: !Ref VPCBPAKeyPair
      SubnetId: !Ref VPCBPAPrivateSubnetC
      SecurityGroupIds:
        - !Ref VPCBPAInstancesSecurityGroup
      Tags:
        - Key: Name
          Value: VPC BPA Instance C

  VPCBPAInstanceD:
    Type: AWS::EC2::Instance
    Properties:
      ImageId: !Ref InstanceAMI
      InstanceType: !Ref InstanceType
      KeyName: !Ref VPCBPAKeyPair
      NetworkInterfaces:
        - DeviceIndex: '0'
          GroupSet:
            - !Ref VPCBPAInstancesSecurityGroup
          SubnetId: !Ref VPCBPAPrivateSubnetC
          Ipv6AddressCount: 1
      Tags:
        - Key: Name
          Value: VPC BPA Instance D

  # Flow Logs IAM Role
  VPCBPAFlowLogRole:
    Type: AWS::IAM::Role
    Properties:
      AssumeRolePolicyDocument:
        Version: '2012-10-17'
        Statement:
          - Effect: Allow
            Principal:
              Service: vpc-flow-logs.amazonaws.com
            Action: 'sts:AssumeRole'
      Tags:
        - Key: Name
          Value: VPC BPA Flow Logs Role

  VPCBPAFlowLogPolicy:
    Type: AWS::IAM::Policy
    Properties:
      PolicyName: VPC-BPA-FlowLogsPolicy
      PolicyDocument:
        Version: '2012-10-17'
        Statement:
          - Effect: Allow
            Action:
              - 'logs:CreateLogGroup'
              - 'logs:CreateLogStream'
              - 'logs:PutLogEvents'
              - 'logs:DescribeLogGroups'
              - 'logs:DescribeLogStreams'
            Resource: '*'
      Roles:
        - !Ref VPCBPAFlowLogRole

  # Flow Logs
  VPCBPAFlowLog:
    Type: AWS::EC2::FlowLog
    Properties:
      ResourceId: !Ref VPCBPA
      ResourceType: VPC
      TrafficType: ALL
      LogDestinationType: cloud-watch-logs
      LogGroupName: /aws/vpc-flow-logs/VPC-BPA
      DeliverLogsPermissionArn: !GetAtt VPCBPAFlowLogRole.Arn
      LogFormat: '${version} ${account-id} ${interface-id} ${srcaddr} ${dstaddr} ${srcport} ${dstport} ${protocol} ${packets} ${bytes} ${start} ${end} ${action} ${log-status} ${vpc-id} ${subnet-id} ${instance-id} ${tcp-flags} ${type} ${pkt-srcaddr} ${pkt-dstaddr} ${region} ${az-id} ${sublocation-type} ${sublocation-id} ${pkt-src-aws-service} ${pkt-dst-aws-service} ${flow-direction} ${traffic-path} ${reject-reason}'
      Tags:
        - Key: Name
          Value: VPC BPA Flow Logs

  # EC2 Instance Connect Endpoint
  VPCBPAEC2InstanceConnectEndpoint:
    Type: AWS::EC2::InstanceConnectEndpoint
    Properties:
      SecurityGroupIds:
        - !Ref VPCBPAInstancesSecurityGroup
      SubnetId: !Ref VPCBPAPublicSubnetB

Outputs:
  VPCBPAVPCId:
    Description: A reference to the created VPC
    Value: !Ref VPCBPA
    Export:
      Name: vpc-id

  VPCBPAPublicSubnetAId:
    Description: The ID of the public subnet A
    Value: !Ref VPCBPAPublicSubnetA

  VPCBPAPublicSubnetAName:
    Description: The name of the public subnet A
    Value: VPC BPA Public Subnet A

  VPCBPAPublicSubnetBId:
    Description: The ID of the public subnet B
    Value: !Ref VPCBPAPublicSubnetB

  VPCBPAPublicSubnetBName:
    Description: The name of the public subnet B
    Value: VPC BPA Public Subnet B

  VPCBPAPrivateSubnetCId:
    Description: The ID of the private subnet C
    Value: !Ref VPCBPAPrivateSubnetC

  VPCBPAPrivateSubnetCName:
    Description: The name of the private subnet C
    Value: VPC BPA Private Subnet C

  VPCBPAInstanceAId:
    Description: The ID of instance A
    Value: !Ref VPCBPAInstanceA

  VPCBPAInstanceBId:
    Description: The ID of instance B
    Value: !Ref VPCBPAInstanceB

  VPCBPAInstanceCId:
    Description: The ID of instance C
    Value: !Ref VPCBPAInstanceC

  VPCBPAInstanceDId:
    Description: The ID of instance D
    Value: !Ref VPCBPAInstanceD
- Amazon Web Services Management Console
-
-
Open the Amazon CloudFormation console at https://console.amazonaws.cn/cloudformation/.
-
Choose Create stack and upload the .yaml template file.
-
Go through the steps to launch the template. You'll need
to enter an image
ID and an instance type (like
t2.micro). You'll also need to allow CloudFormation to create an
IAM role for you for the flow log creation and permission to log
to CloudWatch.
-
Once you launch the stack, view the Events tab to view progress and ensure that the stack completes before you continue.
- Amazon CLI
-
-
Run the following command to create the CloudFormation stack:
aws cloudformation create-stack --stack-name VPC-BPA-stack --template-body file://sampletemplate.yaml --capabilities CAPABILITY_IAM --region us-east-2
Output:
{
    "StackId": "arn:aws:cloudformation:us-east-2:470889052923:stack/VPC-BPA-stack/8a7a2cc0-8001-11ef-b196-06386a84b72f"
}
-
View the progress and ensure that the stack completes before you continue:
aws cloudformation describe-stack-events --stack-name VPC-BPA-stack --region us-east-2
View the impact of VPC BPA with Network Access Analyzer
In this section, you'll use Network Access Analyzer to view the resources in your account that use the internet gateway. Use this analysis to understand the impact of turning on VPC BPA in your account and blocking traffic.
For information about the regional availability of Network Access Analyzer, see Limitations in the Network Access Analyzer Guide.
- Amazon Web Services Management Console
-
-
Open the Amazon Network Insights console at https://console.amazonaws.cn/networkinsights/.
-
Choose Network Access Analyzer.
-
Choose Create Network Access Scope.
-
Choose Assess impact of VPC Block Public Access and choose Next.
-
The template is already configured to analyze traffic to and from the internet gateways in your account. You can view this under Source and Destination.
-
Choose Next.
-
Choose Create Network Access Scope.
-
Choose the scope you just created and choose Analyze.
-
Wait for the analysis to complete.
-
View the findings of the analysis. Each row under
Findings shows a network path that a
packet can take in a network to or from an internet gateway in
your account. In this case, if you turn on VPC BPA and none of
the VPCs and or subnets that appear in these findings are
configured as VPC BPA exclusions, traffic to those VPCs and
subnets will be restricted.
-
Analyze each finding to understand the impact of VPC BPA
on resources in your VPCs.
The impact analysis is complete.
- Amazon CLI
-
-
Create a network access scope:
aws ec2 create-network-insights-access-scope --match-paths "Source={ResourceStatement={ResourceTypes=["AWS::EC2::InternetGateway"]}}" "Destination={ResourceStatement={ResourceTypes=["AWS::EC2::InternetGateway"]}}" --region us-east-2
Output:
{
  "NetworkInsightsAccessScope": {
    "NetworkInsightsAccessScopeId": "nis-04cad3c4b3a1d5e3e",
    "NetworkInsightsAccessScopeArn": "arn:aws:ec2:us-east-2:470889052923:network-insights-access-scope/nis-04cad3c4b3a1d5e3e",
    "CreatedDate": "2024-09-30T15:55:53.171000+00:00",
    "UpdatedDate": "2024-09-30T15:55:53.171000+00:00"
  },
  "NetworkInsightsAccessScopeContent": {
    "NetworkInsightsAccessScopeId": "nis-04cad3c4b3a1d5e3e",
    "MatchPaths": [
      {
        "Source": {
          "ResourceStatement": {
            "ResourceTypes": [
              "AWS::EC2::InternetGateway"
            ]
          }
        }
      },
      {
        "Destination": {
          "ResourceStatement": {
            "ResourceTypes": [
              "AWS::EC2::InternetGateway"
            ]
          }
        }
      }
    ]
  }
}
-
Start the scope analysis:
aws ec2 start-network-insights-access-scope-analysis --network-insights-access-scope-id nis-04cad3c4b3a1d5e3e --region us-east-2
Output:
{
  "NetworkInsightsAccessScopeAnalysis": {
    "NetworkInsightsAccessScopeAnalysisId": "nisa-0aa383a1938f94cd1",
    "NetworkInsightsAccessScopeAnalysisArn": "arn:aws:ec2:us-east-2:470889052923:network-insights-access-scope-analysis/nisa-0aa383a1938f94cd",
    "NetworkInsightsAccessScopeId": "nis-04cad3c4b3a1d5e3e",
    "Status": "running",
    "StartDate": "2024-09-30T15:56:59.109000+00:00",
    "AnalyzedEniCount": 0
  }
}
-
Get the results of the analysis:
aws ec2 get-network-insights-access-scope-analysis-findings --network-insights-access-scope-analysis-id nisa-0aa383a1938f94cd1 --region us-east-2 --max-items 1
Output:
{
  "AnalysisFindings": [
    {
      "NetworkInsightsAccessScopeAnalysisId": "nisa-0aa383a1938f94cd1",
      "NetworkInsightsAccessScopeId": "nis-04cad3c4b3a1d5e3e",
      "FindingId": "AnalysisFinding-1",
      "FindingComponents": [
        {
          "SequenceNumber": 1,
          "Component": {
            "Id": "igw-04a5344b4e30486f1",
            "Arn": "arn:aws:ec2:us-east-2:470889052923:internet-gateway/igw-04a5344b4e30486f1",
            "Name": "VPC BPA Internet Gateway"
          },
          "OutboundHeader": {
            "DestinationAddresses": [
              "10.0.1.85/32"
            ]
          },
          "InboundHeader": {
            "DestinationAddresses": [
              "10.0.1.85/32"
            ],
            "DestinationPortRanges": [
              {
                "From": 22,
                "To": 22
              }
            ],
            "Protocol": "6",
            "SourceAddresses": [
              "0.0.0.0/5",
              "100.0.0.0/10",
              "96.0.0.0/6"
            ],
            "SourcePortRanges": [
              {
                "From": 0,
                "To": 65535
              }
            ]
          },
          "Vpc": {
            "Id": "vpc-0762547ec48b6888d",
            "Arn": "arn:aws:ec2:us-east-2:470889052923:vpc/vpc-0762547ec48b6888d",
            "Name": "VPC BPA"
          }
        },
        {
          "SequenceNumber": 2,
          "AclRule": {
            "Cidr": "0.0.0.0/0",
            "Egress": false,
            "Protocol": "all",
            "RuleAction": "allow",
            "RuleNumber": 100
          },
          "Component": {
            "Id": "acl-06194fc3a4a03040b",
            "Arn": "arn:aws:ec2:us-east-2:470889052923:network-acl/acl-06194fc3a4a03040b"
          }
        },
        {
          "SequenceNumber": 3,
          "Component": {
            "Id": "sg-093dde06415d03924",
            "Arn": "arn:aws:ec2:us-east-2:470889052923:security-group/sg-093dde06415d03924",
            "Name": "VPC BPA Instances Security Group"
          },
          "SecurityGroupRule": {
            "Cidr": "0.0.0.0/0",
            "Direction": "ingress",
            "PortRange": {
              "From": 22,
              "To": 22
            },
            "Protocol": "tcp"
          }
        },
        {
          "SequenceNumber": 4,
          "AttachedTo": {
            "Id": "i-058db34f9a0997895",
            "Arn": "arn:aws:ec2:us-east-2:470889052923:instance/i-058db34f9a0997895",
            "Name": "VPC BPA Instance A"
          },
          "Component": {
            "Id": "eni-0fa23f2766f03b286",
            "Arn": "arn:aws:ec2:us-east-2:470889052923:network-interface/eni-0fa23f2766f03b286"
          },
          "InboundHeader": {
            "DestinationAddresses": [
              "10.0.1.85/32"
            ],
            "DestinationPortRanges": [
              {
                "From": 22,
                "To": 22
              }
            ],
            "Protocol": "6",
            "SourceAddresses": [
              "0.0.0.0/5",
              "100.0.0.0/10",
              "96.0.0.0/6"
            ],
            "SourcePortRanges": [
              {
                "From": 0,
                "To": 65535
              }
            ]
          },
          "Subnet": {
            "Id": "subnet-035d235a762eeed04",
            "Arn": "arn:aws:ec2:us-east-2:470889052923:subnet/subnet-035d235a762eeed04",
            "Name": "VPC BPA Public Subnet A"
          },
          "Vpc": {
            "Id": "vpc-0762547ec48b6888d",
            "Arn": "arn:aws:ec2:us-east-2:470889052923:vpc/vpc-0762547ec48b6888d",
            "Name": "VPC BPA"
          }
        }
      ]
    }
  ],
  "AnalysisStatus": "succeeded",
  "NetworkInsightsAccessScopeAnalysisId": "nisa-0aa383a1938f94cd1",
  "NextToken": "eyJOZXh0VG9rZW4iOiBudWxsLCAiYm90b190cnVuY2F0ZV9hbW91bnQiOiAxfQ=="
}
The results show the traffic to and from the internet gateways in all the VPCs in your account. The results are organized as "findings". "FindingId": "AnalysisFinding-1" indicates that this is the first finding in the analysis. Note that there are multiple findings and each indicates a traffic flow that will be impacted by turning on VPC BPA. The first finding will show that traffic started at an internet gateway ("SequenceNumber": 1), passed to an NACL ("SequenceNumber": 2) to a security group ("SequenceNumber": 3) and ended at an instance ("SequenceNumber": 4).
-
Analyze the findings to understand the impact of VPC BPA
on resources in your VPCs.
The impact analysis is complete.
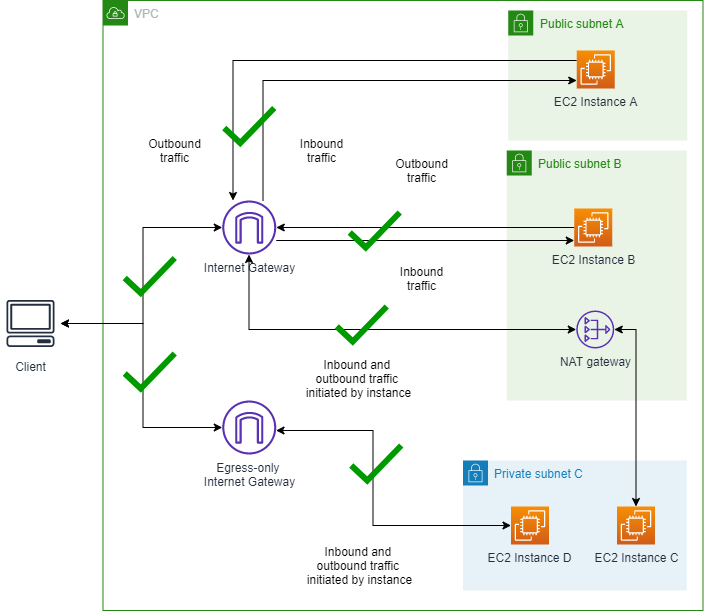
Scenario 1 - Connect to instances without VPC BPA turned on
In this section, EC2 instances in public subnets A and B are reachable from
the internet through the internet gateway, which allows both inbound and outbound
traffic. Instances C and D in the private subnet can initiate outbound traffic
through the NAT gateway or egress-only internet gateway, but are not directly
reachable from the internet. This setup provides internet access to some resources
while protecting others. The purpose of this setup is to set a baseline and ensure
that, before you enable VPC BPA, all instances can be reached, you'll connect to all
instances and ping a public IP address.
Diagram of a VPC without VPC BPA turned on:
1.1 Connect to instances
Complete this section to connect to your instances with VPC BPA turned off to ensure you can
connect without issue. All of the instances created with the CloudFormation for
this example have names like, "VPC BPA Instance A".
- Amazon Web Services Management Console
-
-
Open the Amazon EC2 console at
https://console.amazonaws.cn/ec2/.
-
Open the Instance A details.
-
Connect to instance A using the EC2 Instance
Connect > Connect using EC2
Instance Connect Endpoint option.
-
Choose Connect. Once you successfully connect to the instance, ping www.amazon.com to verify you can send outbound requests to the internet.
-
Use the same method you used to connect to instance A to
connect to instances B, C, and D. From each instance, ping
www.amazon.com to verify you can send outbound requests to
the internet.
- Amazon CLI
-
-
Ping Instance A using the public IPv4 address to check inbound traffic:
ping 18.225.8.244
Output:
Pinging 18.225.8.244 with 32 bytes of data:

Reply from 18.225.8.244: bytes=32 time=51ms TTL=110
Reply from 18.225.8.244: bytes=32 time=61ms TTL=110
Note that the ping is successful and traffic is not blocked.
-
Use the private IPv4 address to connect and check outbound traffic:
aws ec2-instance-connect ssh --instance-id i-058db34f9a0997895 --region us-east-2 --connection-type eice
Output:
A newer release of "Amazon Linux" is available. Version 2023.5.20240916:
Run "/usr/bin/dnf check-release-update" for full release and version update info
,     #_   ~_  ####_        Amazon Linux 2023
~~  _#####\  ~~     ###|
~~       #/ ___   https://aws.amazon.com/linux/amazon-linux-2023
~~       V~' '->
~~~         /
~~._.   _/
/ /
/m/'
Last login: Fri Sep 27 18:27:57 2024 from 3.16.146.5
[ec2-user@ip-10-0-1-85 ~]$ ping www.amazon.com
PING www-amazon-com.customer.fastly.net (18.65.233.187) 56(84) bytes of data.
64 bytes from 18.65.233.187 (18.65.233.187): icmp_seq=15 ttl=58 time=2.06 ms
64 bytes from 18.65.233.187 (18.65.233.187): icmp_seq=16 ttl=58 time=2.26 ms
Note that the ping is successful and traffic is not blocked.
-
Ping Instance B using the public IPv4 address to check inbound traffic:
ping 3.18.106.198
Output:
Pinging 3.18.106.198 with 32 bytes of data:
Reply from 3.18.106.198: bytes=32 time=83ms TTL=110
Reply from 3.18.106.198: bytes=32 time=54ms TTL=110
Note that the ping is successful and traffic is not blocked.
-
Use the private IPv4 address to connect and check outbound traffic:
aws ec2-instance-connect ssh --instance-id i-08552a0774b5c8f72 --region us-east-2 --connection-type eice
Output:
A newer release of "Amazon Linux" is available.
Version 2023.5.20240916:
Run "/usr/bin/dnf check-release-update" for full release and version update info
,     #   ~_  ####        Amazon Linux 2023
~~  _#####\  ~~     ###|
~~       #/ ___   https://aws.amazon.com/linux/amazon-linux-2023
~~       V~' '->
~~~         /
~~..   _/
/ /
/m/'
Last login: Fri Sep 27 18:12:27 2024 from 3.16.146.5
[ec2-user@ip-10-0-2-98 ~]$ ping www.amazon.com
PING d3ag4hukkh62yn.cloudfront.net (18.65.233.187) 56(84) bytes of data.
64 bytes from server-3-160-24-126.cmh68.r.cloudfront.net (18.65.233.187): icmp_seq=1 ttl=249 time=1.55 ms
64 bytes from server-3-160-24-126.cmh68.r.cloudfront.net (18.65.233.187): icmp_seq=2 ttl=249 time=1.67 ms
Note that the ping is successful and traffic is not blocked.
-
Connect to Instance C. Since there is no public IP address to ping, use EC2 Instance Connect to connect and then ping a public IP from the instance to check outbound traffic:
aws ec2-instance-connect ssh --instance-id i-04eca55f2a482b2c4 --region us-east-2 --connection-type eice
Output:
A newer release of "Amazon Linux" is available.
Version 2023.5.20240916:
Run "/usr/bin/dnf check-release-update" for full release and version update info
,     #   ~_  ####        Amazon Linux 2023
~~  _#####\  ~~     ###|
~~       #/ ___   https://aws.amazon.com/linux/amazon-linux-2023
~~       V~' '->
~~~         /
~~..   _/
/ /
/m/'
Last login: Thu Sep 19 20:31:26 2024 from 10.0.2.86
[ec2-user@ip-10-0-3-180 ~]$ ping www.amazon.com
PING d3ag4hukkh62yn.cloudfront.net (18.65.233.187) 56(84) bytes of data.
64 bytes from server-3-160-24-126.cmh68.r.cloudfront.net (18.65.233.187): icmp_seq=1 ttl=248 time=1.75 ms
64 bytes from server-3-160-24-126.cmh68.r.cloudfront.net (18.65.233.187): icmp_seq=2 ttl=248 time=1.97 ms
64 bytes from server-3-160-24-26.cmh68.r.cloudfront.net (18.65.233.187): icmp_seq=3 ttl=248 time=1.08 ms
Note that the ping is successful and traffic is not blocked.
-
Connect to Instance D. Since there is no public IP address to ping, use EC2 Instance Connect to connect and then ping a public IP from the instance to check outbound traffic:
aws ec2-instance-connect ssh --instance-id i-05f9e6a9cfac1dba0 --region us-east-2 --connection-type eice
Output:
The authenticity of host '10.0.3.59 can't be established.
ECDSA key fingerprint is SHA256:c4naBCqbC61/cExDyccEproNU+1HHSpMSzl2J6cOtIZA8g.
Are you sure you want to continue connecting (yes/no/[fingerprint])? yes
Warning: Permanently added '10.0.3.59' (ECDSA) to the list of known hosts.
A newer release of "Amazon Linux" is available.  Version 2023.5.20240916:
Run "/usr/bin/dnf check-release-update" for full release and version update info
,     #   ~_  ####        Amazon Linux 2023
~~  _#####\  ~~     ###|
~~       #/ ___   https://aws.amazon.com/linux/amazon-linux-2023
~~       V~' '->
~~~         /
~~..   _/
_/ _/
_/m/'
[ec2-user@ip-10-0-3-59 ~]$ ping www.amazon.com
PING www.amazon.com(2600:9000:25f3:ee00:7:49a5:5fd4:b121 (2600:9000:25f3:ee00:7:49a5:5fd4:b121)) 56 data bytes
64 bytes from 2600:9000:25f3:ee00:7:49a5:5fd4:b121 (2600:9000:25f3:ee00:7:49a5:5fd4:b121): icmp_seq=1 ttl=58 time=1.19 ms
64 bytes from 2600:9000:25f3:ee00:7:49a5:5fd4:b121 (2600:9000:25f3:ee00:7:49a5:5fd4:b121): icmp_seq=2 ttl=58 time=1.38 ms
Note that the ping is successful and traffic is not blocked.
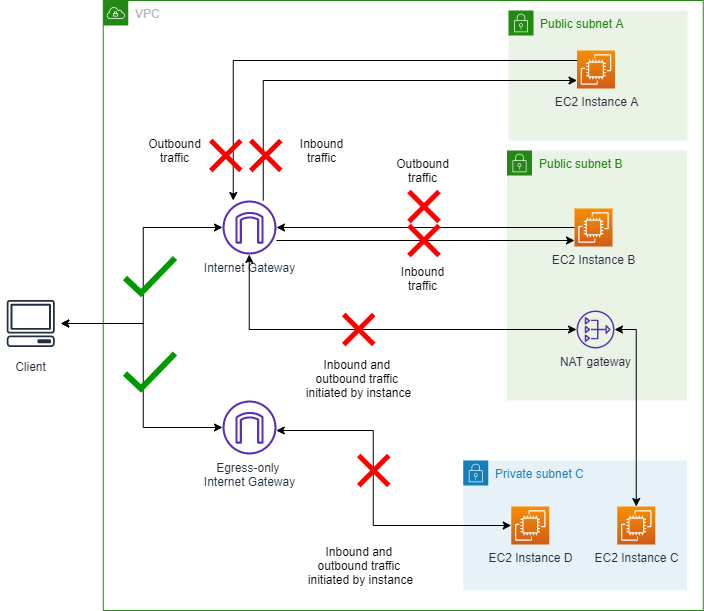
Scenario 2 - Turn on VPC BPA in Bidirectional mode
In this section you'll turn on VPC BPA and block traffic to and from the
internet gateways in your account.
Diagram showing VPC BPA Bidirectional mode turned on:
2.1 Enable VPC BPA bidirectional mode
Complete this section to enable VPC BPA. VPC BPA bidirectional mode blocks all traffic to and from internet gateways and egress-only internet gateways in this Region (except for excluded VPCs and subnets).
- Amazon Web Services Management Console
-
-
Open the Amazon VPC console at
https://console.amazonaws.cn/vpc/.
-
On the left navigation pane, choose
Settings.
-
Choose Edit public access
settings.
-
Choose Turn on block public access and Bidirectional, then choose Save changes.
-
Wait for the Status to change to
On. It may take a few minutes for
VPC BPA settings to take effect and the status to be
updated.
VPC BPA is now on.
- Amazon CLI
-
-
Use the modify-vpc-block-public-access-options command to turn on VPC BPA:
aws ec2 --region us-east-2 modify-vpc-block-public-access-options --internet-gateway-block-mode block-bidirectional
It may take a few minutes for VPC BPA settings to take
effect and the status to be updated.
-
View the status of VPC BPA:
aws ec2 --region us-east-2 describe-vpc-block-public-access-options
2.2 Connect to instances
Complete this section to connect to your instances.
- Amazon Web Services Management Console
-
-
Ping the public IPv4 address of Instance A and Instance B as you did in Scenario 1. Note that traffic is blocked.
-
Connect to instance A using the EC2 Instance
Connect > Connect using EC2
Instance Connect Endpoint option as you did
in Scenario 1. Make sure you use the endpoint option.
-
Choose Connect. Once you successfully
connect to the instance, ping www.amazon.com. Note that all
outbound traffic is blocked.
-
Use the same method you used to connect to instance A to
connect to instances B, C, and D, test outbound requests to
the internet. Note that all outbound traffic is
blocked.
- Amazon CLI
-
-
Ping Instance A using the public IPv4 address to check inbound traffic:
ping 18.225.8.244
Output:
Pinging 18.225.8.244 with 32 bytes of data:

Request timed out.
Note that the ping fails and traffic is blocked.
-
Use the private IPv4 address to connect and check outbound traffic:
aws ec2-instance-connect ssh --instance-id i-058db34f9a0997895 --region us-east-2 --connection-type eice
Output:
The authenticity of host '10.0.1.85' can't be established.
ECDSA key fingerprint is SHA256:3zo/gSss+HAZ+7eTyWlOB/Ke04IM+hadjsoLJeRTWBk.
Are you sure you want to continue connecting (yes/no/[fingerprint])? yes
Warning: Permanently added '10.0.1.85' (ECDSA) to the list of known hosts.
A newer release of "Amazon Linux" is available.  Version 2023.5.20240916:
Run "/usr/bin/dnf check-release-update" for full release and version update info
,     #_   ~_  ####_        Amazon Linux 2023
~~  _#####\  ~~     ###|
~~       #/ ___   https://aws.amazon.com/linux/amazon-linux-2023
~~       V~' '->
~~~         /
~~._.   _/
/ /
/m/'
Last login: Fri Sep 27 14:16:53 2024 from 3.16.146.5
[ec2-user@ip-10-0-1-85 ~]$ ping www.amazon.com
PING d3ag4hukkh62yn.cloudfront.net (18.65.233.187) 56(84) bytes of data.
Note that the ping fails and traffic is blocked.
-
Ping Instance B using the public IPv4 address to check inbound traffic:
ping 3.18.106.198
Output:
Pinging 3.18.106.198 with 32 bytes of data:
Request timed out.
Note that the ping fails and traffic is blocked.
-
Use the private IPv4 address to connect and check outbound traffic:
aws ec2-instance-connect ssh --instance-id i-08552a0774b5c8f72 --region us-east-2 --connection-type eice
Output:
The authenticity of host '10.0.2.98' can't be established.
ECDSA key fingerprint is SHA256:0IjXKKyVlDthcCfI0IPIJMUiItAOLYKRNLGTYURnFXo.
Are you sure you want to continue connecting (yes/no/[fingerprint])? yes
Warning: Permanently added '10.0.2.98' (ECDSA) to the list of known hosts.
A newer release of "Amazon Linux" is available.  Version 2023.5.20240916:
Run "/usr/bin/dnf check-release-update" for full release and version update info
,     #   ~_  ####        Amazon Linux 2023
~~  _#####\  ~~     ###|
~~       #/ ___   https://aws.amazon.com/linux/amazon-linux-2023
~~       V~' '->
~~~         /
~~..   _/
/ /
/m/'
Last login: Fri Sep 27 14:18:16 2024 from 3.16.146.5
[ec2-user@ip-10-0-2-98 ~]$ ping www.amazon.com
PING d3ag4hukkh62yn.cloudfront.net (18.65.233.187) 56(84) bytes of data.
Note that the ping fails and traffic is blocked.
-
Connect to Instance C. Since there is no public IP address to ping, use EC2 Instance Connect to connect and then ping a public IP from the instance to check outbound traffic:
aws ec2-instance-connect ssh --instance-id i-04eca55f2a482b2c4 --region us-east-2 --connection-type eice
Output:
A newer release of "Amazon Linux" is available.  Version 2023.5.20240916:
Run "/usr/bin/dnf check-release-update" for full release and version update info
,     #   ~_  ####        Amazon Linux 2023
~~  _#####\  ~~     ###|
~~       #/ ___   https://aws.amazon.com/linux/amazon-linux-2023
~~       V~' '->
~~~         /
~~..   _/
/ /
/m/'
Last login: Tue Sep 24 15:17:56 2024 from 10.0.2.86
[ec2-user@ip-10-0-3-180 ~]$ ping www.amazon.com
PING d3ag4hukkh62yn.cloudfront.net (18.65.233.187) 56(84) bytes of data.
Note that the ping fails and traffic is blocked.
-
Connect to Instance D. Since there is no public IP address to ping, use EC2 Instance Connect to connect and then ping a public IP from the instance to check outbound traffic:
aws ec2-instance-connect ssh --instance-id i-05f9e6a9cfac1dba0 --region us-east-2 --connection-type eice
Output:
A newer release of "Amazon Linux" is available.  Version 2023.5.20240916:
Run "/usr/bin/dnf check-release-update" for full release and version update info
,     #   ~_  ####        Amazon Linux 2023
~~  _#####\  ~~     ###|
~~       #/ ___   https://aws.amazon.com/linux/amazon-linux-2023
~~       V~' '->
~~~         /
~~..   _/
_/ _/
_/m/'
Last login: Fri Sep 27 16:42:01 2024 from 3.16.146.5
[ec2-user@ip-10-0-3-59 ~]$ ping www.amazon.com
PING www.amazon.com(2600:9000:25f3:8200:7:49a5:5fd4:b121 (2600:9000:25f3:8200:7:49a5:5fd4:b121)) 56 data bytes
Note that the ping fails and traffic is blocked.
2.3 Optional: Verify connectivity is blocked with Reachability Analyzer
VPC Reachability Analyzer can be used to understand whether or not certain network paths can be reached given your network configuration, including VPC BPA settings. In this example you will analyze the same network path that was attempted earlier to confirm that VPC BPA is the reason why connectivity is failing.
- Amazon Web Services Management Console
-
-
Go to the Network Insights console at https://console.amazonaws.cn/networkinsights/home#ReachabilityAnalyzer.
-
Click Create and analyze path.
-
For the Source Type, choose Internet Gateways and
select the internet gateway tagged VPC BPA Internet Gateway
from the Source dropdown.
-
For the Destination Type, choose Instances and select
the instance tagged with VPC BPA Instance A from the
Destination dropdown.
-
Click Create and analyze path.
-
Wait for the analysis to complete. It could take a few minutes.
-
Once complete, you should see that the Reachability Statusis Not reachable and that the Path details shows that VPC_BLOCK_PUBLIC_ACCESS_ENABLED is the cause.
- Amazon CLI
-
-
Create a network path using the ID of the internet
gateway tagged VPC BPA Internet Gateway and the ID of the
instance tagged VPC BPA Instance A:
aws ec2 --region us-east-2 create-network-insights-path --source igw-id --destination instance-id --protocol TCP
-
Start an analysis on the network path:
aws ec2 --region us-east-2 start-network-insights-analysis --network-insights-path-id nip-id
-
Retrieve the results of the analysis:
aws ec2 --region us-east-2 describe-network-insights-analyses --network-insights-analysis-ids nia-id
-
Verify that VPC_BLOCK_PUBLIC_ACCESS_ENABLED is the ExplanationCode for the lack of reachability.
Note that you can also Monitor VPC BPA impact with flow logs.
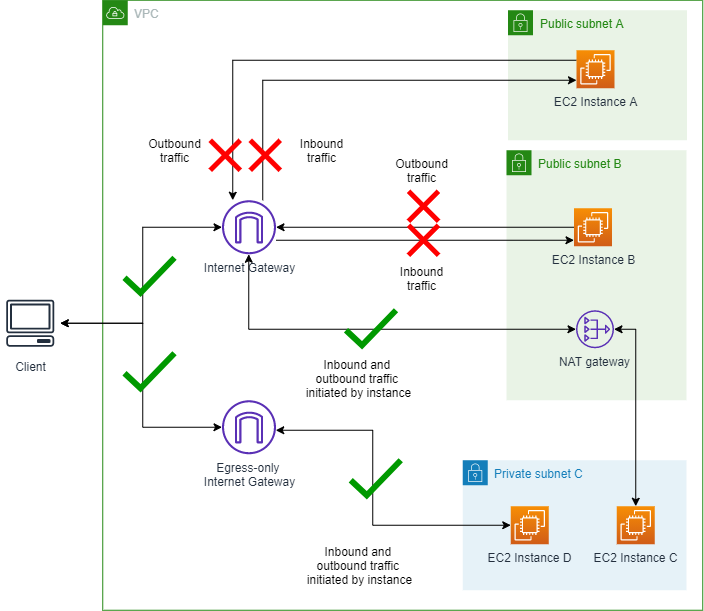
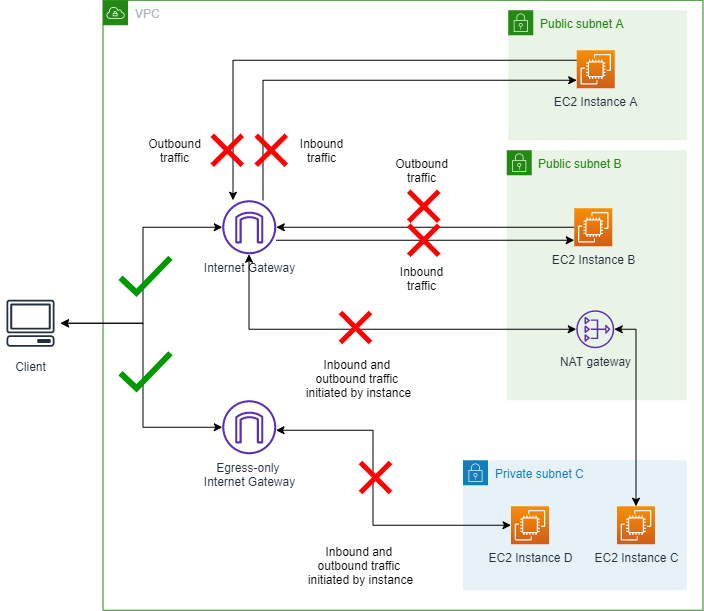
Scenario 3 - Change VPC BPA to Ingress-only mode
In this section you'll change the VPC BPA traffic direction and allow only
traffic that uses a NAT gateway or egress-only internet gateway. EC2 instances A and
B in the public subnets will be unreachable from the internet because BPA blocks
inbound traffic through the Internet Gateway. Instances C and D in the private
subnet will remain able to initiate outbound traffic through the NAT gateway and
egress-only internet gateway, and therefore can still reach the internet.
Diagram of VPC BPA Ingress-only mode turned on:
3.1 Change mode to ingress-only
Complete this section to change the mode.
- Amazon Web Services Management Console
-
-
Open the Amazon VPC console at
https://console.amazonaws.cn/vpc/.
-
On the left navigation pane, choose
Settings.
-
In the Block public access tab,
choose Edit public access
settings.
-
Modify the public access settings in the VPC console and change the direction to Ingress-only.
-
Save the changes and wait for the status to be
updated. It may take a few minutes for VPC BPA settings to
take effect and the status to be updated.
- Amazon CLI
-
-
Modify the VPC BPA mode:
aws ec2 --region us-east-2 modify-vpc-block-public-access-options --internet-gateway-block-mode block-ingress
It may take a few minutes for VPC BPA settings to take
effect and the status to be updated.
-
View the status of VPC BPA:
aws ec2 --region us-east-2 describe-vpc-block-public-access-options
3.2 Connect to instances
Complete this section to connect to the instances.
- Amazon Web Services Management Console
-
-
Ping the public IPv4 address of Instance A and Instance B as you did in Scenario 1. Note that traffic is blocked.
-
Connect to Instance A and B using EC2 instance connect as you did in Scenario 1 and ping www.amazon.com from them. Note that you cannot ping a public site on the internet from Instance A or B and traffic is blocked.
-
Connect to Instance C and D using EC2 instance connect as you did in Scenario 1 and ping www.amazon.com from them. Note that you can ping a public site on the internet from Instance C or D and traffic is allowed.
- Amazon CLI
-
-
Ping Instance A using the public IPv4 address to check inbound traffic:
ping 18.225.8.244
Output:
Pinging 18.225.8.244 with 32 bytes of data:

Request timed out.
Note that the ping fails and traffic is blocked.
-
Use the private IPv4 address to connect and check outbound traffic:
aws ec2-instance-connect ssh --instance-id i-058db34f9a0997895 --region us-east-2 --connection-type eice
Output:
The authenticity of host '10.0.1.85' can't be established.
ECDSA key fingerprint is SHA256:3zo/gSss+HAZ+7eTyWlOB/Ke04IM+hadjsoLJeRTWBk.
Are you sure you want to continue connecting (yes/no/[fingerprint])? yes
Warning: Permanently added '10.0.1.85' (ECDSA) to the list of known hosts.
A newer release of "Amazon Linux" is available.  Version 2023.5.20240916:
Run "/usr/bin/dnf check-release-update" for full release and version update info
,     #_   ~_  ####_        Amazon Linux 2023
~~  _#####\  ~~     ###|
~~       #/ ___   https://aws.amazon.com/linux/amazon-linux-2023
~~       V~' '->
~~~         /
~~._.   _/
/ /
/m/'
Last login: Fri Sep 27 14:16:53 2024 from 3.16.146.5
[ec2-user@ip-10-0-1-85 ~]$ ping www.amazon.com
PING d3ag4hukkh62yn.cloudfront.net (18.65.233.187) 56(84) bytes of data.
Note that the ping fails and traffic is blocked.
-
Ping Instance B using the public IPv4 address to check inbound traffic:
ping 3.18.106.198
Output:
Pinging 3.18.106.198 with 32 bytes of data:
Request timed out.
Note that the ping fails and traffic is blocked.
-
Use the private IPv4 address to connect and check outbound traffic:
aws ec2-instance-connect ssh --instance-id i-08552a0774b5c8f72 --region us-east-2 --connection-type eice
Output:
The authenticity of host '10.0.2.98 ' can't be established.
ECDSA key fingerprint is SHA256:0IjXKKyVlDthcCfI0IPIJMUiItAOLYKRNLGTYURnFXo.
Are you sure you want to continue connecting (yes/no/[fingerprint])? yes
Warning: Permanently added '10.0.2.98' (ECDSA) to the list of known hosts.
A newer release of "Amazon Linux" is available.  Version 2023.5.20240916:
Run "/usr/bin/dnf check-release-update" for full release and version update info
,     #   ~_  ####        Amazon Linux 2023
~~  _#####\  ~~     ###|
~~       #/ ___   https://aws.amazon.com/linux/amazon-linux-2023
~~       V~' '->
~~~         /
~~..   _/
_/ /
/m/'
Last login: Fri Sep 27 14:18:16 2024 from 3.16.146.5
[ec2-user@ip-10-0-2-98 ~]$ ping www.amazon.com
PING d3ag4hukkh62yn.cloudfront.net (18.65.233.187) 56(84) bytes of data.
Note that the ping fails and traffic is blocked.
-
Connect to Instance C. Since there is no public IP address to ping, use EC2 Instance Connect to connect and then ping a public IP from the instance to check outbound traffic:
aws ec2-instance-connect ssh --instance-id i-04eca55f2a482b2c4 --region us-east-2 --connection-type eice
Output:
A newer release of "Amazon Linux" is available.  Version 2023.5.20240916:
Run "/usr/bin/dnf check-release-update" for full release and version update info
   ,     #_   ~\_  ####_        Amazon Linux 2023
  ~~  \_#####\  ~~     \###|
  ~~       \#/ ___   https://aws.amazon.com/linux/amazon-linux-2023
   ~~       V~' '->
    ~~~         /
      ~~._.   _/
         _/ _/
       _/m/'
Last login: Tue Sep 24 15:28:09 2024 from 10.0.2.86
[ec2-user@ip-10-0-3-180 ~]$ ping www.amazon.com
PING d3ag4hukkh62yn.cloudfront.net (18.65.233.187) 56(84) bytes of data.
64 bytes from server-3-160-24-126.cmh68.r.cloudfront.net (18.65.233.187): icmp_seq=1 ttl=248 time=1.84 ms
64 bytes from server-3-160-24-126.cmh68.r.cloudfront.net (18.65.233.187): icmp_seq=2 ttl=248 time=1.40 ms
Note that the ping is successful and traffic is not blocked.
-
Connect to Instance D. Since there is no public IP address to ping, use EC2 Instance Connect to connect and then ping a public IP from the instance to check outbound traffic:
aws ec2-instance-connect ssh --instance-id i-05f9e6a9cfac1dba0 --region us-east-2 --connection-type eice
Output:
A newer release of "Amazon Linux" is available.  Version 2023.5.20240916:
Run "/usr/bin/dnf check-release-update" for full release and version update info
   ,     #_   ~\_  ####_        Amazon Linux 2023
  ~~  \_#####\  ~~     \###|
  ~~       \#/ ___   https://aws.amazon.com/linux/amazon-linux-2023
   ~~       V~' '->
    ~~~         /
      ~~._.   _/
         _/ _/
       _/m/'
Last login: Fri Sep 27 16:48:38 2024 from 3.16.146.5
[ec2-user@ip-10-0-3-59 ~]$ ping www.amazon.com
PING www.amazon.com(2600:9000:25f3:5800:7:49a5:5fd4:b121 (2600:9000:25f3:5800:7:49a5:5fd4:b121)) 56 data bytes
64 bytes from 2600:9000:25f3:5800:7:49a5:5fd4:b121 (2600:9000:25f3:5800:7:49a5:5fd4:b121): icmp_seq=14 ttl=58 time=1.47 ms
64 bytes from 2600:9000:25f3:5800:7:49a5:5fd4:b121 (2600:9000:25f3:5800:7:49a5:5fd4:b121): icmp_seq=16 ttl=58 time=1.59 ms
Note that the ping is successful and traffic is not blocked.
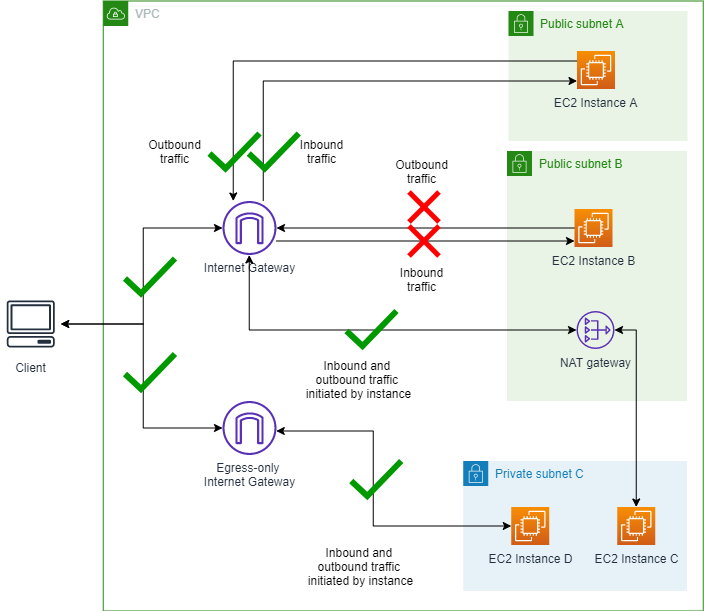
Scenario 4 - Create an exclusion
In this section, you'll create an exclusion. VPC BPA will then only block traffic
on the subnets without an exclusion. A VPC BPA exclusion is a mode that can be applied to a single VPC or subnet that exempts it from the account’s VPC BPA mode and will allow bidirectional or egress-only access. You can create VPC BPA exclusions for VPCs and subnets even when VPC BPA is not enabled on the account to ensure that there is no traffic disruption to the exclusions when VPC BPA is turned on.
In this example, we'll create an exclusion for Subnet A to show how
traffic to exclusions is impacted by VPC BPA.
Diagram of VPC BPA Ingress-only mode turned on and Subnet A exclusion with
Bidirectional mode turned on:
4.1 Create an exclusion for Subnet A
Complete this section to create an exclusion. A VPC BPA exclusion is a mode that can be applied to a single VPC or subnet that exempts it from the account’s VPC BPA mode and will allow bidirectional or egress-only access. You can create VPC BPA exclusions for VPCs and subnets even when VPC BPA is not enabled on the account to ensure that there is no traffic disruption to the exclusions when VPC BPA is turned on.
- Amazon Web Services Management Console
-
-
Open the Amazon VPC console at
https://console.amazonaws.cn/vpc/.
-
On the left navigation pane, choose
Settings.
-
In the Block public access tab, under Exclusions, choose Create exclusions.
-
Choose VPC BPA Public Subnet A,
ensure that allow direction
Bidirectional is selected, and
choose Create exclusions.
-
Wait for the Exclusion status to change to Active. You may need to refresh the exclusion table to see the change.
The exclusion has been created.
- Amazon CLI
-
-
Modify the exclusion allow direction:
aws ec2 --region us-east-2 create-vpc-block-public-access-exclusion --subnet-id subnet-id --internet-gateway-exclusion-mode allow-bidirectional
-
It can take time for the exclusion status to update. To view the status of the exclusion:
aws ec2 --region us-east-2 describe-vpc-block-public-access-exclusions --exclusion-ids exclusion-id
4.2 Connect to instances
Complete this section to connect to the instances.
- Amazon Web Services Management Console
-
-
Ping the public IPv4 address of Instance A. Note that traffic is allowed.
-
Ping the public IPv4 address of Instance B. Note that traffic is blocked.
-
Connect to Instance A using EC2 instance connect as you did in Scenario 1 and ping www.amazon.com. Note that you can ping a public site on the internet from Instance A. Traffic is allowed.
-
Connect to Instance B using EC2 instance connect as you did in Scenario 1 and ping www.amazon.com from it. Note that you cannot ping a public site on the internet from Instance B. Traffic is blocked.
-
Connect to Instance C and D using EC2 instance connect as you did in Scenario 1 and ping www.amazon.com from them. Note that you can ping a public site on the internet from Instance C or D. Traffic is allowed.
- Amazon CLI
-
-
Ping Instance A using the public IPv4 address to check inbound traffic:
ping 18.225.8.244
Output:
Pinging 18.225.8.244 with 32 bytes of data:

Reply from 18.225.8.244: bytes=32 time=51ms TTL=110
Reply from 18.225.8.244: bytes=32 time=61ms TTL=110
Note that the ping is successful and traffic is not blocked.
-
Use the private IPv4 address to connect and check outbound traffic:
aws ec2-instance-connect ssh --instance-id i-058db34f9a0997895 --region us-east-2 --connection-type eice
Output:
A newer release of "Amazon Linux" is available.  Version 2023.5.20240916:
Run "/usr/bin/dnf check-release-update" for full release and version update info
,     #_   ~_  ####_        Amazon Linux 2023
~~  _#####\  ~~     ###|
~~       #/ ___   https://aws.amazon.com/linux/amazon-linux-2023
~~       V~' '->
~~~         /
~~._.   _/
/ /
/m/'
Last login: Fri Sep 27 17:58:12 2024 from 3.16.146.5
[ec2-user@ip-10-0-1-85 ~]$ ping www.amazon.com
PING d3ag4hukkh62yn.cloudfront.net (18.65.233.187) 56(84) bytes of data.
64 bytes from server-3-160-24-126.cmh68.r.cloudfront.net (18.65.233.187): icmp_seq=1 ttl=249 time=1.03 ms
64 bytes from server-3-160-24-126.cmh68.r.cloudfront.net (18.65.233.187): icmp_seq=2 ttl=249 time=1.72 ms
Note that the ping is successful and traffic is not blocked.
-
Ping Instance B using the public IPv4 address to check inbound traffic:
ping 3.18.106.198
Output:
Pinging 3.18.106.198 with 32 bytes of data:
Request timed out.
Note that the ping fails and traffic is blocked.
-
Use the private IPv4 address to connect and check outbound traffic:
aws ec2-instance-connect ssh --instance-id i-08552a0774b5c8f72 --region us-east-2 --connection-type eice
Output:
A newer release of "Amazon Linux" is available.  Version 2023.5.20240916:
Run "/usr/bin/dnf check-release-update" for full release and version update info
,     #   ~_  ####        Amazon Linux 2023
~~  _#####\  ~~     ###|
~~       #/ ___   https://aws.amazon.com/linux/amazon-linux-2023
~~       V~' '->
~~~         /
~~..   _/
_/ /
/m/'
Last login: Fri Sep 27 18:12:03 2024 from 3.16.146.5
[ec2-user@ip-10-0-2-98 ~]$ ping www.amazon.com
PING d3ag4hukkh62yn.cloudfront.net (18.65.233.187) 56(84) bytes of data.
Note that the ping fails and traffic is blocked.
-
Connect to Instance C. Since there is no public IP address to ping, use EC2 Instance Connect to connect and then ping a public IP from the instance to check outbound traffic:
aws ec2-instance-connect ssh --instance-id i-04eca55f2a482b2c4 --region us-east-2 --connection-type eice
Output
A newer release of "Amazon Linux" is available.  Version 2023.5.20240916:
Run "/usr/bin/dnf check-release-update" for full release and version update info
,     #   ~_  ####        Amazon Linux 2023
~~  _#####\  ~~     ###|
~~       #/ ___   https://aws.amazon.com/linux/amazon-linux-2023
~~       V~' '->
~~~         /
~~..   _/
_/ /
/m/'
Last login: Tue Sep 24 15:28:09 2024 from 10.0.2.86
[ec2-user@ip-10-0-3-180 ~]$ ping www.amazon.com
PING d3ag4hukkh62yn.cloudfront.net (18.65.233.187) 56(84) bytes of data.
64 bytes from server-3-160-24-126.cmh68.r.cloudfront.net (18.65.233.187): icmp_seq=1 ttl=248 time=1.84 ms
64 bytes from server-3-160-24-126.cmh68.r.cloudfront.net (18.65.233.187): icmp_seq=2 ttl=248 time=1.40 ms
Note that the ping is successful and traffic is not blocked.
-
Connect to Instance D. Since there is no public IP address to ping, use EC2 Instance Connect to connect and then ping a public IP from the instance to check outbound traffic:
aws ec2-instance-connect ssh --instance-id i-05f9e6a9cfac1dba0 --region us-east-2 --connection-type eice
Output
A newer release of "Amazon Linux" is available.  Version 2023.5.20240916:
Run "/usr/bin/dnf check-release-update" for full release and version update info
   ,     #_   ~\_  ####_        Amazon Linux 2023
  ~~  \_#####\  ~~     \###|
  ~~       \#/ ___   https://aws.amazon.com/linux/amazon-linux-2023
   ~~       V~' '->
    ~~~         /
      ~~._.   _/
         _/ _/
       _/m/'
Last login: Fri Sep 27 18:00:52 2024 from 3.16.146.5
[ec2-user@ip-10-0-3-59 ~]$ ping www.amazon.com
PING www.amazon.com(g2600-141f-4000-059a-0000-0000-0000-3bd4.deploy.static.akamaitechnologies.com (2600:141f:4000:59a::3bd4)) 56 data bytes
64 bytes from g2600-141f-4000-059a-0000-0000-0000-3bd4.deploy.static.akamaitechnologies.com (2600:141f:4000:59a::3bd4): icmp_seq=1 ttl=48 time=15.9 ms
64 bytes from g2600-141f-4000-059a-0000-0000-0000-3bd4.deploy.static.akamaitechnologies.com (2600:141f:4000:59a::3bd4): icmp_seq=2 ttl=48 time=15.8 ms
Note that the ping is successful and traffic is not blocked.
4.3 Optional: Verify connectivity with Reachability Analyzer
Using the same network path created in Reachability Analyzer in Scenario 2, you can now run a new analysis and confirm that the path is reachable now that an exclusion has been created for Public Subnet A.
For
information about the regional availability of Reachability Analyzer, see Considerations in the Reachability Analyzer Guide.
- Amazon Web Services Management Console
-
-
From the Network Path you created earlier in the Network Insights console, click Re-run analysis.
-
Wait for the analysis to complete. It may take several minutes.
-
Confirm that the path is now
Reachable.
- Amazon CLI
-
-
Using the network path ID created earlier, start a new analysis:
aws ec2 --region us-east-2 start-network-insights-analysis --network-insights-path-id nip-id
-
Retrieve the results of the analysis:
aws ec2 --region us-east-2 describe-network-insights-analyses --network-insights-analysis-ids nia-id
-
Confirm that the VPC_BLOCK_PUBLIC_ACCESS_ENABLED explanation code is no longer present.
Scenario 5 - Modify exclusion mode
In this section you'll change the allow traffic direction on the exclusion to see
how it impacts VPC BPA.
In this scenario, you'll change the exclusion mode to Egress-only. Note that when you do this,
the Egress-only exclusion on Subnet A doesn't allow outbound traffic, which is
counterintuitive because you’d expect it to permit outbound traffic. However,
since the account-level BPA is Ingress-only, Egress-only exclusions are ignored,
and Subnet A’s routing to an internet gateway is restricted by VPC BPA, blocking
outbound traffic. To enable outbound traffic on Subnet A, you'd have to switch
VPC BPA to Bidirectional mode.
Diagram of VPC BPA Ingress-only mode turned on and Subnet A exclusion with
egress-only mode turned on:
5.1 Change exclusion allow direction to egress-only
Complete this section to change the exclusion allow direction.
- Amazon Web Services Management Console
-
-
Edit the exclusion you created in Scenario 4 and change the allow direction to Egress-only.
-
Choose Save changes.
-
Wait for the Exclusion status to
change to Active. It may take a few
minutes for VPC BPA settings to take effect and the status
to be updated. You may need to refresh the exclusion table
to see the change.
- Amazon CLI
-
-
Modify the exclusion allow direction:
aws ec2 --region us-east-2 modify-vpc-block-public-access-exclusion --exclusion-id exclusion-id --internet-gateway-exclusion-mode allow-egress
It may take a few minutes for VPC BPA settings to take
effect and the status to be updated.
-
It can take time for the exclusion status to update. To view the status of the exclusion:
aws ec2 --region us-east-2 describe-vpc-block-public-access-exclusion
5.2 Connect to instances
Complete this section to connect to the instances.
- Amazon Web Services Management Console
-
-
Ping the public IPv4 address of Instance A and B. Note that traffic is blocked.
-
Connect to Instance A and B using EC2 instance connect as you did in Scenario 1 and ping www.amazon.com. Note that you cannot ping a public site on the internet from Instance A or B. Traffic is blocked.
-
Connect to Instance C and D using EC2 instance connect as you did in Scenario 1 and ping www.amazon.com from them. Note that you can ping a public site on the internet from Instance C or D. Traffic is allowed.
- Amazon CLI
-
-
Ping Instance A using the public IPv4 address to check inbound traffic:
ping 18.225.8.244
Output:
Pinging 18.225.8.244 with 32 bytes of data:
Request timed out.
Note that the ping fails and traffic is blocked.
-
Use the private IPv4 address to connect and check outbound traffic:
aws ec2-instance-connect ssh --instance-id i-058db34f9a0997895 --region us-east-2 --connection-type eice
Output:
A newer release of "Amazon Linux" is available.  Version 2023.5.20240916:
Run "/usr/bin/dnf check-release-update" for full release and version update info
   ,     #_   ~\_  ####_        Amazon Linux 2023
  ~~  \_#####\  ~~     \###|
  ~~       \#/ ___   https://aws.amazon.com/linux/amazon-linux-2023
   ~~       V~' '->
    ~~~         /
      ~~._.   _/
         _/ _/
       _/m/'
Last login: Fri Sep 27 18:09:55 2024 from 3.16.146.5
[ec2-user@ip-10-0-1-85 ~]$ ping www.amazon.com
PING d3ag4hukkh62yn.cloudfront.net (18.65.233.187) 56(84) bytes of data.
Note that the ping fails and traffic is blocked.
-
Ping Instance B using the public IPv4 address to check inbound traffic:
ping 3.18.106.198
Output:
Pinging 3.18.106.198 with 32 bytes of data:
Request timed out.
Note that the ping fails and traffic is blocked.
-
Use the private IPv4 address to connect and check outbound traffic:
aws ec2-instance-connect ssh --instance-id i-058db34f9a0997895 --region us-east-2 --connection-type eice
Output:
A newer release of "Amazon Linux" is available.  Version 2023.5.20240916:
Run "/usr/bin/dnf check-release-update" for full release and version update info
   ,     #_   ~\_  ####_        Amazon Linux 2023
  ~~  \_#####\  ~~     \###|
  ~~       \#/ ___   https://aws.amazon.com/linux/amazon-linux-2023
   ~~       V~' '->
    ~~~         /
      ~~._.   _/
         _/ _/
       _/m/'
Last login: Fri Sep 27 18:09:55 2024 from 3.16.146.5
[ec2-user@ip-10-0-1-85 ~]$ ping www.amazon.com
PING d3ag4hukkh62yn.cloudfront.net (18.65.233.187) 56(84) bytes of data.
Note that the ping fails and traffic is blocked.
-
Connect to Instance C. Since there is no public IP address to ping, use EC2 Instance Connect to connect and then ping a public IP from the instance to check outbound traffic:
aws ec2-instance-connect ssh --instance-id i-04eca55f2a482b2c4 --region us-east-2 --connection-type eice
Output:
A newer release of "Amazon Linux" is available.  Version 2023.5.20240916:
Run "/usr/bin/dnf check-release-update" for full release and version update info
   ,     #_   ~\_  ####_        Amazon Linux 2023
  ~~  \_#####\  ~~     \###|
  ~~       \#/ ___   https://aws.amazon.com/linux/amazon-linux-2023
   ~~       V~' '->
    ~~~         /
      ~~._.   _/
         _/ _/
       _/m/'
Last login: Fri Sep 27 18:00:31 2024 from 3.16.146.5
[ec2-user@ip-10-0-3-180 ~]$ ping www.amazon.com
PING www.amazon.com(2600:9000:25f3:a600:7:49a5:5fd4:b121 (2600:9000:25f3:a600:7:49a5:5fd4:b121)) 56 data bytes
64 bytes from 2600:9000:25f3:a600:7:49a5:5fd4:b121 (2600:9000:25f3:a600:7:49a5:5fd4:b121): icmp_seq=1 ttl=58 time=1.51 ms
64 bytes from 2600:9000:25f3:a600:7:49a5:5fd4:b121 (2600:9000:25f3:a600:7:49a5:5fd4:b121): icmp_seq=2 ttl=58 time=1.49 ms
Note that the ping is successful and traffic is not blocked.
-
Connect to Instance D. Since there is no public IP address to ping, use EC2 Instance Connect to connect and then ping a public IP from the instance to check outbound traffic:
aws ec2-instance-connect ssh --instance-id i-05f9e6a9cfac1dba0 --region us-east-2 --connection-type eice
Output:
A newer release of "Amazon Linux" is available.  Version 2023.5.20240916:
Run "/usr/bin/dnf check-release-update" for full release and version update info
   ,     #_   ~\_  ####_        Amazon Linux 2023
  ~~  \_#####\  ~~     \###|
  ~~       \#/ ___   https://aws.amazon.com/linux/amazon-linux-2023
   ~~       V~' '->
    ~~~         /
      ~~._.   _/
         _/ _/
       _/m/'
Last login: Fri Sep 27 18:13:55 2024 from 3.16.146.5
[ec2-user@ip-10-0-3-59 ~]$ ping www.amazon.com
PING www.amazon.com(2606:2cc0::374 (2606:2cc0::374)) 56 data bytes
64 bytes from 2606:2cc0::374 (2606:2cc0::374): icmp_seq=1 ttl=58 time=1.21 ms
64 bytes from 2606:2cc0::374 (2606:2cc0::374): icmp_seq=2 ttl=58 time=1.51 ms
Note that the ping is successful and traffic is not blocked.
Scenario 6 - Modify VPC BPA mode
In this section you'll change the VPC BPA block direction to see how it
impacts traffic. In this scenario, VPC BPA enabled in bidirectional mode blocks all
traffic just like in Scenario 1. Unless an exclusion has access to a NAT gateway or
egress-only internet gateway, traffic is blocked.
Diagram of VPC BPA Bidirectional mode turned on and Subnet A exclusion with
egress-only mode turned on:
6.1 Change VPC BPA to bidirectional mode
Complete this section to change the VPC BPA mode.
- Amazon Web Services Management Console
-
-
Open the Amazon VPC console at
https://console.amazonaws.cn/vpc/.
-
On the left navigation pane, choose
Settings.
-
Choose Edit public access
settings.
-
Change the block direction to Bidirectional then choose Save changes.
-
Wait for the Status to change to
On. It may take a few minutes for
VPC BPA settings to take effect and the status to be
updated.
- Amazon CLI
-
-
Modify the VPC BPA block direction:
aws ec2 --region us-east-2 modify-vpc-block-public-access-options --internet-gateway-block-mode block-bidirectional
It may take a few minutes for VPC BPA settings to take
effect and the status to be updated.
-
View the status of VPC BPA:
aws ec2 --region us-east-2 describe-vpc-block-public-access-options
6.2 Connect to instances
Complete this section to connect to the instances.
- Amazon Web Services Management Console
-
-
Ping the public IPv4 address of Instance A and B. Note that traffic is blocked.
-
Connect to Instance A and B using EC2 instance connect as you did in Scenario 1 and ping www.amazon.com. Note that you cannot ping a public site on the internet from Instance A or B. Traffic is blocked.
-
Connect to Instance C and D using EC2 instance connect as you did in Scenario 1 and ping www.amazon.com from them. Note that you cannot ping a public site on the internet from Instance C or D. Traffic is blocked.
- Amazon CLI
-
-
Ping Instance A using the public IPv4 address to check inbound traffic:
ping 18.225.8.244
Output:
Pinging 18.225.8.244 with 32 bytes of data:
Request timed out.
Note that the ping fails and traffic is blocked.
-
Use the private IPv4 address to connect and check outbound traffic:
aws ec2-instance-connect ssh --instance-id i-058db34f9a0997895 --region us-east-2 --connection-type eice
Output:
A newer release of "Amazon Linux" is available.  Version 2023.5.20240916:
Run "/usr/bin/dnf check-release-update" for full release and version update info
   ,     #_   ~\_  ####_        Amazon Linux 2023
  ~~  \_#####\  ~~     \###|
  ~~       \#/ ___   https://aws.amazon.com/linux/amazon-linux-2023
   ~~       V~' '->
    ~~~         /
      ~~._.   _/
         _/ _/
       _/m/'
Last login: Fri Sep 27 18:17:44 2024 from 3.16.146.5
[ec2-user@ip-10-0-1-85 ~]$ ping www.amazon.com
PING d3ag4hukkh62yn.cloudfront.net (18.65.233.187) 56(84) bytes of data.
Note that the ping fails and traffic is blocked.
-
Ping Instance A using the public IPv4 address to check inbound traffic:
ping 3.18.106.198
Output:
Pinging 3.18.106.198 with 32 bytes of data:
Request timed out.
Note that the ping fails and traffic is blocked.
-
Use the private IPv4 address to connect and check outbound traffic:
aws ec2-instance-connect ssh --instance-id i-058db34f9a0997895 --region us-east-2 --connection-type eice
Output:
A newer release of "Amazon Linux" is available.  Version 2023.5.20240916:
Run "/usr/bin/dnf check-release-update" for full release and version update info
   ,     #_   ~\_  ####_        Amazon Linux 2023
  ~~  \_#####\  ~~     \###|
  ~~       \#/ ___   https://aws.amazon.com/linux/amazon-linux-2023
   ~~       V~' '->
    ~~~         /
      ~~._.   _/
         _/ _/
       _/m/'
Last login: Fri Sep 27 18:09:55 2024 from 3.16.146.5
[ec2-user@ip-10-0-1-85 ~]$ ping www.amazon.com
PING d3ag4hukkh62yn.cloudfront.net (18.65.233.187) 56(84) bytes of data.
Note that the ping fails and traffic is blocked.
-
Connect to Instance C. Since there is no public IP address to ping, use EC2 Instance Connect to connect and then ping a public IP from the instance to check outbound traffic:
aws ec2-instance-connect ssh --instance-id i-04eca55f2a482b2c4 --region us-east-2 --connection-type eice
Output:
A newer release of "Amazon Linux" is available.  Version 2023.5.20240916:
Run "/usr/bin/dnf check-release-update" for full release and version update info
   ,     #_   ~\_  ####_        Amazon Linux 2023
  ~~  \_#####\  ~~     \###|
  ~~       \#/ ___   https://aws.amazon.com/linux/amazon-linux-2023
   ~~       V~' '->
    ~~~         /
      ~~._.   _/
         _/ _/
       _/m/'
Last login: Fri Sep 27 18:19:45 2024 from 3.16.146.5
[ec2-user@ip-10-0-3-180 ~]$ ping www.amazon.com
PING www.amazon.com(2600:9000:25f3:6200:7:49a5:5fd4:b121 (2600:9000:25f3:6200:7:49a5:5fd4:b121)) 56 data bytes
Note that the ping fails and traffic is blocked.
-
Connect to Instance D. Since there is no public IP address to ping, use EC2 Instance Connect to connect and then ping a public IP from the instance to check outbound traffic:
aws ec2-instance-connect ssh --instance-id i-05f9e6a9cfac1dba0 --region us-east-2 --connection-type eice
Output:
A newer release of "Amazon Linux" is available.  Version 2023.5.20240916:
Run "/usr/bin/dnf check-release-update" for full release and version update info
   ,     #_   ~\_  ####_        Amazon Linux 2023
  ~~  \_#####\  ~~     \###|
  ~~       \#/ ___   https://aws.amazon.com/linux/amazon-linux-2023
   ~~       V~' '->
    ~~~         /
      ~~._.   _/
         _/ _/
       _/m/'
Last login: Fri Sep 27 18:20:58 2024 from 3.16.146.5
[ec2-user@ip-10-0-3-59 ~]$ ping www.amazon.com
PING www.amazon.com(2600:9000:25f3:b400:7:49a5:5fd4:b121 (2600:9000:25f3:b400:7:49a5:5fd4:b121)) 56 data bytes
Note that the ping fails and traffic is blocked.
Cleanup
In this section you'll delete all of the resources you've created for this advanced example. It's important to cleanup the resources to avoid excess additional charges for resources created in your account.
Delete the CloudFormation resources
Complete this section to delete the resources you created with the Amazon CloudFormation template.
- Amazon Web Services Management Console
-
- Amazon CLI
-
-
Delete the CloudFormation stack. You may have to force delete the stack for it to be fully deleted.
aws cloudformation delete-stack --stack-name VPC-BPA-stack --region us-east-2
-
View the progress and ensure that the stack is deleted.
aws cloudformation describe-stack-events --stack-name VPC-BPA-stack --region us-east-2
Track exclusion deletion using CloudTrail
Complete this section to track exclusion deletion using Amazon CloudTrail. CloudTrail
entries appear when you delete an exclusion.
- Amazon Web Services Management Console
-
You can view any deleted exclusions in the CloudTrail
Event history by looking up Resource type >
AWS::EC2::VPCBlockPublicAccessExclusion in
the AmazonCloudTrail console at https://console.amazonaws.cn/cloudtrailv2/.
- Amazon CLI
-
You can use the lookup-events command to view the events related to deleting exclusions:
aws cloudtrail lookup-events --lookup-attributes AttributeKey=ResourceType,AttributeValue=AWS::EC2::VPCBlockPublicAccessExclusion
The advanced example is complete.