Specify Active Directory details for your WorkSpaces Pools directory
Important
The WorkSpaces Pools feature is not available in the Beijing and Ningxia Regions.
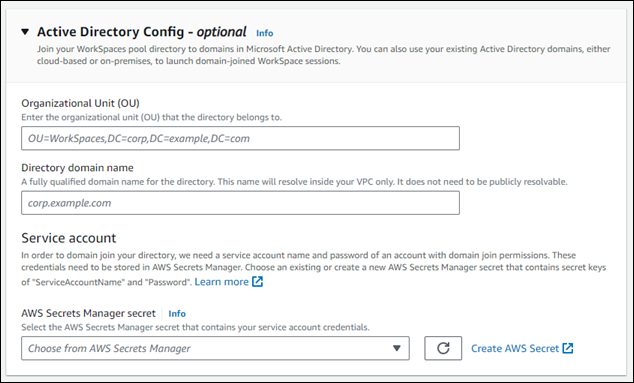
In this topic, we show you how to specify your Active Directory (AD) details within the Create WorkSpaces Pool directory page of the WorkSpaces console. As you create your WorkSpaces Pool directory, you should specify your AD details if you plan to use an AD with your WorkSpaces Pools. You cannot edit the Active Directory Config for your WorkSpaces Pools directory after you create it. Following is an example of the Active Directory Config section of the Create WorkSpaces Pool directory page.
Note
The full process for creating a WorkSpaces Pool directory is outlined in the Configure SAML 2.0 and create a WorkSpaces Pools directory topic. The procedures outlined on this page represent only a subset of steps of the full process to create a WorkSpaces Pool directory.
Topics
Specify the organization unit and directory domain name for your AD
Complete the following procedure to specify an organizational unit (OU) and a directory domain name for your AD in the Create a WorkSpaces Pool directory page.
-
For Organization Unit, enter the OU that the pool belongs to. WorkSpace machine accounts are placed in the organizational unit (OU) that you specify for the WorkSpaces Pool directory.
Note
The OU name can't contain spaces. If you specify an OU name that contains spaces, when it attempts to rejoin the Active Directory domain, WorkSpaces cannot cycle the computer objects correctly and the domain rejoin doesn't work.
-
For Directory domain name, enter the fully qualified domain name (FQDN) of the Active Directory domain (for example,
corp.example.com). Each Amazon Region can have only one directory config value with a specific directory name.-
You can join your WorkSpaces Pool directories to domains in Microsoft Active Directory. You can also use your existing Active Directory domains, either cloud-based or on-premises, to launch domain-joined WorkSpaces.
-
You can also use Amazon Directory Service for Microsoft Active Directory, also known as Amazon Managed Microsoft AD, to create an Active Directory domain. Then, you can use that domain to support your WorkSpaces resources.
-
By joining WorkSpaces to your Active Directory domain, you can:
-
Allow your users and applications to access Active Directory resources, such as printers and file shares from streaming sessions.
-
Use Group Policy settings that are available in the Group Policy Management Console (GPMC) to define the end user experience.
-
Stream applications that require users to be authenticated using their Active Directory login credentials.
-
Apply your enterprise compliance and security policies to your WorkSpaces streaming instances.
-
-
-
For Service account, continue to the Specify the service account for your AD next section of this page.
Specify the service account for your AD
When you configure Active Directory (AD) for your WorkSpaces Pools as part of the directory creation process, you must specify the AD service account to be used for managing the AD. This requires that you provide the service account credentials, which must be stored in Amazon Secrets Manager and encrypted using a Amazon Key Management Service (Amazon KMS) customer managed key. In this section, we show you how to create the Amazon KMS customer managed key and the Secrets Manager secret to store your AD service account credentials.
Step 1: Create an Amazon KMS customer managed key
Complete the following procedure to create an Amazon KMS customer managed key
-
Open the Amazon KMS console at https://console.amazonaws.cn/kms
. -
To change the Amazon Web Services Region, use the Region selector in the upper-right corner of the page.
-
Choose Create a key, and then choose Next.
-
Choose Symetric for the key type, and Encrypt and decrypt for the key usage, and then choose Next.
-
Enter an alias for the key, such as
WorkSpacesPoolDomainSecretKey, and then choose Next. -
Don't choose a key administrator. Choose Next to continue.
-
Don't define key usage permissions. Choose Next to continue.
-
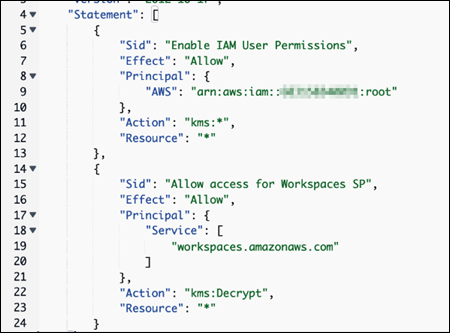
In the Key policy section of the page, add the following:
        {
            "Sid": "Allow access for Workspaces SP",
            "Effect": "Allow",
            "Principal": {
                "Service": "workspaces.amazonaws.com"
            },
            "Action": "kms:Decrypt",
            "Resource": "*"
        }
The result should appear like the following example.
-
Choose Finish.
Your Amazon KMS customer managed key is now ready to be used with Secrets Manager. Continue to the Step 2: Create Secrets Manager secret to store your AD service account credentials section of this page.
Step 2: Create Secrets Manager secret to store your AD service account credentials
Complete the following procedure to create a Secrets Manager secret to store your AD service account credentials.
-
Open the Amazon Secrets Manager console at https://console.amazonaws.cn/secretsmanager/
. -
Choose Create a new secret.
-
Choose Other type of secret.
-
For the first key/value pair, enter
Service Account Namefor the key, and the name of the service account for the value, such asdomain\username. -
For the second key/value pair, enter a
Service Account
                            Password
for the key, and the password of the service account for the value. -
For the encryption key, choose the Amazon KMS customer managed key that you created earlier, and then choose Next.
-
Enter a name for the secret, such as
WorkSpacesPoolDomainSecretAD. -
Choose Edit permissions in the Resource permissions section of the page.
-
Enter the following permission policy:
-
Choose Save to save the permission policy.
-
Choose Next to continue.
-
Don't configure automatic rotation. Choose Next to continue.
-
Choose Store to finish storing your secret.
Your AD service account credentials are now stored in Secrets Manager. Continue to the Step 3: Select the Secrets Manager secret that contains your AD service account credentails section of this page.
Step 3: Select the Secrets Manager secret that contains your AD service account credentails
Complete the following procedure to select the Secrets Manager secret you created in the Active Directory config for your WorkSpaces Pool directory.
-
For Service account, choose the Amazon Secrets Manager secret that contains your service account credentials. Complete the following steps to create the secret if you haven't already done so. The secret must be encrypted using a Amazon Key Management Service customer managed key.
Now that you've completed all of the fields within the Active Directory Config section of the Create WorkSpaces Pool directory page, you can continue to finish creating your WorkSpaces Pool directory. Go to Step 4: Create WorkSpace Pool directory and start on step 9 of the procedure.