Configure SAML 2.0 and create a WorkSpaces Pools directory
Important
The WorkSpaces Pools feature is not available in the Beijing and Ningxia Regions.
You can enable WorkSpaces client application registration and signing in to WorkSpaces in a WorkSpaces Pool by setting up identity federation using SAML 2.0. To do this, you use an Amazon Identity and Access Management (IAM) role and a relay state URL to configure your SAML 2.0 identity provider (IdP) and enable it for Amazon. This grants your federated users access to a WorkSpace Pool directory. The relay state is the WorkSpaces directory endpoint to which users are forwarded after successfully signing in to Amazon.
Important
WorkSpaces Pools doesn't support IP-based SAML 2.0 configurations.
Topics
Step 1: Consider the requirements
The following requirements apply when setting up SAML for a WorkSpaces Pools directory.
-
The workspaces_DefaultRole IAM role must exist in your Amazon account. This role is automatically created when you use the WorkSpaces Quick Setup or if you previously launched a WorkSpace using the Amazon Web Services Management Console. It grants Amazon WorkSpaces permission to access specific Amazon resources on your behalf. If the role already exists, you might need to attach the AmazonWorkSpacesPoolServiceAccess managed policy to it, which Amazon WorkSpaces uses to access required resources in the Amazon account for WorkSpaces Pools. For more information, see Create the workspaces_DefaultRole Role and Amazon managed policy: AmazonWorkSpacesPoolServiceAccess.
-
You can configure SAML 2.0 authentication for WorkSpaces Pools in the Amazon Web Services Regions that support the feature. For more information, see Amazon Web Services Regions and Availability Zones for WorkSpaces Pools.
-
To use SAML 2.0 authentication with WorkSpaces, the IdP must support unsolicited IdP-initiated SSO with a deep link target resource or relay state endpoint URL. Examples of IdPs that support this include ADFS, Azure AD, Duo Single Sign-On, Okta, PingFederate, and PingOne. Consult your IdP documentation for more information.
-
SAML 2.0 authentication is supported only on the following WorkSpaces clients. For the latest WorkSpaces clients, see the Amazon WorkSpaces Client Download page
. -
Windows client application version 5.20.0 or later
-
macOS client version 5.20.0 or later
-
Web Access
-
Step 2: Complete the prerequisites
Complete the following prerequisites before configuring your SAML 2.0 IdP connection to a WorkSpaces Pool directory.
-
Configure your IdP to establish a trust relationship with Amazon.
-
See Integrating third-party SAML solution providers with Amazon for more information on configuring Amazon federation. Relevant examples include IdP integration with IAM to access the Amazon Web Services Management Console.
-
Use your IdP to generate and download a federation metadata document that describes your organization as an IdP. This signed XML document is used to establish the relying party trust. Save this file to a location that you can access from the IAM console later.
-
Create a WorkSpaces Pool directory by using the WorkSpaces console. For more information, see Using Active Directory with WorkSpaces Pools.
-
Create a WorkSpaces Pool for users who can sign in to the IdP using a supported directory type. For more information, see Create a WorkSpaces Pool.
Step 3: Create a SAML identity provider in IAM
To get started, you must create a SAML IdP in IAM. This IdP defines your organization's IdP-to-Amazon trust relationship using the metadata document generated by the IdP software in your organization. For more information, see Creating and managing a SAML identity provider in the Amazon Identity and Access Management User Guide. For information about working with SAML IdPs in Amazon GovCloud (US) Regions, see Amazon Identity and Access Management in the Amazon GovCloud (US) User Guide.
Step 4: Create WorkSpace Pool directory
Complete the following procedure to create a WorkSpaces Pool directory.
Open the WorkSpaces console at https://console.amazonaws.cn/workspaces/v2/home
. -
Choose Directories in the navigation pane.
-
Choose Create directory.
-
For WorkSpace type, choose Pool.
-
In the User identity source section of the page:
-
Enter a placeholder value into the User access URL text box. For example, enter
placeholderinto the text box. You will edit this later after setting up the application entitlement in your IdP. -
Leave the Relay state parameter name text box blank. You will edit this later after setting up the application entitlement in your IdP.
-
-
In the Directory information section of the page, enter a name and a description for the directory. The directory name and description must be less than 128 characters, can contain alphanumeric characters and the following special characters:
_ @ # % * + = : ? . / ! \ -. The directory name and description cannot start with a special character. -
In the Networking and security section of the page:
-
Choose a VPC and 2 subnets that have access to the network resources that your application needs. For increased fault tolerance, you should choose two subnets in different Availability Zones.
-
Choose a security group that allows WorkSpaces to create network links in your VPC. Security groups control what network traffic is allowed to flow from WorkSpaces to your VPC. For example, if your security group restricts all inbound HTTPS connections, users accessing your web portal won't be able to load HTTPS websites from the WorkSpaces.
-
-
The Active Directory Config section is optional. However, you should specify your Active Directory (AD) details during the creation of your WorkSpaces Pools directory if you plan to use an AD with your WorkSpaces Pools. You can't edit the Active Directory Config for your WorkSpaces Pools directory after you create it. For more information about specifying your AD details for your WorkSpaces Pool directory, see Specify Active Directory details for your WorkSpaces Pools directory. After you complete the process outlined in that topic, you should return to this topic to finish creating your WorkSpaces Pools directory.
You can skip the Active Directory Config section if you don't plan on using an AD with your WorkSpaces Pools.
-
In the Streaming properties section of the page:
-
Choose the clipboard permissions behavior, and enter a copy to local character limit (optional), and paste to remote session character limit (optional).
-
Choose to allow or not allow print to local device.
-
Choose to allow or not allow diagnostic logging.
-
Choose to allow or not allow smart card sign in. This feature applies only if you enabled AD configuration earlier in this procedure.
-
-
In the Storage section of the page, you can choose to enable home folders.
-
In the IAM role section of the page, choose an IAM role to be available to all desktop streaming instances. To create a new one, choose Create new IAM role.
When you apply an IAM role from your account to a WorkSpace Pool directory, you can make Amazon API requests from a WorkSpace in the WorkSpace Pool without manually managing Amazon credentials. For more information, see Creating a role to delegate permissions to an IAM user in Amazon Identity and Access Management User Guide.
-
Choose Create directory.
Step 5: Create a SAML 2.0 federation IAM role
Complete the following procedure to create a SAML 2.0 federation IAM role in the IAM console.
-
Open the IAM console at https://console.amazonaws.cn/iam/
. -
Choose Roles in the navigation pane.
-
Choose Create role.
-
Choose SAML 2.0 federation for the trusted entity type.
-
For SAML 2.0-based provider, choose the identity provider you created in IAM. For more information, see Create a SAML identity provider in IAM.
-
Choose Allow programmatic access only for the access to be allowed.
-
Choose SAML:sub_type for the attribute.
-
For Value, enter
https://signin.aws.amazon.com/saml. This value restricts role access to SAML user streaming requests that include a SAML subject type assertion with a value ofpersistent. If the SAML:sub_type is persistent, your IdP sends the same unique value for theNameIDelement in all SAML requests from a particular user. For more information, see Uniquely identifying users in SAML-based federation in Amazon Identity and Access Management User Guide. -
Choose Next to continue.
-
Don't make changes or selections in the Add permissions page. Choose Next to continue.
-
Enter a name and a description for the role.
-
Choose Create role.
-
In the Roles page, choose the role you must created.
-
Choose the Trust relationships tab.
-
Choose Edit trust policy.
-
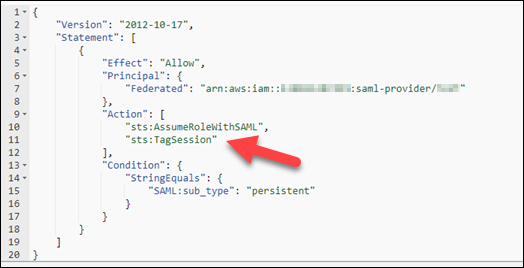
In the Edit trust policy JSON text box, add the sts:TagSession action to the trust policy. For more information, see Passing session tags in Amazon STS in Amazon Identity and Access Management User Guide.
The result should look like the following example.
-
Choose Update policy.
-
Choose the Permissions tab.
-
In the Permissions policies section of the page choose Add permissions and then choose Create inline policy.
-
In the Policy editor section of the page, choose JSON.
-
In the Policy editor JSON text box, enter the following policy. Be sure to replace:
-
<region-code>with the code of the Amazon Region in which you created your WorkSpace Pool directory. -
<account-id>with the Amazon account ID. -
<directory-id>with the ID of the directory you created earlier. You can get this in the WorkSpaces console.
For resources in Amazon GovCloud (US) Regions, use the following format for the ARN:
arn:aws-us-gov:workspaces:.<region-code>:<account-id>:directory/<directory-id> -
-
Choose Next.
-
Enter a name for the policy, and then choose Create policy.
Step 6: Configure your SAML 2.0 identity provider
Depending on your SAML 2.0 IdP, you might need to manually update your IdP to trust
Amazon as a service provider. You do this by downloading the
saml-metadata.xml file found at https://signin.aws.amazon.com/static/saml-metadata.xml
For some IdPs, the update might already be configured. You can skip this step if it's already configured. If the update isn't already configured in your IdP, review the documentation provided by your IdP for information about how to update the metadata. Some providers give you the option to type the URL of the XML file into their dashboard, and the IdP obtains and installs the file for you. Others require you to download the file from the URL and then upload it to their dashboard.
Important
At this time, you can also authorize users in your IdP to access the WorkSpaces application you have configured in your IdP. Users who are authorized to access the WorkSpaces application for your directory don't automatically have a WorkSpace created for them. Likewise, users that have a WorkSpace created for them are not automatically authorized to access the WorkSpaces application. To successfully connect to a WorkSpace using SAML 2.0 authentication, a user must be authorized by the IdP and must have a WorkSpace created.
Step 7: Create assertions for the SAML authentication response
Configure the information that your IdP sends to Amazon as SAML attributes in its authentication response. Depending on your IdP, this is might already be configured. You can skip this step if it's already configured. If it's not already configured, provide the following:
-
SAML Subject NameID — The unique identifier for the user who is signing in. Don't change the format/value of this field. Otherwise, the home folder feature will not work as expected because the user will be treated as different user.
Note
For domain-joined WorkSpaces Pools, the
NameIDvalue for the user must be provided in thedomain\usernameformat using thesAMAccountName, or in theusername@domain.comformat usinguserPrincipalName, or justuserName. If you are using thesAMAccountNameformat, you can specify the domain by using either the NetBIOS name or the fully qualified domain name (FQDN). ThesAMAccountNameformat is required for Active Directory one-way trust scenarios. For more information, see Using Active Directory with WorkSpaces Pools. if justuserNameis provided, the user will be logged in to the primary-domain -
SAML Subject Type (with a value set to
persistent) — Setting the value topersistentensures that your IdP sends the same unique value for theNameIDelement in all SAML requests from a particular user. Make sure that your IAM policy includes a condition to only allow SAML requests with a SAMLsub_typeset topersistent, as described in the Step 5: Create a SAML 2.0 federation IAM role section. -
Attributeelement with theNameattribute set to https://aws.amazon.com/SAML/Attributes/Role — This element contains one or moreAttributeValueelements that list the IAM role and SAML IdP to which the user is mapped by your IdP. The role and IdP are specified as a comma-delimited pair of ARNs. An example of the expected value isarn:aws:iam::.<account-id>:role/<role-name>,arn:aws:iam::<account-id>:saml-provider/<provider-name> -
Attributeelement with theNameattribute set to https://aws.amazon.com/SAML/Attributes/RoleSessionName — This element contains oneAttributeValueelement that provides an identifier for the Amazon temporary credentials that are issued for SSO. The value in theAttributeValueelement must be between 2 and 64 characters long, can contain alphanumeric characters and the following special characters:_ . : / = + - @. It can't contain spaces. The value is typically an email address or a user principal name (UPN). It shouldn't be a value that includes a space, such as a user's display name. -
Attributeelement with theNameattribute set to https://aws.amazon.com/SAML/Attributes/PrincipalTag:Email — This element contains oneAttributeValueelement that provides the email address of the user. The value must match the WorkSpaces user email address as defined in the WorkSpaces directory. Tag values may include combinations of letters, numbers, spaces, and_ . : / = + - @characters. For more information, see Rules for tagging in IAM and Amazon STS in the Amazon Identity and Access Management User Guide. -
(Optional)
Attributeelement with theNameattribute set to https://aws.amazon.com/SAML/Attributes/PrincipalTag:UserPrincipalName — This element contains oneAttributeValueelement that provides the Active DirectoryuserPrincipalNamefor the user who is signing in. The value must be provided in theusername@domain.comformat. This parameter is used with certificate-based authentication as the Subject Alternative Name in the end user certificate. For more information, see Certificate-based authentication and WorkSpaces Personal. -
(Optional)
Attributeelement with theNameattribute set to https://aws.amazon.com/SAML/Attributes/PrincipalTag:ObjectSid (optional) — This element contains oneAttributeValueelement that provides the Active Directory security identifier (SID) for the user who is signing in. This parameter is used with certificate-based authentication to enable strong mapping to the Active Directory user. For more information, see Certificate-based authentication and WorkSpaces Personal. -
(Optional)
Attributeelement with theNameattribute set to https://aws.amazon.com/SAML/Attributes/PrincipalTag:Domain — This element contains oneAttributeValueelement that provides the Active Directory DNS fully qualified domain name (FQDN) for users signing in. This parameter is used with certificate-based authentication when the Active DirectoryuserPrincipalNamefor the user contains an alternative suffix. The value must be provided in thedomain.comformat, and must include any subdomains. -
(Optional)
Attributeelement with theNameattribute set to https://aws.amazon.com/SAML/Attributes/SessionDuration — This element contains oneAttributeValueelement that specifies the maximum amount of time that a federated streaming session for a user can remain active before re-authentication is required. The default value is3600seconds (60 minutes). For more information, see the SAML SessionDurationAttribute in the Amazon Identity and Access Management User Guide.Note
Although
SessionDurationis an optional attribute, we recommend that you include it in the SAML response. If you don't specify this attribute, the session duration is set to a default value of3600seconds (60 minutes). WorkSpaces desktop sessions are disconnected after their session duration expires.
For more information about how to configure these elements, see Configuring SAML assertions for the authentication response in the Amazon Identity and Access Management User Guide. For information about specific configuration requirements for your IdP, see your IdP's documentation.
Step 8: Configure the relay state of your federation
Use your IdP to configure the relay state of your federation to point to the WorkSpaces Pool directory relay state URL. After successful authentication by Amazon, the user is directed to the WorkSpaces Pool directory endpoint, defined as the relay state in the SAML authentication response.
The following is the relay state URL format:
https://relay-state-region-endpoint/sso-idp?registrationCode=registration-code
The following table lists the relay state endpoints for the Amazon Regions where WorkSpaces SAML 2.0 authentication is available. Amazon Regions in which the WorkSpaces Pools feature is not available have been removed.
| Region | Relay state endpoint |
|---|---|
| US East (N. Virginia) Region |
|
| US West (Oregon) Region |
|
| Asia Pacific (Mumbai) Region | workspaces.euc-sso.ap-south-1.aws.amazon.com |
| Asia Pacific (Seoul) Region | workspaces.euc-sso.ap-northeast-2.aws.amazon.com |
| Asia Pacific (Singapore) Region | workspaces.euc-sso.ap-southeast-1.aws.amazon.com |
| Asia Pacific (Sydney) Region | workspaces.euc-sso.ap-southeast-2.aws.amazon.com |
| Asia Pacific (Tokyo) Region | workspaces.euc-sso.ap-northeast-1.aws.amazon.com |
| Canada (Central) Region | workspaces.euc-sso.ca-central-1.aws.amazon.com |
| Europe (Frankfurt) Region | workspaces.euc-sso.eu-central-1.aws.amazon.com |
| Europe (Ireland) Region | workspaces.euc-sso.eu-west-1.aws.amazon.com |
| Europe (London) Region | workspaces.euc-sso.eu-west-2.aws.amazon.com |
| South America (São Paulo) Region | workspaces.euc-sso.sa-east-1.aws.amazon.com |
| Amazon GovCloud (US-West) |
NoteFor information about working with SAML IdPs in Amazon GovCloud (US) Regions, see Amazon WorkSpaces in the Amazon GovCloud (US) User Guide. |
| Amazon GovCloud (US-East) |
NoteFor information about working with SAML IdPs in Amazon GovCloud (US) Regions, see Amazon WorkSpaces in the Amazon GovCloud (US) User Guide. |
Step 9: Enable integration with SAML 2.0 on your WorkSpace Pool directory
Complete the following procedure to enable SAML 2.0 authentication for the WorkSpaces Pool directory.
Open the WorkSpaces console at https://console.amazonaws.cn/workspaces/v2/home
. -
Choose Directories in the navigation pane.
-
Choose the Pools directories tab.
-
Choose the ID of the directory you want to edit.
-
Choose Edit in the Authentication section of the page.
-
Choose Edit SAML 2.0 Identity Provider.
-
For the User Access URL, which is sometimes know as the "SSO URL", replace the placeholder value with the SSO URL provided to you by your IdP.
-
For the IdP deep link parameter name, enter the parameter that is applicable to your IdP and the application you have configured. The default value is
RelayStateif you omit the parameter name.The following table lists the user access URLs and deep link parameter names that are unique to various identity providers for applications.
Identity provider Parameter User access URL ADFS RelayStatehttps://<host>/adfs/ls/idpinitiatedsignon.aspx?RelayState=RPID=<relaying-party-uri>Azure AD RelayStatehttps://myapps.microsoft.com/signin/<app-id>?tenantId=<tenant-id>Duo Single Sign-On RelayStatehttps://<sub-domain>.sso.duosecurity.com/saml2/sp/<app-id>/ssoOkta RelayStatehttps://<sub-domain>.okta.com/app/<app-name>/<app-id>/sso/samlOneLogin RelayStatehttps://<sub-domain>.onelogin.com/trust/saml2/http-post/sso/<app-id>JumpCloud RelayStatehttps://sso.jumpcloud.com/saml2/<app-id>Auth0 RelayStatehttps://<default-tenant-name>.us.auth0.com/samlp/<client-id>PingFederate TargetResourcehttps://<host>/idp/startSSO.ping?PartnerSpId=<sp-id>PingOne for Enterprise TargetResourcehttps://sso.connect.pingidentity.com/sso/sp/initsso?saasid=<app-id>&idpid=<idp-id> -
Choose Save.
Important
Revoking SAML 2.0 from a user won't directly disconnect their session. They will be removed only after the timeout kicks in. They can also terminate it using the TerminateWorkspacesPoolSession API.
Troubleshooting
The following information can help you troubleshoot specific issues with your WorkSpaces Pools.
I am receiving an "Unable to login" message in the WorkSpaces Pools client after completing SAML authentication
The nameID and PrincipalTag:Email in the SAML claims need
to match the username and email configured in Active Directory. Some IdP's may require an
update, refresh, or redeploy after adjusting certain attributes. If you make an adjustment
and it is not reflected in your SAML capture, refer to your IdP's documentation or support
program regarding the specific steps required to make the change take effect.