Instrumenting web frameworks deployed to serverless environments
Note
X-Ray SDK/Daemon Maintenance Notice – On February 25th, 2026, the Amazon X-Ray SDKs/Daemon will enter maintenance mode, where Amazon will limit X-Ray SDK and Daemon releases to address security issues only. For more information on the support timeline, see X-Ray SDK and Daemon Support timeline. We recommend to migrate to OpenTelemetry. For more information on migrating to OpenTelemetry, see Migrating from X-Ray instrumentation to OpenTelemetry instrumentation .
The Amazon X-Ray SDK for Python supports instrumenting web frameworks deployed in serverless applications. Serverless is the native architecture of the cloud that enables you to shift more of your operational responsibilities to Amazon, increasing your agility and innovation.
Serverless architecture is a software application model that enables you to build and run applications and services without thinking about servers. It eliminates infrastructure management tasks such as server or cluster provisioning, patching, operating system maintenance, and capacity provisioning. You can build serverless solutions for nearly any type of application or backend service, and everything required to run and scale your application with high availability is handled for you.
This tutorial shows you how to automatically instrument Amazon X-Ray on a web framework, such as Flask or Django, that is deployed to a serverless environment. X-Ray instrumentation of the application enables you to view all downstream calls that are made, starting from Amazon API Gateway through your Amazon Lambda function, and the outgoing calls your application makes.
The X-Ray SDK for Python supports the following Python application frameworks:
-
Flask version 0.8, or later
-
Django version 1.0, or later
This tutorial develops an example serverless application that is deployed to Lambda and invoked by API Gateway. This tutorial uses Zappa to automatically deploy the application to Lambda and to configure the API Gateway endpoint.
Prerequisites
-
Python – Version 2.7 or 3.6.
-
Amazon CLI
– Verify that your Amazon CLI is configured with the account and Amazon Web Services Region in which you will deploy your application.
Step 1: Create an environment
In this step, you create a virtual environment using virtualenv to host an application.
-
Using the Amazon CLI, create a directory for the application. Then change to the new directory.
mkdirserverless_applicationcdserverless_application -
Next, create a virtual environment within your new directory. Use the following command to activate it.
# Create our virtual environment virtualenvserverless_env# Activate it sourceserverless_env/bin/activate -
Install X-Ray, Flask, Zappa, and the Requests library to your environment.
# Install X-Ray, Flask, Zappa, and Requests into your environment pip install aws-xray-sdk flask zappa requests -
Add application code to the
serverless_applicationdirectory. For this example, we can build off of Flasks's Hello Worldexample. In the
serverless_applicationdirectory, create a file namedmy_app.py. Then use a text editor to add the following commands. This application instruments the Requests library, patches the Flask application's middleware, and opens the endpoint'/'.# Import the X-Ray modules from aws_xray_sdk.ext.flask.middleware import XRayMiddleware from aws_xray_sdk.core import patcher, xray_recorder from flask import Flask import requests # Patch the requests module to enable automatic instrumentation patcher.patch(('requests',)) app = Flask(__name__) # Configure the X-Ray recorder to generate segments with our service name xray_recorder.configure(service='My First Serverless App') # Instrument the Flask application XRayMiddleware(app, xray_recorder) @app.route('/') def hello_world(): resp = requests.get("https://aws.amazon.com") return 'Hello, World: %s' % resp.url
Step 2: Create and deploy a zappa environment
In this step you will use Zappa to automatically configure an API Gateway endpoint and then deploy to Lambda.
-
Initialize Zappa from within the
serverless_applicationdirectory. For this example, we used the default settings, but if you have customization preferences, Zappa displays configuration instructions.zappa initWhat do you want to call this environment (default 'dev'):
dev... What do you want to call your bucket? (default 'zappa-*******'):zappa-*******... ... It looks like this is a Flask application. What's the modular path to your app's function? This will likely be something like 'your_module.app'. We discovered: my_app.app Where is your app's function? (default 'my_app.app'):my_app.app... Would you like to deploy this application globally? (default 'n') [y/n/(p)rimary]:n -
Enable X-Ray. Open the
zappa_settings.jsonfile and verify that it looks similar to the example.{ "dev": { "app_function": "my_app.app", "aws_region": "us-west-2", "profile_name": "default", "project_name": "serverless-exam", "runtime": "python2.7", "s3_bucket": "zappa-*********" } } -
Add
"xray_tracing": trueas an entry to the configuration file.{ "dev": { "app_function": "my_app.app", "aws_region": "us-west-2", "profile_name": "default", "project_name": "serverless-exam", "runtime": "python2.7", "s3_bucket": "zappa-*********","xray_tracing": true} } -
Deploy the application. This automatically configures the API Gateway endpoint and uploads your code to Lambda.
zappa deploy... Deploying API Gateway.. Deployment complete!: https://**********.execute-api.us-west-2.amazonaws.com/
dev
Step 3: Enable X-Ray tracing for API Gateway
In this step you will interact with the API Gateway console to enable X-Ray tracing.
Sign in to the Amazon Web Services Management Console and open the API Gateway console at https://console.amazonaws.cn/apigateway/
. -
Find your newly generated API. It should look something like
serverless-exam-dev. -
Choose Stages.
-
Choose the name of your deployment stage. The default is
dev. -
On the Logs/Tracing tab, select the Enable X-Ray Tracing box.
-
Choose Save Changes.
-
Access the endpoint in your browser. If you used the example
Hello Worldapplication, it should display the following."Hello, World: https://aws.amazon.com/"
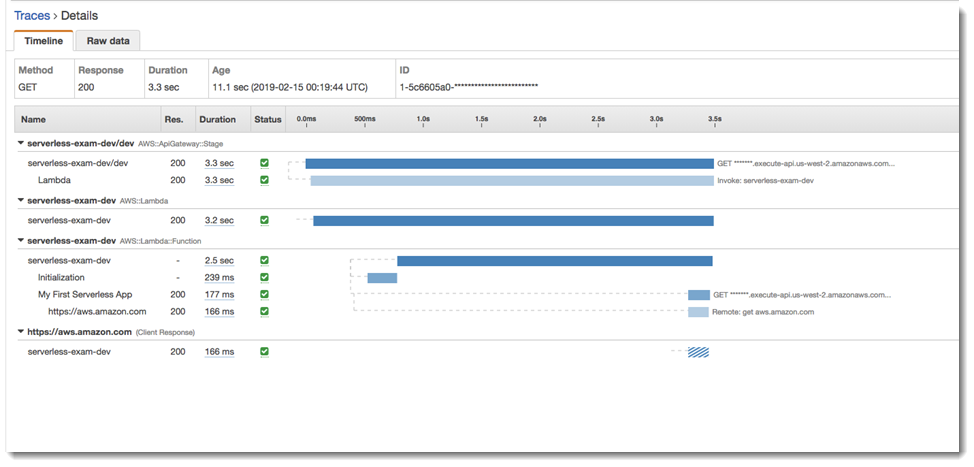
Step 4: View the created trace
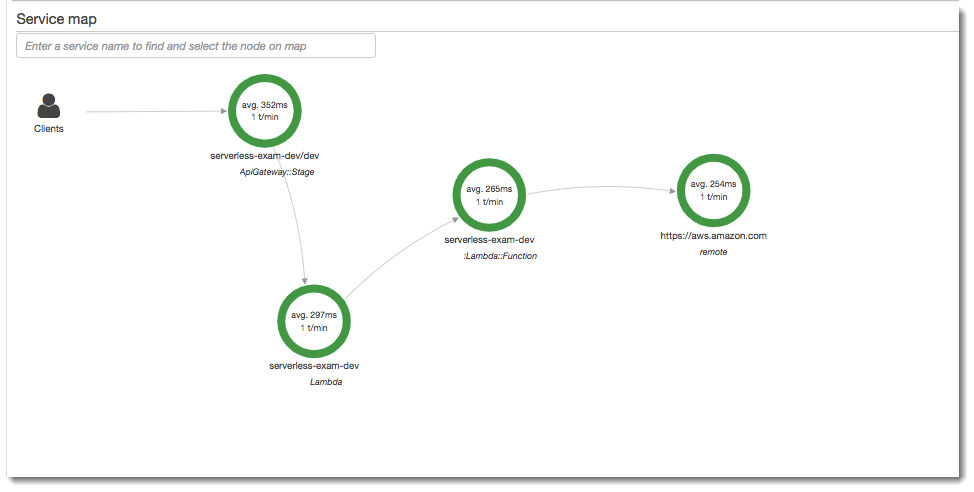
In this step you will interact with the X-Ray console to view the trace created by the example application. For a more detailed walkthrough on trace analysis, see Viewing the Service Map.
Sign in to the Amazon Web Services Management Console and open the X-Ray console at https://console.amazonaws.cn/xray/home
. -
View segments generated by API Gateway, the Lambda function, and the Lambda container.
-
Under the Lambda function segment, view a subsegment named
My First Serverless App. It's followed by a second subsegment namedhttps://aws.amazon.com. -
During initialization, Lambda might also generate a third subsegment named
initialization.
Step 5: Clean up
Always terminate resources you are no longer using to avoid the accumulation of unexpected costs. As this tutorial demonstrates, tools such as Zappa streamline serverless redeployment.
To remove your application from Lambda, API Gateway, and Amazon S3, run the following command in your project directory by using the Amazon CLI.
zappa undeploydev
Next steps
Add more features to your application by adding Amazon clients and instrumenting them with X-Ray. Learn more
about serverless computing options at Serverless on Amazon