本文属于机器翻译版本。若本译文内容与英语原文存在差异,则一律以英文原文为准。
将你的 Windows、Linux 电脑或 Mac 当作 Amazon IoT 设备
在本教程中,您将配置一台用于的个人计算机 Amazon IoT。这些说明支持 Windows 和 Linux PC 以及 Mac。要完成此操作,您需要在电脑上安装某些软件。如果您不想在电脑上安装软件,可以尝试 使用 Amazon EC2 创建虚拟设备,它将在虚拟机上安装所有软件。
在本教程中,您将:
设置您的个人电脑
要完成本教程,您需要一台连接至互联网的 Windows 或 Linux PC 或 Mac。
在继续下一步之前,请确保您可以在电脑上打开命令行窗口。在 Windows PC 上使用 cmd.exe。在 Linux PC 或 Mac 上,使用 Terminal。
安装 Git、Python 和 Amazon IoT Device SDK for Python
在本节中,你将在电脑上安装 Python 和适用于 Python 的 Amazon IoT 设备 SDK。
安装并使用最新版本的 Git 和 Python
此步骤说明了如何在个人计算机上安装最新版本的 Git 和 Python。
要下载 Git 和 Python 并安装在您的电脑上
-
检查您的电脑上是否已经安装了 Git。在命令行输入此命令。
git --version如果命令显示 Git 版本,则表示已安装 Git,您可以继续执行下一步。
如果命令显示错误,请打开
https://git-scm.com/download并为您的电脑安装 Git。 -
检查您是否已安装了 Python。在命令行中输入此命令。
python -V注意
如果此命令返回错误:
Python was not
                                            found
,这可能是因为您的操作系统将 Python v3.x 可执行文件调用为Python3。在这种情况下,请将python的所有实例替换为python3,并继续本教程的其余部分。如果命令显示 Python 版本,则表示已安装 Python。此教程需要 Python v3.7 或更高版本。
-
如果已安装 Python,您可以跳过本部分的其余步骤。如果没有,请继续。
-
打开https://www.python.org/downloads/
并下载适用于您的计算机的安装程序。 -
如果下载的程序没有自动开始安装,请运行下载的程序以安装 Python。
-
验证 Python 的安装。
python -V确认该命令显示 Python 版本。如果没有显示 Python 版本,请尝试再次下载并安装 Python。
安装 Amazon IoT Device SDK for Python
要安装 Amazon IoT 在你的电脑上安装适用于 Python 的设备 SDK
-
安装适用于 Python 的 Amazon IoT 设备开发工具包的 v2。
python3 -m pip install awsiotsdk -
将适用于 Python 的 Amazon IoT 设备 SDK 存储库克隆到主目录的 aws-iot-device-sdevice-sdk-python-v2 目录中。此过程指的是您要安装的文件的基本目录
home。home目录的实际位置取决于您的操作系统。注意
如果你使用的是 Window PowerShell s 而不是cmd.exe,请使用以下命令。
echo $home
有关更多信息,请参阅适用于 Python 的Amazon IoT
设备 SDK GitHub 存储库
准备运行示例应用程序
要准备您的系统以运行示例应用程序
-
创建
certs目录。进入certs目录,复制您在 Create Amazon IoT 资源 中创建和注册事物对象时保存的私有密钥、设备证书和根 CA 证书文件。目标目录中每个文件的文件名应与表中的文件名匹配。下一部分中的命令假定您的密钥和证书文件均已存储在设备上,如下表中所示。
设置策略并运行示例应用程序
在本部分中,您将设置策略并运行在 Amazon IoT Device SDK for Python的 aws-iot-device-sdk-python-v2/samples 目录中找到的 pubsub.py 示例脚本。此脚本显示设备将如何使用 MQTT 库发布和订阅 MQTT 消息。
pubsub.py 示例应用程序订阅了一个主题,test/topic,将 10 条消息发布到该主题,并在从消息代理收到这些消息时予以显示。
要运行 pubsub.py 示例应用程序,您需要具有以下信息:
|
参数 |
在何处查找值 |
|---|---|
your-iot-endpoint |
|
该your-iot-endpoint值的格式为:endpoint_id-ats.iot.region.amazonaws.coma3qj468EXAMPLE-ats.iot.us-west-2.amazonaws.com。
在运行脚本之前,请确保事物的策略为示例脚本提供了连接、订阅、发布和接收的权限。
要查找和查看事物资源的策略文档
-
在 Amazon IoT 控制台
的 Things(事物)列表中,找到代表设备的事物资源。 -
选择代表设备的事物资源名称链接来打开 Thing details(事物详细信息)页面。
-
在Thing details(事物详细信息)页面,Certificates(证书)选项卡中,选择附加到事物资源的证书。列表中应只有一个证书。如果有多个证书,请选择文件安装在设备上并连接到 Amazon IoT Core上的证书。
在Certificate(证书)详细信息页面的Policies(策略)选项卡中,选择附加到该证书的策略。应该只有一个策略。如果有多个策略,请重复下一步,确保至少有一个策略授予所需的访问权限。
-
在策略概述页面,找到 JSON 编辑器然后选择编辑策略文档,根据需要查看和编辑策略文档。
-
下列示例中显示了 JSON 策略。在
"Resource"元素 Amazon Web Services 账户 中,将每个Resource值region:account-
{
    "Version":"2012-10-17",
    "Statement": [
        {
            "Effect": "Allow",
            "Action": [
                "iot:Publish",
                "iot:Receive"
            ],
            "Resource": [
            "arn:aws:iot:us-east-1:123456789012:topic/test/topic"
            ]
        },
        {
            "Effect": "Allow",
            "Action": [
                "iot:Subscribe"
            ],
            "Resource": [
            "arn:aws:iot:us-east-1:123456789012:topicfilter/test/topic"
            ]
        },
        {
            "Effect": "Allow",
            "Action": [
                "iot:Connect"
            ],
            "Resource": [
            "arn:aws:iot:us-east-1:123456789012:client/test-*"
            ]
        }
    ]
}
示例脚本:
-
Amazon IoT Core 为您的账户连接到。
-
订阅消息主题 test/topic,并显示它收到的有关该主题的消息。
-
向该主题发布 10 条消息test/topic。
-
输出类似于以下内容:
Connected!
Subscribing to topic 'test/topic'...
Subscribed with QoS.AT_LEAST_ONCE
Sending 10 message(s)
Publishing message to topic 'test/topic': Hello World! [1]
Received message from topic 'test/topic': b'"Hello World! [1]"'
Publishing message to topic 'test/topic': Hello World! [2]
Received message from topic 'test/topic': b'"Hello World! [2]"'
Publishing message to topic 'test/topic': Hello World! [3]
Received message from topic 'test/topic': b'"Hello World! [3]"'
Publishing message to topic 'test/topic': Hello World! [4]
Received message from topic 'test/topic': b'"Hello World! [4]"'
Publishing message to topic 'test/topic': Hello World! [5]
Received message from topic 'test/topic': b'"Hello World! [5]"'
Publishing message to topic 'test/topic': Hello World! [6]
Received message from topic 'test/topic': b'"Hello World! [6]"'
Publishing message to topic 'test/topic': Hello World! [7]
Received message from topic 'test/topic': b'"Hello World! [7]"'
Publishing message to topic 'test/topic': Hello World! [8]
Received message from topic 'test/topic': b'"Hello World! [8]"'
Publishing message to topic 'test/topic': Hello World! [9]
Received message from topic 'test/topic': b'"Hello World! [9]"'
Publishing message to topic 'test/topic': Hello World! [10]
Received message from topic 'test/topic': b'"Hello World! [10]"'
10 message(s) received.
Disconnecting...
Disconnected!
如果您在运行示例应用程序时遇到问题,请查看 借助示例应用程序排除问题。
您还可以将 --verbosity Debug 参数添加到命令行,以便示例应用程序显示有关其正在执行的操作的详细消息。该信息可能会帮助您改正此问题。
在中查看来自示例应用程序的消息 Amazon IoT 控制台
您可以在 Amazon IoT 控制台中使用 MQTT 测试客户端,在示例应用程序的消息通过消息代理时查看它们。
要查看示例应用程序发布的 MQTT 消息
-
审核 使用查看 MQTT 消息 Amazon IoT MQTT 客户端。它可以帮助您了解如何使用 Amazon IoT 控制台中的 MQTT 测试客户端来查看通过消息代理时的 MQTT 消息。
-
在 Amazon IoT 控制台中打开 MQTT 测试客户端。
-
在 “订阅主题” 中,订阅该主题,test/topic。
-
在命令行窗口中,再次运行示例应用程序,并在 Amazon IoT 控制台的 MQTT 客户端中查看消息。
有关 MQTT 以及如何 Amazon IoT Core 支持该协议的更多信息,请参阅 MQ TT。
在 Python 中运行共享订阅示例
Amazon IoT Core 支持 MQTT 3 和 MQTT 5 的共享订阅。共享订阅允许多个客户端共享对某个主题的订阅,并且只有一个客户端会收到使用随机分布发布到该主题的消息。要使用共享订阅,客户需要订阅共享订阅的主题筛选条件:$share/{ShareName}/{TopicFilter}。
设置策略并运行共享订阅示例
-
要运行共享订阅示例,您必须按照 MQTT 5 共享订阅
中的说明设置您的事物的策略。 -
要运行共享订阅示例,请运行以下命令。
注意
在运行示例时,您可以根据需要选择指定组标识符(例如
--group_identifier consumer)。如果未指定组标识符,则python-sample为默认组标识符。 -
命令行中的输出可能如下所示:
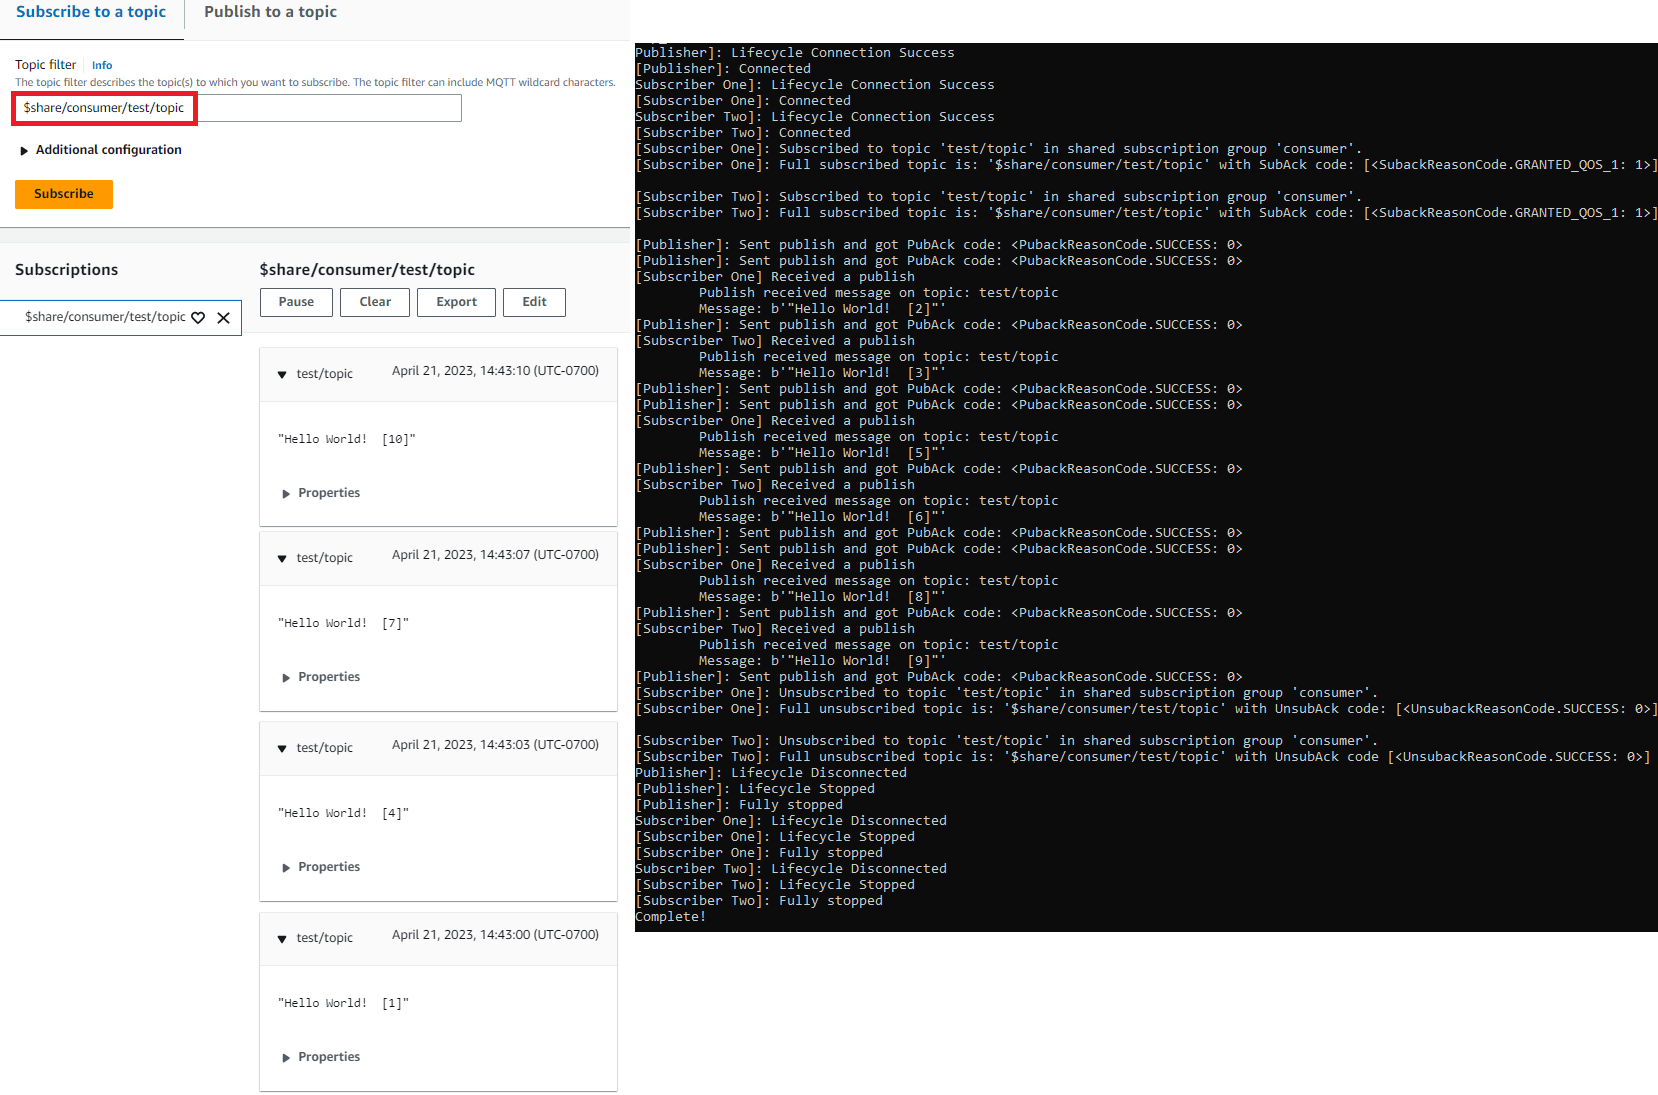
Publisher]: Lifecycle Connection Success [Publisher]: Connected Subscriber One]: Lifecycle Connection Success [Subscriber One]: Connected Subscriber Two]: Lifecycle Connection Success [Subscriber Two]: Connected [Subscriber One]: Subscribed to topic 'test/topic' in shared subscription group 'consumer'. [Subscriber One]: Full subscribed topic is: '$share/consumer/test/topic' with SubAck code: [<SubackReasonCode.GRANTED_QOS_1: 1>] [Subscriber Two]: Subscribed to topic 'test/topic' in shared subscription group 'consumer'. [Subscriber Two]: Full subscribed topic is: '$share/consumer/test/topic' with SubAck code: [<SubackReasonCode.GRANTED_QOS_1: 1>] [Publisher]: Sent publish and got PubAck code: <PubackReasonCode.SUCCESS: 0> [Subscriber Two] Received a publish Publish received message on topic: test/topic Message: b'"Hello World! [1]"' [Publisher]: Sent publish and got PubAck code: <PubackReasonCode.SUCCESS: 0> [Subscriber One] Received a publish Publish received message on topic: test/topic Message: b'"Hello World! [2]"' [Publisher]: Sent publish and got PubAck code: <PubackReasonCode.SUCCESS: 0> [Subscriber Two] Received a publish Publish received message on topic: test/topic Message: b'"Hello World! [3]"' [Publisher]: Sent publish and got PubAck code: <PubackReasonCode.SUCCESS: 0> [Subscriber One] Received a publish Publish received message on topic: test/topic Message: b'"Hello World! [4]"' [Publisher]: Sent publish and got PubAck code: <PubackReasonCode.SUCCESS: 0> [Subscriber Two] Received a publish Publish received message on topic: test/topic Message: b'"Hello World! [5]"' [Publisher]: Sent publish and got PubAck code: <PubackReasonCode.SUCCESS: 0> [Subscriber One] Received a publish Publish received message on topic: test/topic Message: b'"Hello World! [6]"' [Publisher]: Sent publish and got PubAck code: <PubackReasonCode.SUCCESS: 0> [Subscriber Two] Received a publish Publish received message on topic: test/topic Message: b'"Hello World! [7]"' [Publisher]: Sent publish and got PubAck code: <PubackReasonCode.SUCCESS: 0> [Subscriber One] Received a publish Publish received message on topic: test/topic Message: b'"Hello World! [8]"' [Publisher]: Sent publish and got PubAck code: <PubackReasonCode.SUCCESS: 0> [Subscriber Two] Received a publish Publish received message on topic: test/topic Message: b'"Hello World! [9]"' [Publisher]: Sent publish and got PubAck code: <PubackReasonCode.SUCCESS: 0> [Subscriber One] Received a publish Publish received message on topic: test/topic Message: b'"Hello World! [10]"' [Subscriber One]: Unsubscribed to topic 'test/topic' in shared subscription group 'consumer'. [Subscriber One]: Full unsubscribed topic is: '$share/consumer/test/topic' with UnsubAck code: [<UnsubackReasonCode.SUCCESS: 0>] [Subscriber Two]: Unsubscribed to topic 'test/topic' in shared subscription group 'consumer'. [Subscriber Two]: Full unsubscribed topic is: '$share/consumer/test/topic' with UnsubAck code [<UnsubackReasonCode.SUCCESS: 0>] Publisher]: Lifecycle Disconnected [Publisher]: Lifecycle Stopped [Publisher]: Fully stopped Subscriber One]: Lifecycle Disconnected [Subscriber One]: Lifecycle Stopped [Subscriber One]: Fully stopped Subscriber Two]: Lifecycle Disconnected [Subscriber Two]: Lifecycle Stopped [Subscriber Two]: Fully stopped Complete! -
在 Amazon IoT 控制台中打开 MQTT 测试客户端。在订阅主题中,订阅共享订阅的主题,例如:
$share/consumer/test/topic。在运行示例时,您可以根据需要指定组标识符(例如--group_identifier consumer)。如果您未指定组标识符,则默认值为python-sample。有关更多信息,请参阅《Amazon IoT Core 开发人员指南》中的 MQTT 5 共享订阅 Python 示例和共享订阅。 在命令行窗口中,再次运行示例应用程序,并在 Amazon IoT 控制台的 MQTT 测试客户端和命令行中观察消息的分布。