本文属于机器翻译版本。若本译文内容与英语原文存在差异,则一律以英文原文为准。
将数据提取到 Ama OpenSearch zon 无服务器集合中
这些部分详细介绍了支持将数据提取到 Ama OpenSearch zon Serverless 集合中的采集管道。它们还涵盖了一些可用于与 OpenSearch API 操作交互的客户端。您的客户端应与 OpenSearch 2.x 兼容,才能与 OpenSearch Serverless 集成。
主题
所需的最低权限
要将数据采集到 OpenSearch Serverless 集合中,写入数据的委托人必须具有在数据访问策略中分配的以下最低权限:
[
   {
      "Rules":[
         {
            "ResourceType":"index",
            "Resource":[
               "index/target-collection/logs"
            ],
            "Permission":[
               "aoss:CreateIndex",
               "aoss:WriteDocument",
               "aoss:UpdateIndex"
            ]
         }
      ],
      "Principal":[
         "arn:aws:iam::123456789012:user/my-user"
      ]
   }
]
如果您计划写入到其他索引,则权限可以更广。例如,您可以允许访问所有索引(index/ target-collection /*)或索引子集(index//),而不是指定单个目标索引。target-collection logs*
有关所有可用的 OpenSearch API 操作及其相关权限的参考,请参阅Amazon OpenSearch Serverless 中支持的操作和插件。
OpenSearch 摄入
您可以使用 Amazon OpenSearch Ingestion,而不是使用第三方客户端将数据直接发送到 OpenSearch 无服务器集合。您可以将数据生成器配置为将数据发送到 OpenSearch Ingestion,它会自动将数据传输到您指定的集合。您还可以将 OpenSearch Ingestion 配置为在交付数据之前对其进行转换。有关更多信息,请参阅 Amazon OpenSearch Ingestion 概述。
OpenSearch 摄取管道需要权限才能写入配置为其 OpenSearch 接收器的无服务器集合。这些权限包括能够描述集合以及向其发送 HTTP 请求。有关使用 OpenSearch Ingestion 向集合添加数据的说明,请参阅。授予 Amazon OpenSearch Ingestion 管道访问集合的权限
要开始使用 OpenSearch Ingestion,请参阅。教程:使用 Amazon Ingestion 将数据提取到集合中 OpenSearch
Fluent Bit
你可以使用 F Amazon
or Fluent Bit 图像
注意
你必须有 for Fluent Bit 镜像的 2.30.0 或更高版本才能与 Serverless 集成。 Amazon OpenSearch
示例配置:
配置文件的输出示例部分显示了如何使用 OpenSearch Serverless 集合作为目标。添加 AWS_Service_Name 参数(即 aoss)十分重要。Host 是集合端点。
[OUTPUT] Name opensearch Match * Hostcollection-endpoint.us-west-2.aoss.amazonaws.com Port 443 Indexmy_indexTrace_Error On Trace_Output On AWS_Auth On AWS_Region<region>AWS_Service_Name aoss tls On Suppress_Type_Name On
Amazon Data Firehose
Firehose 支持将 OpenSearch 无服务器作为送货目的地。有关将数据发送到 OpenSearch 无服务器的说明,请参阅《亚马逊数据 Fireh ose 开发者指南》中的创建 Kinesis Data Firehose 传送流并 OpenSearch 选择无服务器作为目的地。
您提供给 Firehose 用于传输的 IAM 角色,必须在具有目标集合的 aoss:WriteDocument 最低权限的数据访问策略中指定,并且您必须具有预先存在的索引以向其发送数据。有关更多信息,请参阅 所需的最低权限。
在将数据发送到 OpenSearch Serverless 之前,您可能需要对数据执行转换。要了解有关使用 Lambda 函数执行此任务的更多信息,请参阅此同一指南中的 Amazon Kinesis Data Firehose 数据转换。
Go
以下示例代码使用适用于 Go 的 opensearch-gregion 和 host 的值。
package main

import (
  "context"
  "log"
  "strings"
  "github.com/aws/aws-sdk-go-v2/aws"
  "github.com/aws/aws-sdk-go-v2/config"
  opensearch "github.com/opensearch-project/opensearch-go/v2"
  opensearchapi "github.com/opensearch-project/opensearch-go/v2/opensearchapi"
  requestsigner "github.com/opensearch-project/opensearch-go/v2/signer/awsv2"
)

const endpoint = "" // serverless collection endpoint

func main() {
	ctx := context.Background()

	awsCfg, err := config.LoadDefaultConfig(ctx,
		config.WithRegion("<AWS_REGION>"),
		config.WithCredentialsProvider(
			getCredentialProvider("<AWS_ACCESS_KEY>", "<AWS_SECRET_ACCESS_KEY>", "<AWS_SESSION_TOKEN>"),
		),
	)
	if err != nil {
		log.Fatal(err) // don't log.fatal in a production-ready app
	}

	// create an AWS request Signer and load AWS configuration using default config folder or env vars.
	signer, err := requestsigner.NewSignerWithService(awsCfg, "aoss") // "aoss" for Amazon OpenSearch Serverless
	if err != nil {
		log.Fatal(err) // don't log.fatal in a production-ready app
	}

	// create an opensearch client and use the request-signer
	client, err := opensearch.NewClient(opensearch.Config{
		Addresses: []string{endpoint},
		Signer:    signer,
	})
	if err != nil {
		log.Fatal("client creation err", err)
	}

	indexName := "go-test-index"

  // define index mapping
	mapping := strings.NewReader(`{
	 "settings": {
	   "index": {
	        "number_of_shards": 4
	        }
	      }
	 }`)

	// create an index
	createIndex := opensearchapi.IndicesCreateRequest{
		Index: indexName,
    Body: mapping,
	}
	createIndexResponse, err := createIndex.Do(context.Background(), client)
	if err != nil {
		log.Println("Error ", err.Error())
		log.Println("failed to create index ", err)
		log.Fatal("create response body read err", err)
	}
	log.Println(createIndexResponse)

	// delete the index
	deleteIndex := opensearchapi.IndicesDeleteRequest{
		Index: []string{indexName},
	}

	deleteIndexResponse, err := deleteIndex.Do(context.Background(), client)
	if err != nil {
		log.Println("failed to delete index ", err)
		log.Fatal("delete index response body read err", err)
	}
	log.Println("deleting index", deleteIndexResponse)
}

func getCredentialProvider(accessKey, secretAccessKey, token string) aws.CredentialsProviderFunc {
	return func(ctx context.Context) (aws.Credentials, error) {
		c := &aws.Credentials{
			AccessKeyID:     accessKey,
			SecretAccessKey: secretAccessKey,
			SessionToken:    token,
		}
		return *c, nil
	}
}
Java
以下示例代码使用适用于 Java 的 opensearch-jregion 和 host 的值。
与 OpenSearch 服务域相比,重要的区别在于服务名称(aoss而不是es)。
// import OpenSearchClient to establish connection to OpenSearch Serverless collection
import org.opensearch.client.opensearch.OpenSearchClient;

SdkHttpClient httpClient = ApacheHttpClient.builder().build();
// create an opensearch client and use the request-signer
OpenSearchClient client = new OpenSearchClient(
    new AwsSdk2Transport(
        httpClient,
        "...us-west-2.aoss.amazonaws.com", // serverless collection endpoint
        "aoss" // signing service name
        Region.US_WEST_2, // signing service region
        AwsSdk2TransportOptions.builder().build()
    )
);

String index = "sample-index";

// create an index
CreateIndexRequest createIndexRequest = new CreateIndexRequest.Builder().index(index).build();
CreateIndexResponse createIndexResponse = client.indices().create(createIndexRequest);
System.out.println("Create index reponse: " + createIndexResponse);

// delete the index
DeleteIndexRequest deleteIndexRequest = new DeleteIndexRequest.Builder().index(index).build();
DeleteIndexResponse deleteIndexResponse = client.indices().delete(deleteIndexRequest);
System.out.println("Delete index reponse: " + deleteIndexResponse);

httpClient.close();
以下示例代码会重新建立安全连接,然后搜索索引。
import org.opensearch.client.opensearch.OpenSearchClient;

SdkHttpClient httpClient = ApacheHttpClient.builder().build();

OpenSearchClient client = new OpenSearchClient(
    new AwsSdk2Transport(
        httpClient,
        "...us-west-2.aoss.amazonaws.com", // serverless collection endpoint
        "aoss" // signing service name
        Region.US_WEST_2, // signing service region
        AwsSdk2TransportOptions.builder().build()
    )
);

Response response = client.generic()
    .execute(
        Requests.builder()
            .endpoint("/" + "users" + "/_search?typed_keys=true")
            .method("GET")
            .json("{"
                + "    \"query\": {"
                + "        \"match_all\": {}"
                + "    }"
                + "}")
            .build());

httpClient.close();
JavaScript
以下示例代码使用的 opensearch-jsnode 和 region 的值。
与 OpenSearch 服务域相比,重要的区别在于服务名称(aoss而不是es)。
Logstash
您可以使用 Logstash OpenSearch 插件
使用 Logstash 向无服务器发送数据 OpenSearch
-
使用 Docker 或 Linux 安装该logstash-output-opensearch
插件的 2.0.0 或更高版本。 -
为了使 OpenSearch 输出插件与 OpenSearch Serverless 配合使用,您必须对 logstash.conf 的
opensearch输出部分进行以下修改:-
在
auth_type下,将aoss指定为service_name。 -
为
hosts指定您的集合端点。 -
添加参数
default_server_major_version和legacy_template。这些参数是插件与 OpenSearch Serverless 配合使用所必需的。
output {
  opensearch {
    hosts => "collection-endpoint:443"
    auth_type => {
      ...
      service_name => 'aoss'
    }
    default_server_major_version => 2
    legacy_template => false
  }
}
此示例配置文件从 S3 存储桶中的文件中获取输入并将其发送到 OpenSearch 无服务器集合:
input { s3 { bucket => "my-s3-bucket" region => "us-east-1" } } output { opensearch { ecs_compatibility => disabled hosts => "https://my-collection-endpoint.us-east-1.aoss.amazonaws.com:443" index =>my-indexauth_type => { type => 'aws_iam' aws_access_key_id => 'your-access-key' aws_secret_access_key => 'your-secret-key' region => 'us-east-1' service_name => 'aoss' } default_server_major_version => 2 legacy_template => false } } -
-
然后,使用新配置运行 Logstash,以测试该插件:
bin/logstash -f config/test-plugin.conf
Python
以下示例代码使用适用于 Python 的 opensearch-py 客户端与指定的 OpenSearch 无服务器集合建立安全连接,创建单个索引并搜索region 和 host 的值。
与 OpenSearch 服务域相比,重要的区别在于服务名称(aoss而不是es)。
from opensearchpy import OpenSearch, RequestsHttpConnection, AWSV4SignerAuth
import boto3

host = ''  # serverless collection endpoint, without https://
region = ''  # e.g. us-east-1

service = 'aoss'
credentials = boto3.Session().get_credentials()
auth = AWSV4SignerAuth(credentials, region, service)

# create an opensearch client and use the request-signer
client = OpenSearch(
    hosts=[{'host': host, 'port': 443}],
    http_auth=auth,
    use_ssl=True,
    verify_certs=True,
    connection_class=RequestsHttpConnection,
    pool_maxsize=20,
)

# create an index
index_name = 'books-index'
create_response = client.indices.create(
    index_name
)

print('\nCreating index:')
print(create_response)

# index a document
document = {
  'title': 'The Green Mile',
  'director': 'Stephen King',
  'year': '1996'
}

response = client.index(
    index = 'books-index',
    body = document,
    id = '1'
)


# delete the index
delete_response = client.indices.delete(
    index_name
)

print('\nDeleting index:')
print(delete_response)
Ruby
opensearch-aws-sigv4Gem 开箱即用地提供对 OpenSearch 无服务器和 OpenSearch 服务的访问权限。它具有 opensearch-ruby
在实例化 Sigv4 签名程序时,指定 aoss 为服务名称:
require 'opensearch-aws-sigv4'
require 'aws-sigv4'

signer = Aws::Sigv4::Signer.new(service: 'aoss',
                                region: 'us-west-2',
                                access_key_id: 'key_id',
                                secret_access_key: 'secret')

# create an opensearch client and use the request-signer
client = OpenSearch::Aws::Sigv4Client.new(
  { host: 'https://your.amz-opensearch-serverless.endpoint',
    log: true },
  signer)

# create an index
index = 'prime'
client.indices.create(index: index)

# insert data
client.index(index: index, id: '1', body: { name: 'Amazon Echo',
                                            msrp: '5999',
                                            year: 2011 })

# query the index
client.search(body: { query: { match: { name: 'Echo' } } })

# delete index entry
client.delete(index: index, id: '1')

# delete the index
client.indices.delete(index: index)
与其他客户端签署 HTTP 请求
当您与其他客户端构建 HTTP 请求时,对 OpenSearch 无服务器集合的请求进行签名时,以下要求适用。
-
必须将服务名称指定为
aoss。 -
所有 Amazon 签名版本 4 请求都需要
x-amz-content-sha256标头。它将提供请求负载的哈希。如果有请求有效负载,请将该值设置为其安全哈希算法 (SHA) 加密哈希 (SHA256)。如果没有请求负载,请将该值设置为e3b0c44298fc1c149afbf4c8996fb92427ae41e4649b934ca495991b7852b855,它是空字符串的哈希。
使用 cURL 创建索引
以下示例请求使用客户端 URL 请求库(cURL)将单个文档发送到集合中名为 movies-index 的索引:
curl -XPOST \
    --user "$AWS_ACCESS_KEY_ID":"$AWS_SECRET_ACCESS_KEY" \
    --aws-sigv4 "aws:amz:us-east-1:aoss" \
    --header "x-amz-content-sha256: $REQUEST_PAYLOAD_SHA_HASH" \
    --header "x-amz-security-token: $AWS_SESSION_TOKEN" \
    "https://my-collection-endpoint.us-east-1.aoss.amazonaws.com/movies-index/_doc" \
    -H "Content-Type: application/json" -d '{"title": "Shawshank Redemption"}'
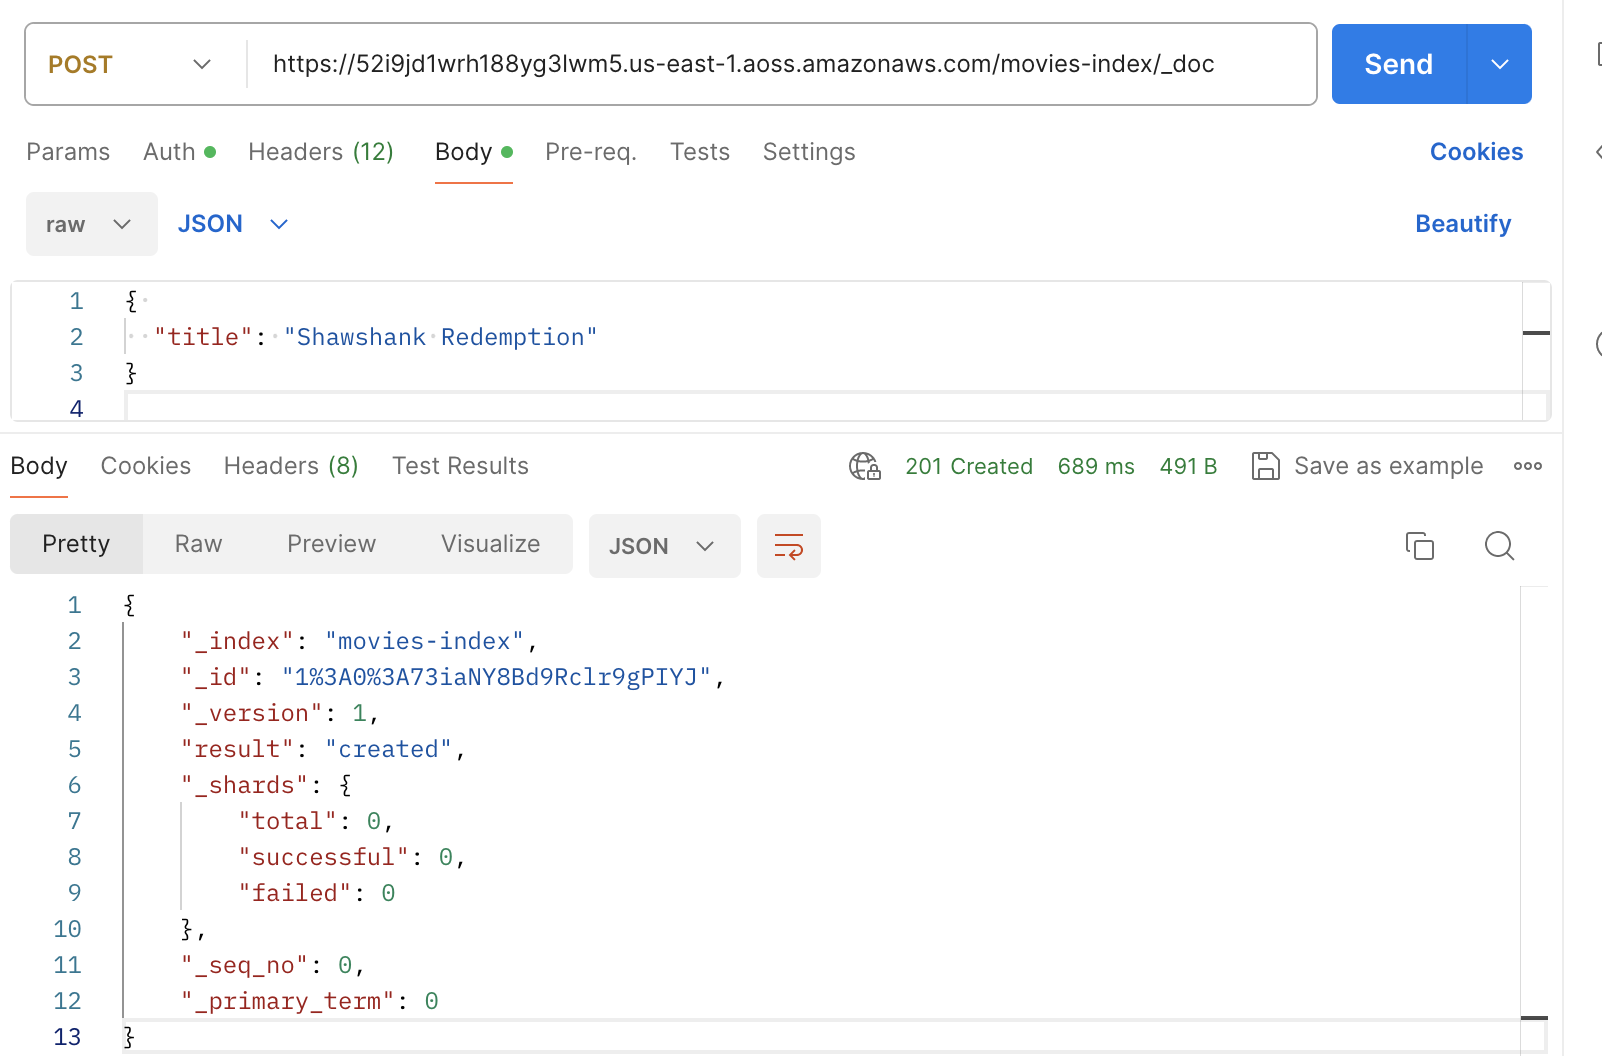
使用 Postman 创建索引
下图演示了如何使用 Postman 将请求发送到集合。有关身份验证的说明,请参阅 Postman 中的使用 Amazon 签名进行身份验证工作流程