适用于 JavaScript 的 Amazon SDK V3 API 参考指南详细描述了 适用于 JavaScript 的 Amazon SDK 版本 3 (V3) 的所有 API 操作。
本文属于机器翻译版本。若本译文内容与英语原文存在差异,则一律以英文原文为准。
构建 Amazon Lex 聊天机器人
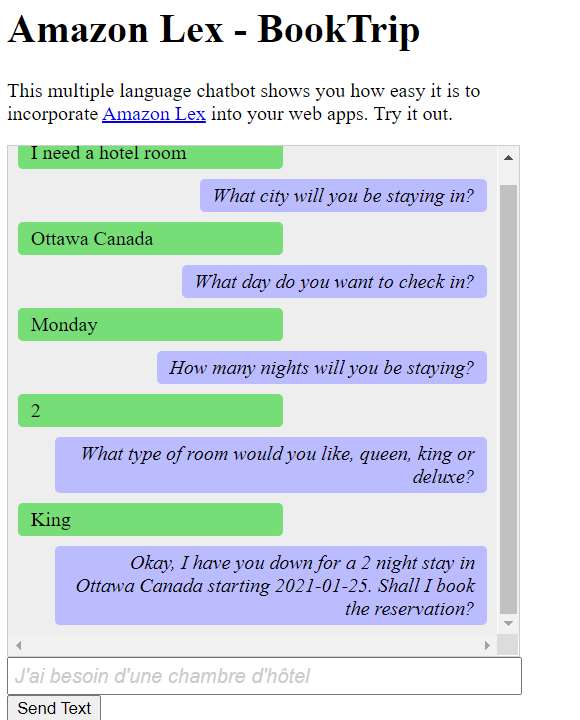
您可以在 Web 应用程序中创建 Amazon Lex 聊天机器人来吸引您的网站访问者。Amazon Lex 聊天机器人是一种无需与人直接接触即可与用户进行在线聊天对话的功能。例如,下图显示了一个 Amazon Lex 聊天机器人,该聊天机器人针对预订酒店房间与用户进行交流。
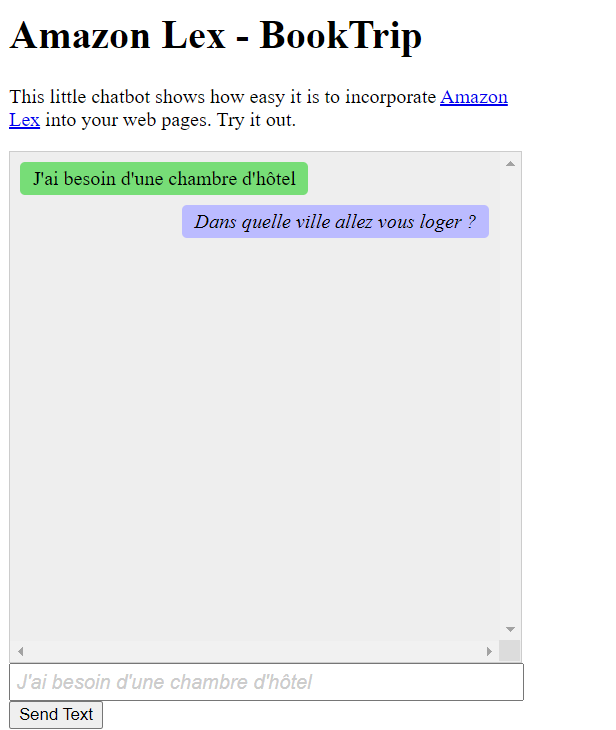
在本 Amazon 教程中创建的 Amazon Lex 聊天机器人能够处理多种语言。例如,说法语的用户可以输入法语文本并收到以法语返回的回复。
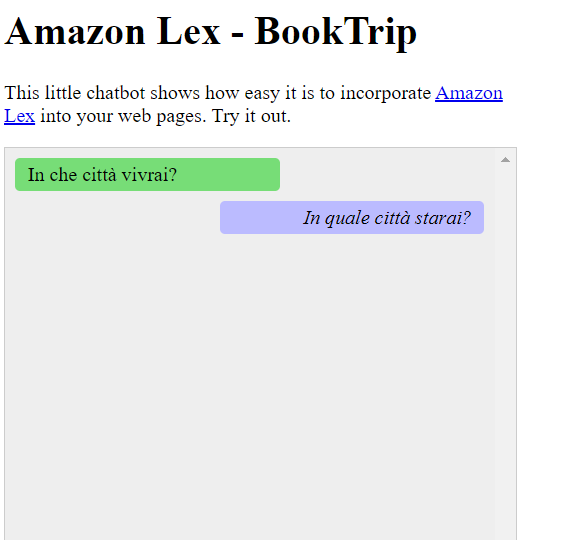
同样,用户可以用意大利语与 Amazon Lex 聊天机器人进行交流。
本 Amazon 教程将指导你创建 Amazon Lex 聊天机器人并将其集成到 Node.js 网络应用程序中。 适用于 JavaScript 的 Amazon SDK (v3) 用于调用以下 Amazon 服务:
-
Amazon Lex
-
Amazon Comprehend
-
Amazon Translate
完成费用:本文档中包含的 Amazon 服务包含在Amazon 免费套餐
注意:在学习本教程时,请务必终止您创建的所有资源,以确保系统不会向您收费。
先决条件
要设置和运行此示例,您必须先完成以下任务:
-
设置项目环境以运行这些 Node TypeScript 示例,并安装所需的模块 适用于 JavaScript 的 Amazon SDK 和第三方模块。按照上的说明进行操作 GitHub
。 -
使用用户凭证创建共享配置文件。有关提供共享凭据文件的更多信息,请参阅和工具参考指南中的共享配置Amazon SDKs 和凭据文件。
重要
此示例使用 ECMAScript6 (ES6)。这需要使用 Node.js 版本 13.x 或更高版本。要下载并安装最新版本的 Node.js,请参阅 Node.js 下载
但是,如果您更喜欢使用 CommonJS 语法,请参阅 JavaScript ES6/CommonJS 语法。
创建 Amazon 资源
本教程要求具有以下资源。
-
一个未经身份验证的 IAM 角色,附加了以下权限:
Amazon Comprehend
Amazon Translate
Amazon Lex
您可以手动创建这些资源,但我们建议使用本教程 Amazon CloudFormation 中所述配置这些资源。
使用创建 Amazon 资源 Amazon CloudFormation
Amazon CloudFormation 使您能够以可预测的方式重复创建和配置 Amazon 基础架构部署。有关的更多信息 Amazon CloudFormation,请参阅《Amazon CloudFormation 用户指南》。
要使用以下方法创建 Amazon CloudFormation 堆栈 Amazon CLI:
按照《 Amazon CLI Amazon CLI 用户指南》中的说明进行安装和配置。
在项目文件夹的根目录
setup.yaml中创建一个名为的文件,然后将此处的内容复制 GitHub到该文件中。 注意
该 Amazon CloudFormation 模板是使用此处 Amazon CDK 提供的模板生成的 GitHub
。有关更多信息 Amazon CDK,请参阅《Amazon Cloud Development Kit (Amazon CDK) 开发人员指南》。 从命令行运行以下命令,
STACK_NAME替换为堆栈的唯一名称。重要
堆栈名称在 Amazon 区域和 Amazon 账户中必须是唯一的。您最多可指定 128 个字符,支持数字和连字符。
aws cloudformation create-stack --stack-name STACK_NAME --template-body file://setup.yaml --capabilities CAPABILITY_IAM有关
create-stack命令参数的更多信息,请参阅 Amazon CLI 命令参考指南和 Amazon CloudFormation 用户指南。要查看创建的资源,请打开 Amazon Lex 控制台,选择堆栈,然后选择资源选项卡。
创建 Amazon Lex 机器人
重要
使用 Amazon Lex 控制台的 V1 创建机器人。此示例不适用于使用 V2 创建的机器人。
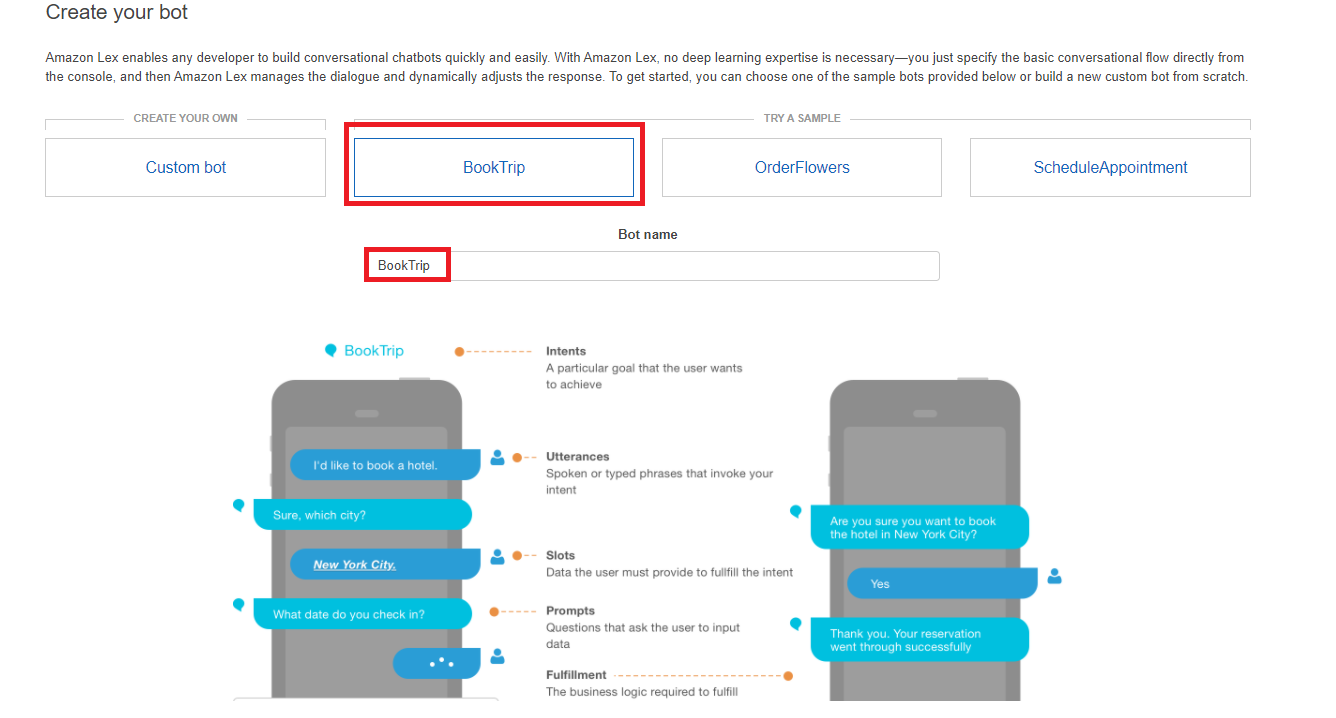
第一步是使用 Amazon Web Services 管理控制台创建 Amazon Lex 聊天机器人。在本示例中,使用了 Amazon Lex BookTrip示例。有关更多信息,请参阅 BookTrip。
-
在 Amazon Web Services 控制台
上登录 Amazon Web Services 管理控制台并打开 Amazon Lex 控制台。 -
在“机器人”页面上,选择创建。
-
选择BookTrip蓝图(保留默认的机器人名称 BookTrip)。
-
填写默认设置并选择创建(控制台显示BookTrip机器人)。在“编辑器”选项卡上,查看预配置目的的详细信息。
-
在测试窗口中测试机器人。输入我想预订酒店房间,,开始测试。

-
选择 “发布” 并指定别名(使用时需要此值 适用于 JavaScript 的 Amazon SDK)。
注意
你需要在 JavaScript 代码中引用机器人名称和机器人别名。
创建 HTML
创建一个名为 index.html的文件。将以下代码复制并粘贴到 index.html。此 HTML 引用 main.js。这是 index.js 的捆绑版本,其中包含所需的 适用于 JavaScript 的 Amazon SDK 模块。您将在 创建 HTML 中创建此文件。 index.html 也引用 style.css,后者用于添加样式。
<!doctype html>
<head>
  <title>Amazon Lex - Sample Application (BookTrip)</title>
  <link type="text/css" rel="stylesheet" href="style.css" />
</head>

<body>
  <h1 id="title">Amazon Lex - BookTrip</h1>
  <p id="intro">
    This multiple language chatbot shows you how easy it is to incorporate
    <a
      href="https://aws.amazon.com/lex/"
      title="Amazon Lex (product)"
      target="_new"
      >Amazon Lex</a
    >
    into your web apps. Try it out.
  </p>
  <div id="conversation"></div>
  <input
    type="text"
    id="wisdom"
    size="80"
    value=""
    placeholder="J'ai besoin d'une chambre d'hôtel"
  />
  <br />
  <button onclick="createResponse()">Send Text</button>
  <script type="text/javascript" src="./main.js"></script>
</body>
此代码也可以在此处找到 GitHub
创建浏览器脚本
创建一个名为 index.js的文件。将以下代码复制并粘贴到 index.js。导入所需的 适用于 JavaScript 的 Amazon SDK 模块和命令。为 Amazon Lex、Amazon Comprehend 和 Amazon Translate 创建客户端。REGION替换为 Amazon 区域,并IDENTITY_POOL_ID替换为您在中创建的身份池的 ID 创建 Amazon 资源。要检索此身份池 ID,请在 Amazon Cognito 控制台中打开身份池,选择编辑身份池,然后在侧面菜单中选择示例代码。身份池 ID 将在控制台中以红色文本显示。
首先,创建一个 libs 目录,然后通过创建三个文件 comprehendClient.js、lexClient.js 和 translateClient.js 来创建所需的服务客户端对象。将下面的相应代码粘贴到每个文件中,然后IDENTITY_POOL_ID在每个文件中替换REGION和。
注意
使用您在使用创建 Amazon 资源 Amazon CloudFormation中创建的 Amazon Cognito 身份池的 ID。
import { CognitoIdentityClient } from "@aws-sdk/client-cognito-identity";
import { fromCognitoIdentityPool } from "@aws-sdk/credential-provider-cognito-identity";
import { ComprehendClient } from "@aws-sdk/client-comprehend";

const REGION = "REGION";
const IDENTITY_POOL_ID = "IDENTITY_POOL_ID"; // An Amazon Cognito Identity Pool ID.

// Create an Amazon Comprehend service client object.
const comprehendClient = new ComprehendClient({
  region: REGION,
  credentials: fromCognitoIdentityPool({
    client: new CognitoIdentityClient({ region: REGION }),
    identityPoolId: IDENTITY_POOL_ID,
  }),
});

export { comprehendClient };
import { CognitoIdentityClient } from "@aws-sdk/client-cognito-identity";
import { fromCognitoIdentityPool } from "@aws-sdk/credential-provider-cognito-identity";
import { LexRuntimeServiceClient } from "@aws-sdk/client-lex-runtime-service";

const REGION = "REGION";
const IDENTITY_POOL_ID = "IDENTITY_POOL_ID"; // An Amazon Cognito Identity Pool ID.

// Create an Amazon Lex service client object.
const lexClient = new LexRuntimeServiceClient({
  region: REGION,
  credentials: fromCognitoIdentityPool({
    client: new CognitoIdentityClient({ region: REGION }),
    identityPoolId: IDENTITY_POOL_ID,
  }),
});

export { lexClient };
import { CognitoIdentityClient } from "@aws-sdk/client-cognito-identity";
import { fromCognitoIdentityPool } from "@aws-sdk/credential-provider-cognito-identity";
import { TranslateClient } from "@aws-sdk/client-translate";

const REGION = "REGION";
const IDENTITY_POOL_ID = "IDENTITY_POOL_ID"; // An Amazon Cognito Identity Pool ID.

// Create an Amazon Translate service client object.
const translateClient = new TranslateClient({
  region: REGION,
  credentials: fromCognitoIdentityPool({
    client: new CognitoIdentityClient({ region: REGION }),
    identityPoolId: IDENTITY_POOL_ID,
  }),
});

export { translateClient };
此代码可从此处获得 GitHub。
接下来,创建一个 index.js 文件,并将以下代码粘贴到文件中。
将BOT_ALIAS和BOT_NAME分别替换为您的 Amazon Lex 机器人的别名和名称,并USER_ID使用用户 ID。createResponse 异步函数将执行以下操作:
将用户输入的文本导入浏览器,然后使用 Amazon Comprehend 来确定其语言代码。
获取语言代码并使用 Amazon Translate 将文本翻译成英文。
获取翻译后的文本并使用 Amazon Lex 生成响应。
将响应发布到浏览器页面。
import { DetectDominantLanguageCommand } from "@aws-sdk/client-comprehend";
import { TranslateTextCommand } from "@aws-sdk/client-translate";
import { PostTextCommand } from "@aws-sdk/client-lex-runtime-service";
import { lexClient } from "./libs/lexClient.js";
import { translateClient } from "./libs/translateClient.js";
import { comprehendClient } from "./libs/comprehendClient.js";

let g_text = "";
// Set the focus to the input box.
document.getElementById("wisdom").focus();

function showRequest() {
  const conversationDiv = document.getElementById("conversation");
  const requestPara = document.createElement("P");
  requestPara.className = "userRequest";
  requestPara.appendChild(document.createTextNode(g_text));
  conversationDiv.appendChild(requestPara);
  conversationDiv.scrollTop = conversationDiv.scrollHeight;
}

function showResponse(lexResponse) {
  const conversationDiv = document.getElementById("conversation");
  const responsePara = document.createElement("P");
  responsePara.className = "lexResponse";

  const lexTextResponse = lexResponse;

  responsePara.appendChild(document.createTextNode(lexTextResponse));
  responsePara.appendChild(document.createElement("br"));
  conversationDiv.appendChild(responsePara);
  conversationDiv.scrollTop = conversationDiv.scrollHeight;
}

function handletext(text) {
  g_text = text;
  const xhr = new XMLHttpRequest();
  xhr.addEventListener("load", loadNewItems, false);
  xhr.open("POST", "../text", true); // A Spring MVC controller
  xhr.setRequestHeader("Content-type", "application/x-www-form-urlencoded"); //necessary
  xhr.send(`text=${text}`);
}

function loadNewItems() {
  showRequest();

  // Re-enable input.
  const wisdomText = document.getElementById("wisdom");
  wisdomText.value = "";
  wisdomText.locked = false;
}

// Respond to user's input.
const createResponse = async () => {
  // Confirm there is text to submit.
  const wisdomText = document.getElementById("wisdom");
  if (wisdomText?.value && wisdomText.value.trim().length > 0) {
    // Disable input to show it is being sent.
    const wisdom = wisdomText.value.trim();
    wisdomText.value = "...";
    wisdomText.locked = true;
    handletext(wisdom);

    const comprehendParams = {
      Text: wisdom,
    };
    try {
      const data = await comprehendClient.send(
        new DetectDominantLanguageCommand(comprehendParams),
      );
      console.log(
        "Success. The language code is: ",
        data.Languages[0].LanguageCode,
      );
      const translateParams = {
        SourceLanguageCode: data.Languages[0].LanguageCode,
        TargetLanguageCode: "en", // For example, "en" for English.
        Text: wisdom,
      };
      try {
        const data = await translateClient.send(
          new TranslateTextCommand(translateParams),
        );
        console.log("Success. Translated text: ", data.TranslatedText);
        const lexParams = {
          botName: "BookTrip",
          botAlias: "mynewalias",
          inputText: data.TranslatedText,
          userId: "chatbot", // For example, 'chatbot-demo'.
        };
        try {
          const data = await lexClient.send(new PostTextCommand(lexParams));
          console.log("Success. Response is: ", data.message);
          const msg = data.message;
          showResponse(msg);
        } catch (err) {
          console.log("Error responding to message. ", err);
        }
      } catch (err) {
        console.log("Error translating text. ", err);
      }
    } catch (err) {
      console.log("Error identifying language. ", err);
    }
  }
};
// Make the function available to the browser.
window.createResponse = createResponse;
此代码可从此处获得 GitHub。
现在使用 webpack 将index.js和 适用于 JavaScript 的 Amazon SDK 模块捆绑到一个文件中main.js。
如果您尚未安装 Webpack,请按照本示例中的先决条件部分进行安装。
注意
有关 webpack 的信息,请参阅使用 Webpack 捆绑应用程序。
在命令行中运行以下命令,将本示例的捆绑到名 JavaScript 为的文件中
main.js:webpack index.js --mode development --target web --devtool false -o main.js
后续步骤
恭喜您!您创建了一个 Node.js 应用程序,该应用程序使用 Amazon Lex 来创建交互式用户体验。如本教程开头所述,请务必在学习本教程时终止您创建的所有资源,以确保系统不会向您收费。您可以通过删除在本教程创建 Amazon 资源主题中创建的 Amazon CloudFormation 堆栈来实现此目的,如下所示:
在堆栈页面上,选择堆栈。
选择删除。
有关更多 Amazon 跨服务示例,请参阅适用于 JavaScript 的 Amazon SDK 跨服务示例。