适用于 JavaScript 的 Amazon SDK V3 API 参考指南详细描述了 适用于 JavaScript 的 Amazon SDK 版本 3 (V3) 的所有 API 操作。
本文属于机器翻译版本。若本译文内容与英语原文存在差异,则一律以英文原文为准。
创建计划事件以执行 Amazon Lambda 函数
您可以使用 Ama CloudWatch zon 事件创建调用 Amazon Lambda 函数的计划事件。您可以将 CloudWatch 事件配置为使用 cron 表达式来安排何时调用 Lambda 函数。例如,您可以安排一个 CloudWatch 事件,使其在每个工作日调用 Lambda 函数。
Amazon Lambda 是一项计算服务,使您无需预置或管理服务器即可运行代码。您可以使用各种编程语言创建 Lambda 函数。有关的更多信息 Amazon Lambda,请参阅什么是 Amazon Lambda。
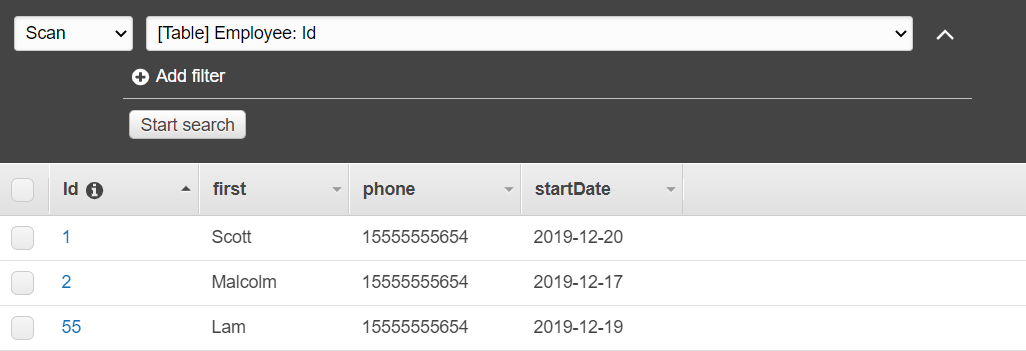
在本教程中,您将使用 Lambda 运行时 API 创建 Lambda 函数。 JavaScript此示例调用不同的 Amazon 服务来执行特定的用例。例如,假设组织在员工入职一周年纪念日时向员工发送移动短信表示祝贺,如下图所示。

完成本教程大约需要 20 分钟。
本教程向您展示如何使用 JavaScript 逻辑来创建执行此用例的解决方案。例如,您将学习如何使用 Lambda 函数读取数据库以确定哪些员工已达到入职一周年纪念日、如何处理数据以及如何发送短信。然后,您将学习如何使用 cron 表达式在每个工作日调用 Lambda 函数。
本 Amazon 教程使用名为 Employee 的 Amazon DynamoDB 表,其中包含这些字段。
id - 表的主键。
firstName - 员工的名字。
phone - 员工的电话号码。
startDate - 员工的入职日期。
重要
完成费用:本文档中包含的 Amazon 服务包含在 Amazon 免费套餐中。但是,请务必在完成本教程后终止所有资源,以确保系统不会向您收费。
完成先决条件任务
要设置和运行此示例,您必须先完成以下任务:
-
设置项目环境以运行这些 Node.js TypeScript 示例,并安装所需的模块 适用于 JavaScript 的 Amazon SDK 和第三方模块。按照上的说明进行操作 GitHub
。 -
使用用户凭证创建共享配置文件。有关提供共享凭据文件的更多信息,请参阅和工具参考指南中的共享配置Amazon SDKs 和凭据文件。
创建 Amazon 资源
本教程要求具有以下资源。
-
一个名为 Employee 的 Amazon DynamoDB 表,其键名为 Id,其字段如上图所示。请务必输入正确的数据,包括要用来测试此使用案例的有效手机号。有关更多信息,请参阅创建表。
-
具有执行 Lambda 函数的附加权限的 IAM 角色。
-
一个用于托管 Lambda 函数的 Amazon S3 存储桶。
您可以手动创建这些资源,但我们建议 Amazon CloudFormation 按照本教程中的说明使用配置这些资源。
使用创建 Amazon 资源 Amazon CloudFormation
Amazon CloudFormation 使您能够以可预测的方式重复创建和配置 Amazon 基础架构部署。有关的更多信息 Amazon CloudFormation,请参阅《Amazon CloudFormation 用户指南》。
要使用以下方法创建 Amazon CloudFormation 堆栈 Amazon CLI:
按照《 Amazon CLI Amazon CLI 用户指南》中的说明进行安装和配置。
在项目文件夹的根目录
setup.yaml中创建一个名为的文件,然后将此处的内容复制 GitHub到该文件中。 注意
该 Amazon CloudFormation 模板是使用此处 Amazon CDK 提供的模板生成的 GitHub
。有关更多信息 Amazon CDK,请参阅《Amazon Cloud Development Kit (Amazon CDK) 开发人员指南》。 从命令行运行以下命令,
STACK_NAME替换为堆栈的唯一名称。重要
堆栈名称在 Amazon 区域和 Amazon 账户中必须是唯一的。您最多可指定 128 个字符,支持数字和连字符。
aws cloudformation create-stack --stack-name STACK_NAME --template-body file://setup.yaml --capabilities CAPABILITY_IAM有关
create-stack命令参数的更多信息,请参阅 Amazon CLI 命令参考指南和 Amazon CloudFormation 用户指南。在控制台中打开堆栈,然后选择 “资源” 选项卡, Amazon CloudFormation 即可查看控制台中的资源列表。您将在本教程中需要这些内容。
创建堆栈后,使用填充 DynamoDB 表,如中所述。 适用于 JavaScript 的 Amazon SDK 填充 DynamoDB 表
填充 DynamoDB 表
要填充表,请先创建一个名为 libs 的目录,然后在其中创建一个名为 dynamoClient.js 的文件,再将下面的内容粘贴到其中。
const { DynamoDBClient } = require( "@aws-sdk/client-dynamodb" );
// Set the AWS Region.
const REGION = "REGION"; // e.g. "us-east-1"
// Create an Amazon DynamoDB service client object.
const dynamoClient = new DynamoDBClient({region:REGION});
module.exports = { dynamoClient };
此代码可从此处获
接下来,在项目文件夹的根目录populate-table.js中创建一个名为的文件,并将此处phone 属性的值替换为 E.164 格式的有效手机号码,将 startDate 的值替换为今天的日期。
在命令行处,运行以下命令。
node populate-table.js
const {
BatchWriteItemCommand } = require( "aws-sdk/client-dynamodb" );
const {dynamoClient} = require(  "./libs/dynamoClient" );
// Set the parameters.
const params = {
  RequestItems: {
    Employees: [
      {
        PutRequest: {
          Item: {
            id: { N: "1" },
            firstName: { S: "Bob" },
            phone: { N: "155555555555654" },
            startDate: { S: "2019-12-20" },
          },
        },
      },
      {
        PutRequest: {
          Item: {
            id: { N: "2" },
            firstName: { S: "Xing" },
            phone: { N: "155555555555653" },
            startDate: { S: "2019-12-17" },
          },
        },
      },
      {
        PutRequest: {
          Item: {
            id: { N: "55" },
            firstName: { S: "Harriette" },
            phone: { N: "155555555555652" },
            startDate: { S: "2019-12-19" },
          },
        },
      },
    ],
  },
};

export const run = async () => {
  try {
    const data = await dbclient.send(new BatchWriteItemCommand(params));
    console.log("Success", data);
  } catch (err) {
    console.log("Error", err);
  }
};
run();
此代码可从此处获
创建 Amazon Lambda 函数
配置 SDK
首先导入所需的 适用于 JavaScript 的 Amazon SDK (v3) 模块和命令:DynamoDBClient以及 Dynamo ScanCommand DB SNSClient 和 Amazon SNS 命令。PublishCommandREGION替换为 Amazon 区域。然后计算今天的日期并将其分配给一个参数。然后使用您在本示例创建 Amazon 资源部分中创建TABLE_NAME的表的名称为 ScanCommand .Replace 创建参数。
下面的代码段演示了此步骤。(有关完整示例,请参阅捆绑 Lambda 函数。)
"use strict";
// Load the required clients and commands.
const { DynamoDBClient, ScanCommand } = require("@aws-sdk/client-dynamodb");
const { SNSClient, PublishCommand } = require("@aws-sdk/client-sns");

//Set the AWS Region.
const REGION = "REGION"; //e.g. "us-east-1"

// Get today's date.
const today = new Date();
const dd = String(today.getDate()).padStart(2, "0");
const mm = String(today.getMonth() + 1).padStart(2, "0"); //January is 0!
const yyyy = today.getFullYear();
const date = yyyy + "-" + mm + "-" + dd;

// Set the parameters for the ScanCommand method.
const params = {
  // Specify which items in the results are returned.
  FilterExpression: "startDate = :topic",
  // Define the expression attribute value, which are substitutes for the values you want to compare.
  ExpressionAttributeValues: {
    ":topic": { S: date },
  },
  // Set the projection expression, which the the attributes that you want.
  ProjectionExpression: "firstName, phone",
  TableName: "TABLE_NAME",
};
扫描 DynamoDB 表
首先创建一个名为的 async/await 函数sendText,用于使用 Amazon SNS PublishCommand 发布一条短信。然后,添加一个 try 块模式,用于扫描 DynamoDB 表中是否有工作周年纪念日在今天的员工,然后调用 sendText 函数向这些员工发送短信。如果发生错误,则将调用 catch 块。
下面的代码段演示了此步骤。(有关完整示例,请参阅捆绑 Lambda 函数。)
exports.handler = async (event, context, callback) => {
  // Helper function to send message using Amazon SNS.
  async function sendText(textParams) {
    try {
      const data = await snsclient.send(new PublishCommand(textParams));
      console.log("Message sent");
    } catch (err) {
      console.log("Error, message not sent ", err);
    }
  }
  try {
    // Scan the table to check identify employees with work anniversary today.
    const data = await dbclient.send(new ScanCommand(params));
    data.Items.forEach(function (element, index, array) {
      const textParams = {
        PhoneNumber: element.phone.N,
        Message:
          "Hi " +
          element.firstName.S +
          "; congratulations on your work anniversary!",
      };
      // Send message using Amazon SNS.
      sendText(textParams);
    });
  } catch (err) {
    console.log("Error, could not scan table ", err);
  }
};
捆绑 Lambda 函数
本主题介绍如何将本示例的模块mylambdafunction.js和必需的 适用于 JavaScript 的 Amazon SDK 模块捆绑到名index.js为的捆绑文件中。
如果您尚未安装 Webpack,请按照本示例中的完成先决条件任务部分进行安装。
注意
有关 webpack 的信息,请参阅使用 Webpack 捆绑应用程序。
在命令行中运行以下命令,将本示例的捆绑到名 JavaScript 为的文件中
<index.js>:webpack mylamdbafunction.js --mode development --target node --devtool false --output-library-target umd -o index.js重要
请注意,输出被命名为
index.js。这是因为 Lambda 函数必须有一个index.js处理程序才能工作。将捆绑的输出文件
index.js压缩到名为my-lambda-function.zip的 ZIP 文件中。将
mylambdafunction.zip上传到您在本教程的创建 Amazon 资源主题中创建的 Amazon S3 存储桶。
以下是 mylambdafunction.js 的完整的浏览器脚本代码。
"use strict";
// Load the required clients and commands.
const { DynamoDBClient, ScanCommand } = require("@aws-sdk/client-dynamodb");
const { SNSClient, PublishCommand } = require("@aws-sdk/client-sns");

//Set the AWS Region.
const REGION = "REGION"; //e.g. "us-east-1"

// Get today's date.
const today = new Date();
const dd = String(today.getDate()).padStart(2, "0");
const mm = String(today.getMonth() + 1).padStart(2, "0"); //January is 0!
const yyyy = today.getFullYear();
const date = yyyy + "-" + mm + "-" + dd;

// Set the parameters for the ScanCommand method.
const params = {
  // Specify which items in the results are returned.
  FilterExpression: "startDate = :topic",
  // Define the expression attribute value, which are substitutes for the values you want to compare.
  ExpressionAttributeValues: {
    ":topic": { S: date },
  },
  // Set the projection expression, which the the attributes that you want.
  ProjectionExpression: "firstName, phone",
  TableName: "TABLE_NAME",
};

// Create the client service objects.
const dbclient = new DynamoDBClient({ region: REGION });
const snsclient = new SNSClient({ region: REGION });

exports.handler = async (event, context, callback) => {
  // Helper function to send message using Amazon SNS.
  async function sendText(textParams) {
    try {
      const data = await snsclient.send(new PublishCommand(textParams));
      console.log("Message sent");
    } catch (err) {
      console.log("Error, message not sent ", err);
    }
  }
  try {
    // Scan the table to check identify employees with work anniversary today.
    const data = await dbclient.send(new ScanCommand(params));
    data.Items.forEach(function (element, index, array) {
      const textParams = {
        PhoneNumber: element.phone.N,
        Message:
          "Hi " +
          element.firstName.S +
          "; congratulations on your work anniversary!",
      };
      // Send message using Amazon SNS.
      sendText(textParams);
    });
  } catch (err) {
    console.log("Error, could not scan table ", err);
  }
};
部署 Lambda 函数
在项目的根目录中,创建一个 lambda-function-setup.js 文件,然后将以下内容粘贴到其中。
BUCKET_NAME替换为您将 Lambda 函数的 ZIP 版本上传到的 Amazon S3 存储桶的名称。将 ZIP_FILE_NAME Lambda 函数的 ZIP 版本替换为命名的名称。IAM_ROLE_ARN替换为您在本教程创建 Amazon 资源主题中创建的 IAM 角色的 Amazon 资源编号 (ARN)。LAMBDA_FUNCTION_NAME替换为 Lambda 函数的名称。
// Load the required Lambda client and commands.
const {
   CreateFunctionCommand,
} = require("@aws-sdk/client-lambda");
const {
   lambdaClient
} = require("..libs/lambdaClient.js");

// Instantiate an Lambda client service object.
const lambda = new LambdaClient({ region: REGION });

// Set the parameters.
const params = {
  Code: {
    S3Bucket: "BUCKET_NAME", // BUCKET_NAME
    S3Key: "ZIP_FILE_NAME", // ZIP_FILE_NAME
  },
  FunctionName: "LAMBDA_FUNCTION_NAME",
  Handler: "index.handler",
  Role: "IAM_ROLE_ARN", // IAM_ROLE_ARN; e.g., arn:aws:iam::650138640062:role/v3-lambda-tutorial-lambda-role
  Runtime: "nodejs12.x",
  Description:
    "Scans a DynamoDB table of employee details and using Amazon Simple Notification Services (Amazon SNS) to " +
    "send employees an email the each anniversary of their start-date.",
};

const run = async () => {
  try {
    const data = await lambda.send(new CreateFunctionCommand(params));
    console.log("Success", data); // successful response
  } catch (err) {
    console.log("Error", err); // an error occurred
  }
};
run();
在命令行中输入以下内容以部署 Lambda 函数。
node lambda-function-setup.js
此代码示例可在此处找到 GitHub
配置 CloudWatch 为调用 Lambda 函数
CloudWatch 要配置为调用 Lambda 函数,请执行以下操作:
-
打开 Lambda 控制台的函数页面。
-
选择 Lambda 函数。
-
在设计器下方,选择添加触发器。
-
将触发器类型设置为 CloudWatch Events/ EventBridge。
-
对于“规则”,选择创建新规则。
-
填写“规则名称”和“规则描述”。
-
对于规则类型,请选择计划表达式。
-
在计划表达式字段中,输入一个 cron 表达式。例如,cron(0 12 ? * MON-FRI *)。
-
选择添加。
注意
有关更多信息,请参阅将 Lambda 与事件配合 CloudWatch 使用。
删除资源
恭喜您!您已使用亚马逊 CloudWatch 计划的事件调用了 Lambda 函数。 适用于 JavaScript 的 Amazon SDK如本教程开头所述,请务必在学习本教程时终止您创建的所有资源,以确保系统不会向您收费。为此,您可以删除在本教程创建 Amazon 资源主题中创建的 Amazon CloudFormation 堆栈,如下所示:
在堆栈页面上,选择堆栈。
选择删除。