要获得与亚马逊 Timestream 类似的功能 LiveAnalytics,可以考虑适用于 InfluxDB 的亚马逊 Timestream。适用于 InfluxDB 的 Amazon Timestream 提供简化的数据摄取和个位数毫秒级的查询响应时间,以实现实时分析。点击此处了解更多信息。
本文属于机器翻译版本。若本译文内容与英语原文存在差异,则一律以英文原文为准。
迁移概述
满足先决条件后:
运行迁移脚本:使用您选择的终端应用程序,运行 Python 脚本,以将数据从源 InfluxDB 实例传输到目标 InfluxDB 实例。
提供凭证:提供主机地址和端口作为 CLI 选项。
验证数据:通过以下方式确保数据已正确传输:
使用 InfluxDB UI 并检查存储桶。
使用
influx bucket list -t <destination token> --host <destination host address> --skip-verify列出存储桶。使用
influx v1 shell -t <destination token> --host <destination host address> --skip-verify并运行SELECT * FROM <migrated bucket>.<retention period>.<measurement name> LIMIT 100 to view contents of a bucket or SELECT COUNT(*) FROM <migrated bucket>.<retention period>.<measurment name>,以验证是否已迁移正确数量的记录。
例示例运行
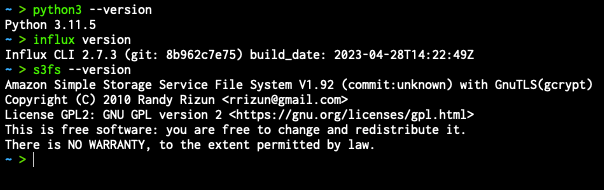
打开您选择的终端应用程序,并确保所需的先决条件已正确安装:
导航至迁移脚本:

准备以下信息:
要迁移的源存储桶名称。
(可选)为目标服务器中已迁移的存储桶选择新的存储桶名称。
源和目标 influx 实例的根令牌。
源和目标 influx 实例的主机地址。
(可选)S3 存储桶名称和凭 Amazon Command Line Interface 证;应在操作系统环境变量中设置凭证。
# AWS credentials (for timestream testing)
    export AWS_ACCESS_KEY_ID="xxx"
    export AWS_SECRET_ACCESS_KEY="xxx"
构造命令如下:
python3 influx_migration.py --src-bucket [amzn-s3-demo-source-bucket] --dest-bucket [amzn-s3-demo-destination-bucket] --src-host [source host] --dest-host [dest host] --s3-bucket [amzn-s3-demo-bucket2](optional) --log-level debug执行脚本:

等待脚本执行完毕。
检查新迁移存储桶的数据完整性,
performance.txt。此文件位于运行脚本的同一目录下,包含有关每个步骤所耗费时间的基本信息。
迁移场景
例示例 1:使用本地存储进行简单迁移
您想要将单个存储桶 amzn-s3-demo-primary-bucket 从源服务器迁移(http://localhost:8086)到目标服务器。(http://dest-server-address:8086)
在确保您可以通过 TCP(用于 HTTP 访问)访问在 8086 端口上运行 InfluxDB 实例的两台计算机,且已获取源和目标令牌,并分别将其存储为环境变量 INFLUX_SRC_TOKEN 和 INFLUX_DEST_TOKEN 以增强安全性之后:
python3 influx_migration.py --src-bucket amzn-s3-demo-primary-bucket --src-host http://localhost:8086 --dest-host http://dest-server-address:8086
该输出值应该类似于以下内容:
INFO: influx_migration.py: Backing up bucket data and metadata using the InfluxDB CLI
2023/10/26 10:47:15 INFO: Downloading metadata snapshot
2023/10/26 10:47:15 INFO: Backing up TSM for shard 1
2023/10/26 10:47:15 INFO: Backing up TSM for shard 8245
2023/10/26 10:47:15 INFO: Backing up TSM for shard 8263
[More shard backups . . .]
2023/10/26 10:47:20 INFO: Backing up TSM for shard 8240
2023/10/26 10:47:20 INFO: Backing up TSM for shard 8268
2023/10/26 10:47:20 INFO: Backing up TSM for shard 2
INFO: influx_migration.py: Restoring bucket data and metadata using the InfluxDB CLI
2023/10/26 10:47:20 INFO: Restoring bucket "96c11c8876b3c016" as "amzn-s3-demo-primary-bucket"
2023/10/26 10:47:21 INFO: Restoring TSM snapshot for shard 12772
2023/10/26 10:47:22 INFO: Restoring TSM snapshot for shard 12773
[More shard restores . . .]
2023/10/26 10:47:28 INFO: Restoring TSM snapshot for shard 12825
2023/10/26 10:47:28 INFO: Restoring TSM snapshot for shard 12826
INFO: influx_migration.py: Migration complete
目录 influxdb-backup-<timestamp> 将被创建并存储在运行脚本的目录中,其中包含备份文件。
例示例 2:使用本地存储和调试日志记录进行完整迁移
与上述相同,但需迁移所有存储桶、令牌、用户和控制面板,并在目标服务器中删除存储桶。通过使用 --confirm-full 选项,无需用户确认即可执行完整的数据库迁移。您还想查看性能测量值,因此启用调试日志记录。
python3 influx_migration.py --full --confirm-full --src-host http://localhost:8086 --dest-host http://dest-server-address:8086 --log-level debug
该输出值应该类似于以下内容:
INFO: influx_migration.py: Backing up bucket data and metadata using the InfluxDB CLI
2023/10/26 10:55:27 INFO: Downloading metadata snapshot
2023/10/26 10:55:27 INFO: Backing up TSM for shard 6952
2023/10/26 10:55:27 INFO: Backing up TSM for shard 6953
[More shard backups . . .]
2023/10/26 10:55:36 INFO: Backing up TSM for shard 8268
2023/10/26 10:55:36 INFO: Backing up TSM for shard 2
DEBUG: influx_migration.py: backup started at 2023-10-26 10:55:27 and took 9.41 seconds to run.
INFO: influx_migration.py: Restoring bucket data and metadata using the InfluxDB CLI
2023/10/26 10:55:36 INFO: Restoring KV snapshot
2023/10/26 10:55:38 WARN: Restoring KV snapshot overwrote the operator token, ensure following commands use the correct token
2023/10/26 10:55:38 INFO: Restoring SQL snapshot
2023/10/26 10:55:39 INFO: Restoring TSM snapshot for shard 6952
2023/10/26 10:55:39 INFO: Restoring TSM snapshot for shard 6953
[More shard restores . . .]
2023/10/26 10:55:49 INFO: Restoring TSM snapshot for shard 8268
2023/10/26 10:55:49 INFO: Restoring TSM snapshot for shard 2
DEBUG: influx_migration.py: restore started at 2023-10-26 10:55:36 and took 13.51 seconds to run.
INFO: influx_migration.py: Migration complete
例示例 3:使用 CSV、目标组织和 S3 存储桶进行完整迁移
与上述示例相同,但使用 Linux 或 Mac 并将文件存储在 S3 存储桶(amzn-s3-demo-bucket)中。这可避免备份文件导致超出本地存储容量。
python3 influx_migration.py --full --src-host http://localhost:8086 --dest-host http://dest-server-address:8086 --csv --dest-org MyOrg --s3-bucket amzn-s3-demo-bucket
该输出值应该类似于以下内容:
INFO: influx_migration.py: Creating directory influxdb-backups
INFO: influx_migration.py: Mounting amzn-s3-demo-influxdb-migration-bucket
INFO: influx_migration.py: Creating directory influxdb-backups/amzn-s3-demo-bucket/influxdb-backup-1698352128323
INFO: influx_migration.py: Backing up bucket data and metadata using the InfluxDB v2 API
INFO: influx_migration.py: Restoring bucket data and metadata from csv
INFO: influx_migration.py: Restoring bucket amzn-s3-demo-some-bucket
INFO: influx_migration.py: Restoring bucket amzn-s3-demo-another-bucket
INFO: influx_migration.py: Restoring bucket amzn-s3-demo-primary-bucket
INFO: influx_migration.py: Migration complete
INFO: influx_migration.py: Unmounting influxdb-backups
INFO: influx_migration.py: Removing temporary mount directory