Option 2: Automatically connect an instance to an RDS database using the RDS console
The objective of Option 2 is to explore the automatic connect feature in the RDS console that automatically configures the connection between your EC2 instance and RDS database to allow traffic from the EC2 instance to the RDS database. In Option 3, you'll learn how to manually configure the connection.
Tasks
Before you begin
You'll need the following to complete this tutorial:
-
An EC2 instance that is in the same VPC as the RDS database. You can either use an existing EC2 instance or follow the steps in Task 1 to create a new instance.
-
Permissions to call the following operations:
-
ec2:AssociateRouteTable -
ec2:AuthorizeSecurityGroupEgress -
ec2:CreateRouteTable -
ec2:CreateSecurityGroup -
ec2:CreateSubnet -
ec2:DescribeInstances -
ec2:DescribeNetworkInterfaces -
ec2:DescribeRouteTables -
ec2:DescribeSecurityGroups -
ec2:DescribeSubnets -
ec2:ModifyNetworkInterfaceAttribute -
ec2:RevokeSecurityGroupEgress
-
Task 1 (Optional): Launch an EC2 instance
Note
Launching an instance is not the focus of this tutorial. If you already have an Amazon EC2 instance and would like to use it in this tutorial, you can skip this task.
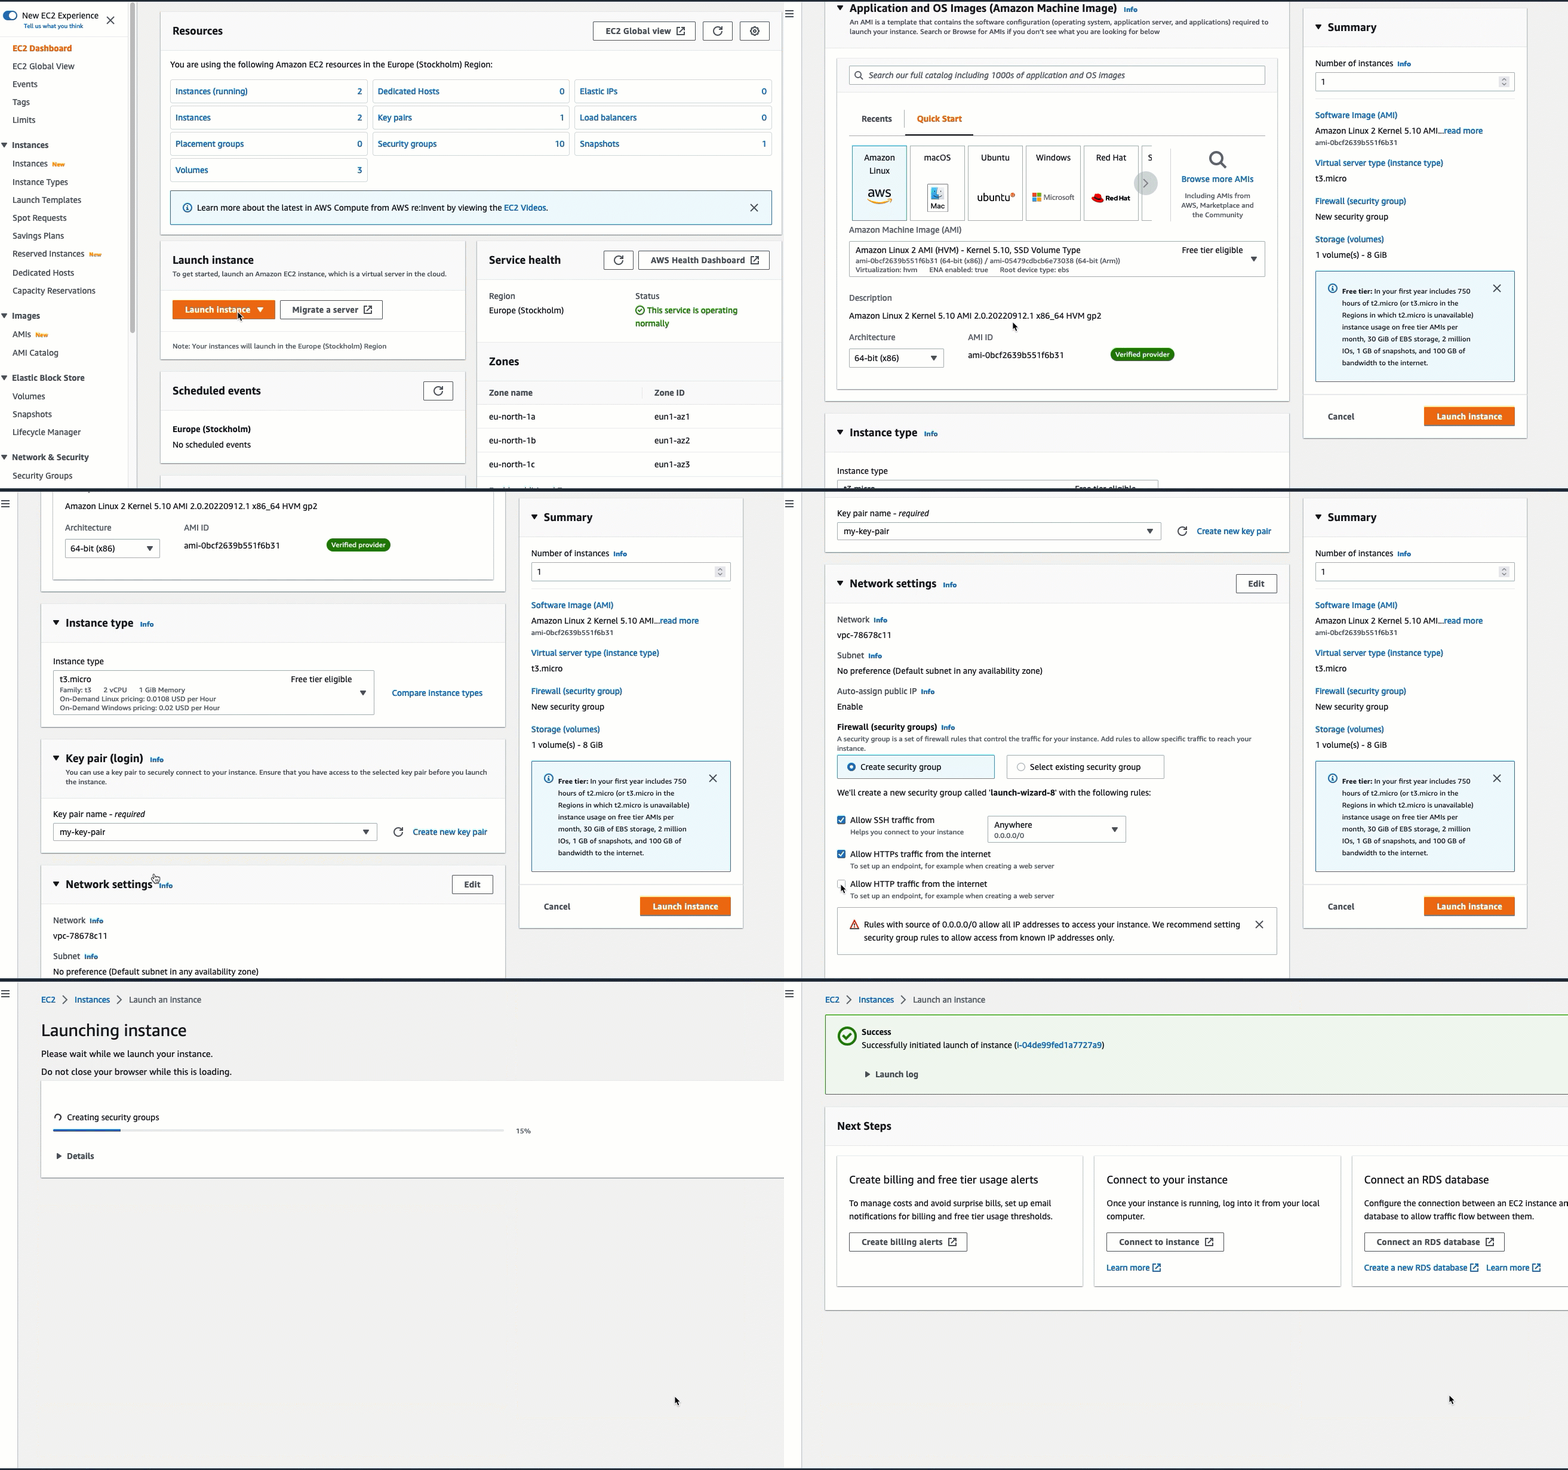
The objective of this task is to launch an EC2 instance so that you can complete Task 2 where you configure the connection between your EC2 instance and your Amazon RDS database. The steps in this task configure the EC2 instance as follows:
-
Instance name:
tutorial-instance-2 -
AMI: Amazon Linux 2
-
Instance type:
t2.micro -
Auto-assign public IP: Enabled
-
Security group with the following three rules:
-
Allow SSH from your IP address
-
Allow HTTPS traffic from anywhere
-
Allow HTTP traffic from anywhere
-
Important
In a production environment, you should configure your instance to meet your specific needs.
To launch an EC2 instance
Open the Amazon EC2 console at https://console.amazonaws.cn/ec2/
. -
On the EC2 Dashboard, choose Launch instance.
-
Under Name and tags, for Name, enter a name to identify your instance. For this tutorial, name the instance
tutorial-instance-2. While the instance name is not mandatory, when you select your instance in the RDS console, the name will help you easily identify it. -
Under Application and OS Images, choose an AMI that meets your web server needs. This tutorial uses Amazon Linux.
-
Under Instance type, for Instance type, select an instance type that meets your web server needs. This tutorial uses
t2.micro.Note
Depending on when you created your account, you might be eligible to use Amazon EC2 under the Free Tier.
If you created your Amazon Web Services account on or after July 15, 2025, you can use t3.micro, t3.small, t4g.micro, t4g.small, c7i-flex.large, and m7i-flex.large instance types for 6 months or until your credits are used up.
-
Under Key pair (login), for Key pair name, choose your key pair.
-
Under Network settings, do the following:
-
For Network and Subnet, if you haven’t made changes to your default VPC or subnets, you can keep the default settings.
If you have made changes to your default VPC or subnets, check the following:
-
The instance must be in the same VPC as the RDS database to use the automatic connection configuration. By default you have only one VPC.
-
The VPC that you’re launching your instance into must have an internet gateway attached to it so that you can access your web server from the internet. Your default VPC is automatically set up with an internet gateway.
-
To ensure that your instance receives a public IP address, for Auto-assign public IP, check that Enable is selected. If Disable is selected, choose Edit (to the right of Network Settings), and then, for Auto-assign public IP, choose Enable.
-
-
To connect to your instance by using SSH, you need a security group rule that authorizes SSH (Linux) or RDP (Windows) traffic from your computer’s public IPv4 address. By default, when you launch an instance, a new security group is created with a rule that allows inbound SSH traffic from anywhere.
To make sure that only your IP address can connect to your instance, under Firewall (security groups), from the drop-down list next to the Allow SSH traffic from checkbox, choose My IP.
-
To allow traffic from the internet to your instance, select the following checkboxes:
-
Allow HTTPs traffic from the internet
-
Allow HTTP traffic from the internet
-
-
-
In the Summary panel, review your instance configuration and then choose Launch instance.
-
Choose View all instances to close the confirmation page and return to the console. Your instance will first be in a
pendingstate, and will then go into therunningstate.If the instance fails to launch or the state immediately goes to
terminatedinstead ofrunning, see Troubleshoot Amazon EC2 instance launch issues.
For more information about launching an instance, see Launch an EC2 instance using the launch instance wizard in the console.

Task 2: Create an RDS database and automatically connect it to your EC2 instance
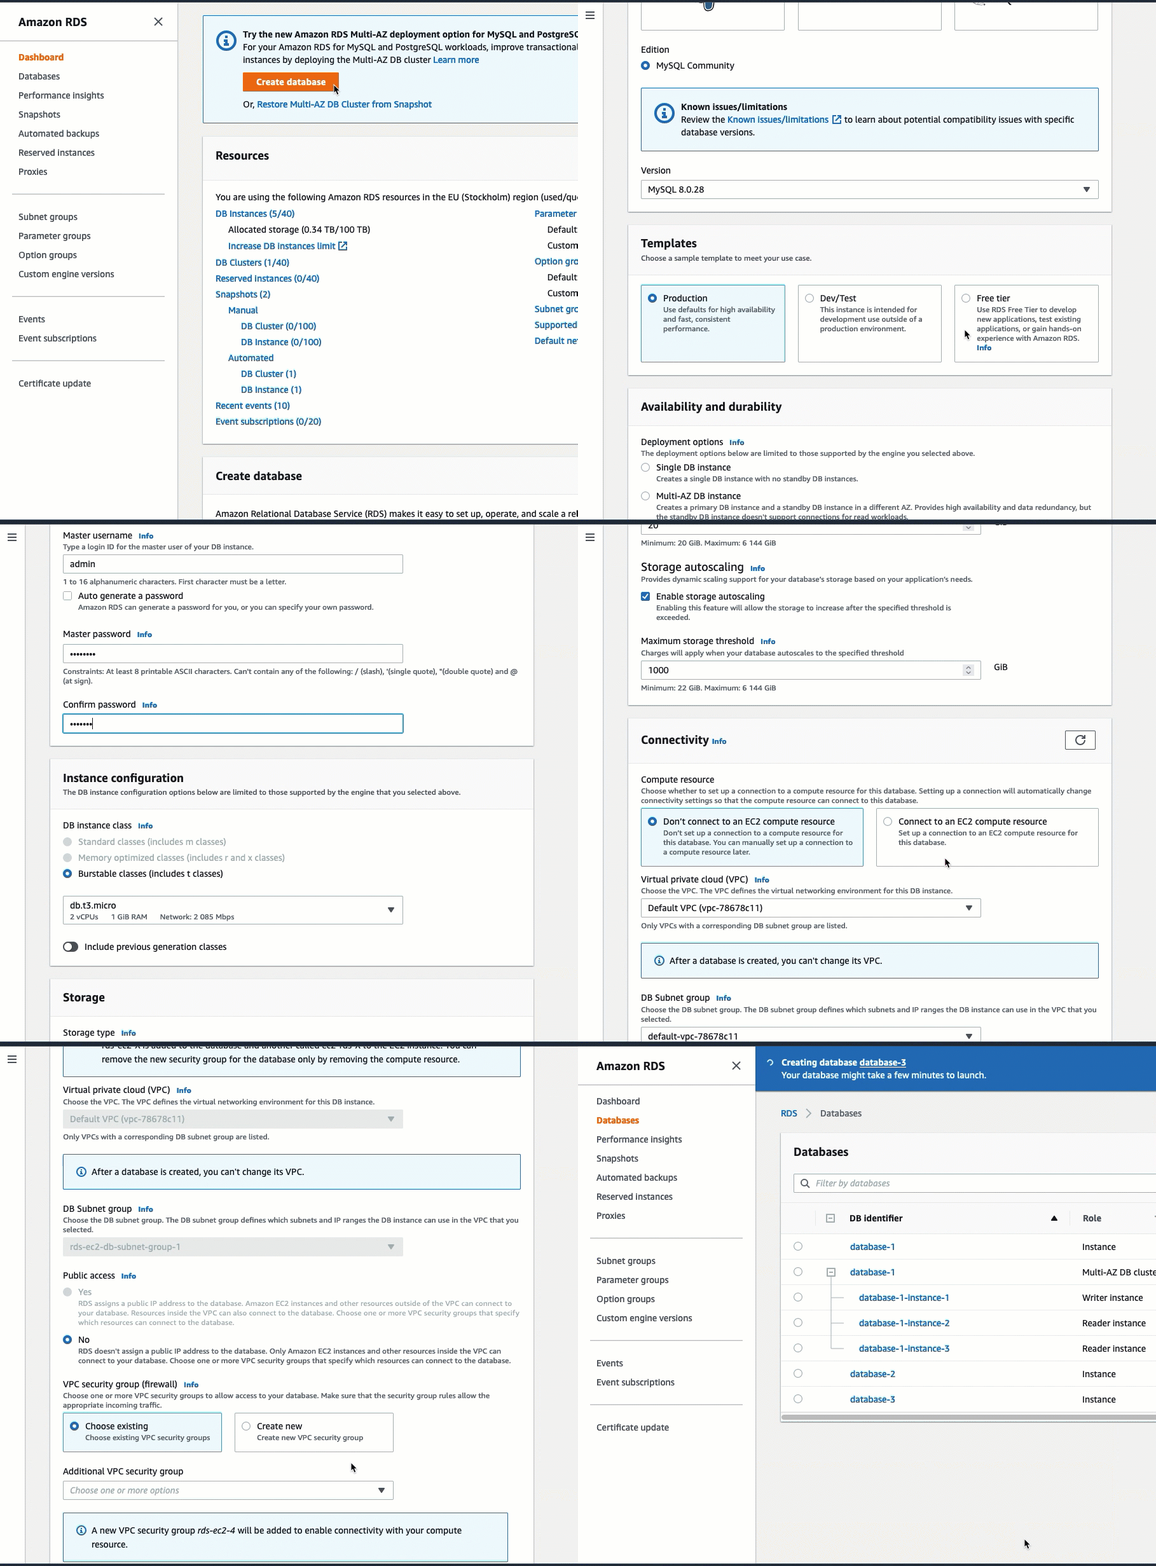
The objective of this task is to create an RDS database and use the automatic connection feature in the RDS console to automatically configure the connection between your EC2 instance and your RDS database. The steps in this task configure the DB instance as follows:
-
Engine type: MySQL
-
Template: Free tier
-
DB instance identifier:
tutorial-database -
DB instance class:
db.t3.micro
Important
In a production environment, you should configure your instance to meet your specific needs.
To create an RDS database and automatically connect it to an EC2 instance
Open the Amazon RDS console at https://console.amazonaws.cn/rds/
. -
From the Region selector (at top right), choose the Amazon Web Services Region in which you created the EC2 instance. The EC2 instance and the RDS database must be in the same Region.
-
On the dashboard, choose Create database.
-
Under Choose a database creation method, check that Standard create is selected. If you choose Easy create, the automatic connection feature is not available.
-
Under Engine options, for Engine type, choose MySQL.
-
Under Templates, choose a sample template to meet your needs. For this tutorial, choose Free tier to create an RDS database at no cost. However, note that the Free Tier is only available if your account qualifies for the Free Tier. You can read more by choosing the Info link in the Free tier box.
-
Under Settings, do the following:
-
For DB instance identifier, enter a name for the database. For this tutorial, enter
tutorial-database. -
For Master username, leave the default name, which is
admin. -
For Master password, enter a password that you can remember for this tutorial, and then, for Confirm password, enter the password again.
-
-
Under Instance configuration, for DB instance class, leave the default, which is db.t3.micro.
-
Under Connectivity, for Compute resource, choose Connect to an EC2 compute resource. This is the automatic connection feature in the RDS console .
-
For EC2 instance, choose the EC2 instance that you want to connect to. For the purposes of this tutorial, you can either choose the instance that you created in the previous task, which you named
tutorial-instance, or choose another existing instance. If you don't see your instance in the list, choose the refresh icon to the right of Connectivity.When you use the automatic connection feature, a security group is added to this EC2 instance, and another security group is added to the RDS database. The security groups are automatically configure to allow traffic between the EC2 instance and the RDS database. In the next task, you'll verify that the security groups were created and assigned to the EC2 instance and RDS database.
-
Choose Create database.
On the Databases screen, the Status of the new database is Creating until the database is ready to use. When the status changes to Available, you can connect to the database. Depending on the database class and the amount of storage, it can take up to 20 minutes before the new database is available.
To learn more, see Configure automatic network connectivity with an EC2 instance in the Amazon RDS User Guide.

Task 3: Verify the connection configuration
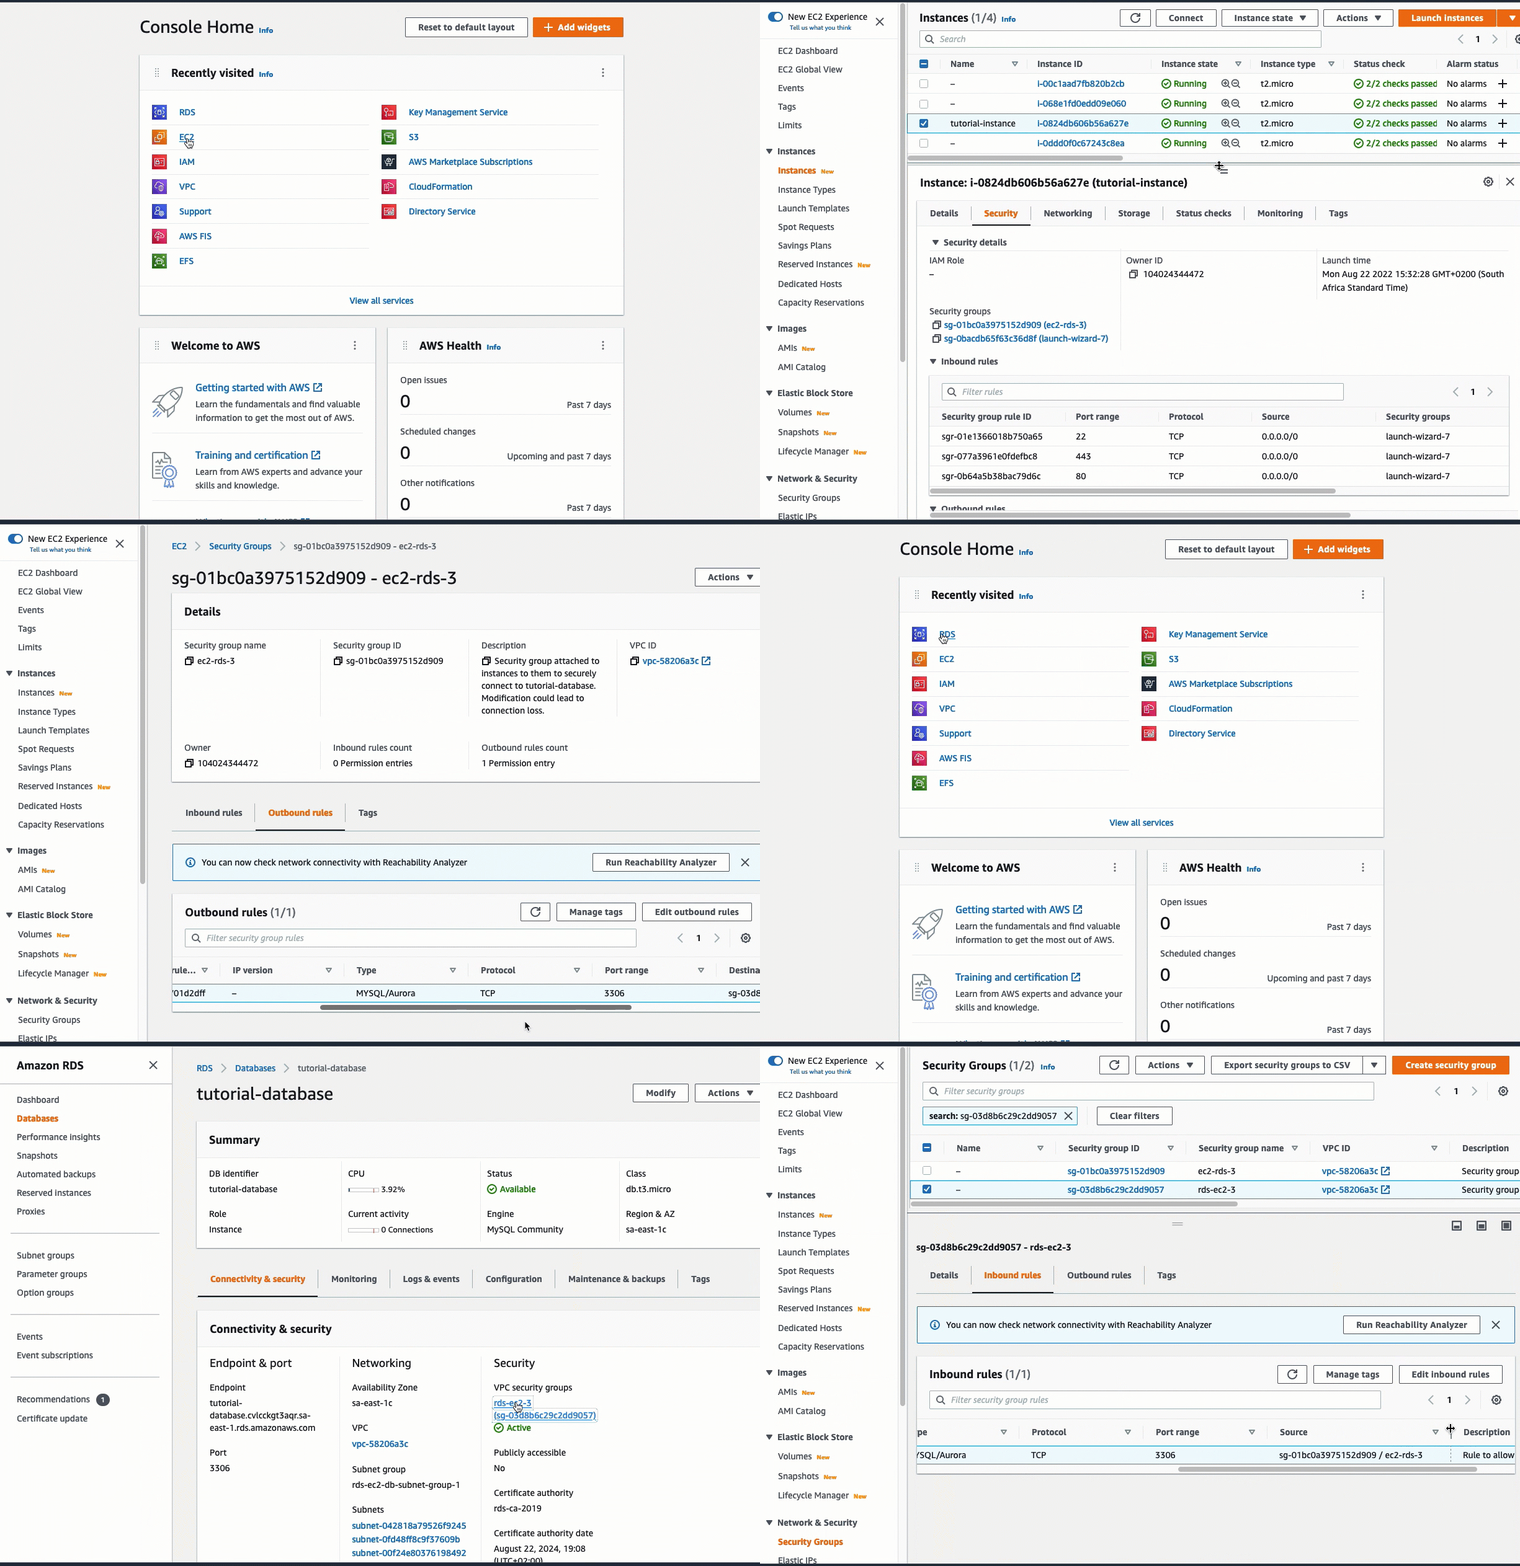
The objective of this task is to verify that the two security groups were created and assigned to the instance and database.
When you use the automatic connection feature in the console to configure the connectivity, the security groups are automatically created and assigned to the instance and database, as follows:
-
Security group rds-ec2-
xis created and added to the RDS database. It has one inbound rule that references the ec2-rds-xsecurity group as its source. This allows traffic from the EC2 instance with the ec2-rds-xsecurity group to reach the RDS database. -
Security group ec2-rds-
xis created and added to the EC2 instance. It has one outbound rule that references the rds-ec2-xsecurity group as its destination. This allows traffic from the EC2 instance to reach the RDS database with the rds-ec2-xsecurity group.
To verify the connection configuration using the console
Open the Amazon RDS console at https://console.amazonaws.cn/rds/
. -
In the navigation page, choose Databases.
-
Choose the RDS database that you created for this tutorial.
-
On the Connectivity & security tab, under Security, VPC security groups, verify that a security group called rds-ec2-
xis displayed. -
Choose the rds-ec2-
xsecurity group. The Security Groups screen in the EC2 console opens. -
Choose the rds-ec2-
xsecurity group to open it. -
Choose the Inbound rules tab.
-
Verify that the following security group rule exists, as follows:
-
Type: MYSQL/Aurora
-
Port range: 3306
-
Source:
sg-0987654321example/ ec2-rds-x– This is the security group that is assigned to the EC2 instance that you verified in the preceding steps. -
Description: Rule to allow connections from EC2 instances with
sg-1234567890exampleattached
-
Open the Amazon EC2 console at https://console.amazonaws.cn/ec2/
. -
In the navigation pane, choose Instances.
-
Choose the EC2 instance that you selected to connect to the RDS database in the previous task, and choose the Security tab.
-
Under Security details, Security groups, verify that a security group called ec2-rds-
xis in the list.xis a number. -
Choose the ec2-rds-
xsecurity group to open it. -
Choose the Outbound rules tab.
-
Verify that the following security group rule exists, as follows:
-
Type: MYSQL/Aurora
-
Port range: 3306
-
Destination:
sg-1234567890example/ rds-ec2-x -
Description: Rule to allow connections to
database-tutorialfrom any instances this security group is attached to
-
By verifying that these security groups and security group rules exist and that they are assigned to the RDS database and EC2 instance as described in this procedure, you can verify that the connection was automatically configured by using the automatic connection feature.

You have completed Option 2 of this tutorial. You can now either complete Option 3, which teaches you how to manually configure the security groups that were automatically created in Option 2.
Task 4 (Optional): Clean up
Warning
Terminating an instance is permanent and irreversible.
After you terminate an instance, you can no longer connect to it, and it can't be recovered. All attached Amazon EBS volumes that are configured to be deleted on termination are also permanently deleted and can't be recovered. All data stored on instance store volumes is permanently lost. For more information, see How instance termination works.
Before you terminate an instance, ensure that you have backed up all data that you need to retain after the termination to persistent storage.
Now that you have completed the tutorial, it is good practice to clean up (delete) any resources you no longer want to use. Cleaning up Amazon resources prevents your account from incurring any further charges.
If you launched an EC2 instance specifically for this tutorial, you can terminate it to stop incurring any charges associated with it.
To terminate an instance using the console
Open the Amazon EC2 console at https://console.amazonaws.cn/ec2/
. -
In the navigation pane, choose Instances.
-
Select the instance that you created for this tutorial, and choose Instance state, Terminate instance.
-
Choose Terminate when prompted for confirmation.
If you created an RDS database specifically for this tutorial, you can delete it to stop incurring any charges associated with it.
To delete an RDS database using the console
Open the Amazon RDS console at https://console.amazonaws.cn/rds/
. -
In the navigation pane, choose Databases.
-
Select the RDS database that you created for this tutorial, and choose Actions, Delete.
-
Enter
delete mein the box, and then choose Delete.